When you click on links to various merchants on this site and make a purchase, this can result in this site earning a commission. Affiliate programs and affiliations include, but are not limited to, the eBay Partner Network.
Tech / General EngineIs your car making a strange sound or won't start? Thinking of adding power with a new combination? Need other technical information or engine specific advice? Don't see another board for your problem? Post it here!
What needs to be removed especially on the passenger side to remove the valve cover, I have the valve cover loose but it looks like the injection harness is in the way... I need more clearance.
How do you get at the spark plugs so I can remove them and thread in the compressor adapter hose to pressurize the cylinders.
What kind of spring compressor is used? looks like its going to be a challenge especially cylinders 7 and 8. I welcome any tricks, tools to help with this.
This is probably gonna cause a dustup, since there are two very distinct methods of holding the valves in place, and each method has it's ardent supporters........
You are planning the compressed air method, all well and good. But, do you know there is a different, far simpler method?
If you haven't heard of it, it's gonna sound crazy, but do a search of "Valve Stem Seals" with the word "Rope" and read what comes up. I have always used the rope method to great success instead of compressed air, after seeing the compressed air method fail many years ago when the shop air supply blew a line during the seal replacement. Thankfully it wasn't a car I was working on, and it was the shop owner doing the repair, man that poor guy invented new swear words that day.......
What needs to be removed especially on the passenger side to remove the valve cover,
I'm going from memory:
Air intake tube, accessory belt
Driver's side: alternator, injector wiring harness, PCV valve, break booster hose, EVAP vacuum hose.
Passenger's side: AIRS valve and plumbing, HVAC coolant valve, PCV hose, coil, HVAC vacuum hose, spark plug wires and get injectors wiring harness out of the way which includes, wiring for IAC, CTS, TPS, AC and AIRS. I had to pry the AIRS tube going to CAT and an AIRS bracket. That saved me lots of work. Also I only got the wiring harness out of the way by pulling on it. It is hooked to the starter. Again saved me lots of work.
The driver's side cover comes out fairly easy. On passenger side it is a bare! If you get the AIRS tube to CAT and wiring harness out of the way, that will be easier but more work.
Originally Posted by MikeT290
How do you get at the spark plugs so I can remove them and thread in the compressor adapter hose to pressurize the cylinders.
Some from top, some from bottom. I think I did:
1-3-5-4 from top
7-2-6-8 from bottom
Had a hoist!!!!
Originally Posted by MikeT290
What kind of spring compressor is used? looks like its going to be a challenge especially cylinders 7 and 8. I welcome any tricks, tools to help with this.
I used
Had to modify the fork angle so the springs would compress straight.
It's a tedious job that requires patience and systematic approach, specially #8 with A/C box. Lots of threads and videos on how to do it and what parts to use.
... after seeing the compressed air method fail many years ago...
Good you mention that! My compressor was making a racket so I turned it off temporarily but forgot about it. I did ran out of air and the valve fell. However, piston was at TDC, so no harm. I did have a chill that went through my spine thinking of the consequences.
The air method is tricky and you have to do things in sequence to make sure the valves stay closed. Otherwise, the engine will keep turning and valves will open.
MAKE SURE you don't run out of air, just like a scuba diver lol
I find a junk spark plug wire with an end cut off and a little white lithium grease the 'best' rope to use when doing the rope method to hold the valves shut. Doesn't bind, comes out easily, doesn�t squish.
I'm going from memory:
Air intake tube, accessory belt
Driver's side: alternator, injector wiring harness, PCV valve, break booster hose, EVAP vacuum hose.
Passenger's side: AIRS valve and pluming, HVAC coolant valve, PCV hose, coil, HVAC vacuum hose, spark plug wires and get injectors wiring harness out of the way which includes, wiring for IAC, CTS, TPS, AC and AIRS. I had to pry the AIRS tube going to CAT and an AIRS bracket. That saved me lots of work. Also I only got the wiring harness out of the way by pulling on it. It is hooked to the starter. Again saved me lots of work.
The driver's side cover comes out fairly easy. On passenger side it is a bare! If you get the AIRS tube to CAT and wiring harness out of the way, that will be easier but more work.
Some from top, some from bottom. I think I did:
1-3-5-4 from top
7-2-6-8 from bottom
Had a hoist!!!!
I used
Had to modify the fork angle so the springs would compress straight.
It's a tedious job that requires patience and systematic approach, specially #8 with A/C box. Lots of threads and videos on how to do it and what parts to use.
Faced with this problem, I always ended up removing the heads. You have to remove a lot anyway. Disassembling rocker arms and springs in a confined space is torture.
( An easy job on the workbench)
you can also check and lapping the valves and clean the channels. The oil that has penetrated for a long time leads to oil carbon which clogs everything : Valve guides, channels , valve stems
This is why I like ARP damper/balancer bolts with the square center, makes it easier to turn the engine over for springs/seals/lash. I have one of those tools the Summit version, used it for years after borrowing a friends Moroso tool(same thing) but these days I got a LSM tool. I never use rope, just get the piston TDC by feeling with a screwdriver and turning slow.
Since your already there why not put in some fresh springs, they don't last forever or better yet maybe an upgrade(beehives).
Make sure to use that plastic sleeve when installing the new seals, the valve lock groove is sharp. Here's a pic of some new seals after removing new unused valves, note the chunks of rubber(viton).
Cleared another hurdle. Removed all the spark plugs, that was a PITA. Rotated the crankshaft TDC for #1. Used spark plug wire in the cylinder. Was able to remove the exhaust valve spring. The O ring seal fell apart while removing it.
Taking a break because the new Valve stem seals won't be here until Friday.
I find a junk spark plug wire with an end cut off and a little white lithium grease the 'best' rope to use when doing the rope method to hold the valves shut. Doesn't bind, comes out easily, doesn�t squish.
Thanks. I used your spark plug wire method and it worked out great on cylinder #1. I'll let you know how the other cylinders go!
This is why I like ARP damper/balancer bolts with the square center, makes it easier to turn the engine over for springs/seals/lash. I have one of those tools the Summit version, used it for years after borrowing a friends Moroso tool(same thing) but these days I got a LSM tool. I never use rope, just get the piston TDC by feeling with a screwdriver and turning slow.
Since your already there why not put in some fresh springs, they don't last forever or better yet maybe an upgrade(beehives).
Make sure to use that plastic sleeve when installing the new seals, the valve lock groove is sharp. Here's a pic of some new seals after removing new unused valves, note the chunks of rubber(viton).
I took a spark plug and asked a guy I knew in a shop to make this hose for me, screw it into the spark plug hole and connect compressor hose. Worked like a charm.
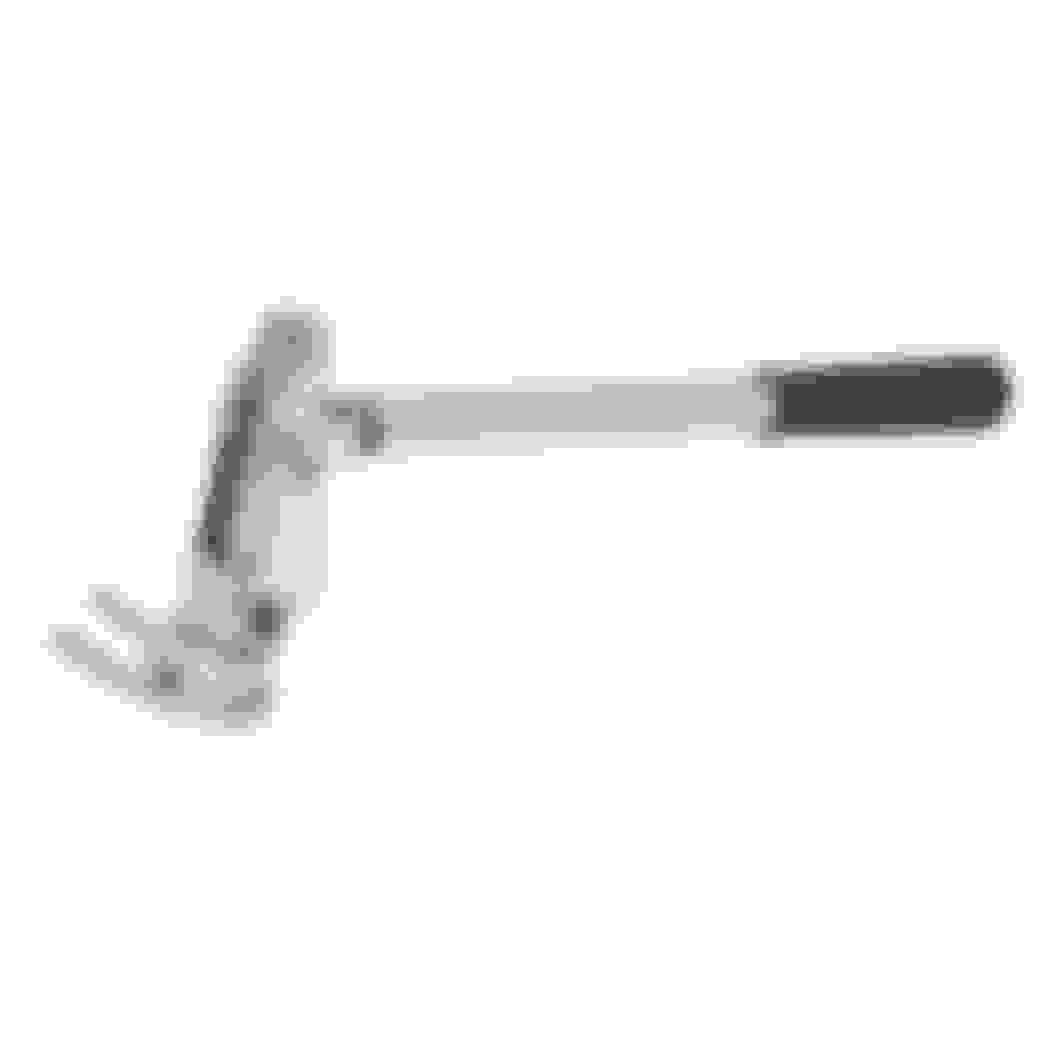
I tried the garbage spring compressors they sell in auto shops, broke on the first spring. So I made this from a wrecking bar, can't take credit, don't know where I got the idea, might've been someone on here, better than any "spring compressor".
I personally wouldn't use the rope method as I've heard people say it can leave fibres in the cylinder and even recall a post here on tgo where someone managed to loop some of the rope around the base of the valve.
 04-25-2023, 10:41 AM