When you click on links to various merchants on this site and make a purchase, this can result in this site earning a commission. Affiliate programs and affiliations include, but are not limited to, the eBay Partner Network.
My friend, aaron_sK “The Mountain Man” at CascadeCrew.org, who is also a member here at thirdgen.org, wrote the following article and created all the pictures back in March 2012. Aaron and I have a desire to save this article by re-posting here at thirdgen.org. Having Aaron's permission, I have mapped all the pictures away from Photobucket (that lousy dumpster fire) to another location and embedded in the text below. Thanks again, Aaron!
-----------------
You gotta pay $34 right now or close your eyes!!!
So when I floated the idea of a guide to disassemble the GM tilt column there seemed to be a lot of people who wanted it, so here you all go!
If you are completely mechanically inept don't just go diving into your column. It is a complex mechanical device. With some thought and care you can get through it, but if you are the type of person who breaks everything and loses parts then maybe this is not for you.
I am not going off of any manual to write this guide. I have taken apart maybe a dozen GM columns over the years to fix various problems and I am writing this based on my own experience. I am certain that someone will have something to add, or point out something that I forked up and that's fine by me, the more info that's out there the better.
All GM columns are similar from the 70's through the 90's but they changed stuff from one model to the next. I have done this job on a variety of cars and I have found only a few variations. Auto to manual doesn't really matter, nor do column shifted cars (we're not going that far into the column anyway). I don't know what to tell you if you have a Berlinetta or a GTA with some funky steering wheel setup, your mileage may vary on that.
Having done it both ways I much prefer to do this job with the column still in the car. That way the column isn't flopping around all over the bench, I have a nice place to sit, and with a t-top car in the shop I have plenty of light.
I am not a photographer. Some of these pictures are out of focus or have poor lighting of flash or whatever... you can get the basic idea from them. I did this job over two days because I got lazy and busy and sidetracked (say it ain't so! Aaron getting sidetracked on a project? ). It took me about ninety minutes of work including stopping all the time to backtrack and take pictures and write everything down. Normally it takes me less than an hour.
The pictures were not taken in sequence and many were staged after the fact, so you will sometimes see things I haven't gotten to in the writeup already done in the picture. Don't worry about it, just do what I say, not what I do.
There are three main problems with the GM column, and all are simple design flaws:
Blinkers don't cancel causing you to look like an old man driving around.
Ignition cylinder needs to be replaced due to attempted theft, purchase of column at a junkyard, ect.
Tilt column flops around like a limp wrist.
I will discuss all three of these issues as we go along. If you don't have a tilt column but your blinkers still don't cancel keep reading, you'll just have an easier job.
Prep and tools
If your car is upholstered (wussies!) get a flat tray or pan and line it with bright-colored towels to lay parts out in. Lay the parts in a row in order of removal to avoid confusion later on.
Disconnect the battery negative. This will allow you to test the mechanical function of all the switches with impunity.
Go to Ye' Old VatoBlatoZone and rent the following two tools:
27017 Steering wheel puller
27044 Steering lock plate remover
You will need to purchase some 2 1/2" long 8/32 machine bolts and nuts to build a puller out of. Get fender washers of varying sizes as well. Buy a few of them, they're cheap and you will break some because they are soft Chinese steel.
You will also need the following tools:
P1 and P2 screwdrivers
T-20 and T-30 Torx sockets or drivers
21mm or 13/16" socket and breaker bar or impact
E8 'inverse' torx socket
Telescoping magnet with small head
An assortment of probes
Needle nose pliers
Snap ring pliers
A small hammer
In fact here's a picture of all the tools I actually used on this job:
So lets start off:
Step one: Wheel
All horns pads vary. Some have metal tangs, this one had plastic. Use a dull putty knife or spudger to remove the pad:
Now, with the snap ring pliers set to spread, remove the lock ring from above the center nut:
Remove the center nut (21mm) with an impact or alternately use a breaker bar.
Then install the puller as shown with the two small-diameter course-thread bolts (1/2" bolt heads). Make sure they are run down equally and sufficiently. The old puller had a nice centering piece but this one doesn't so I just rolled with it:
The wheel might be stubborn and require a few centered whacks on the puller with a small hammer to jar it loose. Once it pops off uninstall the puller; we are done with it.
Re: Whereby Mountain Man rebuilds a steering column
Step two: Lock plate
Now you'll be faced with the dust cover like so. Pop that off with a flat-blade screwdriver (it may be brittle and crack, this one cracked badly and came off in pieces)
Now we are at the lock plate:
Install the lock plate compressor like so:
With the compressor installed turn the nut down the threaded shaft to compress the lock plate down into the column:
This will reveal a safety clip that was holding the lock plate in place:
Because of the design of the safety clip you can't use snap ring pliers on it so just get two angled probes under it and pull it up thusly:
Make sure the safety clip is all the way up the shaft (it likes to hang in various grooves and annoy you) and loosen the nut on the compressor to release the lock plate. When the lock plate is loose remove the compressor tool entirely:
Remove the safety clip, lock plate, horn ring and lock plate spring in that order and lay them out in your tray (or floorpan if you have a gutted ghetto bomber like I do )
Re: Whereby Mountain Man rebuilds a steering column
Step three: Blinkers
Now we're into the meat of this job. This is the blinker assembly:
See those two coiled springs? If your blinkers aren't canceling then one or both of them will be snapped off. If you have a non-tilt column and that was your only issue then congratulations, install new springs, hit page down a few times and join us later on, if not then we keep going.
You will see four black P2 screws. Three hold the switch to the column and one holds the blinker arm to the switch. You will need to move the blinker stalk to get access to all of the screws. Remove all four...
...then remove the hazard switch (P1 screw)
Pull the stalk arm down and out of the way (it may fall out, if it does just set it aside in your tray, it's no big deal).
Now remove whatever hush panels/ect. are under your dash and find the blinker and windshield washer harness connectors (only the blinker is shown in this pic, the windshield wiper harness is the one with the green tag in the very bottom of the picture)
Remove them from their various clips to the column. You may have to unplug them or you may be able to loosen enough wire under the dash. Basically you want to free up enough slack in the wire so you can push the connectors all the way up to where the wire enters the column like this:
This will allow you to pull the blinker switch assembly forward and out of the column like so:
Step four: Ignition
Remove this little guy here:
This is what causes the bell to go off when the keys are left in the ignition. Some people delete theirs; I like not locking my keys in the car.
Remove the T-20 bolt from below the warning bell trigger...
...and with the key in the ignition turn the cylinder forward to the unlock position and slide it out of the column:
See that green tab hanging down from the cylinder? Normally the cylinder will not come out of the column without the ignition being in the unlock position. If you need to get a damaged cylinder out or have a car with no keys then you need to snap that tab off to remove the cylinder.
Re: Whereby Mountain Man rebuilds a steering column
Step five: Upper column housing
Remove the three silver T-30 bolts holding the upper column on:
...then remove the tilt adjustment stalk:
It may be stubborn and require you to remove it with Vise-Grips and a rag.
Now pull the entire upper column piece forward and over the steering shaft. On the left side will be two loose parts: a larger plastic cover that goes under the tilt stalk and a small slider that triggers the high-beams. I have my index finger on the larger piece in this picture and you can barely see the small slider held between it and the column (more on that later).
The slider looks like this inside the plastic cover:
Step six: Tilt
With the column stripped to this point...
...remove the tilt spring cap with a P2 or P3 screwdriver by pushing down against the spring and turning the cap counterclockwise about 1/4 turn:
This will release the tilt spring like so:
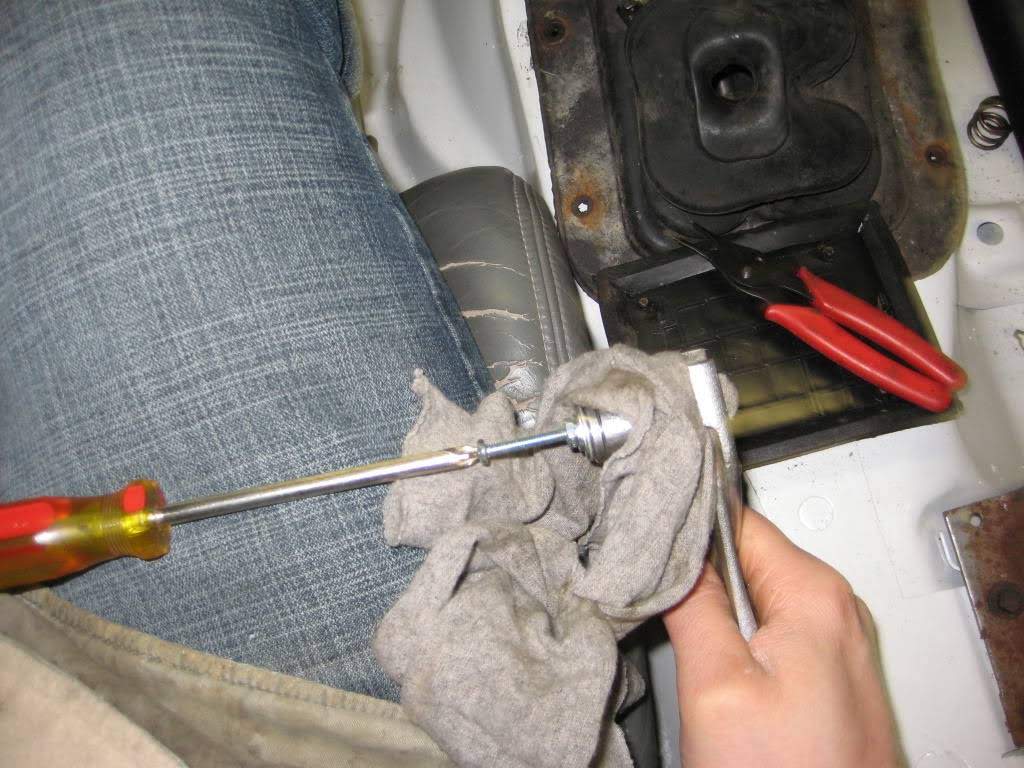
Now it's time to build our puller. I am sure that there is some tool that can be bought to do this but why buy what you can build for a dime's worth of hardware. Hell, these didn't even cost me a dime as the counter girl threw them in with my order.
Run a nut far up onto the bolt then drop a washer on that fits the bolt. Then stack another washer or two till you can get a wide one on there without any tipping. Then get a 9/16" (or larger) socket with the wide end towards the column and drop it onto the bolt. Thread the bolt into one of the pivots on either side of the shaft like this:
Now turn the nut slowly making sure the socket is centered over the pivot plug. Soon it should pop out like this:
Now do the same thing on the other side.
If you have a factory manual car with that awful piece of s**t key release thing that I hate in general, you will find another reason to hate it as you will have to have three arms to hold it down while also holding the puller and turning the nut.
Anyhow, once you get them both pulled out reinstall the tilt adjustment stalk...
..and pull it forward to release the tilt catch. Without the tilt spring and pivots this will cause the entire upper part of the column to pop forward. Don't pull it off just yet, first remove and set aside the upper bearing race and it's compressor ring:
Now you need to pull the upper piece off while making sure that two things don't happen:
The ignition slider does not fall out
The high-beam switch does not get hung up in the hole it comes through
Just leave that entire piece hanging down there for now.
Re: Whereby Mountain Man rebuilds a steering column
Step seven: Tilt bolts
These are the criminals right here. Four E8 inverse Torx bolts that always back out and cause column wobble.
Remove them ONE AT A TIME, clean them and give them a dab of Loctite. You will have to shift the steering shaft around to get to each bolt.
Now that we've got that on the run it's all reassembly from here!
Some notes on reassembly: I wrote this guide detailing only the minimum needed to get down to the tilt bolts. It is possible you will take something apart that I didn't cover. I have done more in these columns than I am outlining here, so if you're having trouble because something fell out that shouldn't have, post up and we can help you get it back together.
Also, throughout the reassembly process be sure to test everything as you go. Make sure the ignition switch goes into all positions at all tilt angles, make high-beam switch triggers at all tilt angles, ect. The sooner you catch any issues the less you will have to take apart to fix them!
Re: Whereby Mountain Man rebuilds a steering column
Step eight: Reassemble tilt section
Maneuver the upper column back over the shaft and onto the lower column. The first thing you need to make sure of is that the ignition slider ends up in the right place. In these pictures you can see how it needs to be hooked over the peg in the lower column:
Then make sure the high beam switch rod makes it back through the hole in the lower left side.
Now, holding the tilt stalk forward to open the tilt catch, slide the whole assembly back onto the column:
At this point the high-beam pushrod has almost certainly fallen out of it's switch and is hanging off to the side (as you can see in the picture above). This is what it will look like down below:
Now maneuver the pushrod back into the high-beam switch so it sits in a small retainer like so:
This should cause the pushrod to sit tight to the column at the top like this:
Now find both the pivot pins and remove the puller bolts from them. If you do like I did and ran the bolts in tight you may need to use pliers and a rag to remove the bolts:
Now clean and grease the pivots:
Start them gently by hand and once they bottom out...
...drive them home with a "punch" and a small hammer.
Re: Whereby Mountain Man rebuilds a steering column
Now take some time to test the ignition switch. It should move smoothly through all positions and at all tilt angles. The lockout (if a manual column) should work properly. An automatic should trigger the shifter lockout properly. The ignition slider and lock pin should look like the following pictures for each position:
Accessory:
Lock:
Unlock:
Run:
Start (should spring back to run):
Now clean, grease and reinstall the bearing race and the cap that centers it below the spring. Do not worry if it is not perfectly seated just yet:
Reinstall the tilt spring using a large P2 or P3 screwdriver:
Re: Whereby Mountain Man rebuilds a steering column
Step nine: Reassemble upper housing
This part can be a bit tricky. Before you begin, turn the ignition to RUN. Get the small plastic cover and slider that you took out earlier. Use some grease to hold the slider in the cover like this. Make sure the slider is oriented correctly:
I am holding it upside down in this picture for a better angle.
Now hold the plastic cover firmly against the column. It will drop into a cutout and the slider will be captured against the column and above the high-beam pushrod. Do not force it together, it has some tricky angles. If you are at the right angle it should drop in easily.
While holding the plastic cover against the column on the left side take the large plastic piece and set it onto the column.
If you have done this part right you will see that the small slider has made it through into it's hole (directly above the probe in this picture):
If you have the ignition in run as I mentioned earlier the lock pin should slide back making it easier to get the cover on. This is the lock pin correctly in it's hole.
Reinstall the three silver T-30 bolts holding the upper plastic housing to the upper column. The rounded bolt goes in the top like so:
Now would be a good time for a test of the high beam and ignition switches.
Step ten: Reassemble Ignition
It is possible that the spring holding the ignition bell trigger fell out on you (it did on me ). If so, reinstall it in the slot with the curled part of the spring down and the bent part up, like this:
Make sure that the upper part goes below the ignition cylinder bore like this:
...and doesn't stick up into the bore like this:
Now reinstall the lock cylinder and the cylinder hold-down bolt (T-20)
Re: Whereby Mountain Man rebuilds a steering column
Step eleven: Reassemble blinker
Pull the blinker assembly up over the steering shaft with one hand...
...while feeding wire back down through the column with your other hand:
Reinstall the three black P2 screws holding the blinker to the upper column:
Reinstall the hazard switch (P1):
Fish out the blinker stalk connector:
...and reinstall it in it's correct position on the blinker assembly:
If the connector falls out don't worry about it. The other end of it is merely a peg that rides in a slot. Just slide it back into the slot and reinstall it onto the blinker switch.
Re: Whereby Mountain Man rebuilds a steering column
Step twelve: Lock plate, wheel and big finish!
Carefully make sure the upper bearing race is seated and then install the lock plate spring:
Install the horn ring with the pin towards the upper left. You might have to replace the horn ring if the pin is broken off or the contact wheel on the back is burnt up.
Slide the lock plate down onto the steering shaft (don't worry, the splines are keyed so it will end up in the right place).
Slide the safety clip down over the shaft and then install the lock plate compressor yet again:
Compress the lock plate until it is past the groove the safety clip drops into:
...then shove the clip down into the groove with probes:
If your lock plate dust cover survived install it now.
Install the horn spring:
...and install the steering wheel. I believe it also has keyed splines. If not, line up the keyed marks on the wheel with those on the shaft:
Reinstall the safety snap ring:
...and snap the horn cover back on:
Now you can take it for a test drive and return your rented tools.
Re: Whereby Mountain Man rebuilds a steering column
@QwkTrip Do you know how to get into contact with the OP? Seems like he knows his way around these columns and I had some questions on the ignition slider. Checked the original forum this was posted on and it seems to have not had a post on it in 4 years haha which is a shame because I�m from the PNW.
Re: Whereby Mountain Man rebuilds a steering column
This guide is priceless, great tips like using grease to keep the plastic slider switch in place. Just finished with the whole job and could have saved some frustration by reading this closer before getting too far into the column.
Re: Whereby Mountain Man rebuilds a steering column
I have a fairly good video on repairing the Tilt pins on a GM column.
I kept killing my column during race seasons.
Nearly 300 Autocross laps and 30min+ track sessions destroy that weak aluminum.
 09-08-2018, 06:19 PM