Ever changing 85 project.
 04-21-2012, 09:40 PM
#1
Member

Thread Starter
iTrader: (1)
Join Date: Feb 2010
Posts: 467
Likes: 0
Received 3 Likes
on
3 Posts
Car: 85 Trans Am
Engine: 98 Vortec 350 LT1 Cam w/ TPI
Transmission: T56
Axle/Gears: 9 bolt 3:27
Ever changing 85 project.
First off let me say I am a 2nd gen guy. I grew up around them and my first full resto was my 79 TA.

Soon after finishing my 79 a friend called me up and said I got an 85 TA in my yard and I want it gone. So an hour later I had another TA in my possession.

First thing I did was replace the rotted T-roof and weather seals as I was in a temporary location and had to move at a moments notice.
The second stage was to think about what I wanted to do with this thing. I honestly had no love for the 3rd gens at all. I always thought they were under powered piles of junk. But this car was very solid even though it sat outside for the better part of 15 years. So I decided to keep it and have a little fun with it. I wasn't looking to do a full resto like my 79 but more of a fix as I go approach and also experiment with it.
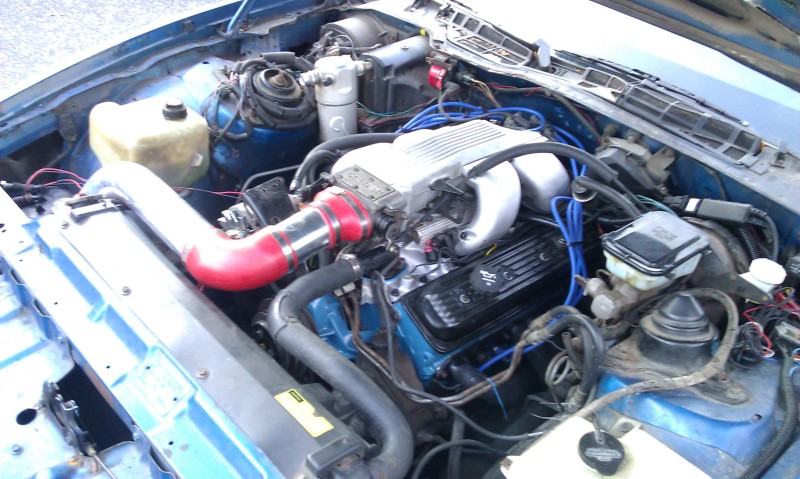
First up was fuel injection. I had a megasquirt ECU laying around and I decided to use it.
I started with TBI

The car ran good and I drove it on the road like this for maybe 2 months. Then I got the itch to try TPI. So I did
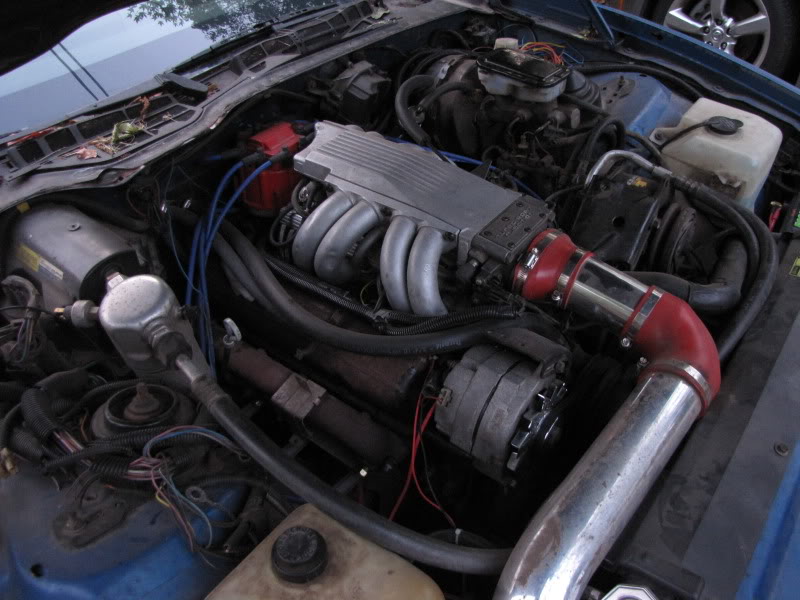
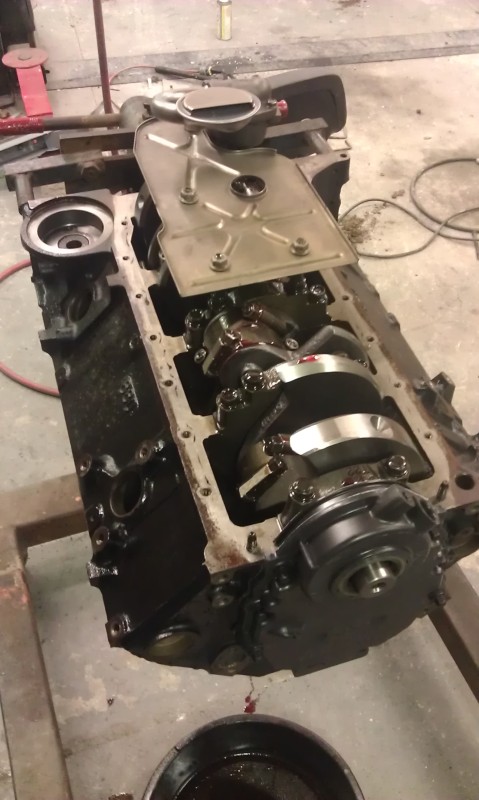
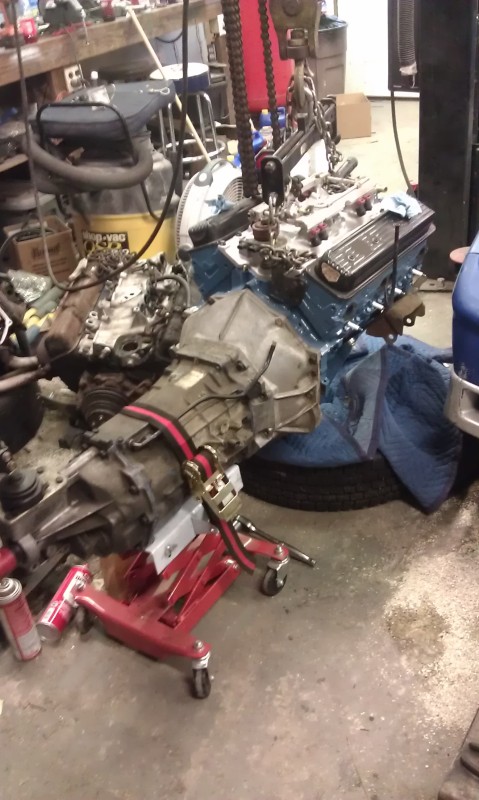
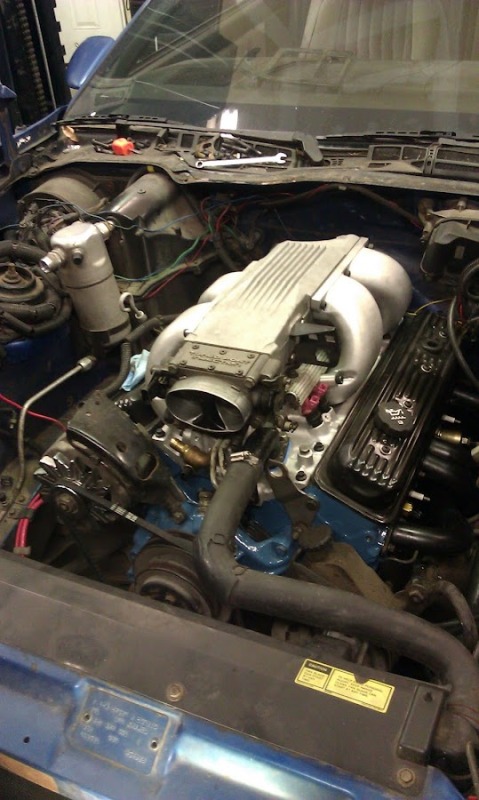
At this point I ran 100% off my megasquirt with timing, knock sensing, and even dual fan control. I drove the car like this most of last summer and this winter. It is not a DD but I drove it quite a bit. I went through 2 T5s at this point and decided it is time to go for a T56. And since my 305 was a 2 piece rear main I wanted a 1 piece motor to run a full LT1 setup. It turned out my friend had a vortec 350 in his basement with bad bearings. He gave it to me and I tore it down.
I found that the rod bearings were toast and ruined the crank and cam.

So I ordered up a new crank and bearings and found myself an LT1 cam for $25.
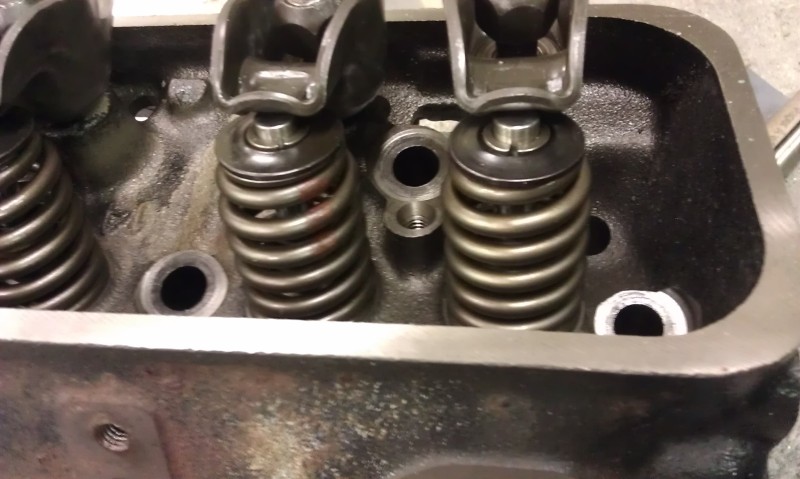
I installed LS1 springs and comp keepers in the heads
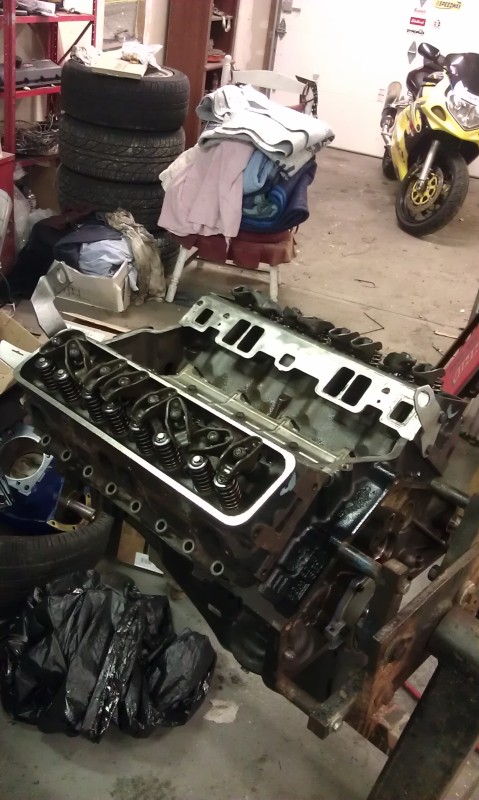
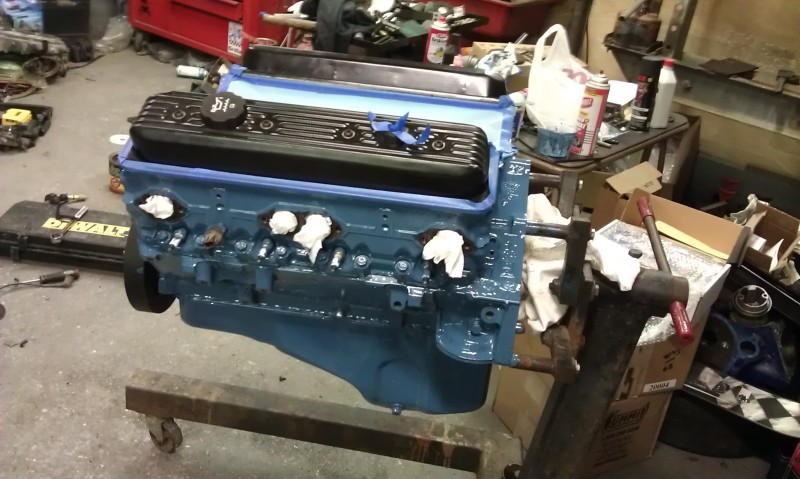
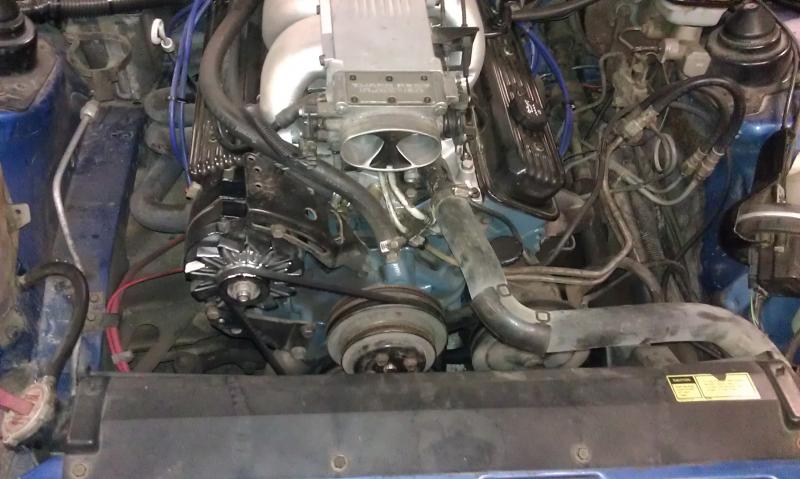
Being from the 2nd gen world I decided the motor should be pontiac blue so that is what I did.
Soon after finishing my 79 a friend called me up and said I got an 85 TA in my yard and I want it gone. So an hour later I had another TA in my possession.
First thing I did was replace the rotted T-roof and weather seals as I was in a temporary location and had to move at a moments notice.
The second stage was to think about what I wanted to do with this thing. I honestly had no love for the 3rd gens at all. I always thought they were under powered piles of junk. But this car was very solid even though it sat outside for the better part of 15 years. So I decided to keep it and have a little fun with it. I wasn't looking to do a full resto like my 79 but more of a fix as I go approach and also experiment with it.
First up was fuel injection. I had a megasquirt ECU laying around and I decided to use it.
I started with TBI
The car ran good and I drove it on the road like this for maybe 2 months. Then I got the itch to try TPI. So I did
At this point I ran 100% off my megasquirt with timing, knock sensing, and even dual fan control. I drove the car like this most of last summer and this winter. It is not a DD but I drove it quite a bit. I went through 2 T5s at this point and decided it is time to go for a T56. And since my 305 was a 2 piece rear main I wanted a 1 piece motor to run a full LT1 setup. It turned out my friend had a vortec 350 in his basement with bad bearings. He gave it to me and I tore it down.
I found that the rod bearings were toast and ruined the crank and cam.
So I ordered up a new crank and bearings and found myself an LT1 cam for $25.
I installed LS1 springs and comp keepers in the heads
Being from the 2nd gen world I decided the motor should be pontiac blue so that is what I did.
Last edited by LilSki; 04-21-2012 at 09:58 PM.
 04-21-2012, 09:53 PM
#2
Member
Thread Starter
iTrader: (1)
Join Date: Feb 2010
Posts: 467
Likes: 0
Received 3 Likes
on
3 Posts
Car: 85 Trans Am
Engine: 98 Vortec 350 LT1 Cam w/ TPI
Transmission: T56
Axle/Gears: 9 bolt 3:27
Re: Ever changing 85 project.
Mock up of T56 before install.
Installed and ready for wiring
Ready to roll
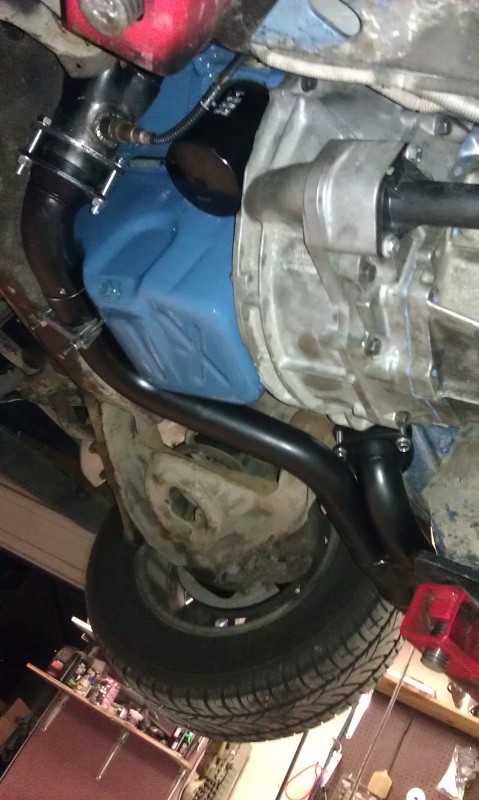
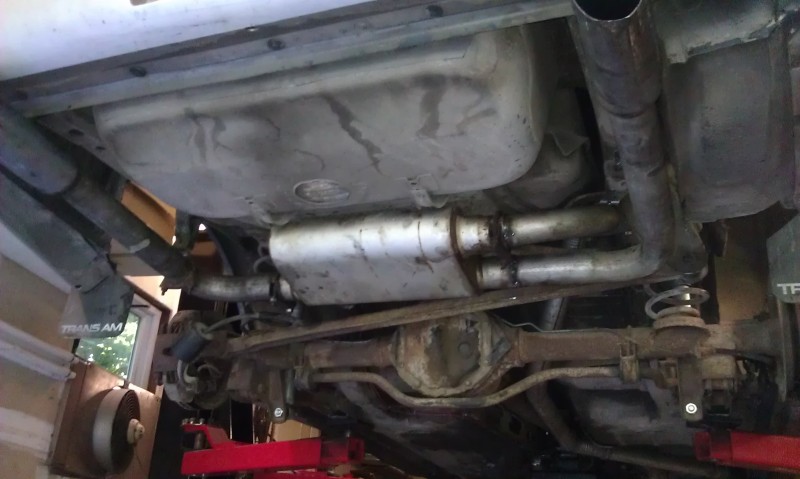
Headman Y-pipe goes to factory exhaust for now minus the cat
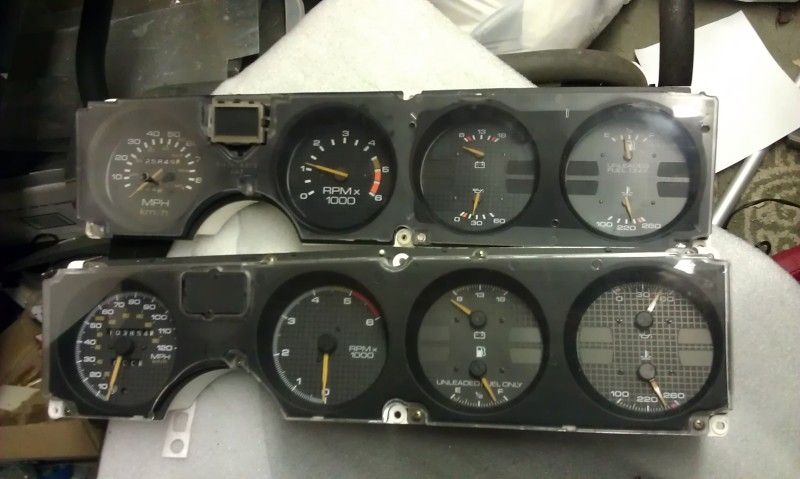
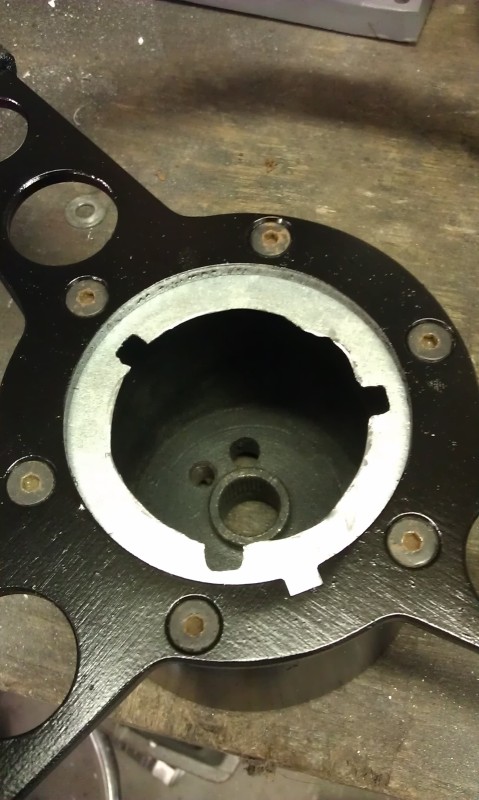
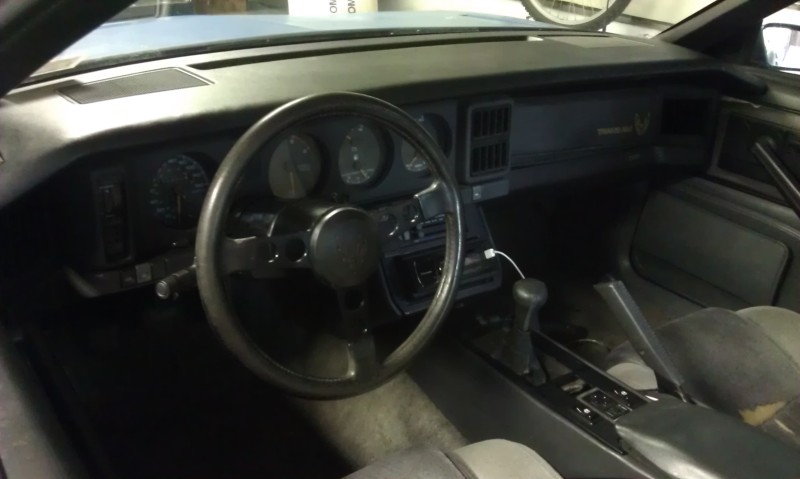
Swapped out the old mechanical speedo cluster for an 89 unit. You have to re-pin the dash wiring to do this. You cannot just slap in a later cluster as almost none of the wires match up. I mainly did this as the T56 uses VSS and not a cable but also because the later gauges look sooooo much nicer in my opinion.
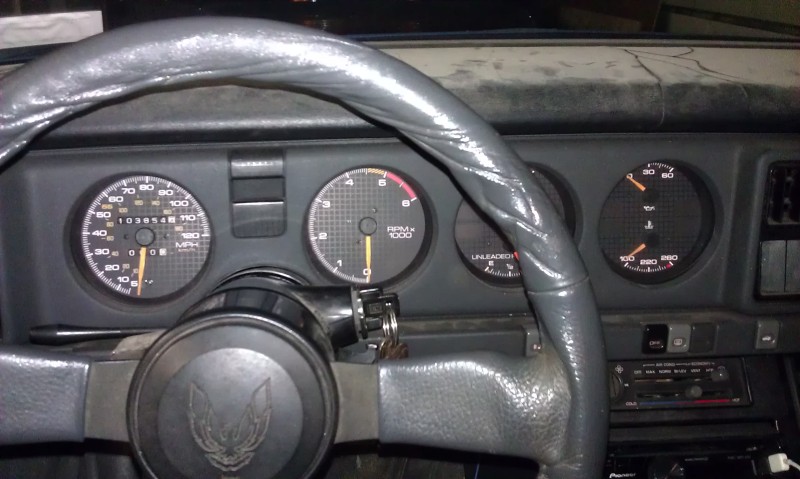
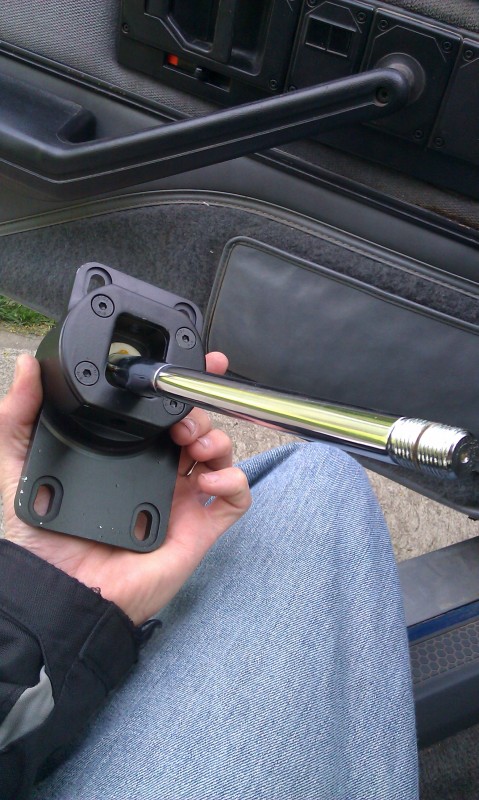
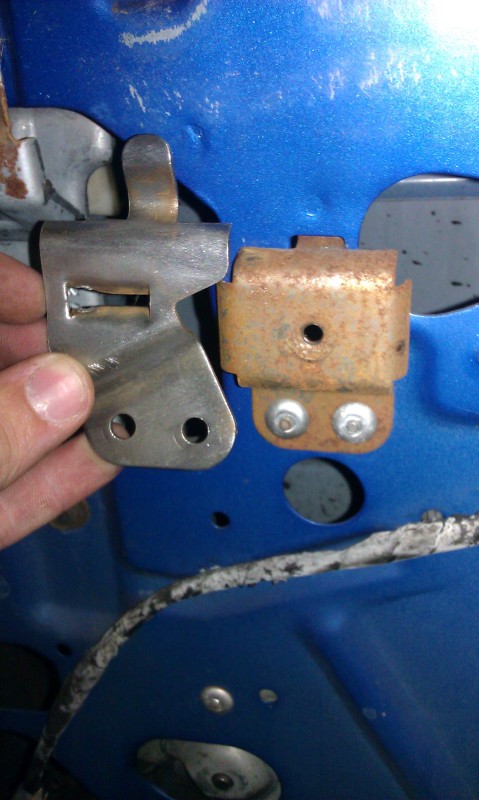
As you can see the steering wheel is toast so I decided to change that. I wanted to put a 2nd gen wheel in there but the horn button and old style bird just wouldn't work in this application. So I made up a way to use the 3rd gen horn button with a 2nd gen wheel
I made a plate that went between the hub and wheel to hold the horn
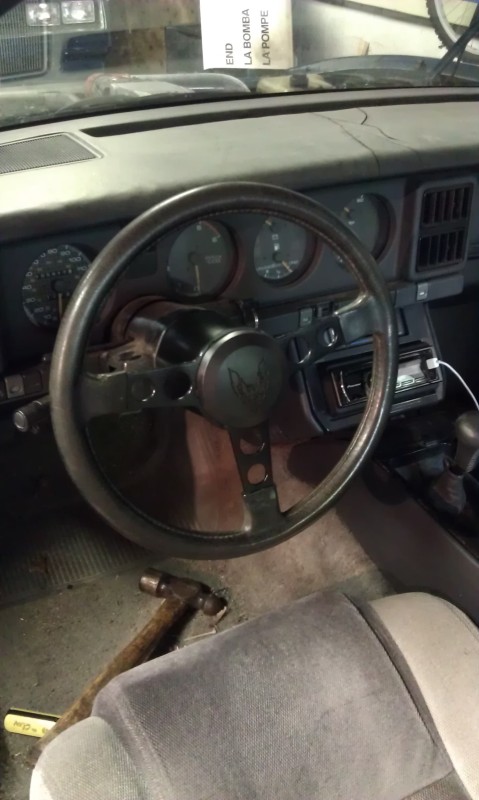
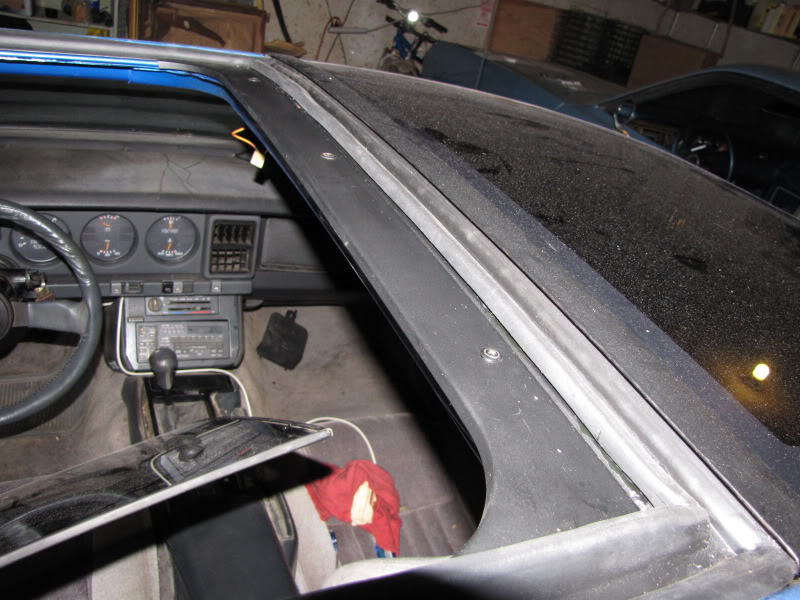
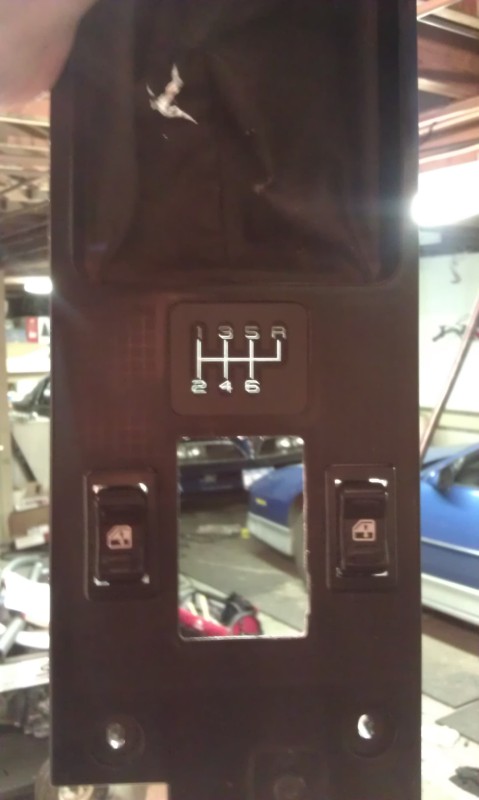
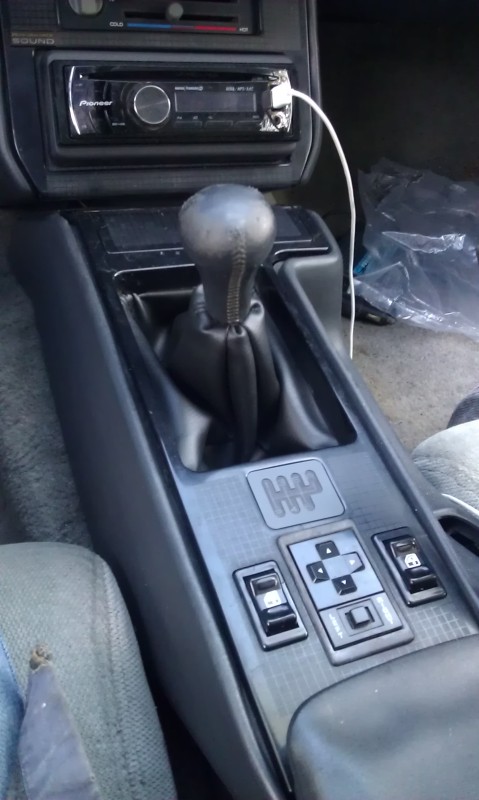
New dash pad, radio pod, center console, and e-brake grip.
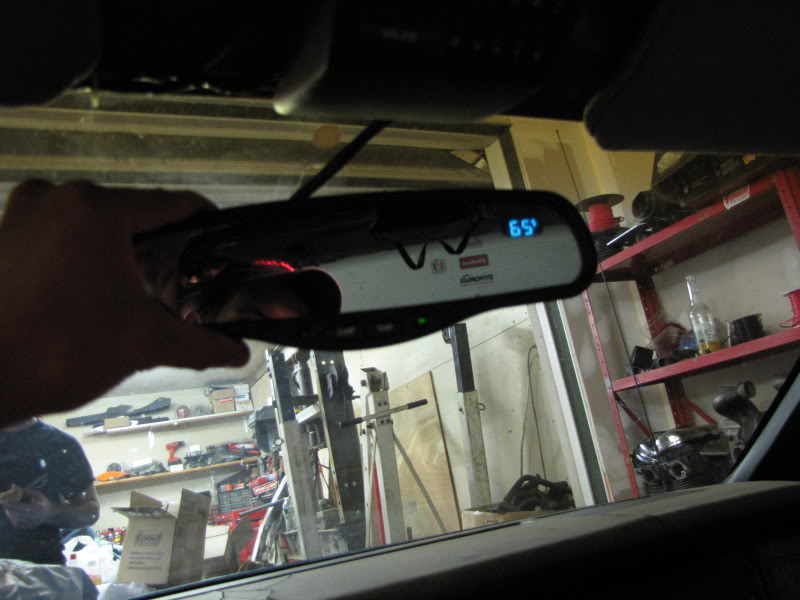
Also along the way I installed an auto dim mirror from an 03 GMC with temp and compass
Installed and ready for wiring
Ready to roll
Headman Y-pipe goes to factory exhaust for now minus the cat
Swapped out the old mechanical speedo cluster for an 89 unit. You have to re-pin the dash wiring to do this. You cannot just slap in a later cluster as almost none of the wires match up. I mainly did this as the T56 uses VSS and not a cable but also because the later gauges look sooooo much nicer in my opinion.
As you can see the steering wheel is toast so I decided to change that. I wanted to put a 2nd gen wheel in there but the horn button and old style bird just wouldn't work in this application. So I made up a way to use the 3rd gen horn button with a 2nd gen wheel
I made a plate that went between the hub and wheel to hold the horn
New dash pad, radio pod, center console, and e-brake grip.
Also along the way I installed an auto dim mirror from an 03 GMC with temp and compass
Last edited by LilSki; 04-21-2012 at 10:00 PM.
04-21-2012, 09:55 PM
#3
Member
Thread Starter
iTrader: (1)
Join Date: Feb 2010
Posts: 467
Likes: 0
Received 3 Likes
on
3 Posts
Car: 85 Trans Am
Engine: 98 Vortec 350 LT1 Cam w/ TPI
Transmission: T56
Axle/Gears: 9 bolt 3:27
Re: Ever changing 85 project.
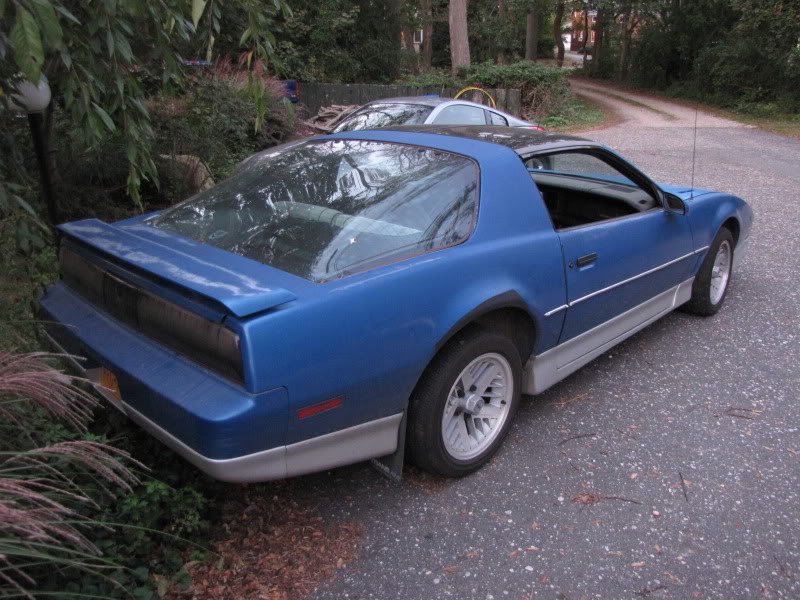
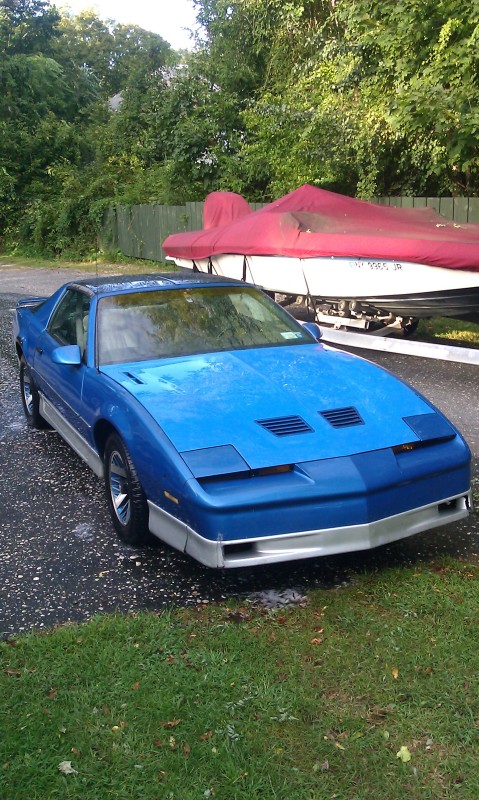
This is the car as it sits today on formula wheels. Tires are one size too small but they came with the wheels so they work for now.
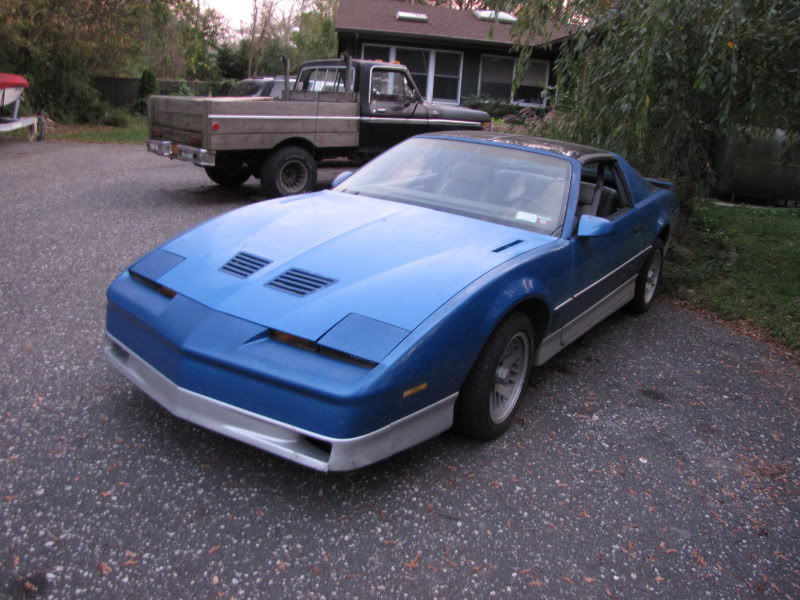
This fall/winter I hope to repaint it the factory colors.
I would also like to report that after the first drive of this car even with the underpowered 305 I suddenly had a new respect for these cars. My first love is still the 2nd gen cars but now I stop and look at a 3rd gen when I see one.
This fall/winter I hope to repaint it the factory colors.
I would also like to report that after the first drive of this car even with the underpowered 305 I suddenly had a new respect for these cars. My first love is still the 2nd gen cars but now I stop and look at a 3rd gen when I see one.
Last edited by LilSki; 04-21-2012 at 10:05 PM.
04-22-2012, 10:27 PM
#4
Supreme Member
Join Date: Mar 2001
Location: Renton, WA
Posts: 2,262
Likes: 0
Received 0 Likes
on
0 Posts
Car: 1985 Camaro, 1986 Trans Am
Engine: 5.0L carbed and 5.0L TPI
Transmission: TH700R4
Axle/Gears: 3.23 and 3.27 posi
Re: Ever changing 85 project.
Wow! Both of your T/As are awesome! I would rock that 2ndgen all day long!

 05-15-2012, 10:02 PM
#7
Junior Member
Join Date: May 2004
Location: Cedar Rapids, Iowa
Posts: 35
Likes: 0
Received 0 Likes
on
0 Posts
Car: 91 Z28, 89 Formula, 85 IROC Z28
Engine: 305 TPI, 305 TBI, 305 TPI
Transmission: 5 Speed, 5 Speed, 700R4
Re: Ever changing 85 project.
Lilski
That project is awesome. What you are doing is really great work. I wondering if you can help me a bit understanding what your megasquirt setup is. Or maybe more what it was when you first went TPI with it.
I am looking at Megasquirting my '85 TPI Camaro. I'm just getting started looking at what I need to do to set it up. I understand if you prefer to not share all your information, but anything you are willing to share is greatly appreciated.
Thanks,
Ed
Trending Topics
05-15-2012, 10:27 PM
#8
Member
Thread Starter
iTrader: (1)
Join Date: Feb 2010
Posts: 467
Likes: 0
Received 3 Likes
on
3 Posts
Car: 85 Trans Am
Engine: 98 Vortec 350 LT1 Cam w/ TPI
Transmission: T56
Axle/Gears: 9 bolt 3:27
Re: Ever changing 85 project.
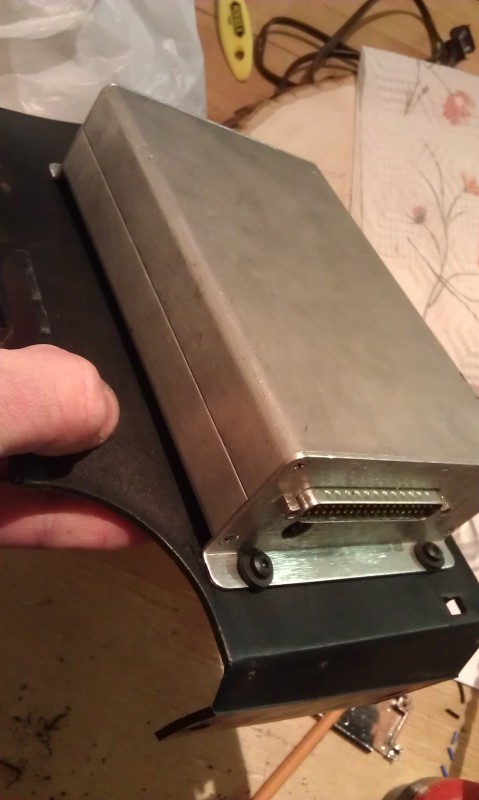
What do you want to know? If you are starting off with an already TPI car you are ahead of the game. I had to make the entire engine harness from scratch. They make adapters to connect a megasquirt directly to the TPI harness with little to no modification. Which is nice if you ever wanted to return to the factory ECU.
I am running a megasquirt II on a v3 board. I have added circuits to control both of my fans so I can program when they come on. One comes on at 195 and the other at 205. I also added a knock sensing circuit which works with the factory module and sensor. I am also using the factory IAC motor.
I can take pics of the megasquirt inside to show my internal mods and added circuits. And I would even share my tunes to help get you started or if you just wanted to look over them in tuner studio. I still have tunes from the TBI and initial TPI install with the 305.
05-15-2012, 11:06 PM
#9
Member
iTrader: (16)
Join Date: Dec 2006
Location: TX/FL
Posts: 469
Likes: 0
Received 1 Like
on
1 Post
Car: 88 GTA/86 C20 Burb/91 325i
Engine: L98/454/M20
Transmission: 700R4/NV4500/Getrag
Axle/Gears: 3.27 9-bolt/3.73 14 Bolt/3.73 IRS
Re: Ever changing 85 project.
LilSki,
Great work so far, and a beautiful '79/'77 halfbreed you've got going on there. Very well done.
I too started out with 2nd Gens. Although I've always preferred the looks (and 400/455/403 powerplants) of the 2nd Gens, you will find that the 3rd Gens more than make up for it in handling and suspension design. Not to mention that a well-built 350/TPI combo like yours makes for a very formidable powerplant in cars as light as these. Not to mention it's nice to be able to walk into any parts house in the country and get over the counter parts for a fraction of the price what you pay for 2nd Gen and Pontiac engine parts these days.
Keep up the good work, I've got a feeling this one will come together real nice. Also, good call on the steering wheel. That's what Pontiac should have done for the 3rd Gen wheel.
-cal30sniper
05-16-2012, 09:30 AM
#10
Member
Thread Starter
iTrader: (1)
Join Date: Feb 2010
Posts: 467
Likes: 0
Received 3 Likes
on
3 Posts
Car: 85 Trans Am
Engine: 98 Vortec 350 LT1 Cam w/ TPI
Transmission: T56
Axle/Gears: 9 bolt 3:27
Re: Ever changing 85 project.
Thanks I have been having a lot of fun with this car. The power of the new engine is a ton of fun and knowing the trans won't grenade on me makes me feel much better. I'll have to try and get some videos of it.
I am in the process of replacing the interior now trying to make it look presentable. I got the door locks fixed and have also purchased a keyless entry module and keyfob from a 95 TA. I also purchased a serpentine setup and I have a new sending unit and bosch fuel pump to replace the current summit external fuel pump which is super loud. I just need to find the time to get it all in there.
I recently installed a short throw shifter, upper boot, and installed a 6 speed shift indicator from Hawks. I forgot to update this thread about those so maybe I'll do that later. And I'll try to keep it up to date with my future mods/fixes.
05-17-2012, 06:11 AM
#11
Senior Member
Join Date: Jul 2009
Location: Morgantown, WV
Posts: 524
Received 100 Likes
on
69 Posts
Car: 1990 Trans Am
Engine: 5.7 350 HSR afr195 xfi268
Transmission: T5
Axle/Gears: 3.08 posi
Re: Ever changing 85 project.
some awsome work man!!!!!!! too many good things to say
05-18-2012, 02:02 AM
#12
Junior Member
Join Date: May 2004
Location: Cedar Rapids, Iowa
Posts: 35
Likes: 0
Received 0 Likes
on
0 Posts
Car: 91 Z28, 89 Formula, 85 IROC Z28
Engine: 305 TPI, 305 TBI, 305 TPI
Transmission: 5 Speed, 5 Speed, 700R4
Re: Ever changing 85 project.
What do you want to know? If you are starting off with an already TPI car you are ahead of the game. I had to make the entire engine harness from scratch. They make adapters to connect a megasquirt directly to the TPI harness with little to no modification. Which is nice if you ever wanted to return to the factory ECU.
I am running a megasquirt II on a v3 board. I have added circuits to control both of my fans so I can program when they come on. One comes on at 195 and the other at 205. I also added a knock sensing circuit which works with the factory module and sensor. I am also using the factory IAC motor.
I can take pics of the megasquirt inside to show my internal mods and added circuits. And I would even share my tunes to help get you started or if you just wanted to look over them in tuner studio. I still have tunes from the TBI and initial TPI install with the 305.
I am running a megasquirt II on a v3 board. I have added circuits to control both of my fans so I can program when they come on. One comes on at 195 and the other at 205. I also added a knock sensing circuit which works with the factory module and sensor. I am also using the factory IAC motor.
I can take pics of the megasquirt inside to show my internal mods and added circuits. And I would even share my tunes to help get you started or if you just wanted to look over them in tuner studio. I still have tunes from the TBI and initial TPI install with the 305.
I am starting with a TPI car. I'm planning on starting with the DIYPNP kit for TPI cars. It should get me started and I see that's what your set up basically is. I would love to look at a tune. I have not ordered my Megasquirt yet, but plan to shortly. I'm sure it will be a slow project for me with all the other things I have going. And I have to rebuild the engine first since it is totally toast. I'll be on a 305 most likely and I'm still picking parts and direction. I have a few options, none are ideal as some are much more expensive and some are much quicker for the summer, but will cause more rework over the winter.
Ok, that's enough hi-jacking your thread. I appreciate the info.
Ed
05-18-2012, 07:40 AM
#13
05-18-2012, 10:17 AM
#15
Member
Thread Starter
iTrader: (1)
Join Date: Feb 2010
Posts: 467
Likes: 0
Received 3 Likes
on
3 Posts
Car: 85 Trans Am
Engine: 98 Vortec 350 LT1 Cam w/ TPI
Transmission: T56
Axle/Gears: 9 bolt 3:27
Re: Ever changing 85 project.
Here are some more pics of stuff I did recently
I got a 6 speed indicator from HAWKS
I had some sheets of ABS plastic so I glued together a box for the light
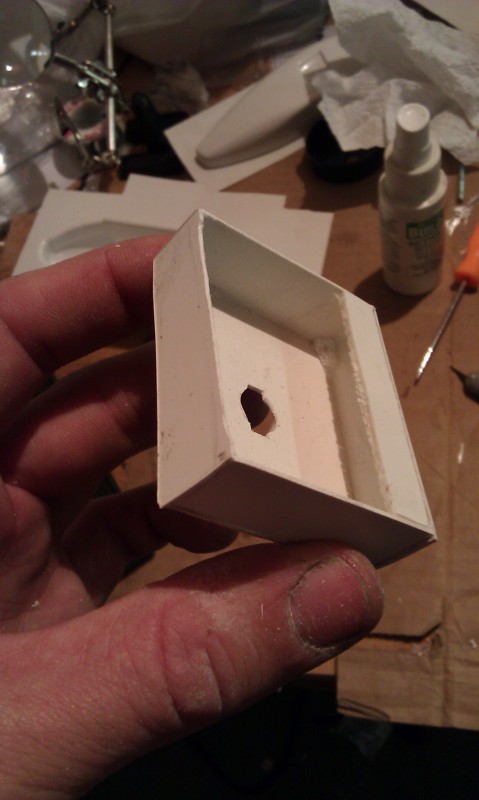
I used the boot to hold it in place. This worked for a while but I ended up making some 90deg brackets from the same plastic that I glued to the shift bezel and then screwed the box to the brackets. The white stuff is fiberglass clotch and CA (crazy) glue to fix the cracks.
I had an orange cover for the tiny bulb. The original setup had the inside of the box painted red. But this works for now

All lit up

I bought one of those cheap ebay shifters. It was $29 w/ free shipping so I figured how could I go wrong
Required a little bending in my press
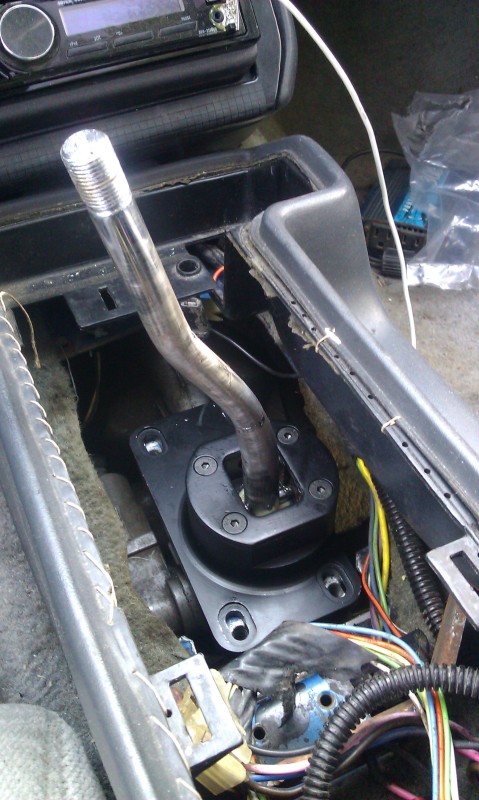
Installed with new boot
I found this picture while looking for some other pics on my computer. This is how it sat at my friends house. If I didn't take it it would have probably headed to the crusher.
I got a 6 speed indicator from HAWKS
I had some sheets of ABS plastic so I glued together a box for the light
I used the boot to hold it in place. This worked for a while but I ended up making some 90deg brackets from the same plastic that I glued to the shift bezel and then screwed the box to the brackets. The white stuff is fiberglass clotch and CA (crazy) glue to fix the cracks.
I had an orange cover for the tiny bulb. The original setup had the inside of the box painted red. But this works for now
All lit up
I bought one of those cheap ebay shifters. It was $29 w/ free shipping so I figured how could I go wrong
Required a little bending in my press
Installed with new boot
I found this picture while looking for some other pics on my computer. This is how it sat at my friends house. If I didn't take it it would have probably headed to the crusher.
05-19-2012, 08:35 PM
#16
Re: Ever changing 85 project.
I adopted an orphan like this. The 91 TA in my sig was going to the crusher and I saved it. I did very similar things as you did and had a blast with the car. It was rust free and the paint was buffed out and looked great from 10ft away. It was my daily driver with a swirl port headed LT1 cammed TPI 305 and I rebuilt a T5 and swapped it in. It was just fun to work on it and play but not worry about where I parked it. My point is, I had way more fun with that car than I ever dreamed I would. It also enabled me to get even more race oriented with my IROC since it was no longer the summer DD.
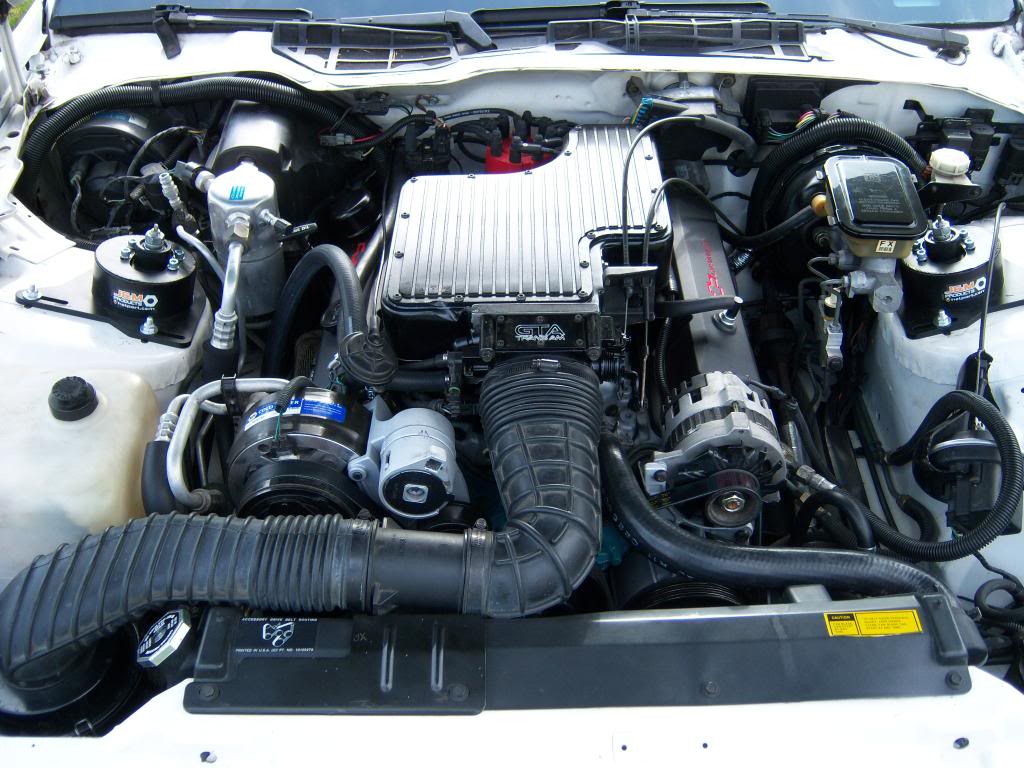
I also loved that you painted the engine blue. I'm a 2nd gen fan too and I thought I was the only guy that painted my engine pontiac blue this past winter (look closely under the alternator) The short block is blue with aluminum heads etc.
I'm ecstatic you saved this car and have chosen to have fun with it. These cars need more guys like you... Keep us posted on your progress!
05-22-2012, 09:17 AM
#17
Member
Thread Starter
iTrader: (1)
Join Date: Feb 2010
Posts: 467
Likes: 0
Received 3 Likes
on
3 Posts
Car: 85 Trans Am
Engine: 98 Vortec 350 LT1 Cam w/ TPI
Transmission: T56
Axle/Gears: 9 bolt 3:27
Re: Ever changing 85 project.
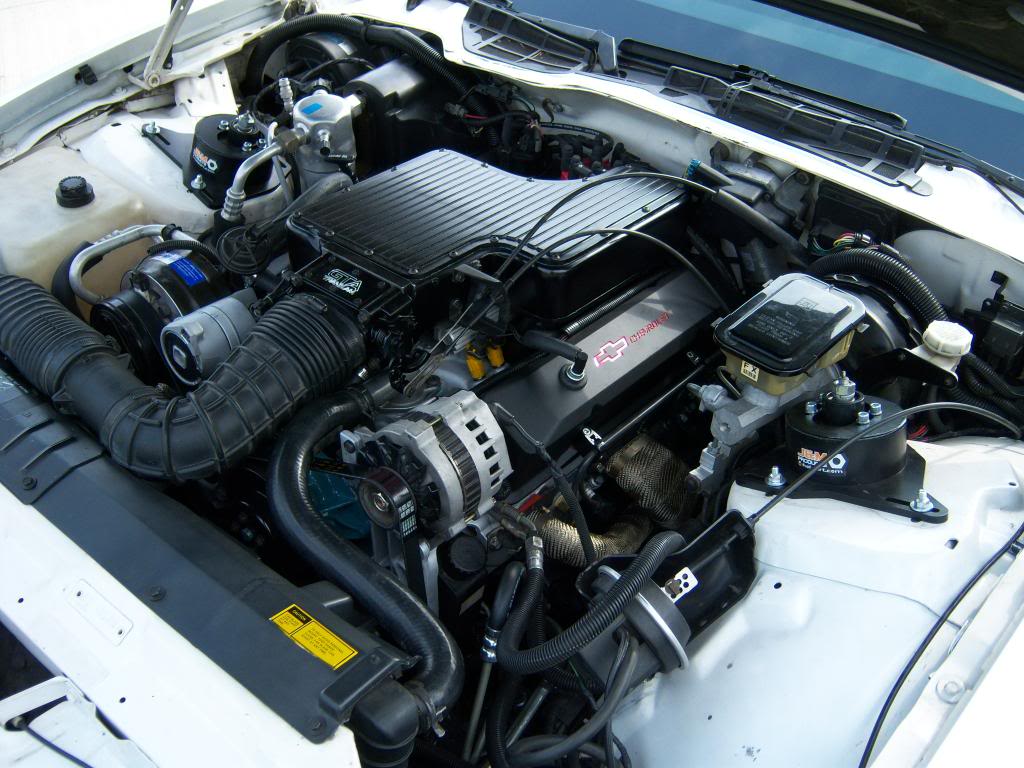
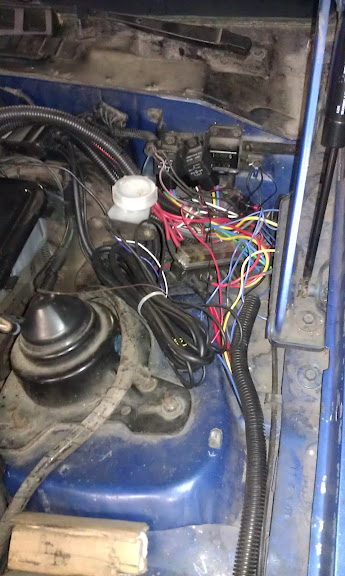
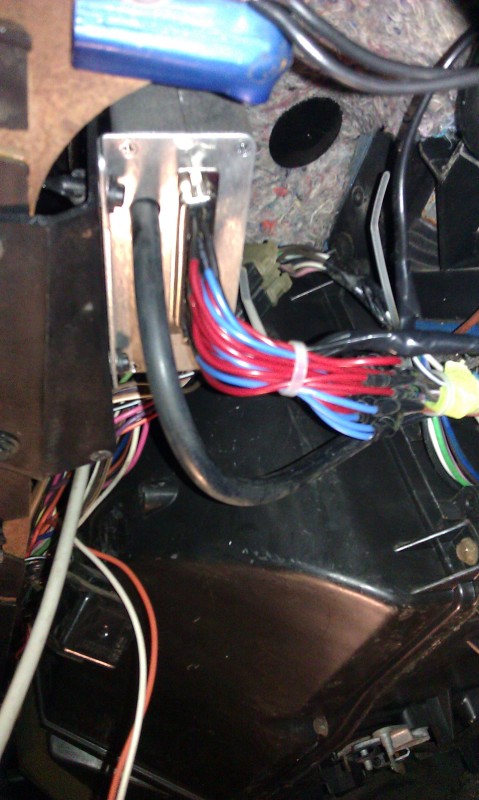
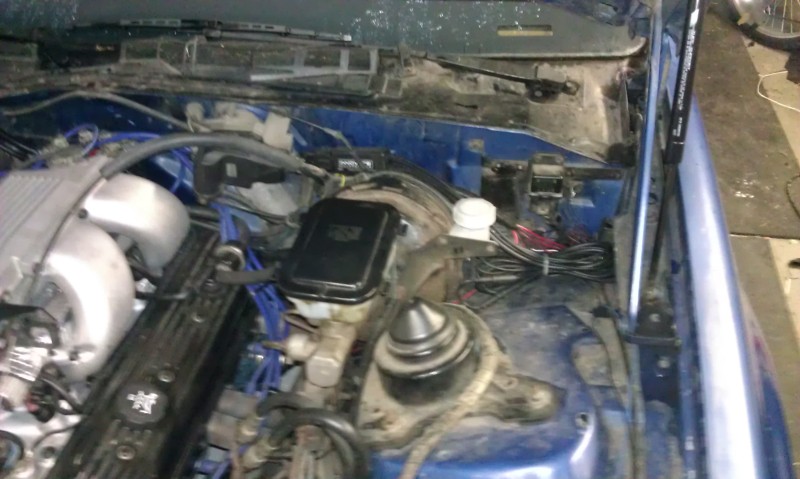
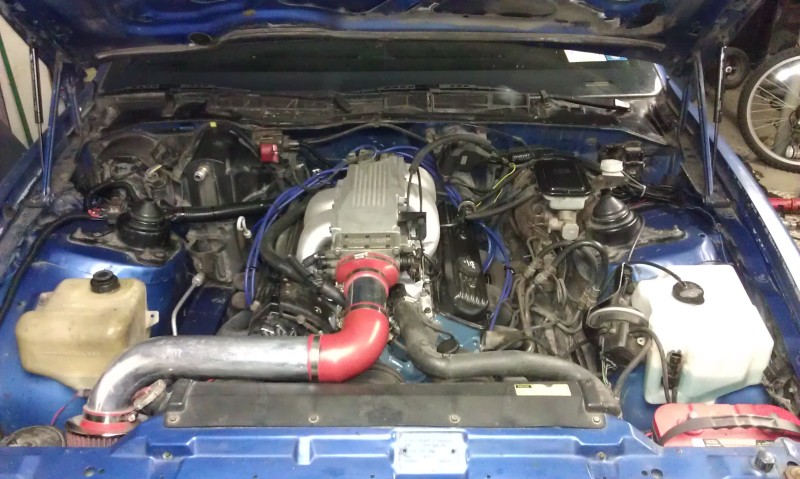
Thanks I wish my engine bay looked as nice as yours! Maybe one day I'll get around cleaning things up under there. I did end up rewiring my engine harness as it was a total mess. When I originally put the car together the factory ECU was in place and in the picture above you can see the factory harness coiled up around the passenger strut tower. All my wires were stuffed through a small hole on in the driver side firewall and the megasquirt was stuffed up by the clutch pedal. It was very hard to get to and take out if there was a problem. So I decided to move everything over to the passenger side. I used the factory harness that goes inside the fender and into the passenger kick panel.
Rats nest before I started
Moved over to passenger side

Mounted megasquirt to factory bracket
Mounted under dash
Driver side cleaned up. Still have the mile long wideband 02 sensor wiring which I don't know what to do with.
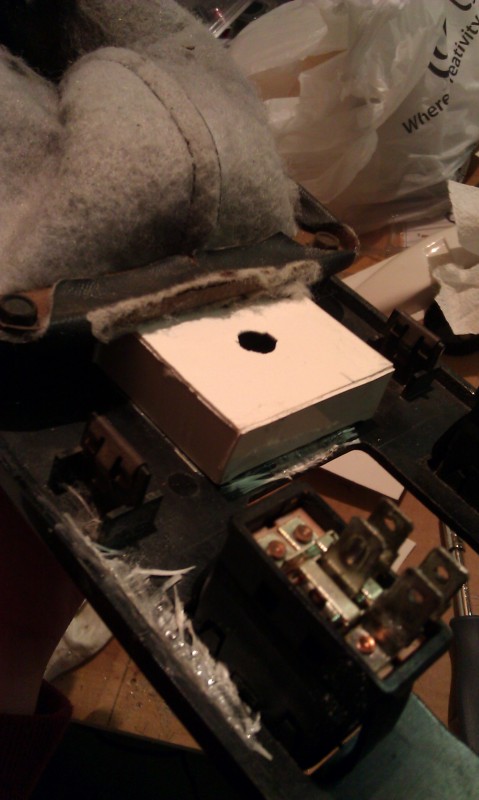
Wire loom installed cleans things up a lot. I still need to mount my relays and my fuse block.
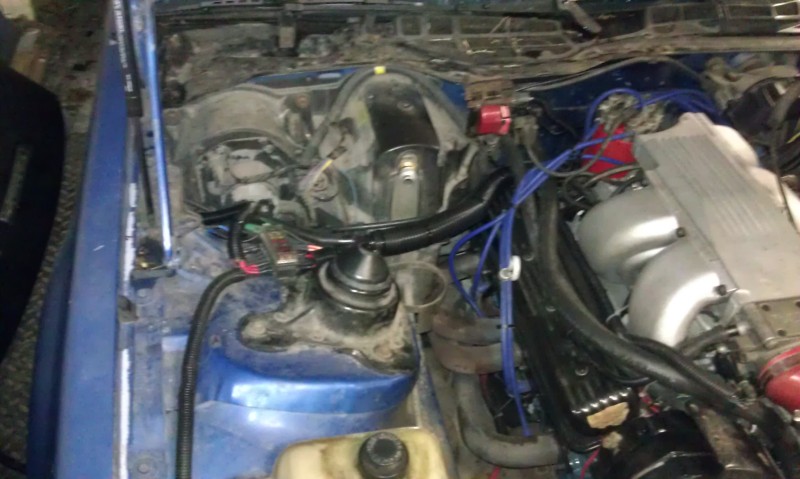
I also just installed an 89 throttle body. Let me tell you what a different this made. The car is soo much easier to drive now with the progressive throttle.
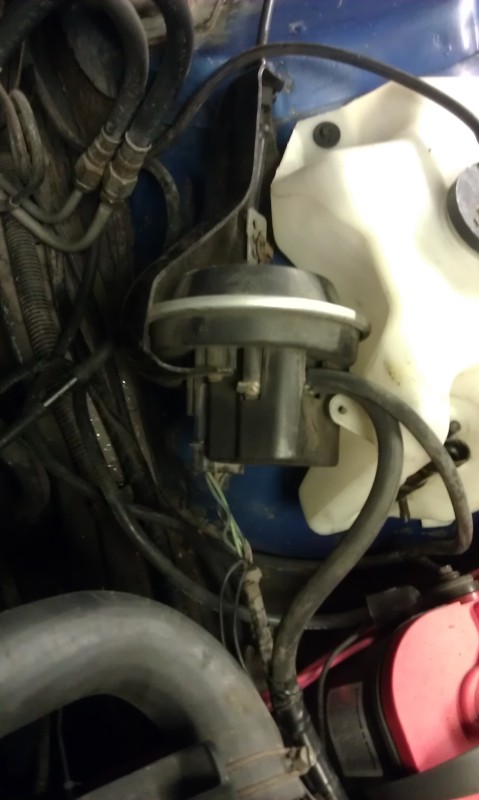
The only wires left hanging around are the cruise control wiring. I also got a washer bottle and cruise unit from an 89 GTA so I can mount it on the driver side fender well. I think that will be my next project.
Rats nest before I started
Moved over to passenger side
Mounted megasquirt to factory bracket
Mounted under dash
Driver side cleaned up. Still have the mile long wideband 02 sensor wiring which I don't know what to do with.
Wire loom installed cleans things up a lot. I still need to mount my relays and my fuse block.
I also just installed an 89 throttle body. Let me tell you what a different this made. The car is soo much easier to drive now with the progressive throttle.
The only wires left hanging around are the cruise control wiring. I also got a washer bottle and cruise unit from an 89 GTA so I can mount it on the driver side fender well. I think that will be my next project.
05-22-2012, 01:01 PM
#20
Member
Thread Starter
iTrader: (1)
Join Date: Feb 2010
Posts: 467
Likes: 0
Received 3 Likes
on
3 Posts
Car: 85 Trans Am
Engine: 98 Vortec 350 LT1 Cam w/ TPI
Transmission: T56
Axle/Gears: 9 bolt 3:27
Re: Ever changing 85 project.
No not really it is one of the easier things I've done to the car. I already have wires that run down the A pillar for the overhead console so I ran the mirror wires along side those. I ran 3 wires through the firewall. Two go to the temp sender and the other goes to the switched 12v source for you backup lights. This is so at night it comes out of dim mode when backing up.
Other than that it just needs a simple accessory power and ground and that is it. The compass it self contained in the base of the mirror and it attaches to any standard mirror mount.
The mirror works great in these cars since they are so low and have such a large back window. I am probably going to get one for my 79 at some point as well.
05-22-2012, 01:51 PM
#21
Supreme Member
iTrader: (1)
Join Date: Jun 2009
Location: Central Connecticut
Posts: 1,777
Likes: 0
Received 0 Likes
on
0 Posts
Car: 91 Trans Am 'vert
Engine: LB9
Transmission: T5
Axle/Gears: 3.45 9 bolt
Re: Ever changing 85 project.
Looks awesome, I love what you did to it and I LOVE the blue/silver color combo!  Keep us updated.
Keep us updated.
05-23-2012, 01:49 AM
#22
Junior Member
Join Date: Sep 2011
Location: Shalimar, FL
Posts: 58
Likes: 0
Received 0 Likes
on
0 Posts
Car: 1986 Trans-Am
Engine: 305 5.0 TPI
Transmission: 700 R4
Axle/Gears: 2.73 posi
Re: Ever changing 85 project.
Your car lloks good. I love that mirror, now I'm on the lookout for one...
05-24-2012, 09:06 PM
#23
Member
Thread Starter
iTrader: (1)
Join Date: Feb 2010
Posts: 467
Likes: 0
Received 3 Likes
on
3 Posts
Car: 85 Trans Am
Engine: 98 Vortec 350 LT1 Cam w/ TPI
Transmission: T56
Axle/Gears: 9 bolt 3:27
Re: Ever changing 85 project.
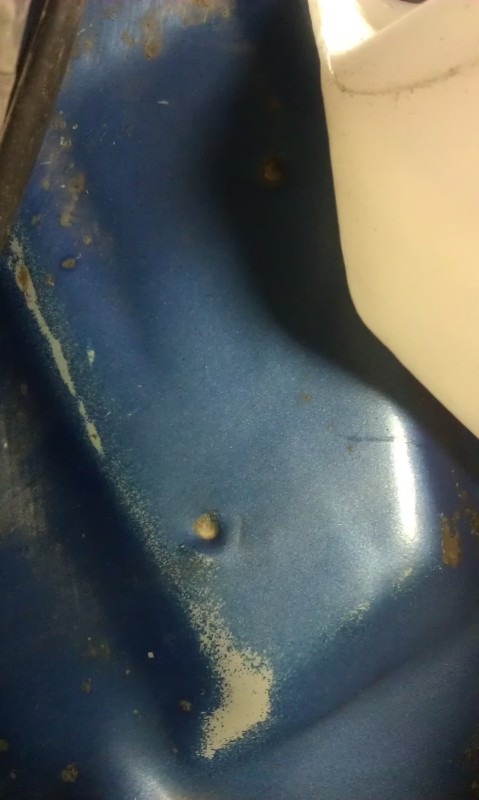
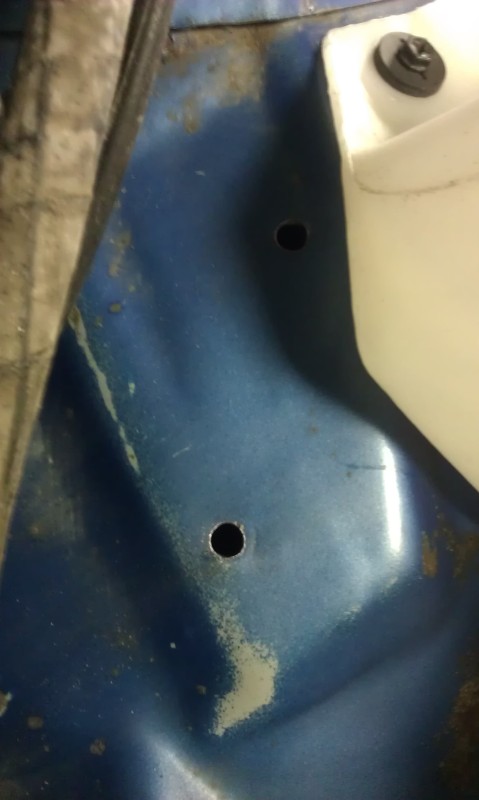
Thanks guys! Small update I got the cruise control working. It didn't work at first but thanks to this thread (https://www.thirdgen.org/forums/elec...e-control.html) I was able to pinpoint the problem to a disconnect on the blu/blk SPS wire. I have a feeling it happened during my gauge swap. I located the wire as it comes up by the steering column and ran a wire over to the module connector. I took it out for a test run and what do you know it worked! I wasn't sure how it was going to work with my SGI-5 speedo converter box but it seems to work fine.
My car was originally a carbed car so the battery was originally on the passenger side and the cruise unit was next to the charcoal canister on the drivers side. With the TPI swap I put the battery over on the drivers side like a true TPI car would have it. I recently got the washer bottle and cruise unit from an 89 which puts it up on the drivers fender well. The 89 bottle also has the pump located there. My car has it located at the wiper motor so I just plugged the washer pump in the tank and put my cap with the suction hose on it for now. Someday I'll move the wires down to the pump in the tank.
Here are the spots that need to be drilled out.
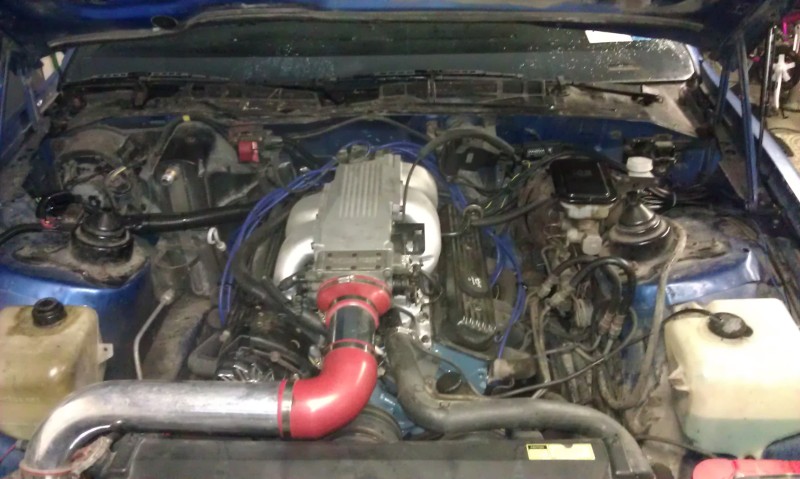
I took the time to clean the engine bay a bit so it doesn't look so crusty under there. I guess I need a new coolant bottle now...
My car was originally a carbed car so the battery was originally on the passenger side and the cruise unit was next to the charcoal canister on the drivers side. With the TPI swap I put the battery over on the drivers side like a true TPI car would have it. I recently got the washer bottle and cruise unit from an 89 which puts it up on the drivers fender well. The 89 bottle also has the pump located there. My car has it located at the wiper motor so I just plugged the washer pump in the tank and put my cap with the suction hose on it for now. Someday I'll move the wires down to the pump in the tank.
Here are the spots that need to be drilled out.
I took the time to clean the engine bay a bit so it doesn't look so crusty under there. I guess I need a new coolant bottle now...
05-31-2012, 06:56 PM
#24
Member
Thread Starter
iTrader: (1)
Join Date: Feb 2010
Posts: 467
Likes: 0
Received 3 Likes
on
3 Posts
Car: 85 Trans Am
Engine: 98 Vortec 350 LT1 Cam w/ TPI
Transmission: T56
Axle/Gears: 9 bolt 3:27
Re: Ever changing 85 project.
Don't have any pics but I installed the keyless entry over the weekend. I followed the thread below to install it and it works great. I tucked the unit up where my megasquirt was and it fits like it was made to be there.
Reference thread
https://www.thirdgen.org/forums/elec...ess-entry.html
Reference thread
https://www.thirdgen.org/forums/elec...ess-entry.html
 06-04-2012, 05:20 PM
#26
Junior Member

Join Date: Jun 2012
Location: Southern MN
Posts: 2
Likes: 0
Received 0 Likes
on
0 Posts
Car: Cadilliac, Chevy 3/4 Ton, Firebird
Engine: Fire Bird 355/450hp
Transmission: 700R4
Axle/Gears: 10 bolt, 3.73
Re: Ever changing 85 project.
Lookin great!!! I have an 85 Firebird SE that was in dire need of TLC. We are going to fire the car up the first time in 10 years tomorrow. I painted my motor GM orange, but blue sure does look awesome.
06-04-2012, 07:37 PM
#28
Member
Thread Starter
iTrader: (1)
Join Date: Feb 2010
Posts: 467
Likes: 0
Received 3 Likes
on
3 Posts
Car: 85 Trans Am
Engine: 98 Vortec 350 LT1 Cam w/ TPI
Transmission: T56
Axle/Gears: 9 bolt 3:27
Re: Ever changing 85 project.
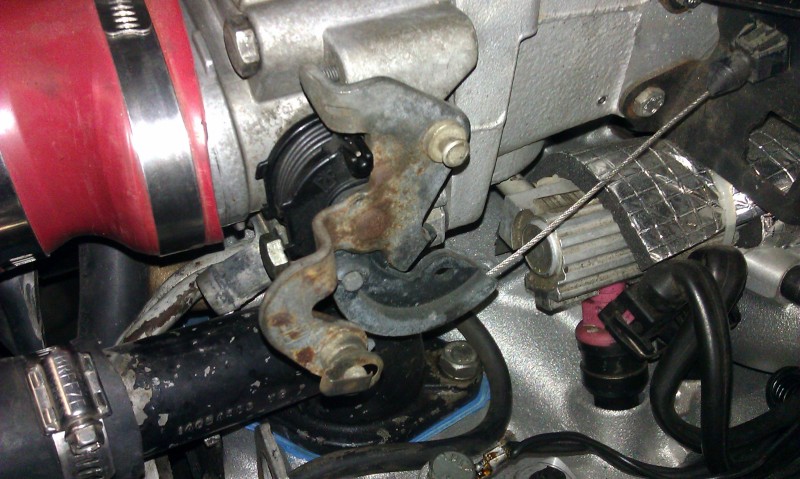
Originally Posted by 83 Crossfire TA
I'm guessing that this takes more than just power, do you have any details? where does it get a temperature reading from?
Originally Posted by tylercamaro
lookin good. whered you get the air intake couplers?
06-22-2012, 08:51 PM
#29
Member
Thread Starter
iTrader: (1)
Join Date: Feb 2010
Posts: 467
Likes: 0
Received 3 Likes
on
3 Posts
Car: 85 Trans Am
Engine: 98 Vortec 350 LT1 Cam w/ TPI
Transmission: T56
Axle/Gears: 9 bolt 3:27
Re: Ever changing 85 project.
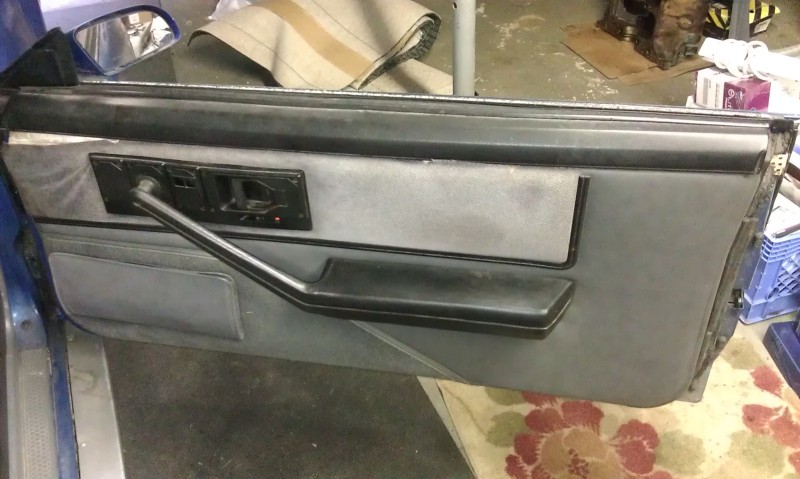
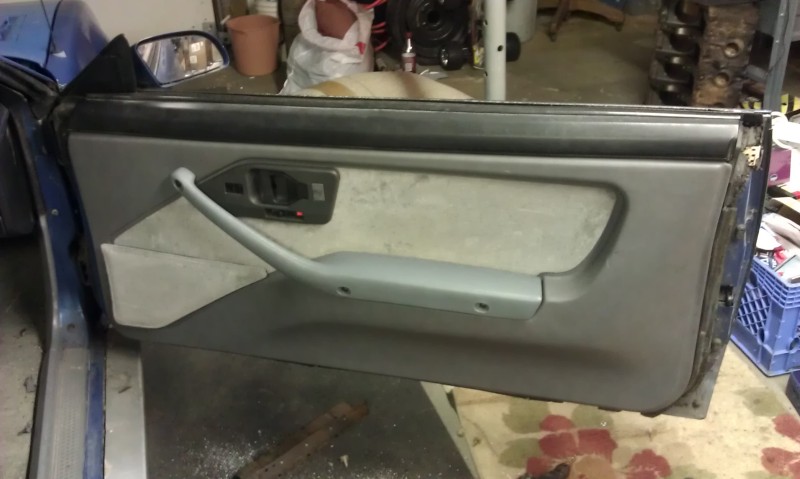
Sooo I spent some time working on the car and thought I would post an update. A few months ago I decided I wanted the Deluxe (aka GTA) door panels. So through a few members here I got all the parts I needed. Tonight I got the passenger side panel on.
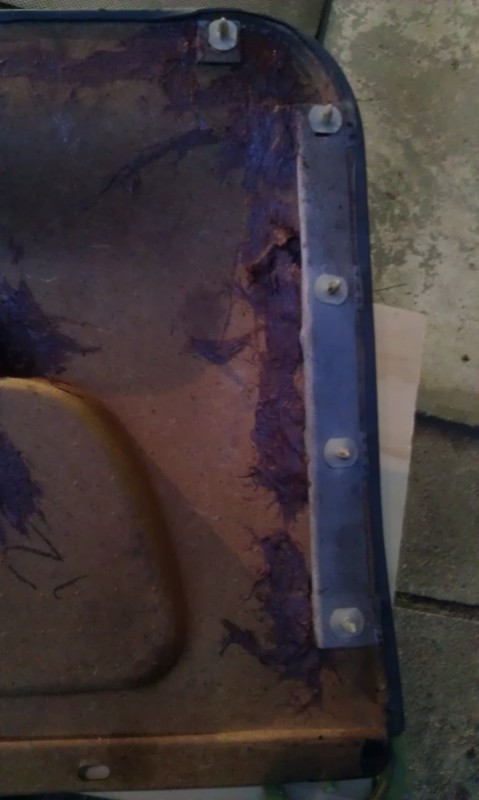
But first things first I had to fix up the panels a bit. There were a few cracks and the metal mounting tabs were detached from the panel in a few spots.
This is one of the cracks. This one wasn't as bad as the other but I forgot to take pics before I started
I used tiger hair since it makes a very strong bond and with the fiberglass in it, it makes a more than strong enough for this application.
While I was at it I figured I would reinforce the metal tabs as some were loose or completely detached from the panel
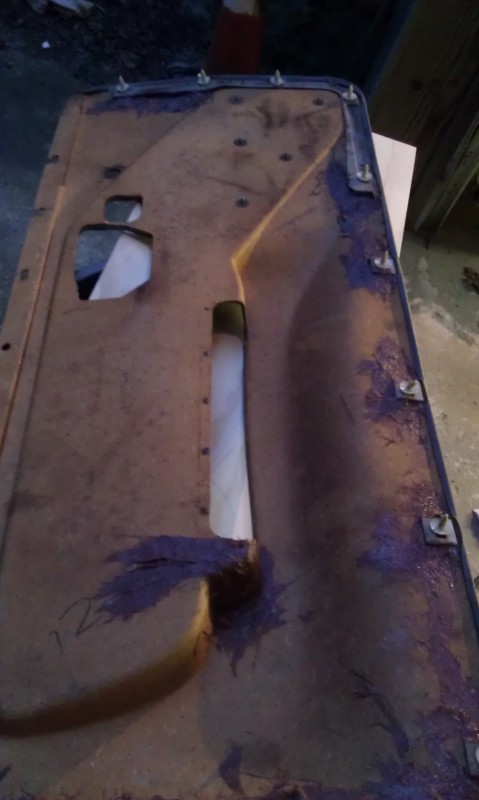
The door before I started. As you can see the panel is tired.
This is the difference between the standard arm rest mount and the Deluxe mount.
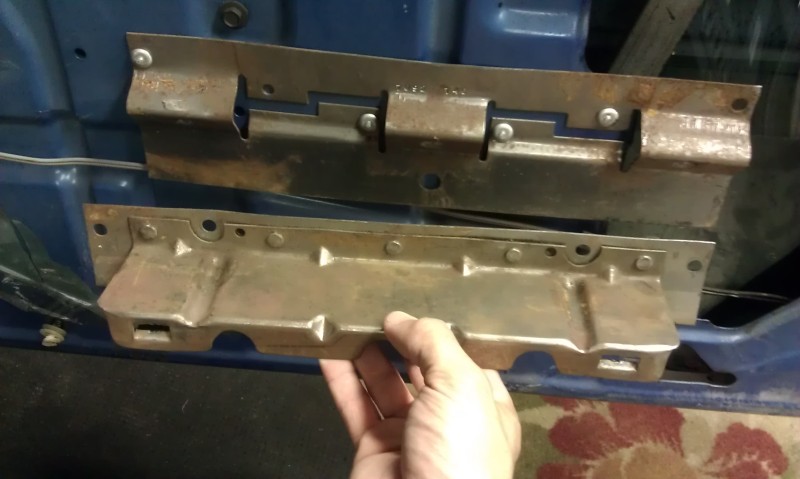
This is the front mount and as you can see it moves the bolt further forward. You could probably drill out the old style mount but I got the front mounts with the rears so I figured I would use them.
All done.
Tomorrow I hope to get the other side done as well as drop the gas tank and install my new fuel pump and sending unit.
But first things first I had to fix up the panels a bit. There were a few cracks and the metal mounting tabs were detached from the panel in a few spots.
This is one of the cracks. This one wasn't as bad as the other but I forgot to take pics before I started
I used tiger hair since it makes a very strong bond and with the fiberglass in it, it makes a more than strong enough for this application.
While I was at it I figured I would reinforce the metal tabs as some were loose or completely detached from the panel
The door before I started. As you can see the panel is tired.
This is the difference between the standard arm rest mount and the Deluxe mount.
This is the front mount and as you can see it moves the bolt further forward. You could probably drill out the old style mount but I got the front mounts with the rears so I figured I would use them.
All done.
Tomorrow I hope to get the other side done as well as drop the gas tank and install my new fuel pump and sending unit.
06-26-2012, 09:57 PM
#31
Junior Member
Join Date: Jun 2012
Location: Southern MN
Posts: 2
Likes: 0
Received 0 Likes
on
0 Posts
Car: Cadilliac, Chevy 3/4 Ton, Firebird
Engine: Fire Bird 355/450hp
Transmission: 700R4
Axle/Gears: 10 bolt, 3.73
Re: Ever changing 85 project.
Your project is ever changing and for the better! Love the car and the hard work often goes unappreciated by those who have never tackled a job like yours. I finally got mine running and on the road. Ordering a custom rearend; 12 bolt with 411's and disk brakes. I went old school muscle to a degree and built a 350 similar to the many of the dirt track cars due to all my frinds race and without their help my car would still be in a barn covered. I am leary about the 700R4, but when going thru it I added the beast and a shift kit hoping this will add to the longevity and strength to the tranny. I did discover that it is a posi rearend with 3.08's and not 373's as I was told when I purchased the car from my mother's estate 5 yrs ago--yes it was my mom's car, but it adds sentimental value. I will post pictures in near future with motor and car. I did paint the engine compartment flat black. I did have to add a vaccum pump for the breaks due to the cam--motor did not have enough vaccum to barely stop the car within 100's of yards. They are never ending projects, but sure are fun. If you have an idea where I guy can buy a decent rearend let me know? I have a supplier and the cost should I order as planned is approximately $2,700 and it supposed to replace the old one without much modification and they cliam it is ready to go--we'll see??? Thank god I put in frame ties or my T-tops wouldn't seal--it goes. I am glad I brought the car and brought it back from the pits of hell--I love it!
06-28-2012, 01:05 PM
#32
Supreme Member

Join Date: Apr 2012
Location: Streetsboro Oh
Posts: 1,353
Likes: 0
Received 1 Like
on
1 Post
Car: 1987 T/A WS6 T-Tops/92 RS
Engine: LB9/3.1
Transmission: 700R4/700R4
Axle/Gears: 2.73/3.23
Re: Ever changing 85 project.
Two very sweet cars and I love, love, love the 79/77. After looking at your 85 I for sure what that spoiler over my aero. Sure the aero is correct, but I like the clean looks of the one you have and they are alot cheaper. Keep up the good work.
07-09-2012, 08:37 PM
#33
Member
Thread Starter
iTrader: (1)
Join Date: Feb 2010
Posts: 467
Likes: 0
Received 3 Likes
on
3 Posts
Car: 85 Trans Am
Engine: 98 Vortec 350 LT1 Cam w/ TPI
Transmission: T56
Axle/Gears: 9 bolt 3:27
Re: Ever changing 85 project.
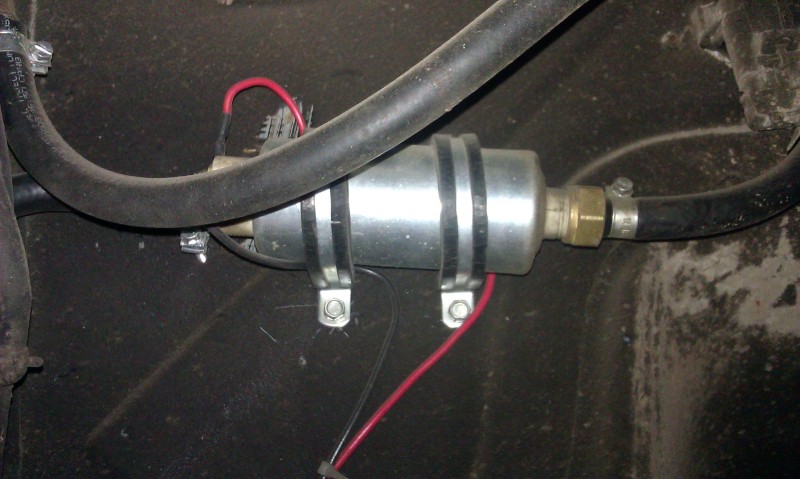
Thanks guys I'm glad you like it. I made some progress lately and ditched the summit external pump.
This is what is looked like. It is against the wall of the back seat and it was LOUD
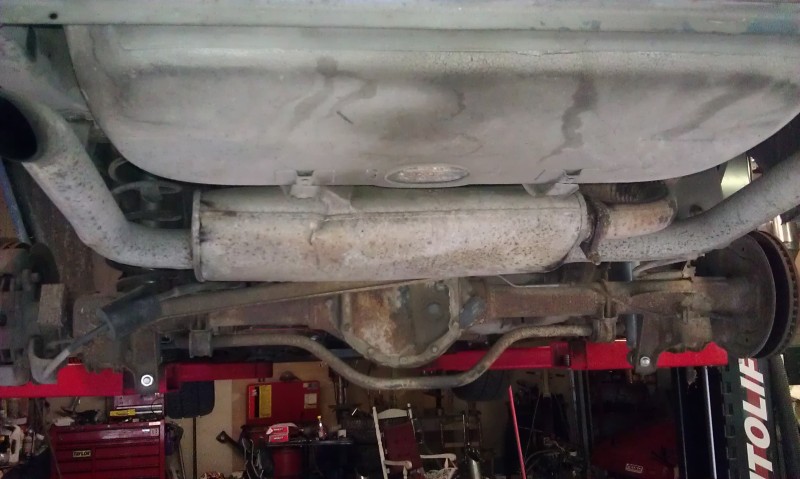
Stock setup with original exhaust that seems to have been backed into something.
I think I like the look. Put some 30" rims on it it would be schaweeet lol
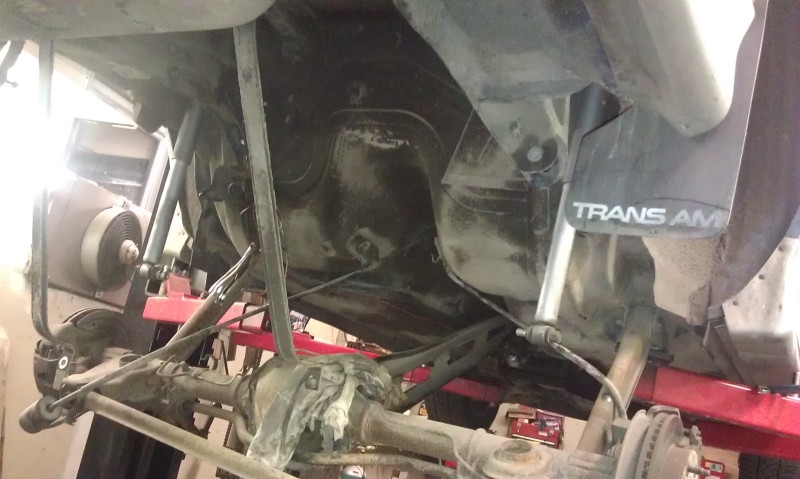
other than some dust the tank is mint
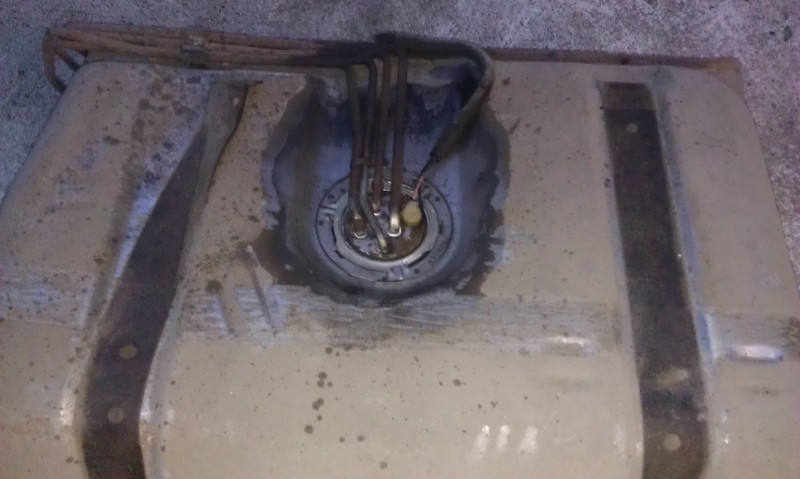
Old unit next to new unit
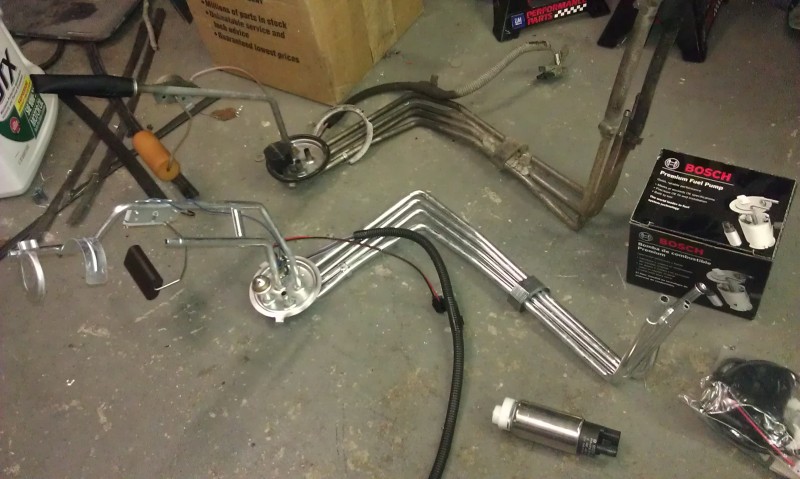
New unit installed
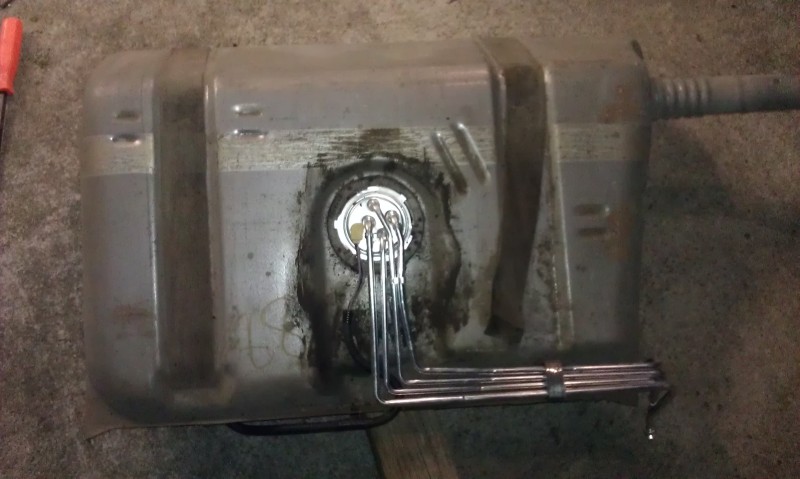
All together with new exhaust given to me by a friend. It is typical flowmaster which sounds OK but kinda generic.
Since I installed the new pump all my tuning issues have disappeared. I had heat soak issues where it would go lean. It seems the summit pump can't put out 43psi under 14v. So until the alternator got to 14v the motor would run lean. Now she fires right up perfectly every time. And I can't even hear the pump now. Now when I turn the key on I think something is wrong until I realize I changed the pump.
This is what is looked like. It is against the wall of the back seat and it was LOUD
Stock setup with original exhaust that seems to have been backed into something.
I think I like the look. Put some 30" rims on it it would be schaweeet lol
other than some dust the tank is mint
Old unit next to new unit
New unit installed
All together with new exhaust given to me by a friend. It is typical flowmaster which sounds OK but kinda generic.
Since I installed the new pump all my tuning issues have disappeared. I had heat soak issues where it would go lean. It seems the summit pump can't put out 43psi under 14v. So until the alternator got to 14v the motor would run lean. Now she fires right up perfectly every time. And I can't even hear the pump now. Now when I turn the key on I think something is wrong until I realize I changed the pump.
 09-19-2012, 07:22 PM
#35
Member
Thread Starter
iTrader: (1)
Join Date: Feb 2010
Posts: 467
Likes: 0
Received 3 Likes
on
3 Posts
Car: 85 Trans Am
Engine: 98 Vortec 350 LT1 Cam w/ TPI
Transmission: T56
Axle/Gears: 9 bolt 3:27
Re: Ever changing 85 project.
Just wanted to update this thread to let you know I haven't given up on the 85. I have just been driving it like crazy this summer. I put over 6000 miles on it this summer and it has been flawless. I took it on a few longish trips a few weeks back and it cruises great on the highway. Once you get it up to 65 and get it in 6th gear and set the cruise control it just purrs down the road at 1800 RPM.
I took the time to clean it today as it was getting a little ragged. It is still not much to look at but it doesn't look that terrible. I put the other wheels back on this summer since they had brand new tires on them. After it gets repainted I'll get new tires for the formula wheels.
I'm in the process of rebuilding the motor in my 79 due to a cracked block. So there will be no updates on the 85 until the new motor is done for the 79. The next time you see the 85 is may be getting disassembled for paint.
11-08-2012, 11:02 PM
#37
Member
iTrader: (16)
Join Date: Dec 2006
Location: TX/FL
Posts: 469
Likes: 0
Received 1 Like
on
1 Post
Car: 88 GTA/86 C20 Burb/91 325i
Engine: L98/454/M20
Transmission: 700R4/NV4500/Getrag
Axle/Gears: 3.27 9-bolt/3.73 14 Bolt/3.73 IRS
Re: Ever changing 85 project.
What color are you planning on painting it? Are you going to have two blue T/As, or are you going to go with something different on the '85?
I'm loving the work so far. Very well played.
I'm loving the work so far. Very well played.
11-09-2012, 11:42 AM
#38
Member
Thread Starter
iTrader: (1)
Join Date: Feb 2010
Posts: 467
Likes: 0
Received 3 Likes
on
3 Posts
Car: 85 Trans Am
Engine: 98 Vortec 350 LT1 Cam w/ TPI
Transmission: T56
Axle/Gears: 9 bolt 3:27
Re: Ever changing 85 project.
Funny you ask as I had considered painting it the same color as my 79 and have matching color TAs. But in the end I'm pretty set on keeping it the original color as it is. The car actually originally was all blue as the RPO tag lists the same color for upper and lower. But I like the two tone with the silver so I believe I will do it again. Plus when the formula wheels are on there is really pops with the lower silver color.
As for parts I picked up a new set of complete doors minus the panels for the price of one. And I will be picking up a new nose in a few weeks as mine is pretty busted up. I have all new fog light brackets and lenses for when I get it all back together.
I am in the middle of building my new 461 for my 79. Once that is done I plan to start pulling the 85 apart. If anyone is interested in my 461 build you can follow the link below.
http://www.78ta.com/HTAF/index.php?topic=39619.0
03-29-2013, 08:30 AM
#40
Member
Thread Starter
iTrader: (1)
Join Date: Feb 2010
Posts: 467
Likes: 0
Received 3 Likes
on
3 Posts
Car: 85 Trans Am
Engine: 98 Vortec 350 LT1 Cam w/ TPI
Transmission: T56
Axle/Gears: 9 bolt 3:27
Re: Ever changing 85 project.
Just a minor update I thought I would post up. A long time ago when I got the cruise control stuff I also got a serpentine setup from the same car. I finally decided to install it the other day. I have a friend with a blasting cabinet so I blasted the brackets along with the pulleys and painted everything. The original radiator was starting to leak at one of the tanks so I ordered up a new one ($60). I also ordered up the new alternator ($30), ac delete pulley ($29), and reverse rotation water pump ($30). I also updated my megasquirt to MSEXTRA code which has closed loop idle so the next step is to start collecting AC parts.
Before
After

Before
After
 03-31-2013, 10:55 AM
#42
 03-31-2013, 09:14 PM
#44
Member
Thread Starter
iTrader: (1)
Join Date: Feb 2010
Posts: 467
Likes: 0
Received 3 Likes
on
3 Posts
Car: 85 Trans Am
Engine: 98 Vortec 350 LT1 Cam w/ TPI
Transmission: T56
Axle/Gears: 9 bolt 3:27
Re: Ever changing 85 project.
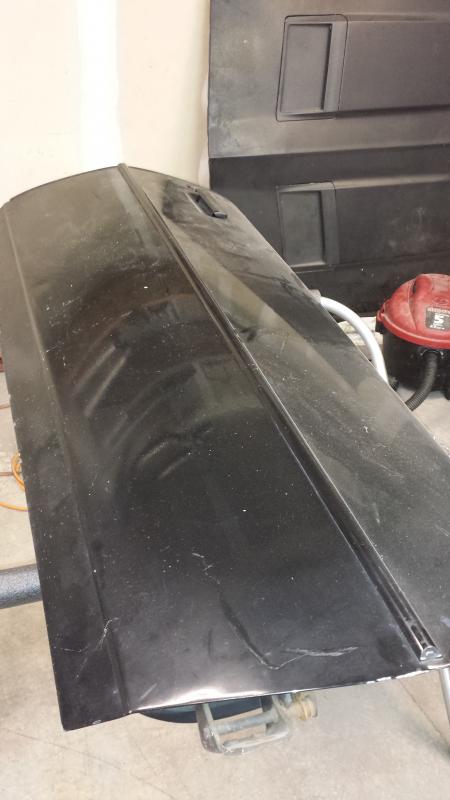
Haha yeah that's kind of how I see the car. I forgot to mention in this thread that I picked up a set of charcoal cloth 4th gen seats for it a while back but I am waiting until I paint it to install them. I also got a new nose as well a another set of doors for it as the bottom is rotted out of the passenger door. The only body part I need is a hood as the current one is toast but I might try to save it. I originally wanted to have it painted by now but money is a bit tight due to some house issues (new roof) so I am just doing little stuff here and there until I can get all the materials together. I really don't want to pull it apart during the summer so if it doesn't happen this spring I may wait until fall.
04-01-2013, 06:07 AM
#45
Re: Ever changing 85 project.
I've been meaning to ask, what kind of fuel mileage you getting with that thing? I'm wondering how it compares to my GTA since we have the same rear gear and a T56. However my T56 is a '93 model for use with the 3.23 gear so it has a .62 6th gear (if I'm remembering correctly) compared to the .5 6th gear of most T56s.
04-01-2013, 08:37 AM
#46
Member
Thread Starter
iTrader: (1)
Join Date: Feb 2010
Posts: 467
Likes: 0
Received 3 Likes
on
3 Posts
Car: 85 Trans Am
Engine: 98 Vortec 350 LT1 Cam w/ TPI
Transmission: T56
Axle/Gears: 9 bolt 3:27
Re: Ever changing 85 project.
I have that same 93 M29 T56 in mine. I haven't done a fuel mileage run lately but when I did I was getting as good as 18MPG around town and up to 22MPG on the highway.
04-02-2014, 12:41 PM
#47
Member

Join Date: Dec 2011
Location: West Haven, Utah
Posts: 420
Likes: 0
Received 0 Likes
on
0 Posts
Car: 1985 trans am
Engine: 350 TPI
Transmission: T5
Axle/Gears: 3.27
Re: Ever changing 85 project.
Lil Ski, WOW!!! this is way more intense than i thought! all this stuff your so good at makes my head swim. Its so far over my head. I wish i could do all of that stuff. Anyway, way nice build man!!! I love it so far!
04-27-2014, 10:32 PM
#48
Member
Thread Starter
iTrader: (1)
Join Date: Feb 2010
Posts: 467
Likes: 0
Received 3 Likes
on
3 Posts
Car: 85 Trans Am
Engine: 98 Vortec 350 LT1 Cam w/ TPI
Transmission: T56
Axle/Gears: 9 bolt 3:27
Re: Ever changing 85 project.
Time to bring this thread back from the dead. It is finally time to make this ole bird look new again. I have been collecting tools and parts for the last few months and should have everything I need to start next weekend.
I started stripping down the doors I got a while back and get them ready to strip and paint. One door is newer than the other and is in near perfect condition. The other has some issues but overall not too bad. Both are complete minus door panels.
Passenger door
Driver door
Better door stripped
Other door stripped
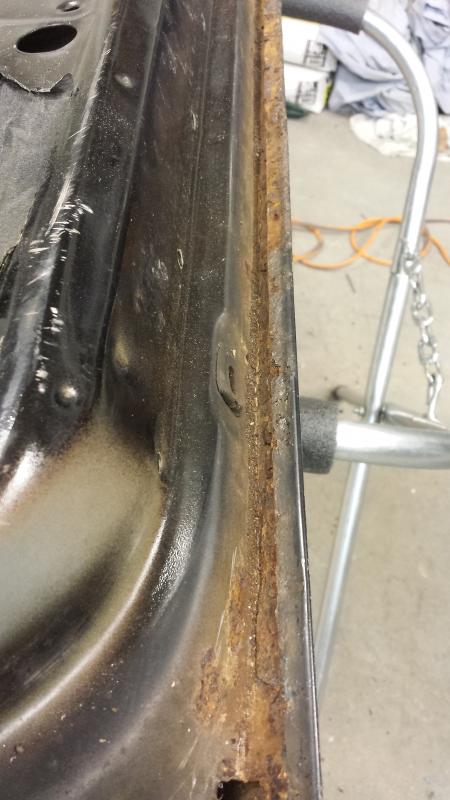
Rot on bottom edge
One thing I noticed is the support bar is different between the two. The newer one uses a round bar compared to the flat formed support on the older door.
Newer
Older

Overall I am very happy with the doors. The hinges are in great shape on both. The rot on the one isn't too bad and is 100x better than what is on the car now.
My plan for next weekend is to blow the front of the car apart and pull the motor/trans and get the engine bay ready for paint.
I started stripping down the doors I got a while back and get them ready to strip and paint. One door is newer than the other and is in near perfect condition. The other has some issues but overall not too bad. Both are complete minus door panels.
Passenger door

Driver door

Better door stripped

Other door stripped

Rot on bottom edge

One thing I noticed is the support bar is different between the two. The newer one uses a round bar compared to the flat formed support on the older door.
Newer

Older

Overall I am very happy with the doors. The hinges are in great shape on both. The rot on the one isn't too bad and is 100x better than what is on the car now.
My plan for next weekend is to blow the front of the car apart and pull the motor/trans and get the engine bay ready for paint.
05-04-2014, 08:09 PM
#49
Member
Thread Starter
iTrader: (1)
Join Date: Feb 2010
Posts: 467
Likes: 0
Received 3 Likes
on
3 Posts
Car: 85 Trans Am
Engine: 98 Vortec 350 LT1 Cam w/ TPI
Transmission: T56
Axle/Gears: 9 bolt 3:27
Re: Ever changing 85 project.
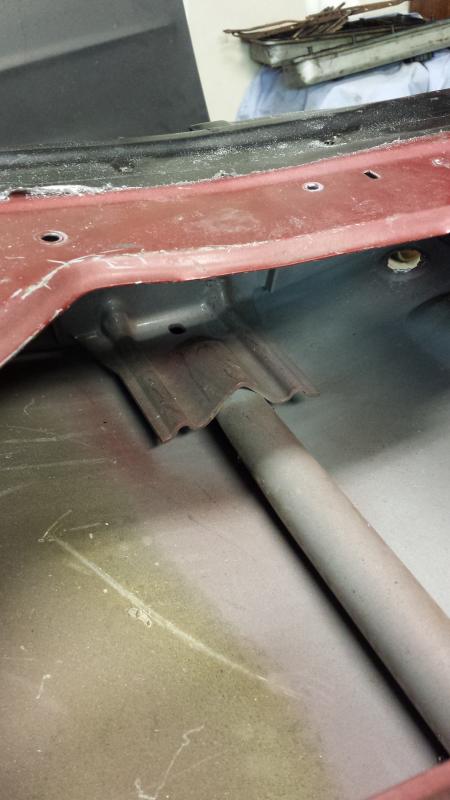
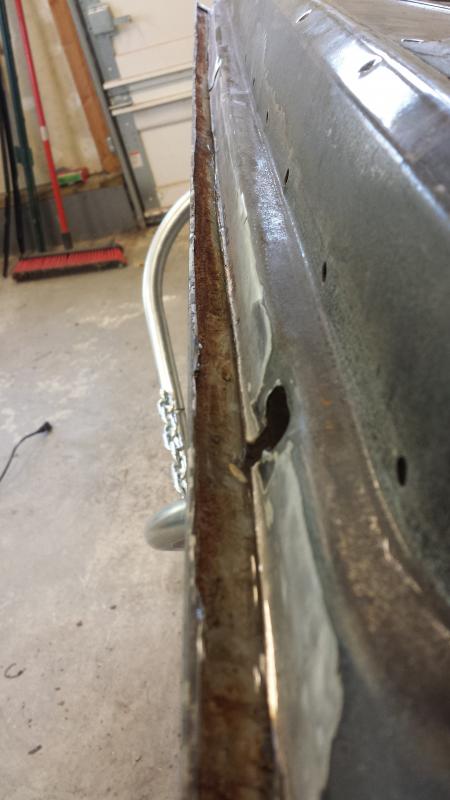
So I decided to keep the car together for now and concentrate on the doors. I cut out the bottom inner edge of the passenger door and left the very bottom edge of the outer skin for reference.

This is my first time welding sheet metal (new to welding all together) so it is taking me some time learning as I go. I practiced on some scrap pieces before I started on the door. To keep the heat down I tack welded it moving around after each weld.
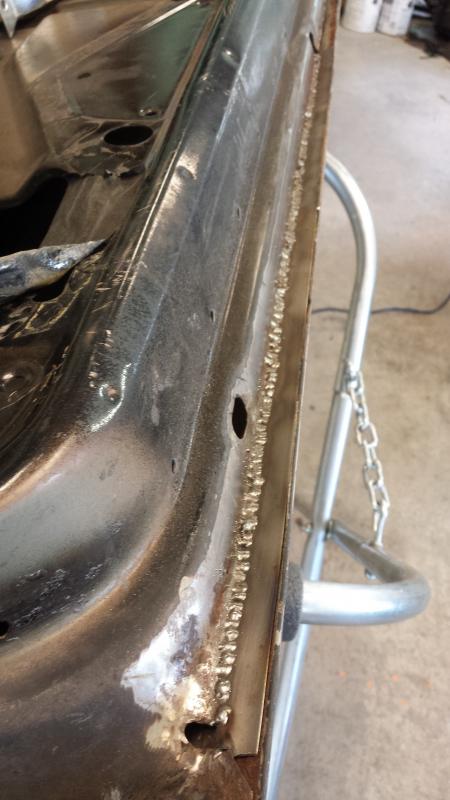
smoothed out

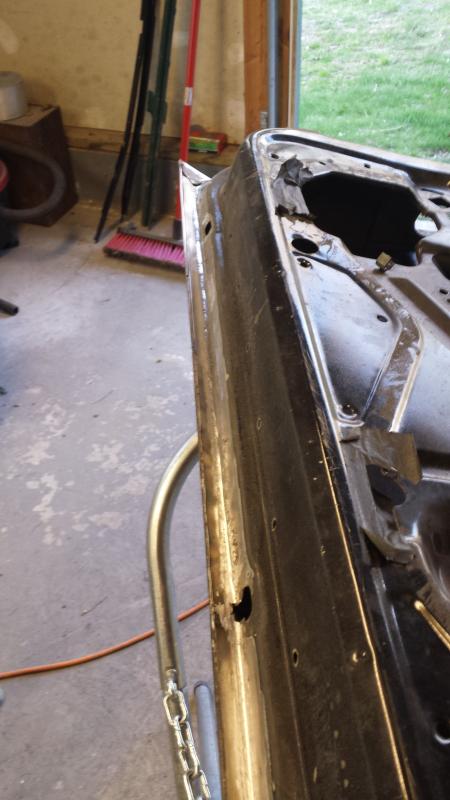
This is the patch panel I got for the outer skin. I used some of it to make the patches for the inside. Now that the inside is fixed I'm going to replace the very bottom edge of the outer skin as it had more rust that previously thought.
And I got the paint in on Friday.


This is my first time welding sheet metal (new to welding all together) so it is taking me some time learning as I go. I practiced on some scrap pieces before I started on the door. To keep the heat down I tack welded it moving around after each weld.

smoothed out


This is the patch panel I got for the outer skin. I used some of it to make the patches for the inside. Now that the inside is fixed I'm going to replace the very bottom edge of the outer skin as it had more rust that previously thought.

And I got the paint in on Friday.


Thread
Thread Starter
Forum
Replies
Last Post
86CamaroDan
Engine/Drivetrain/Suspension Parts for Sale
2
09-29-2015 10:08 PM