Ryan's 1984 Z/28 Restoration/LSA Build: In Progress
 12-07-2022, 06:39 AM
#51
Junior Member
Thread Starter
Re: Ryan's 1984 Z/28 Restoration/LSA Build: In Progress
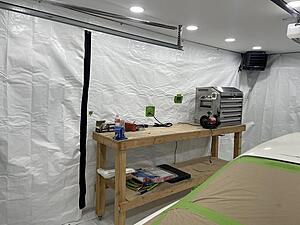
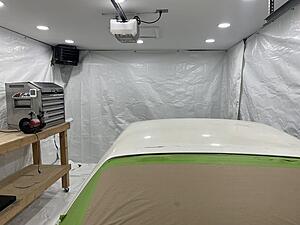
Started putting up my removable "paint booth". I still have to cut holes in two windows, one for the air intake and the other for the exhaust fan. Each window will have a filter as well. I took everything out the garage beside the workbench, I added casters so it can easily be pushed out. I should be able to remove/reinstall in about an hour which isn't to bad. Hoping to get the epoxy and 2K sprayed this weekend on the interior.


 12-13-2022, 05:58 AM
#52
Junior Member
Thread Starter
Re: Ryan's 1984 Z/28 Restoration/LSA Build: In Progress
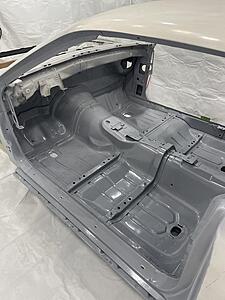
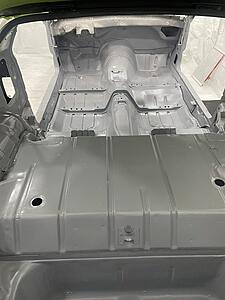
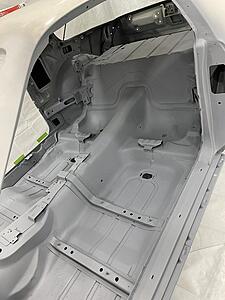
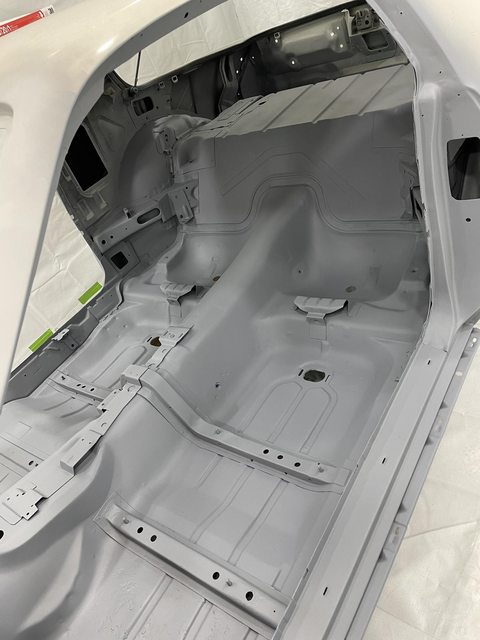
I had a chance to spray the epoxy this weekend on the interior. I came out pretty well, the only issue I ran into was that on part of the second coat (passenger side) did not lay as well as the rest and has a texture to it. I believe this was a rookie mistake on my part my not cleaning the gun between coats, live and learn. I am not to worried because this will all be covered by the RestoMod Air Membrane and carpet. If I can not level out the passenger side door jamb I will respray it when I do the engine bay. Next weekend I will be shooting the 2K primer.

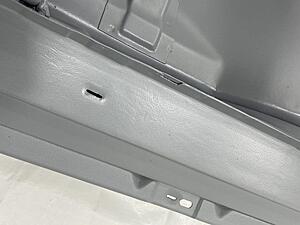
This is the texture I was referring to.


This is the texture I was referring to.
 12-21-2022, 05:54 AM
#53
Junior Member
Thread Starter
Re: Ryan's 1984 Z/28 Restoration/LSA Build: In Progress
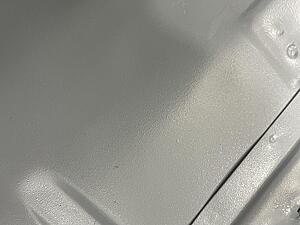
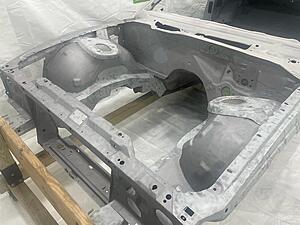
I had a productive few days. I was able to 2K prime the interior, however I made a rookie mistake using the same color for both epoxy and 2K primer but will be moving to black epoxy for all future areas. It shouldn't be a big deal since the only areas being finished sanded are the jambs and the rest will just be scuffed prior to basecoat.
I was also able to mock up the Restomod Air Haymaker-S. It was an extremely tight fit but fits absolutely perfectly. You can still utilize the under dash plastics and the whole unit is completely hidden. I decided to use steel brackets and mount it from the cowl rather then the firewall since it is much more sturdy. The defroster outlets on the unit might be a tight fit given the proximity of the cowl. If need be I should be able to add 1/2"-1" spacers to push the unit out to give more clearance. However, I will wait until final assembly for that since there may be slight variations with production unit.
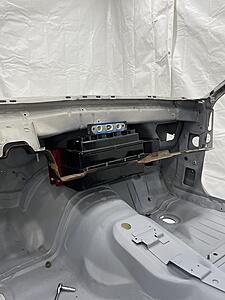
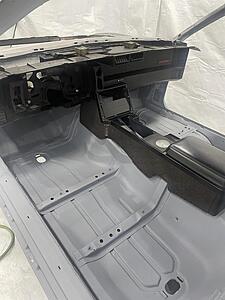
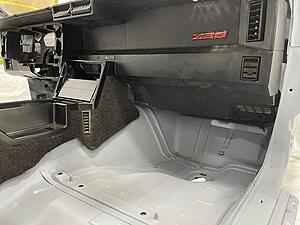
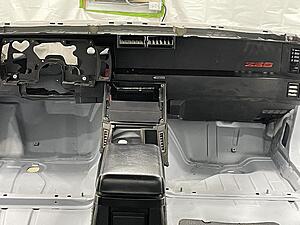
I was also able to mock up the Restomod Air Haymaker-S. It was an extremely tight fit but fits absolutely perfectly. You can still utilize the under dash plastics and the whole unit is completely hidden. I decided to use steel brackets and mount it from the cowl rather then the firewall since it is much more sturdy. The defroster outlets on the unit might be a tight fit given the proximity of the cowl. If need be I should be able to add 1/2"-1" spacers to push the unit out to give more clearance. However, I will wait until final assembly for that since there may be slight variations with production unit.


Last edited by Burton5251; 12-21-2022 at 05:58 AM.
The following 2 users liked this post by Burton5251:
3.1EyeCandy (12-21-2022), vorteciroc (12-22-2022)
12-22-2022, 05:19 PM
#54
Supporter/Moderator

iTrader: (7)
Join Date: Feb 2001
Location: Cincinnati, OH
Posts: 13,220
Likes: 0
Received 376 Likes
on
289 Posts
Car: '90 RS
Engine: 377 LSX
Transmission: Magnum T56
Re: Ryan's 1984 Z/28 Restoration/LSA Build: In Progress
I hate you...JK. I can't believe that system fits that well. My vintage air setup required beyond extensive dash mods. Major surgery. Will you be able to run air through all of the vents? The giant OEM plenums fit around that? Bravo to you sir. This is such a nice build.
The following users liked this post:
Burton5251 (12-23-2022)
12-22-2022, 05:53 PM
#55
Supreme Member
Join Date: Jul 2006
Location: 212 is up in this Bit@#
Posts: 2,762
Received 739 Likes
on
565 Posts
Car: Resto-Mod 1987 IROC-Z Clone
Engine: Alky fed L92 Vortec Twin-Turbo 6.8L
Transmission: My own built/ design 4L80M
Axle/Gears: Custom 12 bolt (4.10:1)
Re: Ryan's 1984 Z/28 Restoration/LSA Build: In Progress
^ What he said!!! 
I love it!
On almost all the Third-Gens that I do, I gut all the HVAC Components for a smooth Fire-Wall.
Most of the time... the ONLY way that I install an AC Compressor, is for a Refrigerant to Water Inter-Cooler.
That HVAC System looks to fit so well, that I would start putting actual AC back into these Cars
(And NOT just for an Inter-Cooler).
Keep up the great work!
You are inspiring me to actually work on my own Third-Gen (Which almost never happens, LOL)
The following users liked this post:
Burton5251 (12-23-2022)
12-23-2022, 05:45 AM
#56
Junior Member
Thread Starter
Re: Ryan's 1984 Z/28 Restoration/LSA Build: In Progress
I hate you...JK. I can't believe that system fits that well. My vintage air setup required beyond extensive dash mods. Major surgery. Will you be able to run air through all of the vents? The giant OEM plenums fit around that? Bravo to you sir. This is such a nice build.
Also as I am sure you know Vintage Air is coming out with a Sure Fit kit for the 3rd gen in the upcoming weeks that was just on display at SEMA. I am hoping they have adaptors made that do not utilize the large OEM plenum that I could just purchase separate from the kit so that I do not need to 3D print my own. I am sure this is wishful thinking but I am still holding on to hope, so we will see.
I wanted to get this mocked up in the very early stages as the hardest part is going to be sourcing adaptors or making them in my opinion. This way I have plenty of time to work that out because I think it is going to take time and/or a lot of attempts to get correct. Glad everyone is enjoying the build so far and can get some useful information for their own projects.
01-03-2023, 06:20 AM
#57
Junior Member
Thread Starter
Re: Ryan's 1984 Z/28 Restoration/LSA Build: In Progress
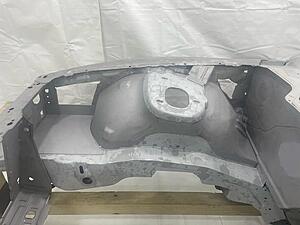
I took advantage of the random warm day here in PA yesterday and was able to blast the engine bay, hopefully I will have it in epoxy by next weekend.


 01-03-2023, 06:29 AM
#58
Junior Member
Thread Starter
Re: Ryan's 1984 Z/28 Restoration/LSA Build: In Progress
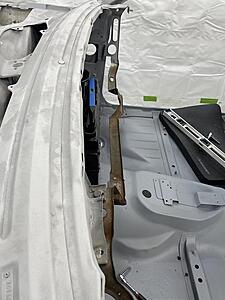
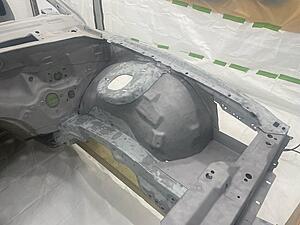
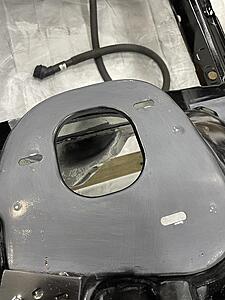
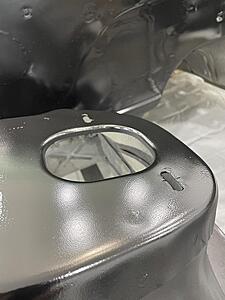
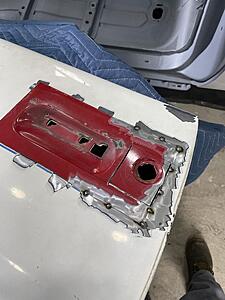
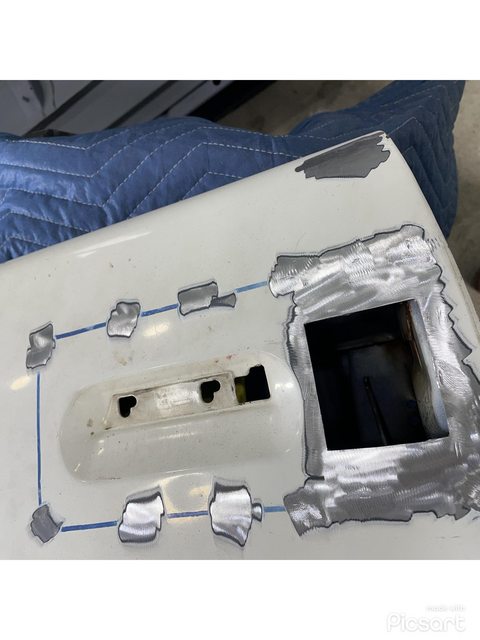
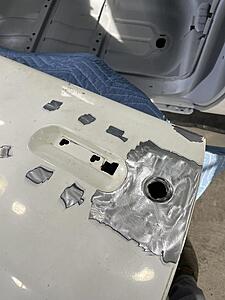
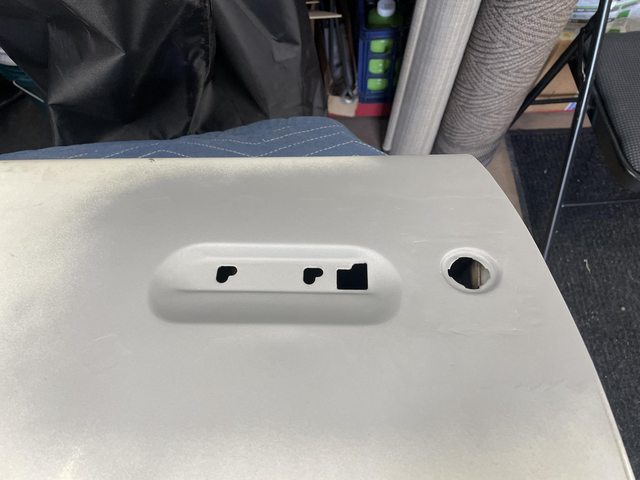
On another note, when I first cut my CMC hole I used the 3rd gen pedals and bought a cheap CMC from Amazon to get the location as close as possible. I recently purchased the CMC cut template from "3rd Gen Guy" and noticed that my location was a bit off. I then decided I would mock up the actual CMC I plan on using, which is the Tick so I went ahead and purchased that.
I have confirmed that for whatever reason my original mounting location is off, I figured I'd share my first mistake with everyone. Not sure how I went wrong exactly but you can see from the picture where it needs to be extended upwards and to the right and that is exactly what I was seeing with the cut template mock up. I am hoping once I make the modifications the face of the CMC will cover the now larger mounting hole. If not its back to welding in a patch I suppose....
I have confirmed that for whatever reason my original mounting location is off, I figured I'd share my first mistake with everyone. Not sure how I went wrong exactly but you can see from the picture where it needs to be extended upwards and to the right and that is exactly what I was seeing with the cut template mock up. I am hoping once I make the modifications the face of the CMC will cover the now larger mounting hole. If not its back to welding in a patch I suppose....
 01-10-2023, 06:14 AM
#59
Junior Member
Thread Starter
Re: Ryan's 1984 Z/28 Restoration/LSA Build: In Progress
I had a chance to epoxy the engine bay yesterday morning. Unfortunately it came out like absolute trash and will have to be redone. On the first coat of epoxy the gun started randomly shooting out "string" like specs. I should have stopped then and there. Coat 2 and 3 laid fine but the damage was done. The gun was cleaned prior to the first coat and the all the epoxy was mixed at once. Frustrating to say the least because I don't know what went wrong. I planning on doing some research so that I do not make the same mistake again.
*Note: After speaking with a few people that are professionals the consensus seems to be it is lint from wiping the sandblasted metal even though I used lint free wipes and it was not visual to my eye, live and learn. I am going to sand a test spot and respray and see how that turns out since I already have some epoxy mixed up.

*Note: After speaking with a few people that are professionals the consensus seems to be it is lint from wiping the sandblasted metal even though I used lint free wipes and it was not visual to my eye, live and learn. I am going to sand a test spot and respray and see how that turns out since I already have some epoxy mixed up.


Last edited by Burton5251; 01-10-2023 at 12:05 PM.
01-11-2023, 02:23 PM
#60
Junior Member
Thread Starter
Re: Ryan's 1984 Z/28 Restoration/LSA Build: In Progress
I am highly impressed with how easy the SPI epoxy is to sand. I prepped two spots where the lint was the worst and I am going to respray tonight as a test. If all goes according to plan I will sand the engine bay back down with 180 and respray this weekend.
 01-12-2023, 05:43 AM
#61
Junior Member
Thread Starter
Re: Ryan's 1984 Z/28 Restoration/LSA Build: In Progress
Turns out it was was lint. The test sections sprayed fine, now I just need to improve my technique to get less orange peel. Looks like I have a lot of sanding ahead of me this weekend....


The following users liked this post:
Burton5251 (01-16-2023)
02-07-2023, 02:15 PM
#63
Junior Member
Thread Starter
Re: Ryan's 1984 Z/28 Restoration/LSA Build: In Progress
My father is helping me with some of the epoxy/bodywork on the fenders and doors so I needed to get the fabrication completed on the driver's door where the F*ck face broke in and stole the car. I had a donor door to cut out the lock section which was extremely helpful. I am please with the outcome. I just threw come rattle can primer on the bare spots until the door gets completely taken down to metal and epoxied.

 02-07-2023, 03:06 PM
#64
Re: Ryan's 1984 Z/28 Restoration/LSA Build: In Progress
I had the same damage when they stole my 87. I opted to just replace the whole door.
For the firewall, I had something similar happen to me, I used to aggressive of a activator with a 2k paint and it cured in the gun mid spray on a 2nd coat of clear. Really messed up my paint job but it wasn't like yours. Yours is clearly lint from the rag you used. I try to use compressed air and run my hand over the panel/part with new rubber gloves to get any of the stuck fibers off the rough spots. I would also think that maybe a tac cloth would help get these up as well. Are you going to prime the inside of the door where you patched?
For the firewall, I had something similar happen to me, I used to aggressive of a activator with a 2k paint and it cured in the gun mid spray on a 2nd coat of clear. Really messed up my paint job but it wasn't like yours. Yours is clearly lint from the rag you used. I try to use compressed air and run my hand over the panel/part with new rubber gloves to get any of the stuck fibers off the rough spots. I would also think that maybe a tac cloth would help get these up as well. Are you going to prime the inside of the door where you patched?
02-07-2023, 03:27 PM
#65
Junior Member
Thread Starter
Re: Ryan's 1984 Z/28 Restoration/LSA Build: In Progress
I had the same damage when they stole my 87. I opted to just replace the whole door.
For the firewall, I had something similar happen to me, I used to aggressive of a activator with a 2k paint and it cured in the gun mid spray on a 2nd coat of clear. Really messed up my paint job but it wasn't like yours. Yours is clearly lint from the rag you used. I try to use compressed air and run my hand over the panel/part with new rubber gloves to get any of the stuck fibers off the rough spots. I would also think that maybe a tac cloth would help get these up as well. Are you going to prime the inside of the door where you patched?
For the firewall, I had something similar happen to me, I used to aggressive of a activator with a 2k paint and it cured in the gun mid spray on a 2nd coat of clear. Really messed up my paint job but it wasn't like yours. Yours is clearly lint from the rag you used. I try to use compressed air and run my hand over the panel/part with new rubber gloves to get any of the stuck fibers off the rough spots. I would also think that maybe a tac cloth would help get these up as well. Are you going to prime the inside of the door where you patched?
Last edited by Burton5251; 02-07-2023 at 03:44 PM.
02-26-2024, 06:58 AM
#66
Junior Member
Thread Starter
Re: Ryan's 1984 Z/28 Restoration/LSA Build: In Progress
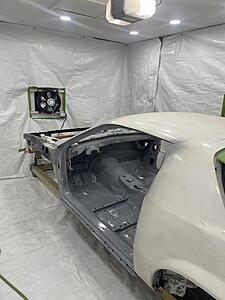
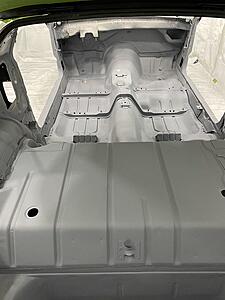
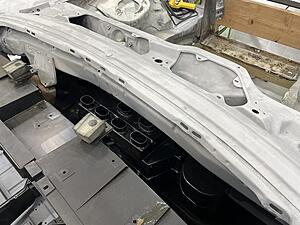
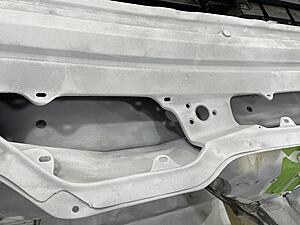
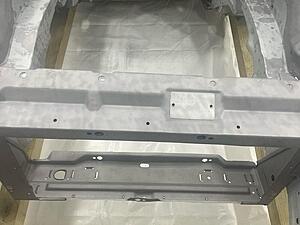
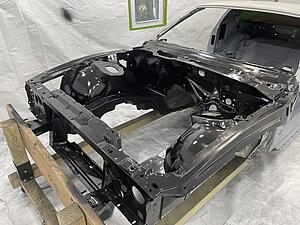
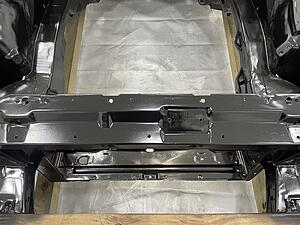
After getting wrapped up in another unexpected mini car restoration that took much longer then expected I am back to working on the Camaro. I decided since this is the only car I am restoring I don't want to have any regrets so I have decided to smooth the engine bay. I am first starting by stitch welding all the seams. I completed the inside frame rails and will also be completing the inside fender well sides, strut caps and firewall. I will also be removing the "humps" on the inside fender wells. I have also decided to pause on the body work and finish all of the fabrication then shoot another coat of epoxy and move on to the body work. A lot of the filler has not been sanded yet but I will address that before the epoxy. Here are a few shots of the frame rails.


03-04-2024, 05:50 AM
#67
Junior Member
Thread Starter
Re: Ryan's 1984 Z/28 Restoration/LSA Build: In Progress
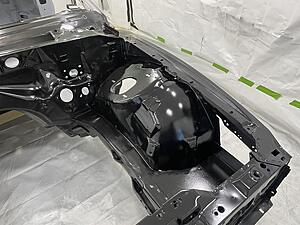
I was able to knock out the sides of the inner fenders wells this weekend. I opted to double stitch weld the seams and added a third pass on the ends of both seams so that I could tie the panel into the frame rail. I also finished the passenger strut cap brace and did one pass on the strut cap. It will need several more but hopefully I can finish that up next weekend.


03-11-2024, 05:34 AM
#68
Junior Member
Thread Starter
Re: Ryan's 1984 Z/28 Restoration/LSA Build: In Progress
Finished welding and blending the passenger strut cap seam.

03-20-2024, 05:25 AM
#69
Junior Member
Thread Starter
Re: Ryan's 1984 Z/28 Restoration/LSA Build: In Progress
Drivers side completed. Up next, firewall seam.

04-04-2024, 05:57 AM
#70
Junior Member
Thread Starter
Re: Ryan's 1984 Z/28 Restoration/LSA Build: In Progress
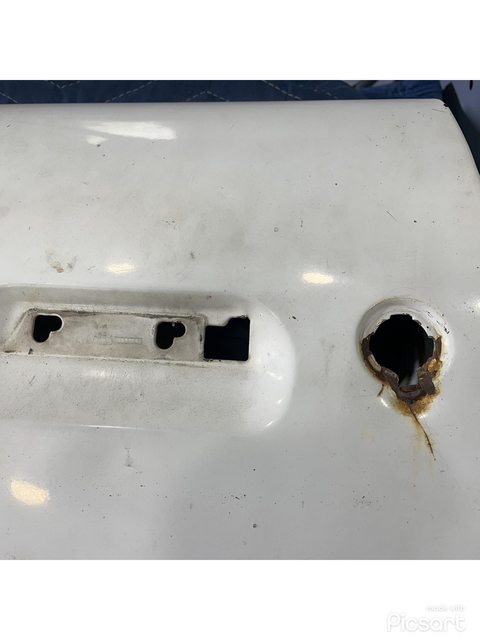
The fuel tank is prepped and ready to go, I just need to add a vent valve. I will be using an upgraded 5th gen ZL1 fuel pump module and PWM kit to control the pumps. This will allow me to run a return-less system eliminating the need for a fuel pump pressure regulator and return line eliminating clutter in the engine bay. Additionally, it will eliminate any fuel starvation issues on track that is sometimes observed with the typical fuel pump/hanger set-up in low fuel level conditions while utilizing OE components.


Last edited by Burton5251; 04-04-2024 at 08:52 AM.
04-22-2024, 05:22 AM
#71
Junior Member
Thread Starter
Re: Ryan's 1984 Z/28 Restoration/LSA Build: In Progress
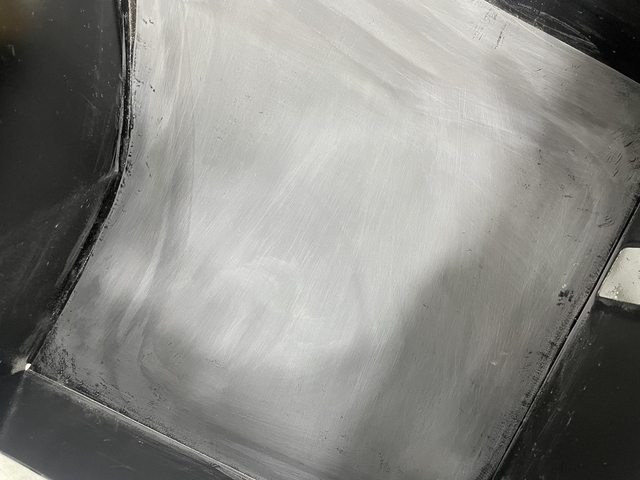
I was able to get the firewall seam stitch welded, I still need to grind down the welds. Not much but at least it progress.


04-22-2024, 03:43 PM
#72
Supreme Member
Join Date: Jul 2006
Location: 212 is up in this Bit@#
Posts: 2,762
Received 739 Likes
on
565 Posts
Car: Resto-Mod 1987 IROC-Z Clone
Engine: Alky fed L92 Vortec Twin-Turbo 6.8L
Transmission: My own built/ design 4L80M
Axle/Gears: Custom 12 bolt (4.10:1)
Re: Ryan's 1984 Z/28 Restoration/LSA Build: In Progress
I absolutely love to see the Engine Bay given this treatment!
I am rather Jealous as the Engine Bay, I am sure will look amazing.
Damn she is going to look great!!!
Where are you going to have an Electrical Connector Bulkhead?
I am rather Jealous
as the Engine Bay, I am sure will look amazing.Damn she is going to look great!!!
Where are you going to have an Electrical Connector Bulkhead?
The following users liked this post:
Burton5251 (04-23-2024)
04-22-2024, 03:57 PM
#73
Re: Ryan's 1984 Z/28 Restoration/LSA Build: In Progress
The fuel tank is prepped and ready to go, I just need to add a vent valve. I will be using an upgraded 5th gen ZL1 fuel pump module and PWM kit to control the pumps. This will allow me to run a return-less system eliminating the need for a fuel pump pressure regulator and return line eliminating clutter in the engine bay. Additionally, it will eliminate any fuel starvation issues on track that is sometimes observed with the typical fuel pump/hanger set-up in low fuel level conditions while utilizing OE components.
04-23-2024, 05:20 AM
#74
Junior Member
Thread Starter
Re: Ryan's 1984 Z/28 Restoration/LSA Build: In Progress
I am planning on running the engine harness into the cabin from the front of the trans tunnel that others have done. That way it is not visible and the harness enters the cabin right behind the radio. For the body harness I will be running it under the drivers side fender similar to the DSE car to keep it hidden. I still need to cut both holes to run the harnesses.
04-23-2024, 05:28 AM
#75
Junior Member
Thread Starter
Re: Ryan's 1984 Z/28 Restoration/LSA Build: In Progress
Yes, the gauges will read accurate/correct as the pump is set to the appropriate depth in the tank to function as it would in an OEM 5th gen tank. In my case I will be using the Dakota Digital gauges which have a setting preprogramed for the 40-250 ohm sending unit that is used in this pump. Alternatively, you could use the OEM gauge set and just use an aftermarket 90 ohm sending unit. There was a provision for that in the installation plate but I had it removed since I would not be using that.
Last edited by Burton5251; 04-23-2024 at 05:43 AM.
Yesterday, 05:58 AM
#76
Junior Member
Thread Starter
Re: Ryan's 1984 Z/28 Restoration/LSA Build: In Progress
I had to order more Roloc disks to blend the firewall seam so in the meantime I figured I would start removing the wheel well "humps". Shoutout to @92RS_Ttop on the write up and confirmation by @Tibo as their method worked great and was much easier then expected. Word of caution, like the firewall the metal is extremely thin and I had to go very slowly only completing 2-3 tacks at a time followed by cooling with compressed air.


Last edited by Burton5251; Yesterday at 06:02 AM.

Thread
Thread Starter
Forum
Replies
Last Post
easySPEEDcamaro
Third Gen Association of Ontario
11
03-03-2004 11:55 PM