My completed LS1/T56 swap... Money well spent! Lots of pics!
 10-16-2014, 07:03 PM
#1
Member

Thread Starter
iTrader: (2)
Join Date: Feb 2003
Location: ME
Posts: 219
Likes: 0
Received 0 Likes
on
0 Posts
Car: 1986 IROC-Z
Engine: LS1-ish
Transmission: T56 stage II
Axle/Gears: S60 4:10's
My completed LS1/T56 swap... Money well spent! Lots of pics!
Let's face it, all you really want to see is the pictures and videos right... But first I wanted to say I got a lot of inspiration from builds on here. And also thanks to the people who took the time to answer the few questions I had with this build.
Here's a quick rundown of my build... I took a ton of pics along the way I'll be posting up. I'll post a few up for now, but plan to post a bunch more and separate them into their own sections. It was a 1986 IROC-Z 305TPI/700R4. I've owned it for around 18 years, 2nd owner. Car has around 85k miles on it, pretty good shape for the year, with original paint, and pretty much everything is original on the body. Not perfect, but not too bad. Torn down almost to a bare shell and fixed lots of little things along the way. I took a lot of time to keep this as stock/clean looking as possible with as little money as necessary. I spent some time on the wiring trying to figure out how to hide it as best as I could, even mounted the computer in the factory location after modifying the old bracket. I went way over budget, but who doesn't. It's fun as hell to drive and this thing sounds angry so it's worth every penny! Driven over 400 miles in the last 5 days, which is more than I have in the last 5-6 years. So now that the Rear end is broken in, trans is broken in... it's time to let it eat!
LS1/T56 out of an '02 SS. I left the bottom end alone and I would have left the trans alone but when I went to install it in the car I found I had a broken key, so I rebuilt it. Everything else is either new, slightly used, or rebuilt. Most everything was cleaned and painted. I have more to do over the winter but waited because I just wanted to drive this for a month or so before snow flies. I'm sure I've forgotten some stuff but oh well most of you have been through this so you get the point. Enjoy!
I'll start with a video right after I built the exhaust... or lack there of! The mic on the camera doesn't really do it justice... It's loud!

Some pics from along the way... more to come!
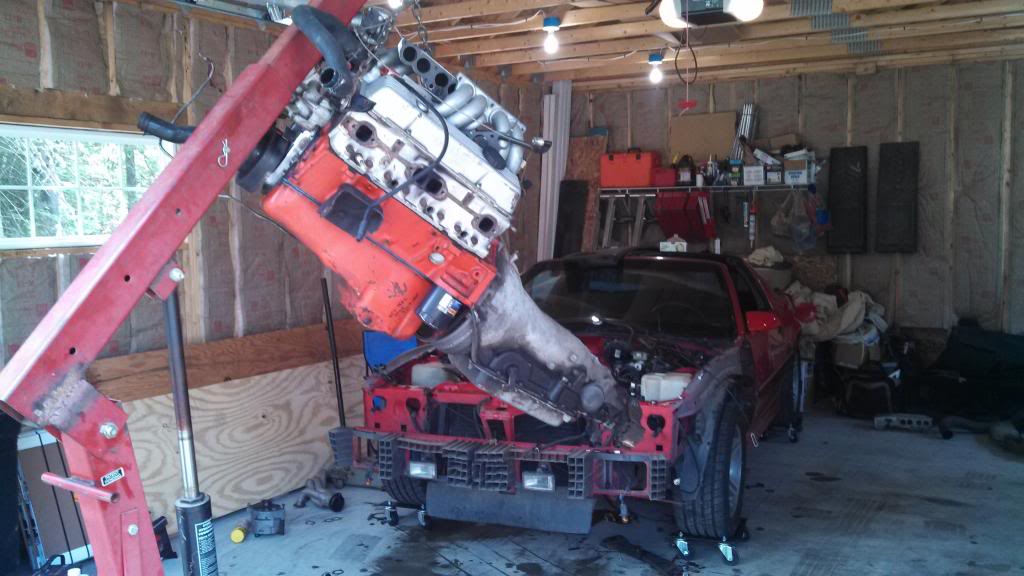
Out with the 305!
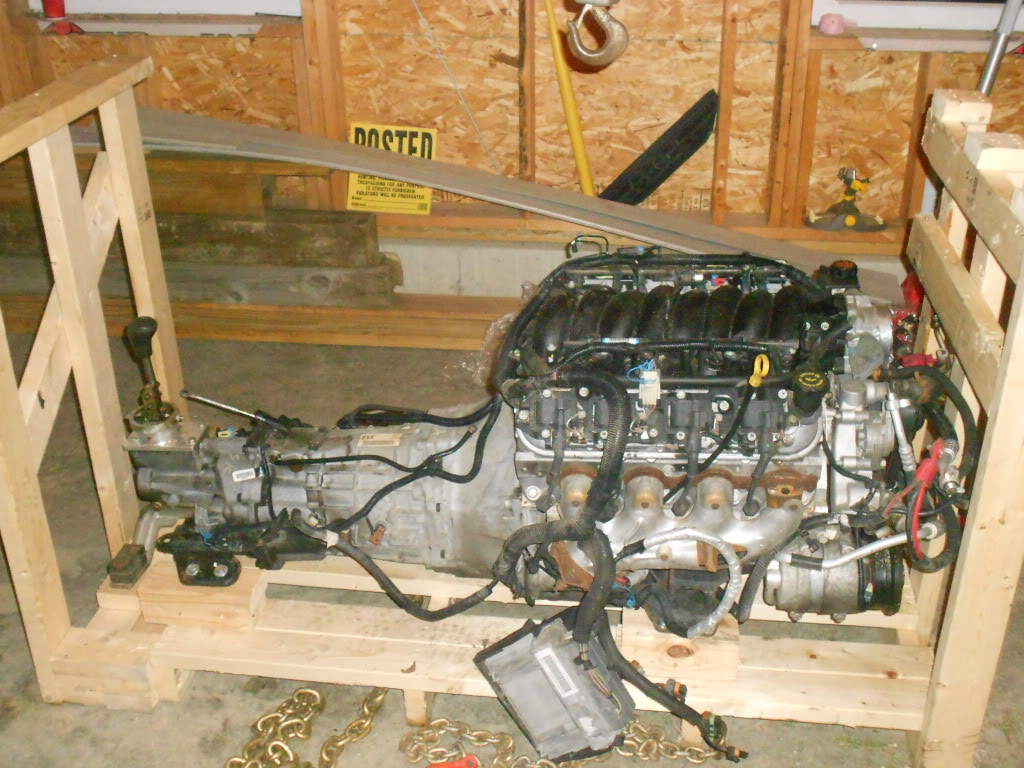
Dropout as it arrived
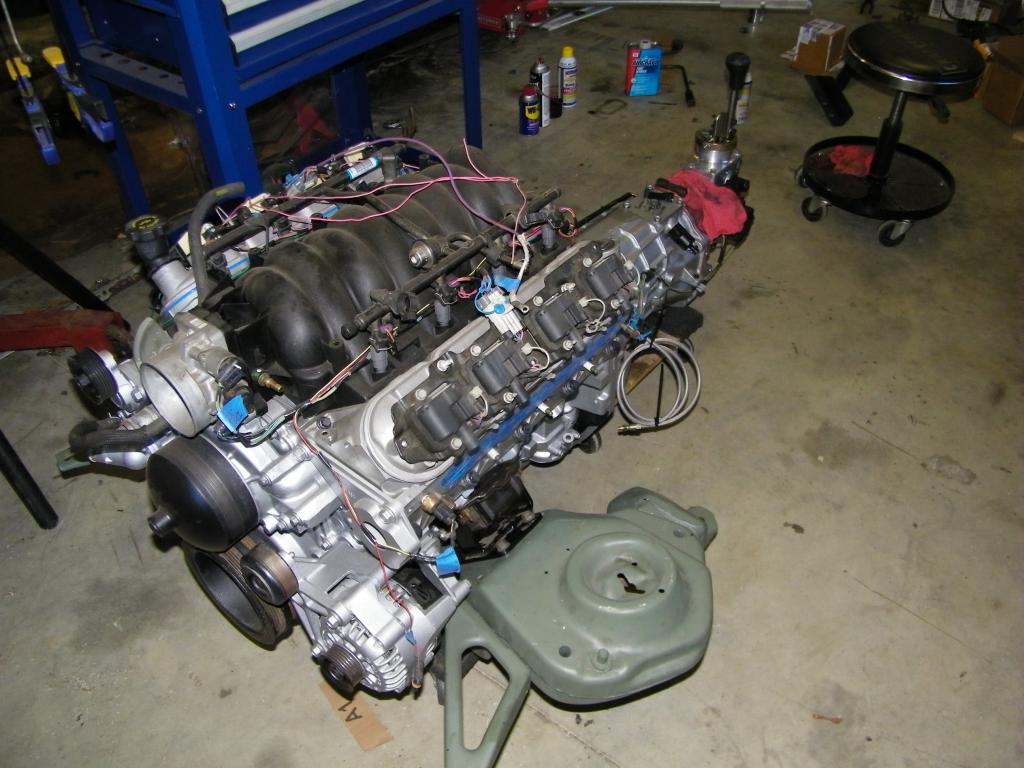
All cleaned up
Wiring...Uggh

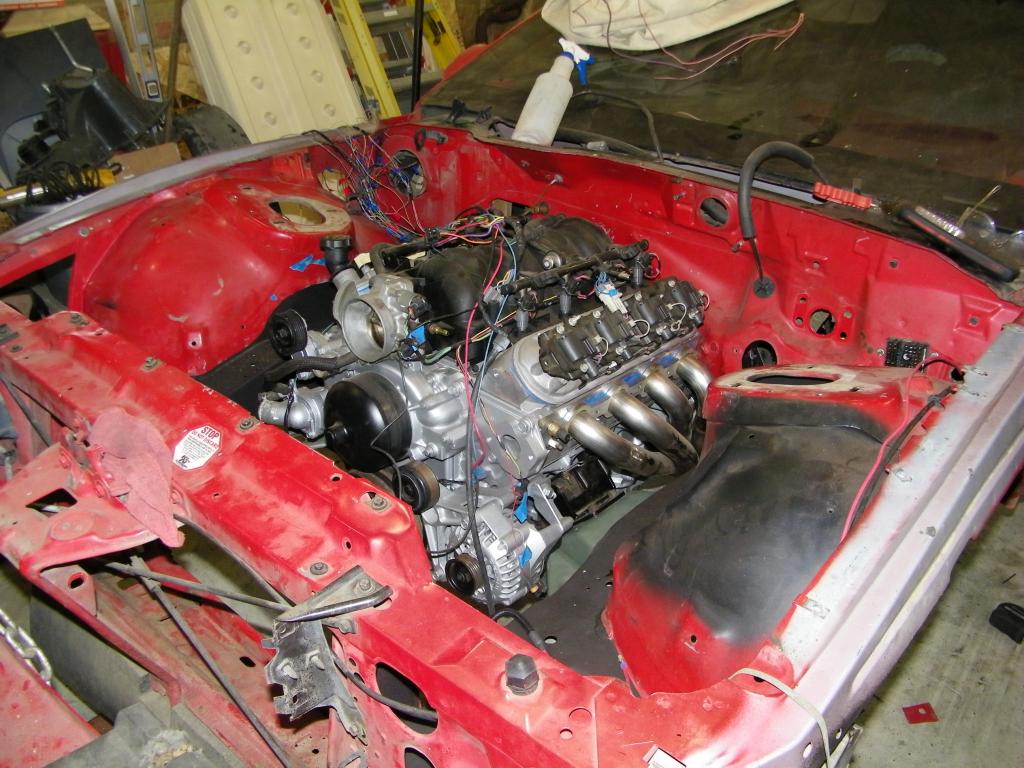
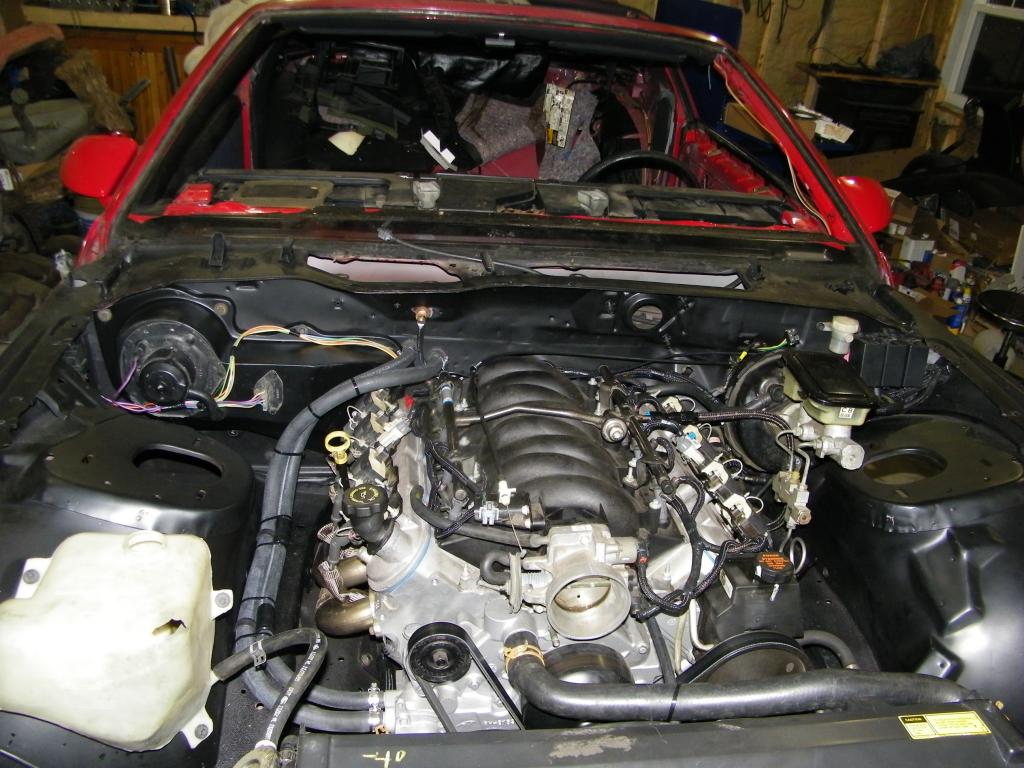
Test Fit
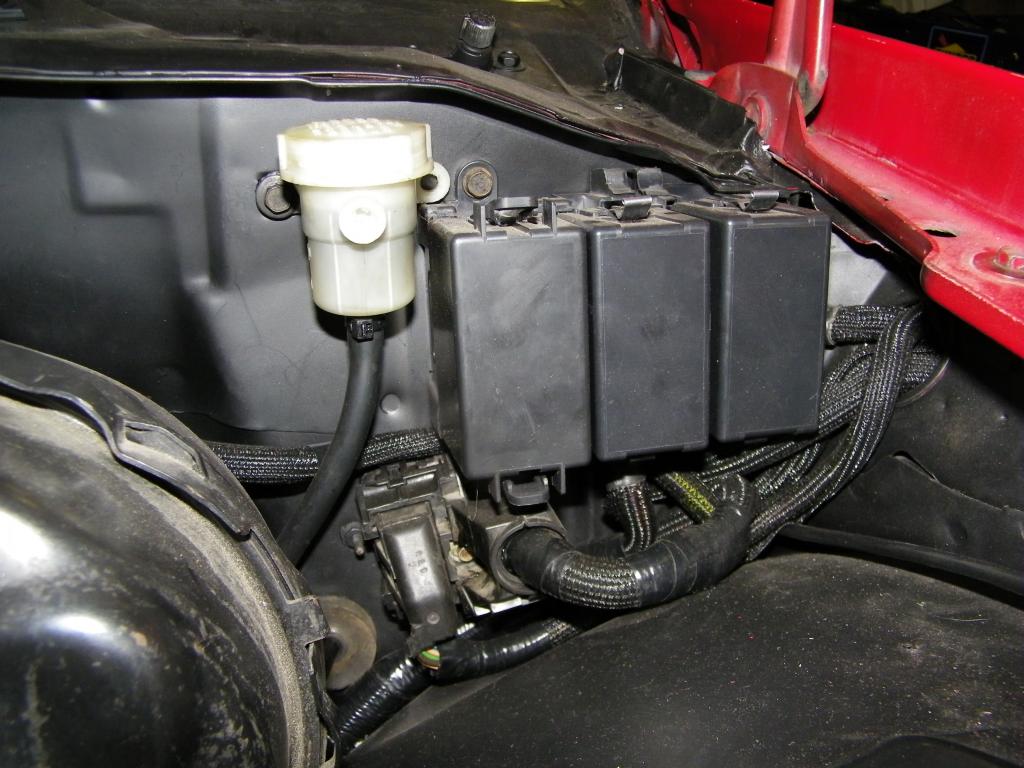
mounted in ***ignore the overflow... it was only in there until the new one arrived lol
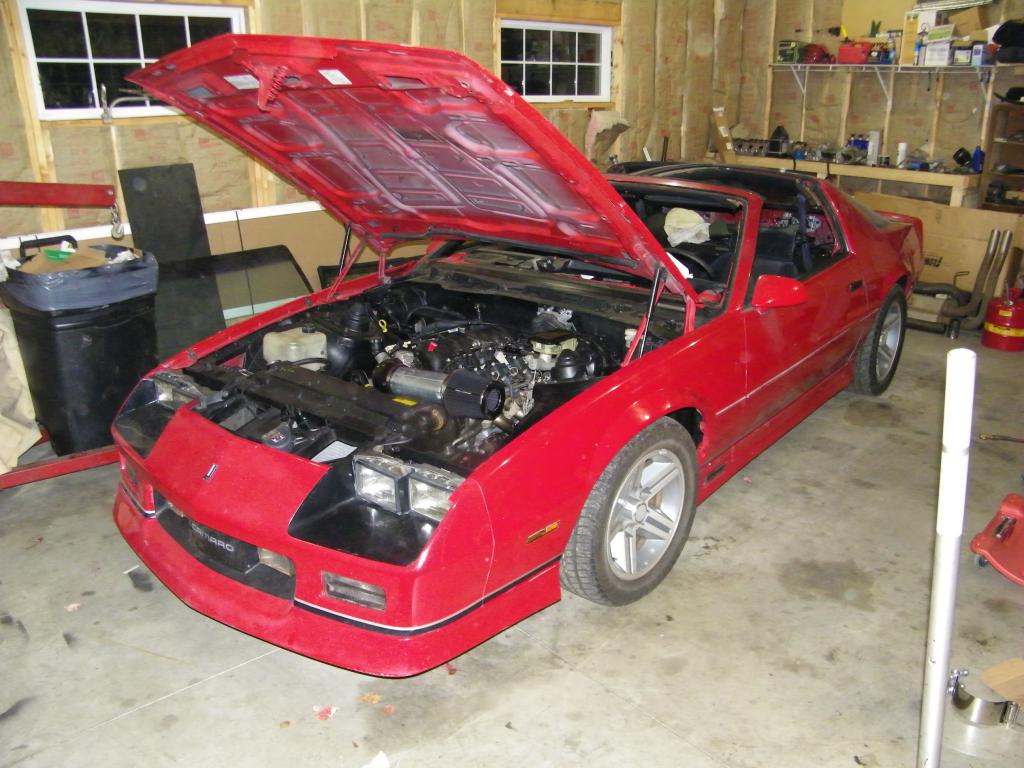
Front end back together... Air filter setup is temp for now. Doing CAI over the winter
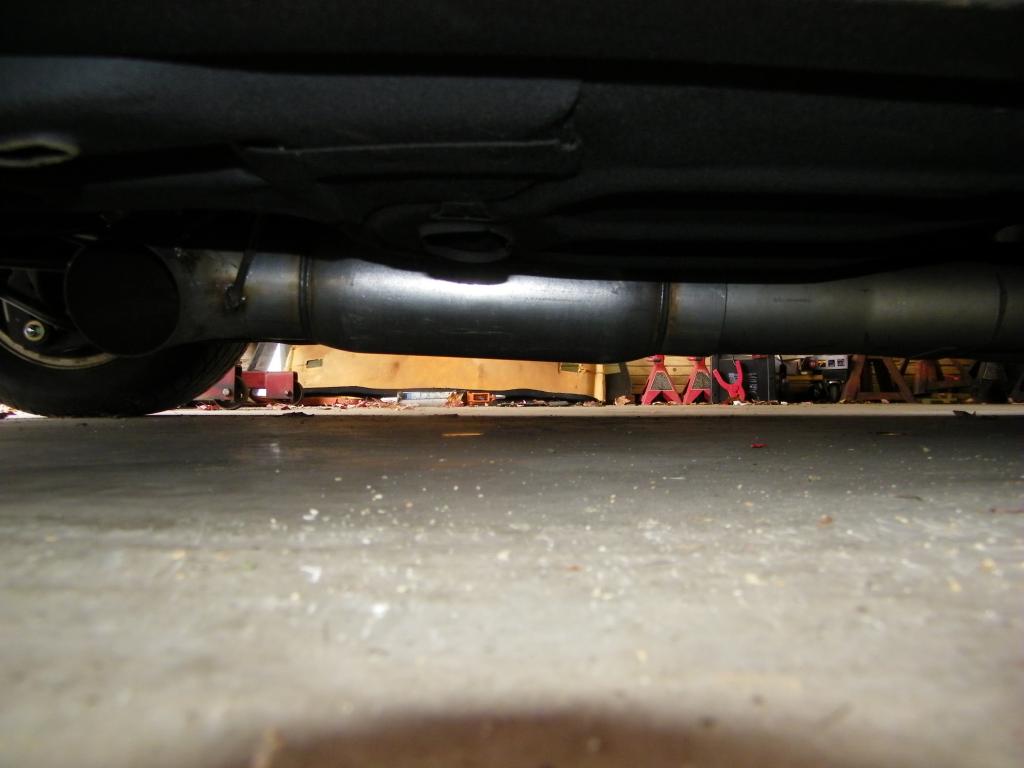
3" y pipe into flowmaster merge 4" out w/ Dynomax 4" bullett then dumped
Here's a quick rundown of my build... I took a ton of pics along the way I'll be posting up. I'll post a few up for now, but plan to post a bunch more and separate them into their own sections. It was a 1986 IROC-Z 305TPI/700R4. I've owned it for around 18 years, 2nd owner. Car has around 85k miles on it, pretty good shape for the year, with original paint, and pretty much everything is original on the body. Not perfect, but not too bad. Torn down almost to a bare shell and fixed lots of little things along the way. I took a lot of time to keep this as stock/clean looking as possible with as little money as necessary. I spent some time on the wiring trying to figure out how to hide it as best as I could, even mounted the computer in the factory location after modifying the old bracket. I went way over budget, but who doesn't. It's fun as hell to drive and this thing sounds angry so it's worth every penny! Driven over 400 miles in the last 5 days, which is more than I have in the last 5-6 years. So now that the Rear end is broken in, trans is broken in... it's time to let it eat!
LS1/T56 out of an '02 SS. I left the bottom end alone and I would have left the trans alone but when I went to install it in the car I found I had a broken key, so I rebuilt it. Everything else is either new, slightly used, or rebuilt. Most everything was cleaned and painted. I have more to do over the winter but waited because I just wanted to drive this for a month or so before snow flies. I'm sure I've forgotten some stuff but oh well most of you have been through this so you get the point. Enjoy!
- Stock short block
- Melling High volume oil pump
- Cloyes adjustable timing set
- 230/238 cam 600 lift 112 LSA
- LS6 valley cover
- hand ported 243's w/ PAC 1518 springs
- ARP head bolts
- trunion upgrade
- hardened pushrods
- stock LS6 intake and TB
- Hawks SW 1 3/4 headers
- custom exhaust dumped before the axle
- T56 w/ Stage 2 kit
- Modified tailhousing for mechanical speedo
- Mcleod RXT twin disk
- Pro 5.0 shifter
- Tick speedbleeder
- 3rd gen radiator and shroud
- 4th gen fans with custom bracket
- Strange S60 w/ 4:10 gears
- LS1 rear brakes
- Strange Chrome-moly driveshaft w/ 1350 U joints
- 4th gen fuel tank with complete braided hoses
- Racetronix hotwire kit
- custom fuse block/power distribution center
- all wiring loomed in Techflex F6
- Fiberglass non-ac box
I'll start with a video right after I built the exhaust... or lack there of! The mic on the camera doesn't really do it justice... It's loud!
Some pics from along the way... more to come!
Out with the 305!

Dropout as it arrived

All cleaned up

Wiring...Uggh

Test Fit

mounted in ***ignore the overflow... it was only in there until the new one arrived lol

Front end back together... Air filter setup is temp for now. Doing CAI over the winter

3" y pipe into flowmaster merge 4" out w/ Dynomax 4" bullett then dumped

Last edited by coptzer; 10-17-2014 at 06:44 PM.
 10-16-2014, 07:33 PM
#2
Member
Join Date: Oct 2007
Location: Vancouver, B.C.
Posts: 155
Likes: 0
Received 0 Likes
on
0 Posts
Car: 85 Camaro Z28
Engine: 6.0L LS
Transmission: T56 Magnum
Axle/Gears: 3.23
Re: Nothing too special... but Money well spent!
Where did you end up mounting your PCM.... Im not seeing many wires =S
10-16-2014, 11:19 PM
#3
Member
Thread Starter
iTrader: (2)
Join Date: Feb 2003
Location: ME
Posts: 219
Likes: 0
Received 0 Likes
on
0 Posts
Car: 1986 IROC-Z
Engine: LS1-ish
Transmission: T56 stage II
Axle/Gears: S60 4:10's
Re: Nothing too special... but Money well spent!

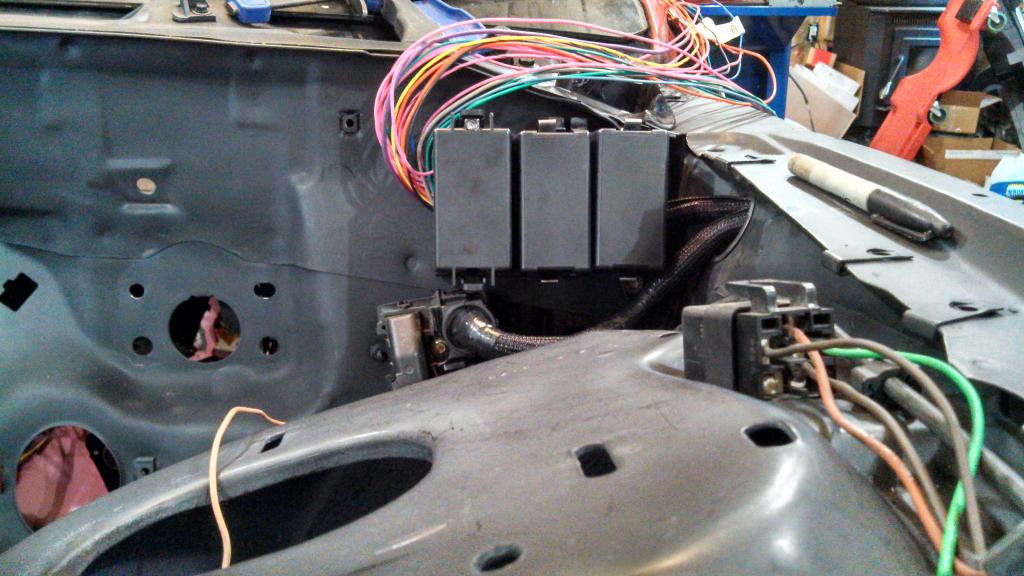
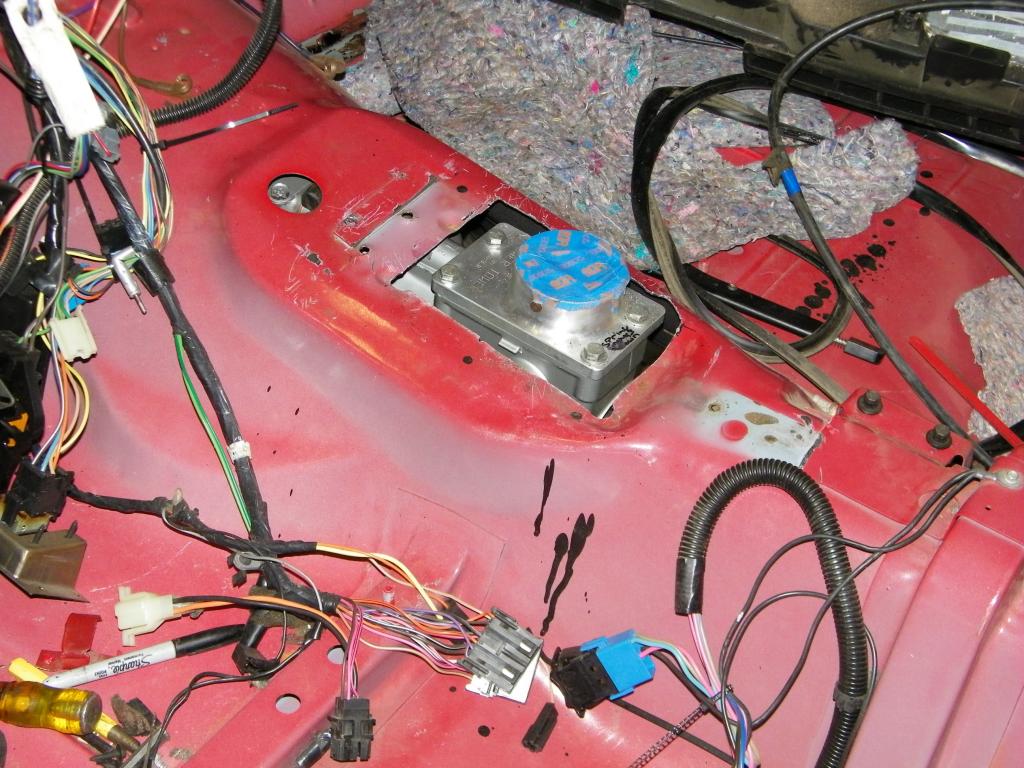
I know a lot of people go in just under the heater box, but here is where I put it through the firewall. Fits in nicely behind the HVAC stuff, and no exposed wiring at all in the car.

The computer is mounted in the factory location with a modified factory bracket. Here it is looking from under the dash. It's like it was meant to be there.

Here is the bracket I made. Works perfect, tucks up in just like factory w/ plenty of room. Mounts into the speaker like stock.

Last edited by coptzer; 10-17-2014 at 08:33 AM.
 10-17-2014, 07:54 AM
#5
Member
Thread Starter
iTrader: (2)
Join Date: Feb 2003
Location: ME
Posts: 219
Likes: 0
Received 0 Likes
on
0 Posts
Car: 1986 IROC-Z
Engine: LS1-ish
Transmission: T56 stage II
Axle/Gears: S60 4:10's
Re: My completed LS1/T56 swap... Money well spent! Lots of pics!
OK... time to bore you with pictures! I'm going to try and breakdown certain areas of the swap and show lots of pics hoping that someone may find it useful in the future. I got a lot of information from here while doing my swap, but there where certain ways I did things which I hadn't seen done before. It's going to take me some time to dig through all my pictures, but I'll start with this...
10-17-2014, 07:56 AM
#6
Member
Thread Starter
iTrader: (2)
Join Date: Feb 2003
Location: ME
Posts: 219
Likes: 0
Received 0 Likes
on
0 Posts
Car: 1986 IROC-Z
Engine: LS1-ish
Transmission: T56 stage II
Axle/Gears: S60 4:10's
Re: My completed LS1/T56 swap... Money well spent! Lots of pics!
Main Power Distribution Panel
I did not want to run the power wiring down to the starter and I wanted to get rid of the fusible links. I made a bracket and mounted this modular system behind the drivers side headlight. (I ran out of satin paint in the middle of putting it together and all I had was gloss, which I hate... oh well) It tucks in nicely and leaves enough room for me to do a CAI and put my air filter under the tray. It is fed by the 4th gen battery cable and distributes power to the standalone fuse/relay block, all the main power wires coming from the C100, and my Racetronix kit. It is expandable as well for future use.
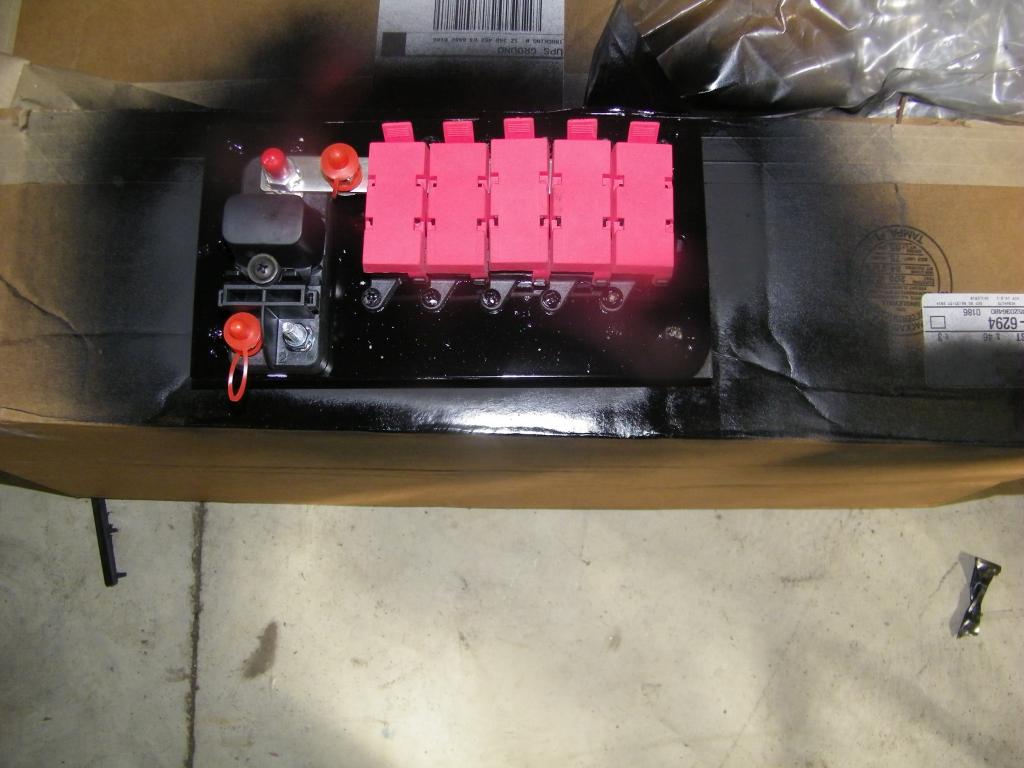
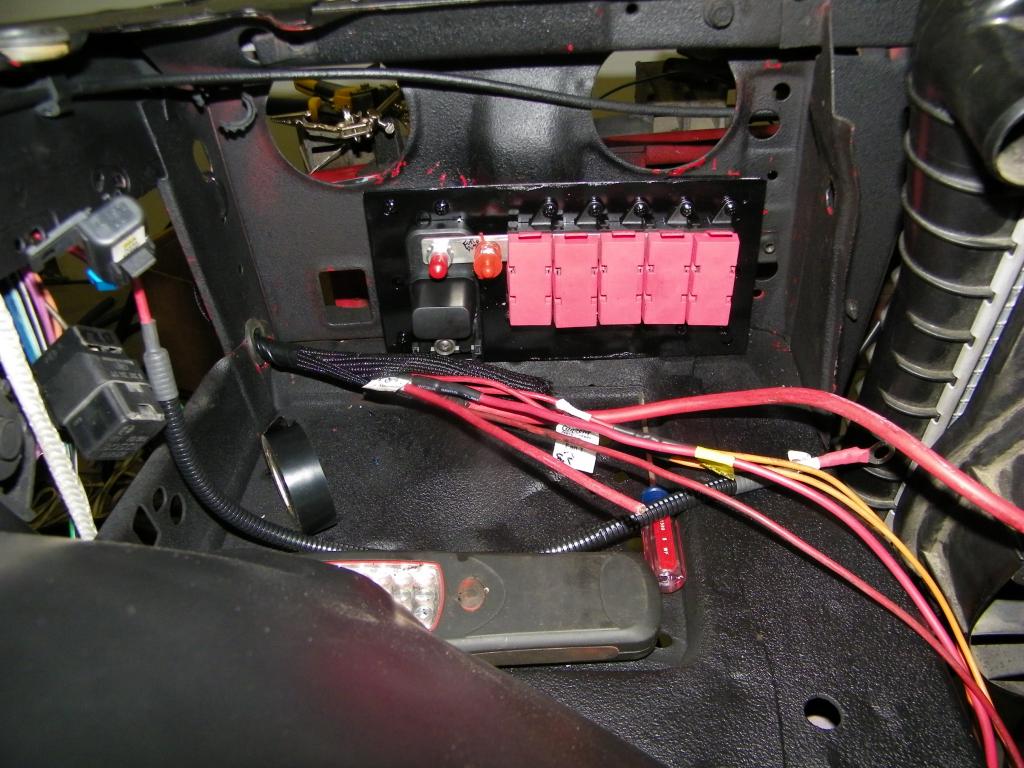
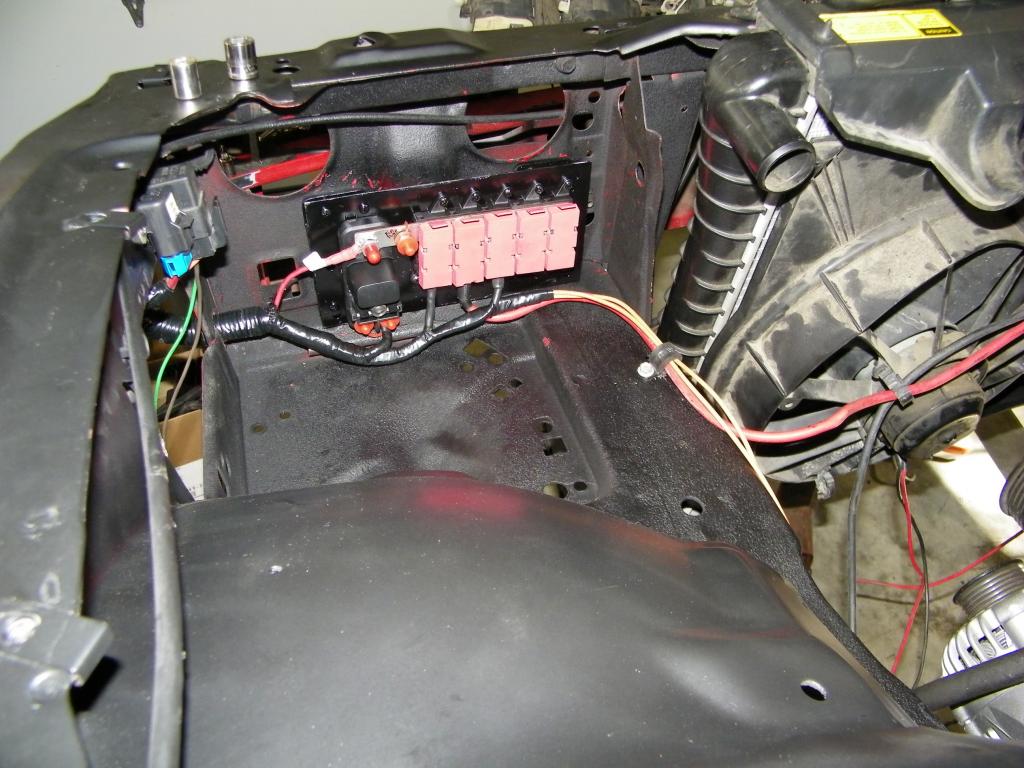
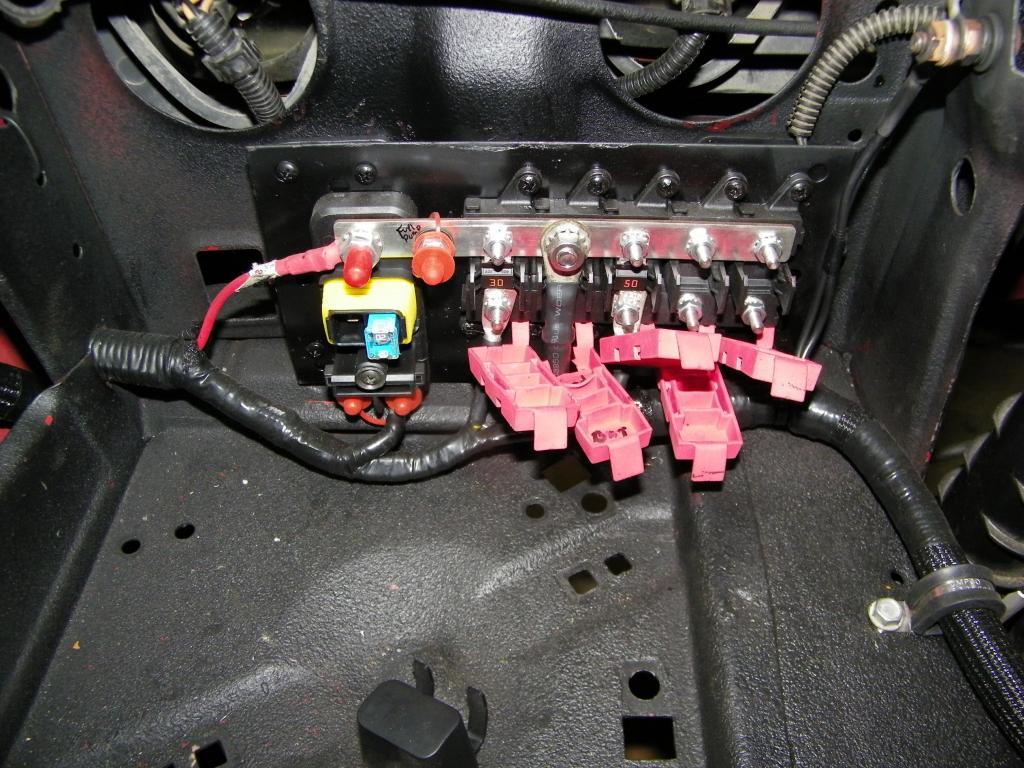
Fuse & Relay center for Engine and trans
I am not using this to it's full potential as of yet, and probably most would consider this overkill, but this houses all the engine/trans fuses and relays. I was going to just put in a few relays, and fuse stuff off the factory fuse block, but in the end I decided to go with this. I've seen one other person use this as well.
I did not want to run the power wiring down to the starter and I wanted to get rid of the fusible links. I made a bracket and mounted this modular system behind the drivers side headlight. (I ran out of satin paint in the middle of putting it together and all I had was gloss, which I hate... oh well) It tucks in nicely and leaves enough room for me to do a CAI and put my air filter under the tray. It is fed by the 4th gen battery cable and distributes power to the standalone fuse/relay block, all the main power wires coming from the C100, and my Racetronix kit. It is expandable as well for future use.


Fuse & Relay center for Engine and trans
I am not using this to it's full potential as of yet, and probably most would consider this overkill, but this houses all the engine/trans fuses and relays. I was going to just put in a few relays, and fuse stuff off the factory fuse block, but in the end I decided to go with this. I've seen one other person use this as well.


Last edited by coptzer; 10-17-2014 at 08:25 AM.
10-17-2014, 09:43 AM
#7
Supreme Member
iTrader: (12)
Join Date: Aug 2005
Location: M.D
Posts: 1,923
Likes: 0
Received 2 Likes
on
1 Post
Car: 1987 Camaro
Engine: 350 hsr
Transmission: 700R4(blown)
Axle/Gears: 3:73
Re: My completed LS1/T56 swap... Money well spent! Lots of pics!
It looks great!
If I may ask how much did the whole swap run you?
When you cleaned up the T-56 how did you?
what are your plans for the Interior?
If I may ask how much did the whole swap run you?
When you cleaned up the T-56 how did you?
what are your plans for the Interior?
Trending Topics
10-17-2014, 06:18 PM
#8
Member
Thread Starter
iTrader: (2)
Join Date: Feb 2003
Location: ME
Posts: 219
Likes: 0
Received 0 Likes
on
0 Posts
Car: 1986 IROC-Z
Engine: LS1-ish
Transmission: T56 stage II
Axle/Gears: S60 4:10's
Re: My completed LS1/T56 swap... Money well spent! Lots of pics!
As far as the T56, if you mean cleaning up the outside, I wire wheeled/wire brushed it, cleaned it with brake cleaner, and painted it with Duplicolor Cast aluminum high temp engine enamel.
The interior doesn't need too much work. I'll work on it some over the winter. Headliner needs to be redone, steering wheel re-wrapped, maybe a new carpet, few odds and ends, etc... But for the most part it will stay looking stock. I might add some sound proofing as well.
Last edited by coptzer; 10-17-2014 at 06:47 PM.
10-18-2014, 08:42 AM
#9
Member
Thread Starter
iTrader: (2)
Join Date: Feb 2003
Location: ME
Posts: 219
Likes: 0
Received 0 Likes
on
0 Posts
Car: 1986 IROC-Z
Engine: LS1-ish
Transmission: T56 stage II
Axle/Gears: S60 4:10's
Re: My completed LS1/T56 swap... Money well spent! Lots of pics!
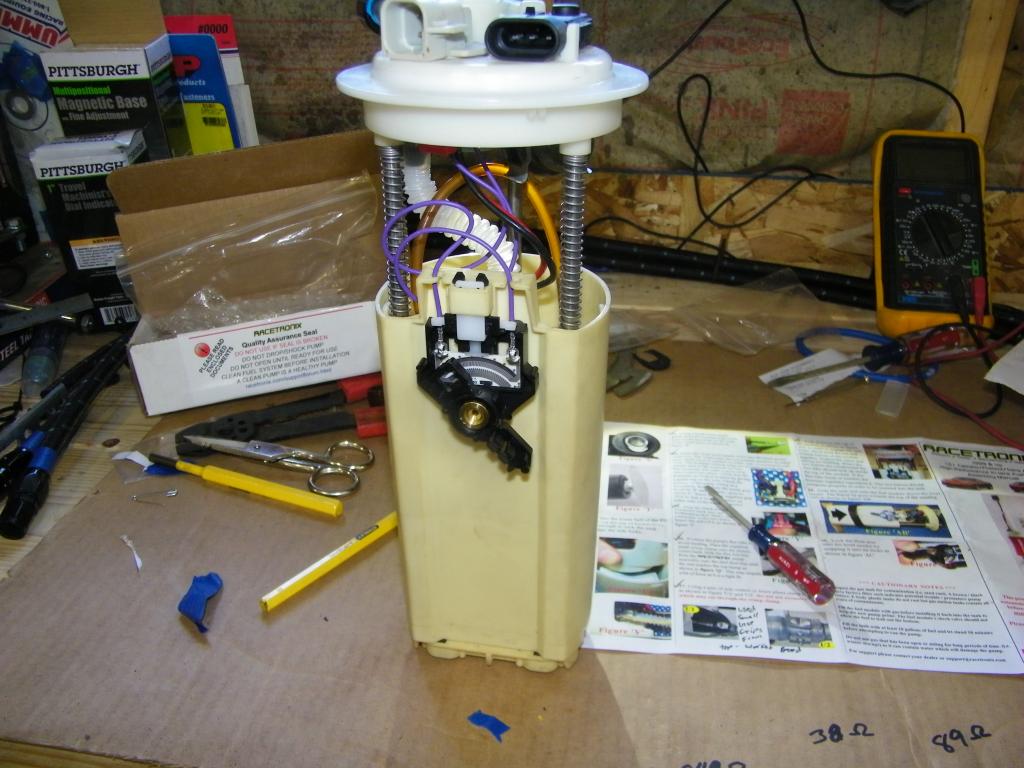
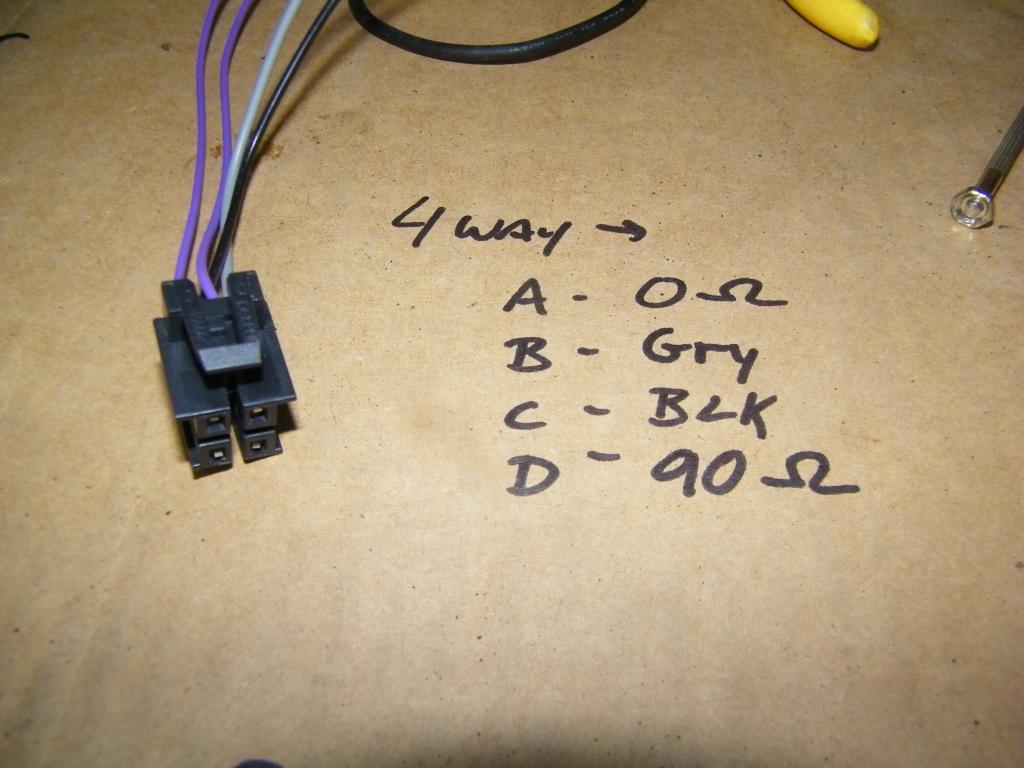
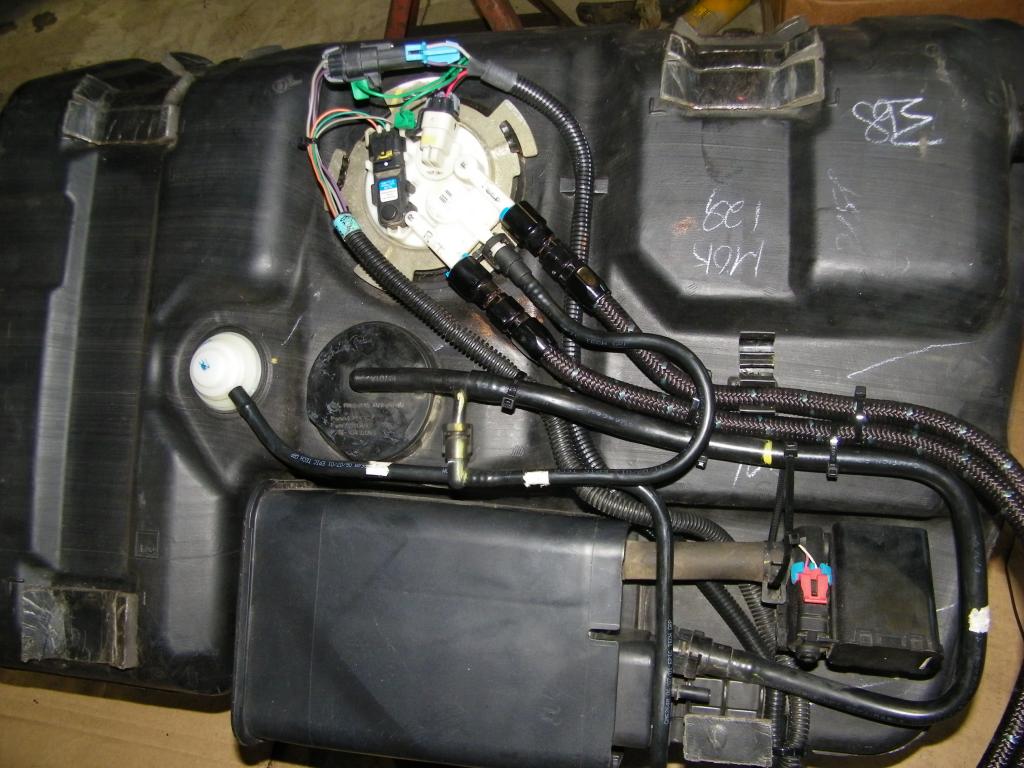
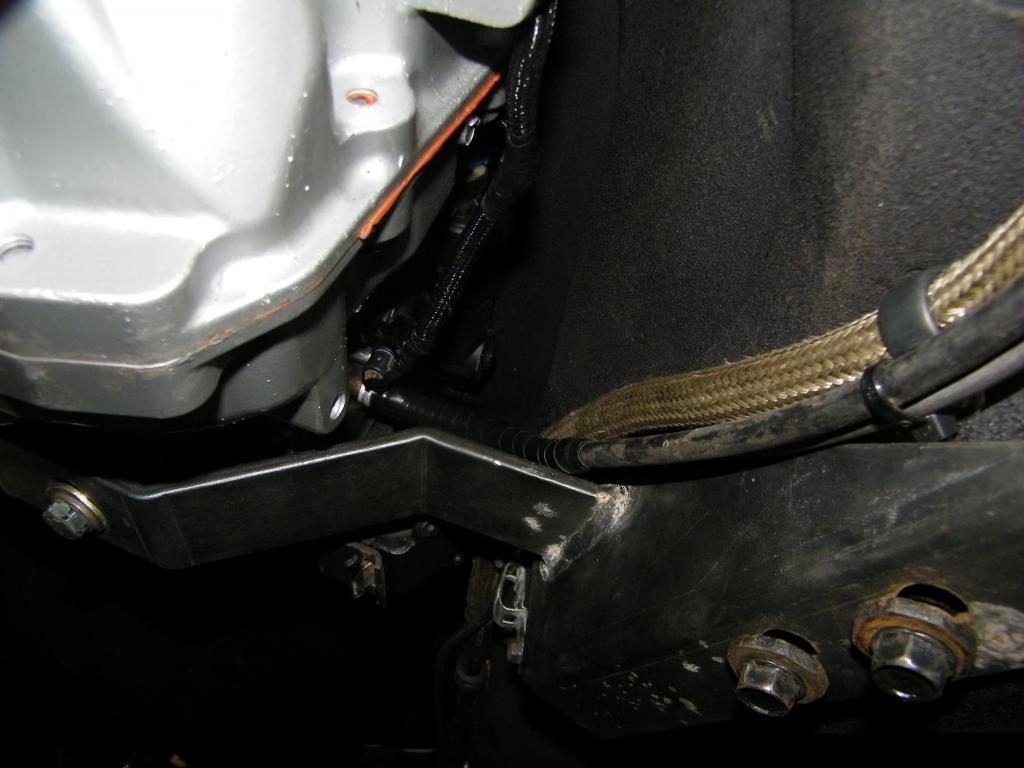
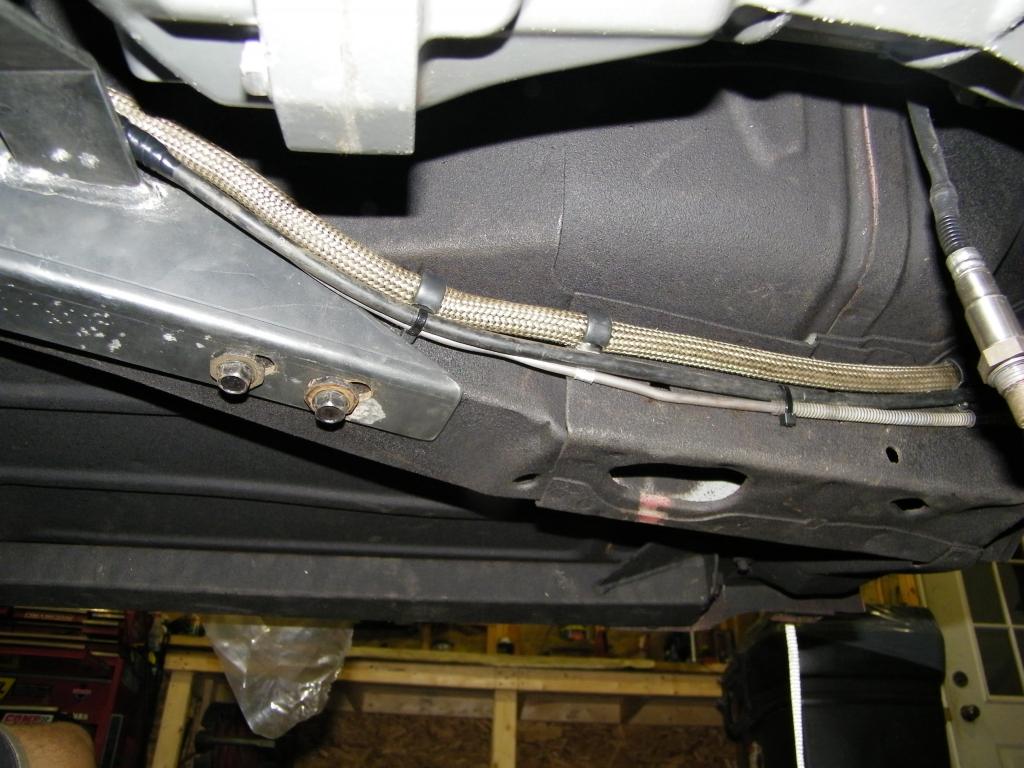
4th Gen fuel tank w/ Racetronix hotwire kit.
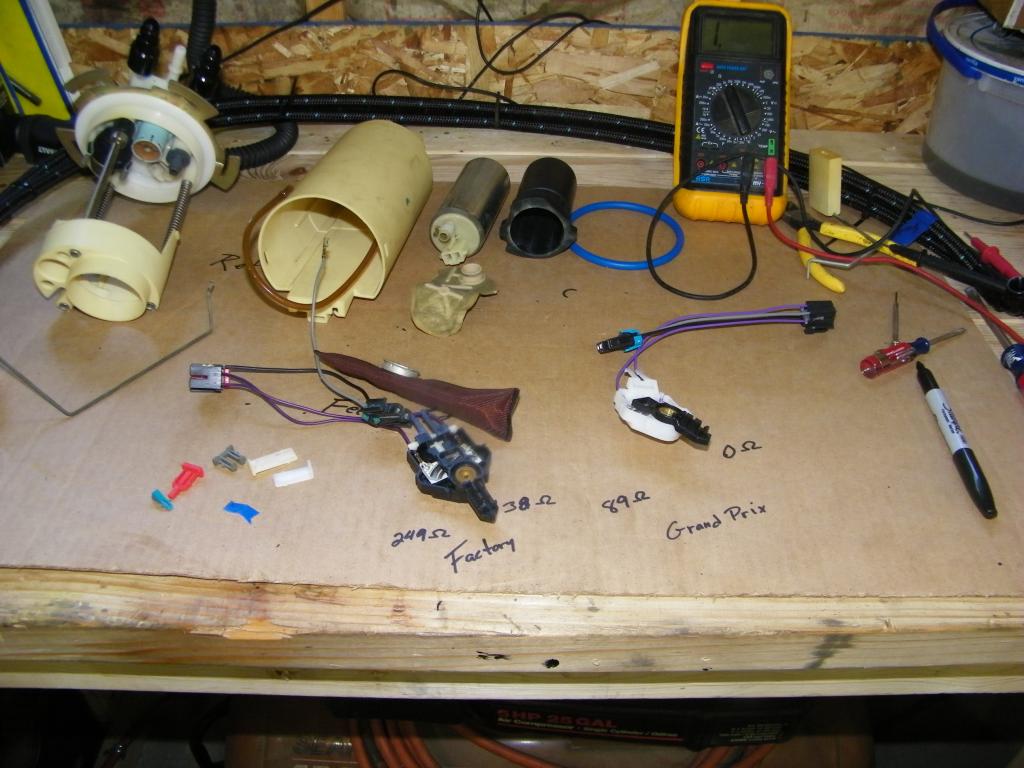
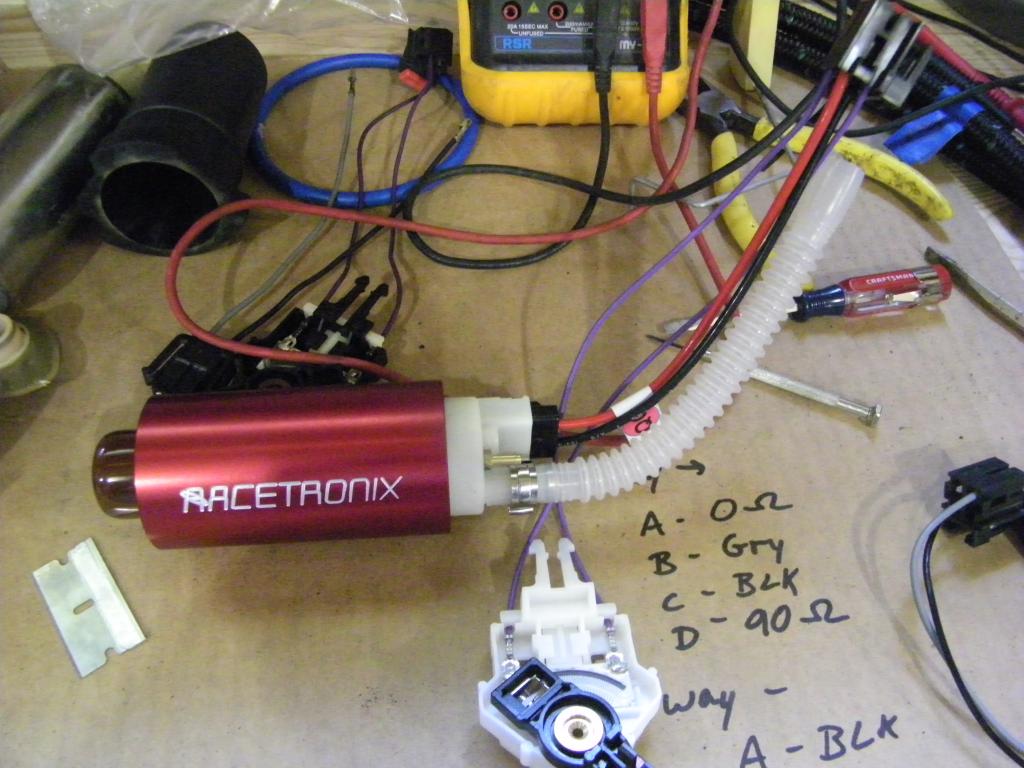
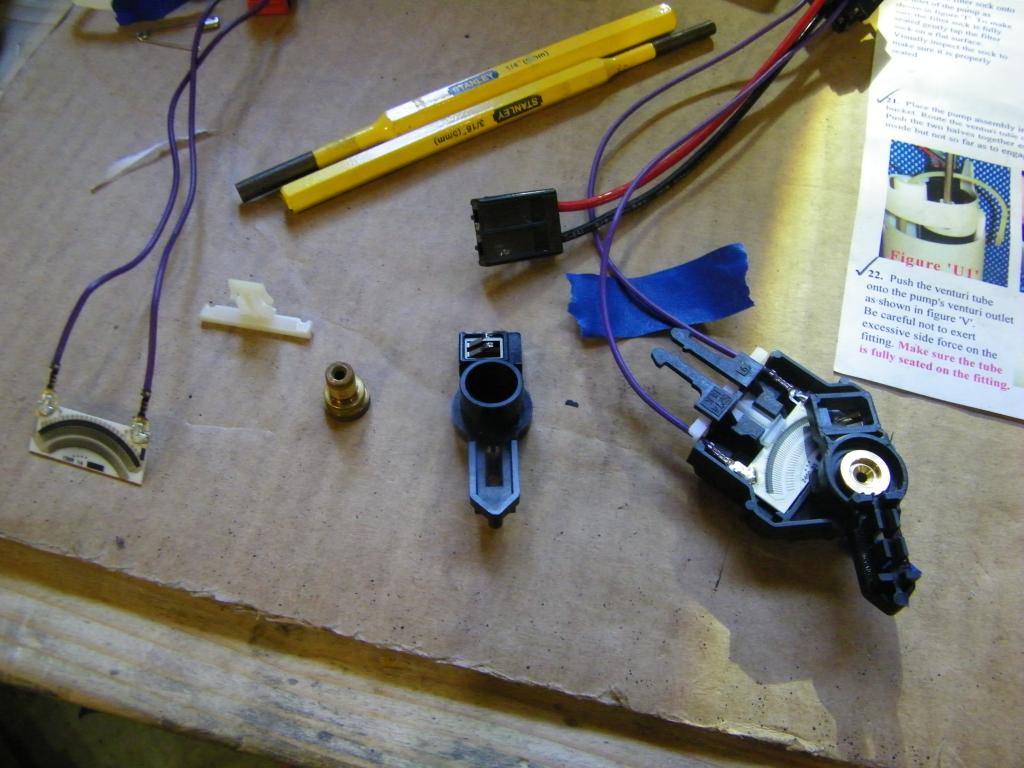
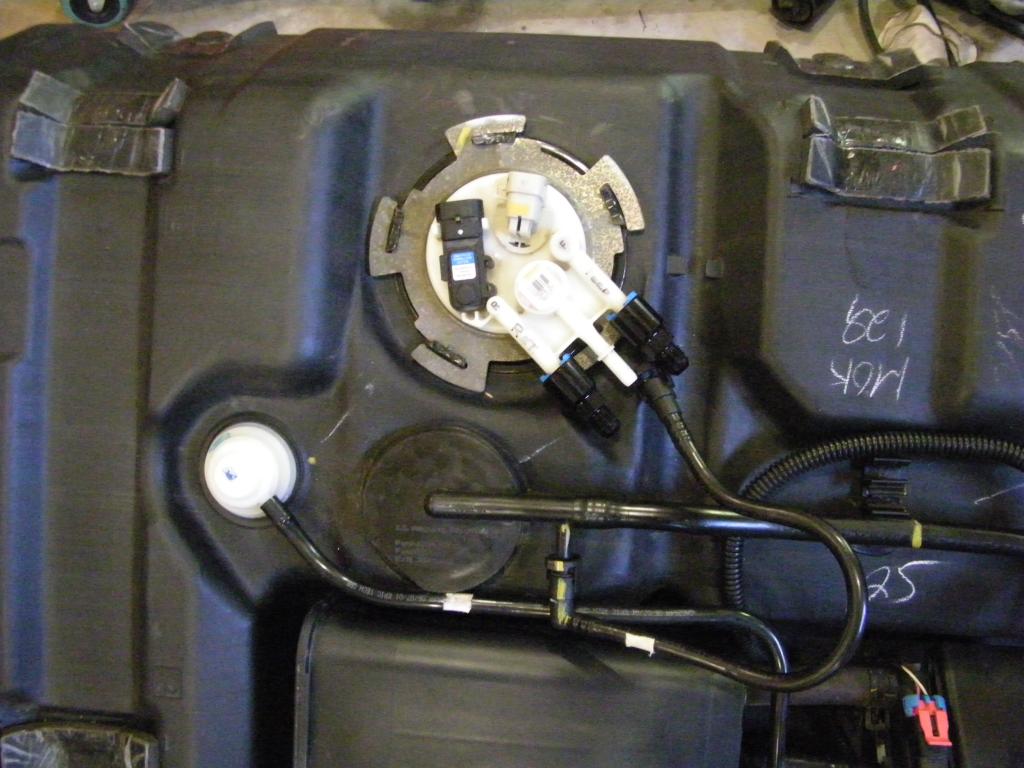
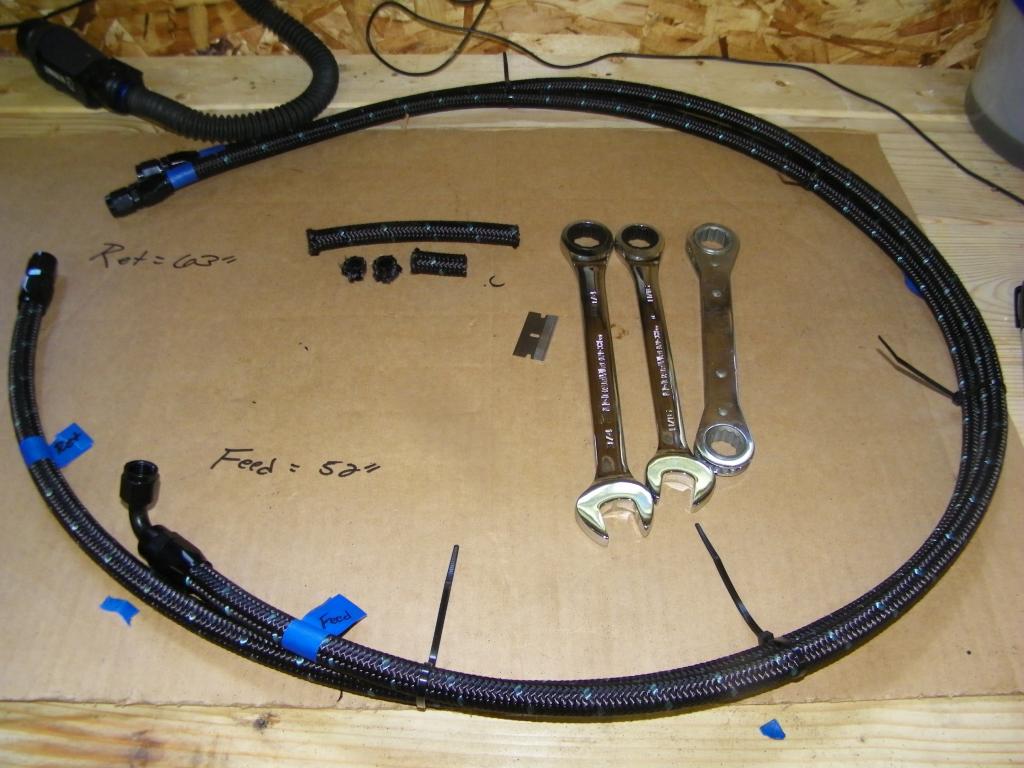
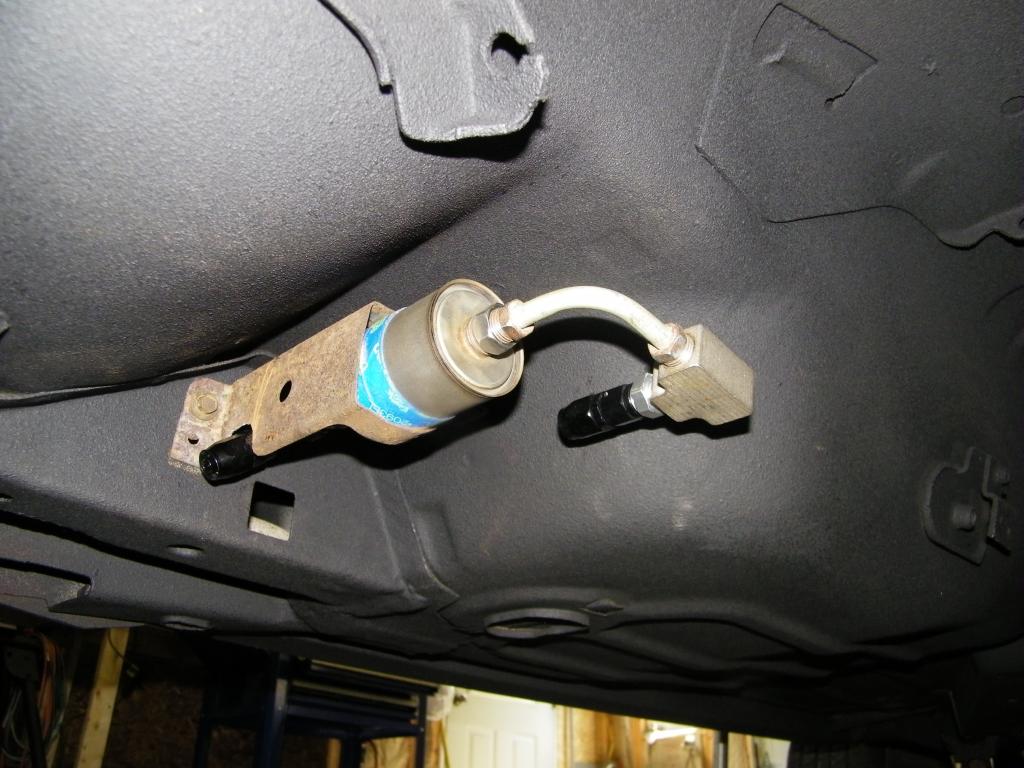
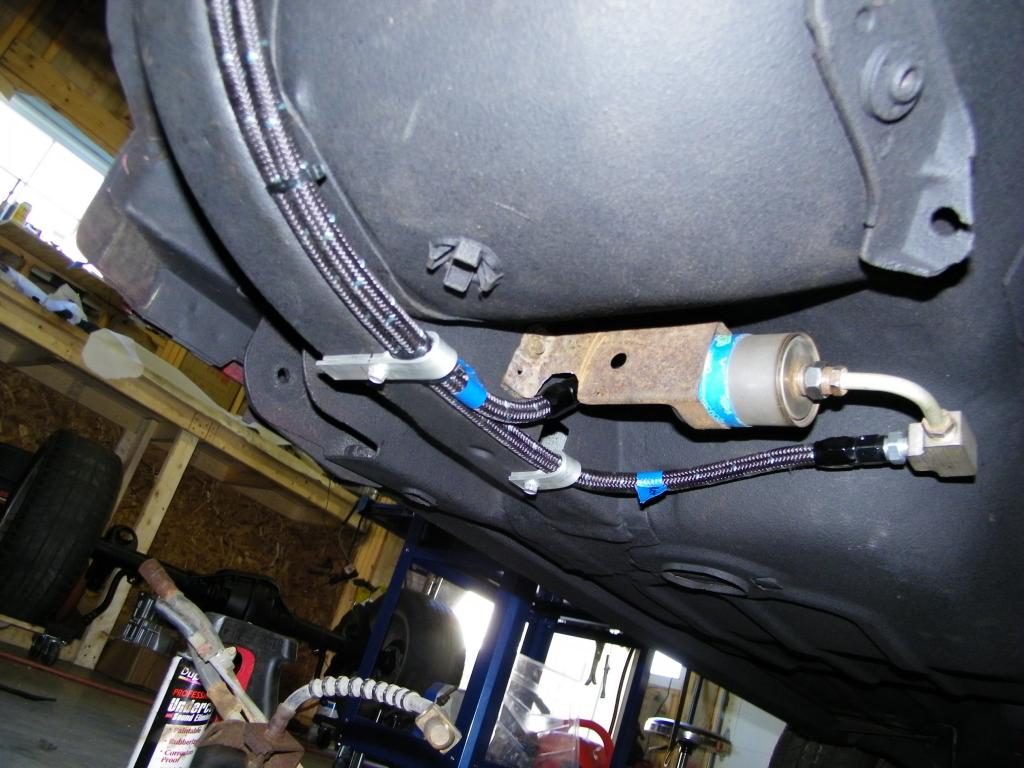
Here is my completed fuel system. I used the Racetronix Hotwire kit with a Grand Prix sending unit. I made up braided fuel lines all the way from the tank to the fuel rail. I also used adapters which allowed me to use a stock LS1 fuel filter and locate it in the factory bracket with only very slight modification.
Grand Prix sending unit and Racetronix pump:
Fuel Tank with adapters and braided lines:
Home made aluminum brackets:

Mocking up the Fuel filter bracket:
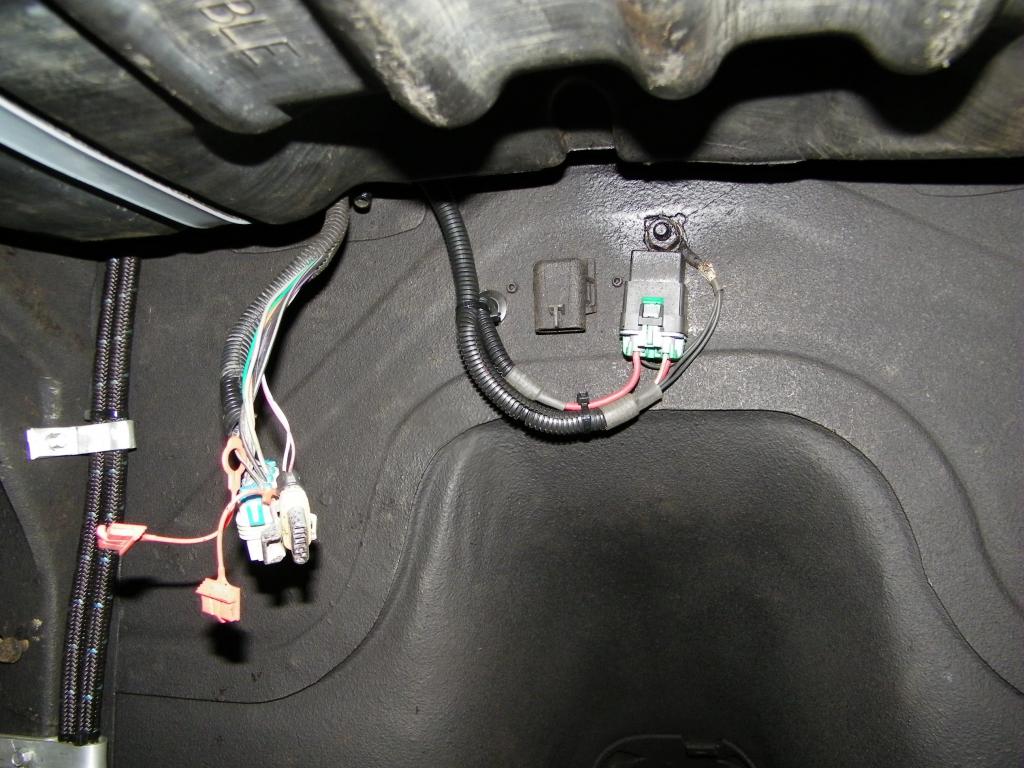
Racetronix pump wiring runs through the inside of the car and I also used the factory fuel pump wiring bulkhead:
Here is my completed fuel system. I used the Racetronix Hotwire kit with a Grand Prix sending unit. I made up braided fuel lines all the way from the tank to the fuel rail. I also used adapters which allowed me to use a stock LS1 fuel filter and locate it in the factory bracket with only very slight modification.
Grand Prix sending unit and Racetronix pump:


Fuel Tank with adapters and braided lines:


Home made aluminum brackets:

Mocking up the Fuel filter bracket:


Racetronix pump wiring runs through the inside of the car and I also used the factory fuel pump wiring bulkhead:

Last edited by coptzer; 10-18-2014 at 08:52 AM.
10-18-2014, 08:47 AM
#10
Member
Thread Starter
iTrader: (2)
Join Date: Feb 2003
Location: ME
Posts: 219
Likes: 0
Received 0 Likes
on
0 Posts
Car: 1986 IROC-Z
Engine: LS1-ish
Transmission: T56 stage II
Axle/Gears: S60 4:10's
Re: My completed LS1/T56 swap... Money well spent! Lots of pics!
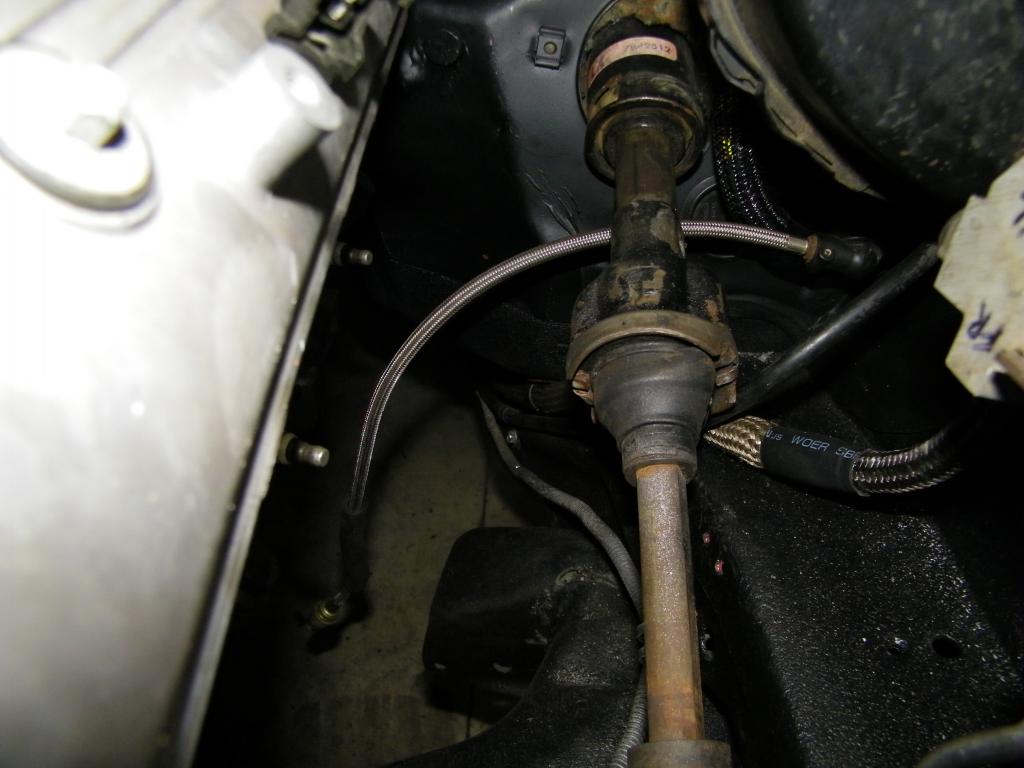
Since the fuel line was too close for comfort to the header I wrapped it with DEI Titanium Protect-A-Sleeve. I wrapped it from the trans crossmember to just short of the fuel rail.


 10-20-2014, 08:55 AM
#11
Senior Member
Re: My completed LS1/T56 swap... Money well spent! Lots of pics!
looks like you did a nice job!
how is the drone inside with that dumped 4" bullet?
how is the drone inside with that dumped 4" bullet?
10-20-2014, 09:39 PM
#12
Member
Thread Starter
iTrader: (2)
Join Date: Feb 2003
Location: ME
Posts: 219
Likes: 0
Received 0 Likes
on
0 Posts
Car: 1986 IROC-Z
Engine: LS1-ish
Transmission: T56 stage II
Axle/Gears: S60 4:10's
Re: My completed LS1/T56 swap... Money well spent! Lots of pics!
As far as the bullet, well... it's pretty loud in there. It's not awful and is definitely tolerable. Sustaining certain RPM's for significant period of time can be a little too much with the t-tops in and windows up. Not a problem at all with the tops out and windows down, which is mostly how I'll be driving since I removed A/C. I don't have my headliner in either which isn't helping absorb any of the noise. I plan on adding some sound deadening to the floor also over the winter so we'll see how that does. I wanted something easy and cheap to try so I could just to get my car on the road. I definitely won't change it right away because I really like how it sounds. Haven't had much luck getting a good sound clip as of yet. I have a couple of videos from inside the car while cruising that I will post up soon. Pretty hard sneaking through town though.
 10-21-2014, 08:08 AM
#14
Senior Member
Re: My completed LS1/T56 swap... Money well spent! Lots of pics!
i used the fatmat rattle trap on my car, seems to be a good product. nice and thick and was the best price vs. quality i could find.
10-21-2014, 04:15 PM
#15
Member
Thread Starter
iTrader: (2)
Join Date: Feb 2003
Location: ME
Posts: 219
Likes: 0
Received 0 Likes
on
0 Posts
Car: 1986 IROC-Z
Engine: LS1-ish
Transmission: T56 stage II
Axle/Gears: S60 4:10's
Re: My completed LS1/T56 swap... Money well spent! Lots of pics!
good advice. Not sure what I'm going to use for sound deadening. Probably not Dynamat since it's so expensive. But, I have all winter to figure it out.
10-21-2014, 04:40 PM
#16
Member
Thread Starter
iTrader: (2)
Join Date: Feb 2003
Location: ME
Posts: 219
Likes: 0
Received 0 Likes
on
0 Posts
Car: 1986 IROC-Z
Engine: LS1-ish
Transmission: T56 stage II
Axle/Gears: S60 4:10's
Re: My completed LS1/T56 swap... Money well spent! Lots of pics!
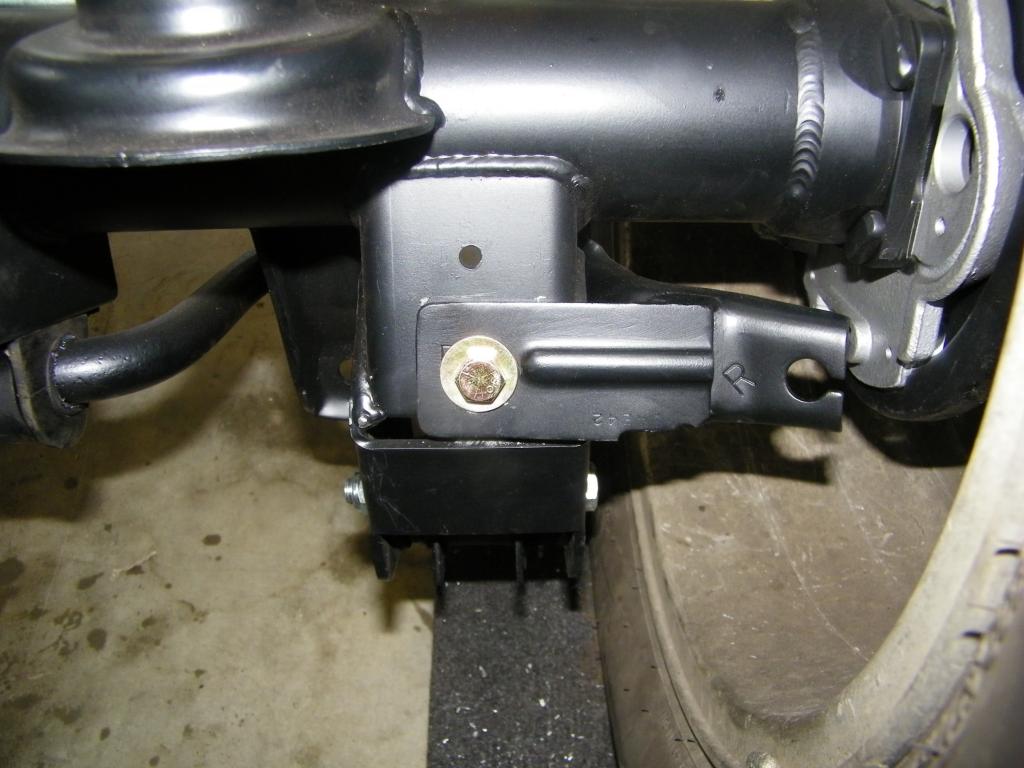
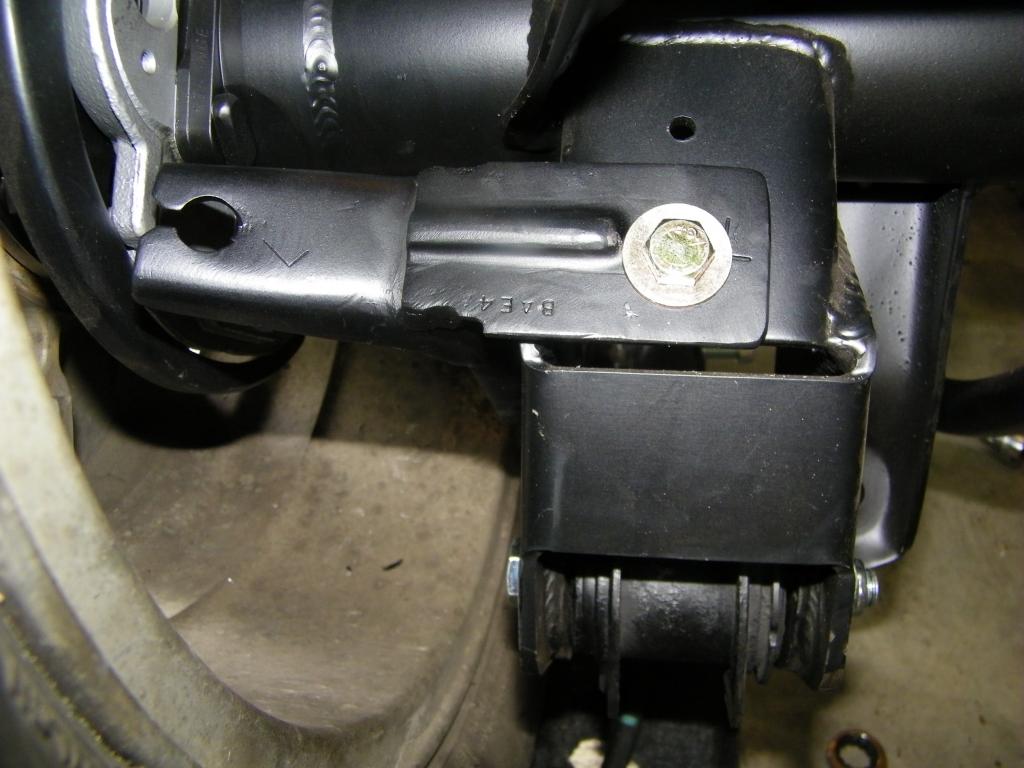
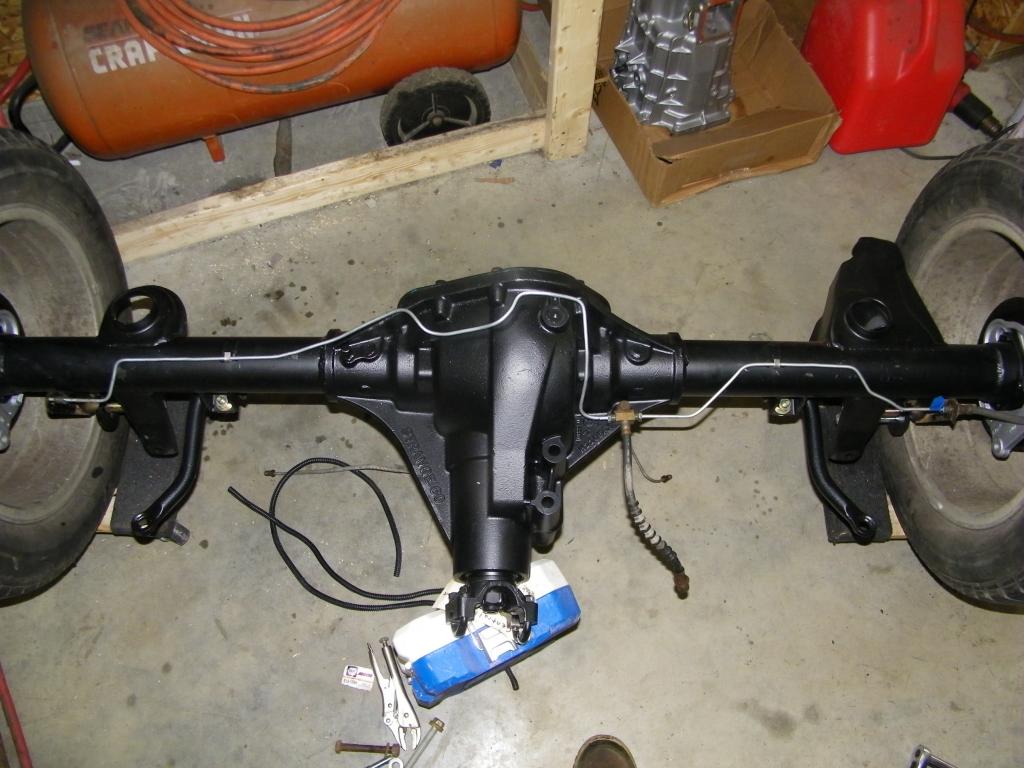
S60 Install
Not a ton of info here, but here's my S60, stock 3rd gen width, 35 spline axles, TrueTrac, 4.10 gears, welded LCA relocation brackets, and LS1 brakes. It's crazy how much bigger than stock this thing is. I also ended using Ed Millers LS1 Emergency Brake cables. Very nice cables, and very easy to install.
Using the stock E-brake brackets requires some modification with the LCA relo brackets. I ended up cutting off the inside part that wrapped around and used 2 bolts to attach it.
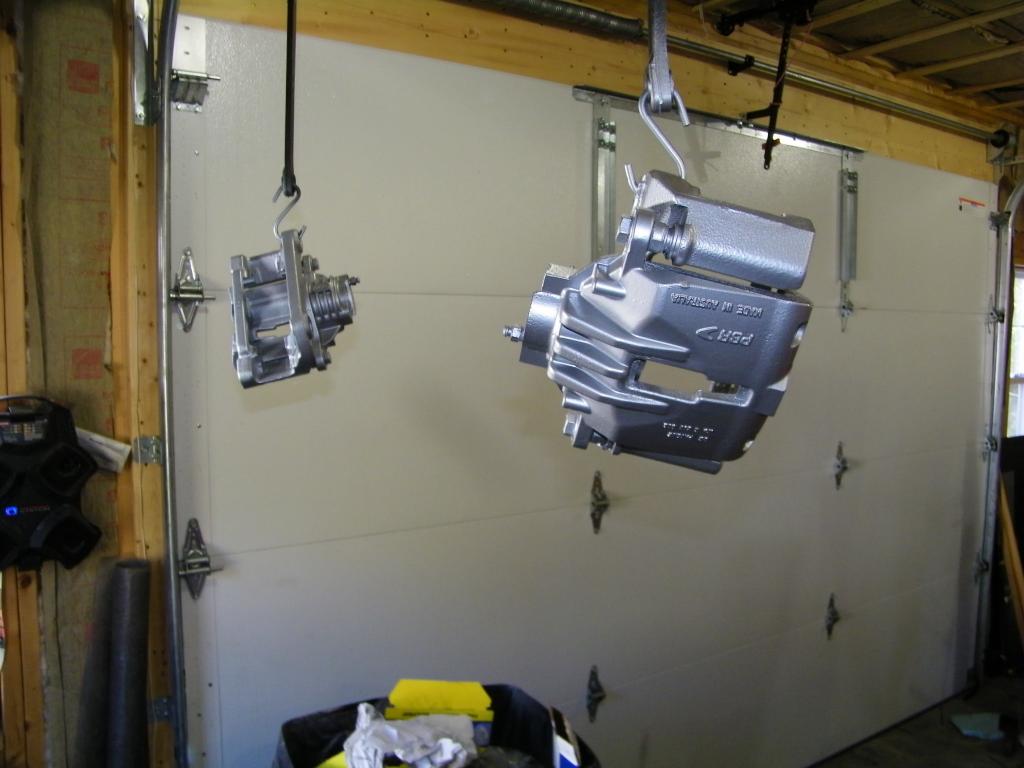
Made new Brake lines and painted calipers:
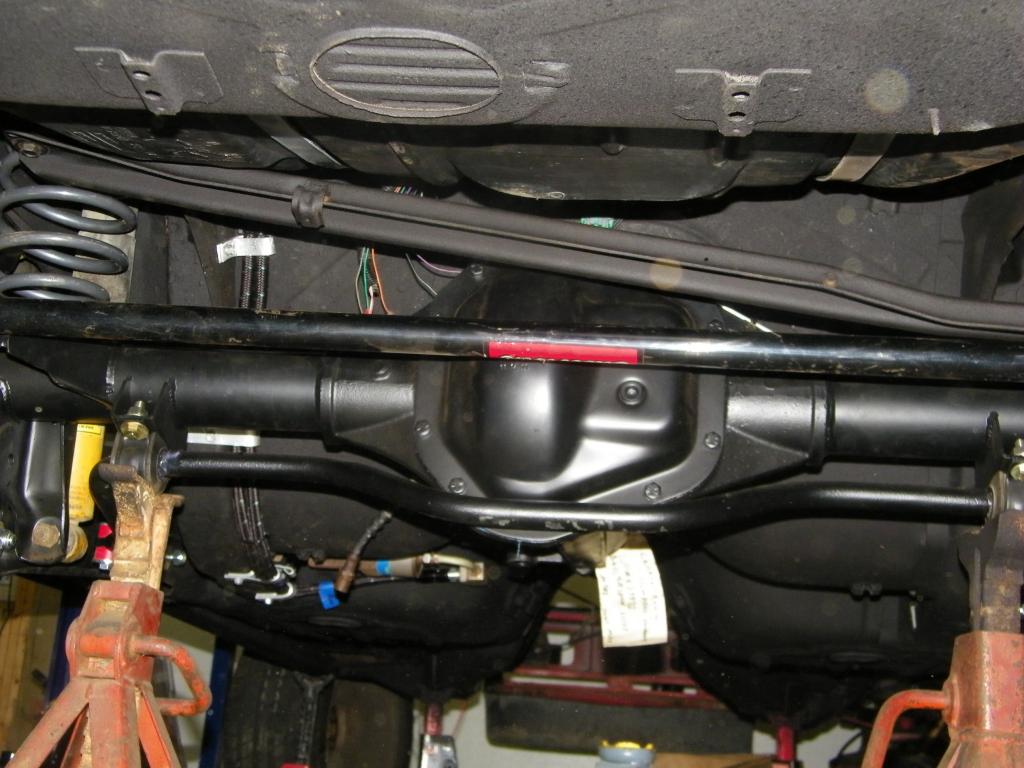
Installed. I've since switched to an adjustable Panhard bar.
Not a ton of info here, but here's my S60, stock 3rd gen width, 35 spline axles, TrueTrac, 4.10 gears, welded LCA relocation brackets, and LS1 brakes. It's crazy how much bigger than stock this thing is. I also ended using Ed Millers LS1 Emergency Brake cables. Very nice cables, and very easy to install.
Using the stock E-brake brackets requires some modification with the LCA relo brackets. I ended up cutting off the inside part that wrapped around and used 2 bolts to attach it.


Made new Brake lines and painted calipers:


Installed. I've since switched to an adjustable Panhard bar.

Last edited by coptzer; 10-21-2014 at 09:15 PM.
10-21-2014, 05:11 PM
#17
Member
Thread Starter
iTrader: (2)
Join Date: Feb 2003
Location: ME
Posts: 219
Likes: 0
Received 0 Likes
on
0 Posts
Car: 1986 IROC-Z
Engine: LS1-ish
Transmission: T56 stage II
Axle/Gears: S60 4:10's
Re: My completed LS1/T56 swap... Money well spent! Lots of pics!
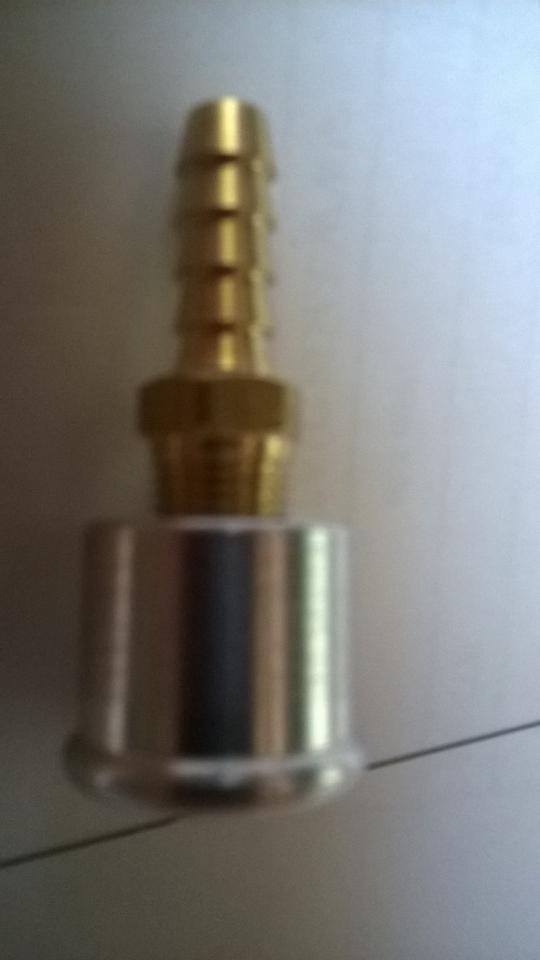
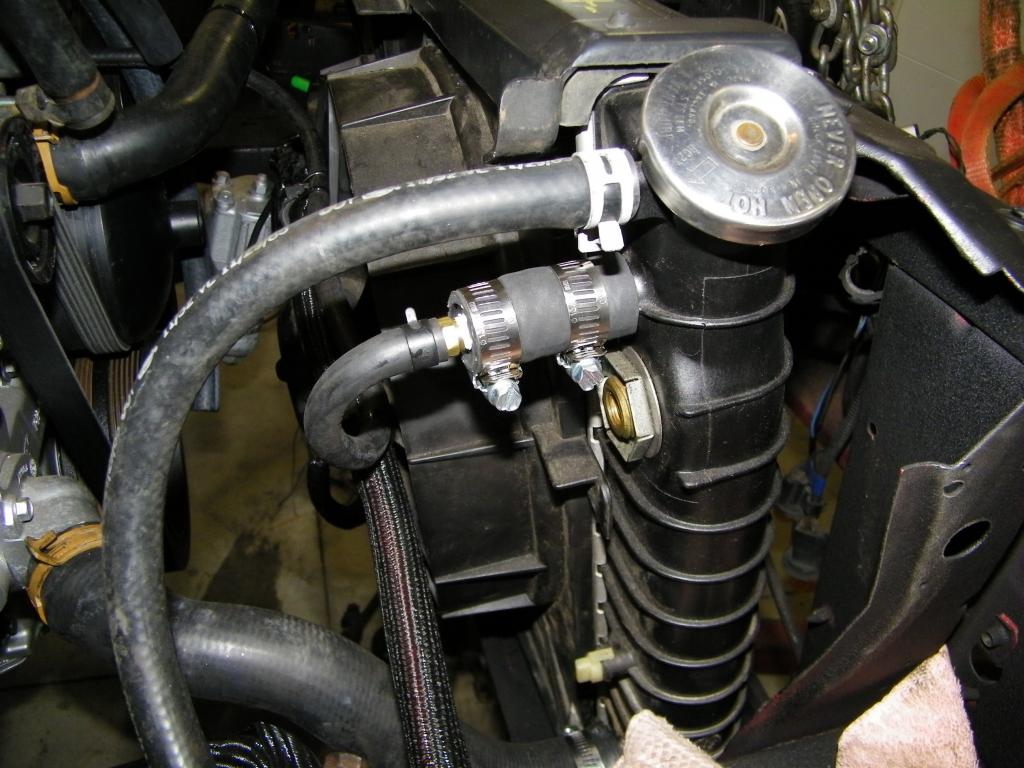
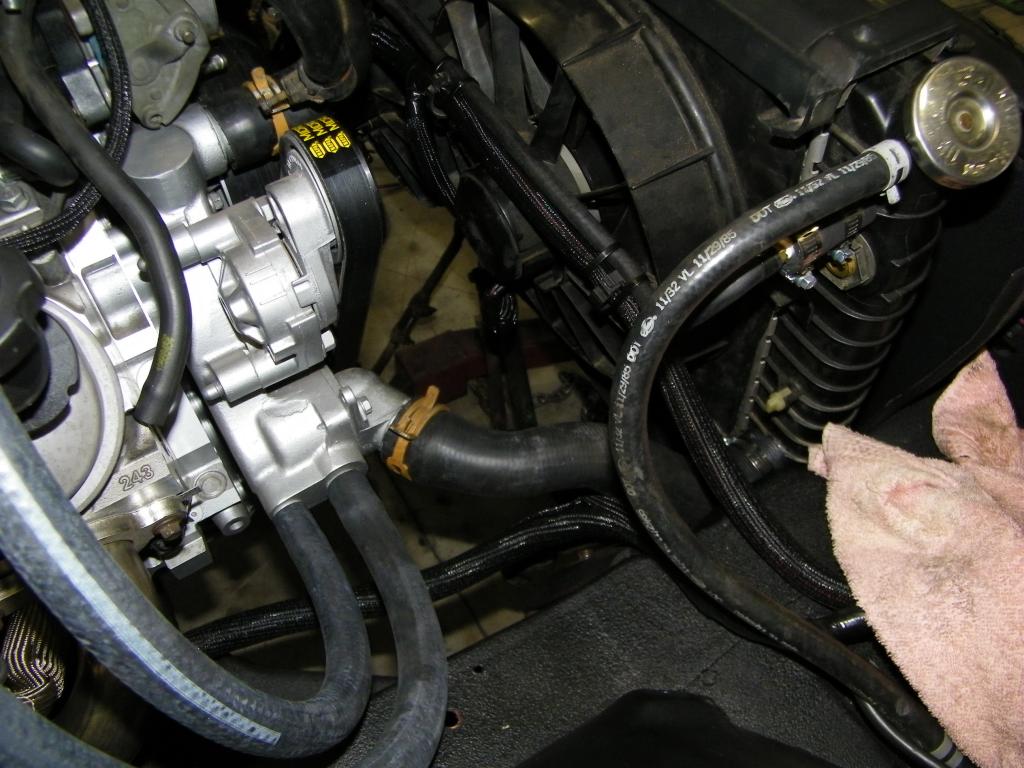
My Steam Vent solution:
Even though I had an LS1 radiator, I wanted to use my 3rd gen radiator because it was practically brand new and fits the car the way it should, no modifications. This meant I needed to either block off the old heater core nipple from my radiator, or come up with an adapter that would allow me to run the steam vent into it. After stressing out about it for a while, I found this adapter from JagsThatRun. This is a very high quality piece and fairly inexpensive. This solved two problems at the same time.
Machined 3/4" adapter to barb fitting for the steam line. Sorry for the bad pic, but you get the just of it.


 10-21-2014, 06:00 PM
#18
COTM Editor
iTrader: (22)
Join Date: Mar 2001
Posts: 9,932
Likes: 0
Received 1,860 Likes
on
1,274 Posts
Car: '89 Firebird
Engine: 7.0L
Transmission: T56
Re: My completed LS1/T56 swap... Money well spent! Lots of pics!
I'm really liking all the pictures. Great help to see what you did in each area. Definitely going to shamelessly copy some things! 
10-21-2014, 09:13 PM
#19
Member
Thread Starter
iTrader: (2)
Join Date: Feb 2003
Location: ME
Posts: 219
Likes: 0
Received 0 Likes
on
0 Posts
Car: 1986 IROC-Z
Engine: LS1-ish
Transmission: T56 stage II
Axle/Gears: S60 4:10's
Re: My completed LS1/T56 swap... Money well spent! Lots of pics!
For me, it's a great big help to see pictures while doing a build so you can wrap your head around some of this stuff. There were quite a few times I just needed to see a pic of something to make sense of it, and referred back to this site. So hopefully these will provide the same to someone.
10-21-2014, 09:33 PM
#20
Member
Join Date: Oct 2007
Location: Vancouver, B.C.
Posts: 155
Likes: 0
Received 0 Likes
on
0 Posts
Car: 85 Camaro Z28
Engine: 6.0L LS
Transmission: T56 Magnum
Axle/Gears: 3.23
Re: My completed LS1/T56 swap... Money well spent! Lots of pics!
I agree completely. The support on this website was amazing when doing my engine swap.
I just feel that I need to make sure everything works before i show it off lol!
Also, I did the EXACT same thing as you for the steam vent. Like literally, i thought that was a picture of my car.
So far that has worked for me, and its reassuring to see someone else do it...
I was always unsure of the steam vent line...
10-22-2014, 10:26 AM
#21
Member
Thread Starter
iTrader: (2)
Join Date: Feb 2003
Location: ME
Posts: 219
Likes: 0
Received 0 Likes
on
0 Posts
Car: 1986 IROC-Z
Engine: LS1-ish
Transmission: T56 stage II
Axle/Gears: S60 4:10's
Re: My completed LS1/T56 swap... Money well spent! Lots of pics!
I agree completely. The support on this website was amazing when doing my engine swap.
I just feel that I need to make sure everything works before i show it off lol!
Also, I did the EXACT same thing as you for the steam vent. Like literally, i thought that was a picture of my car.
So far that has worked for me, and its reassuring to see someone else do it...
I was always unsure of the steam vent line...
I just feel that I need to make sure everything works before i show it off lol!
Also, I did the EXACT same thing as you for the steam vent. Like literally, i thought that was a picture of my car.
So far that has worked for me, and its reassuring to see someone else do it...
I was always unsure of the steam vent line...
10-22-2014, 07:31 PM
#22
Member
Thread Starter
iTrader: (2)
Join Date: Feb 2003
Location: ME
Posts: 219
Likes: 0
Received 0 Likes
on
0 Posts
Car: 1986 IROC-Z
Engine: LS1-ish
Transmission: T56 stage II
Axle/Gears: S60 4:10's
Re: My completed LS1/T56 swap... Money well spent! Lots of pics!
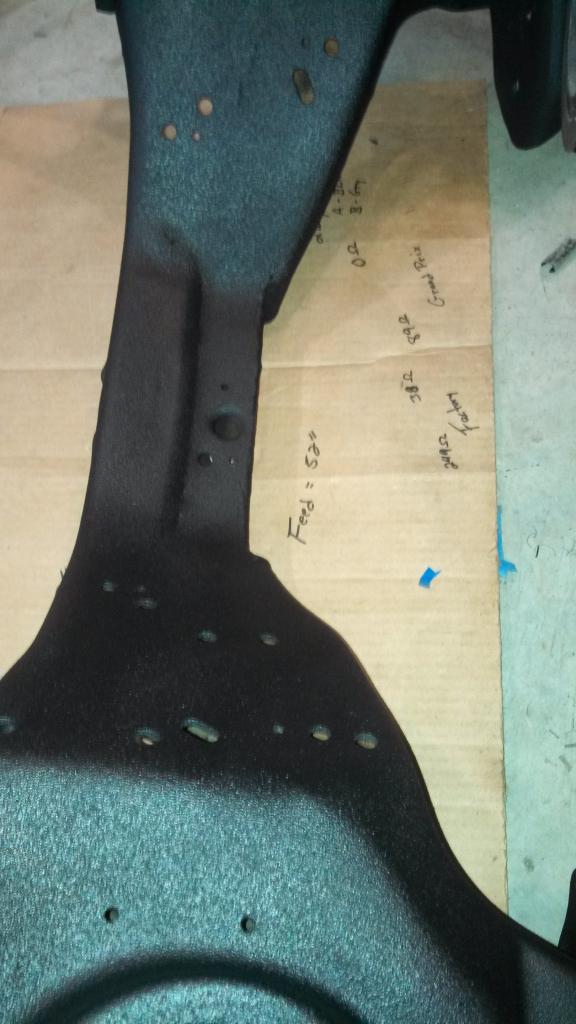
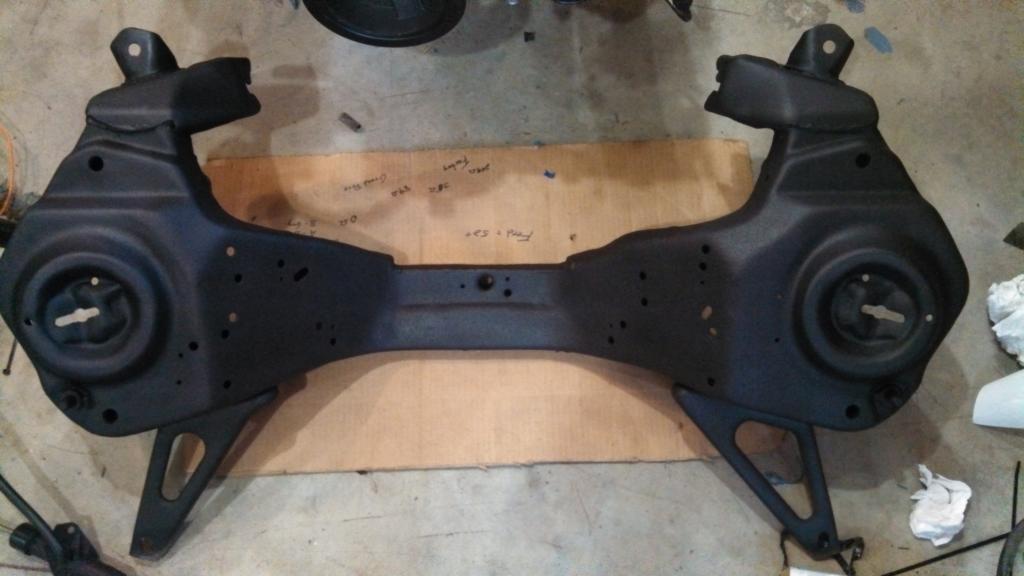
K Member notch...Non-AC
Nothing too exciting here. I kept it pretty simple, no AC notch. It was real close to the oil pan, probably could have gotten away without notching, but not worth the risk.
Nothing too exciting here. I kept it pretty simple, no AC notch. It was real close to the oil pan, probably could have gotten away without notching, but not worth the risk.


Last edited by coptzer; 10-22-2014 at 07:35 PM.
10-22-2014, 09:06 PM
#23
Member
Thread Starter
iTrader: (2)
Join Date: Feb 2003
Location: ME
Posts: 219
Likes: 0
Received 0 Likes
on
0 Posts
Car: 1986 IROC-Z
Engine: LS1-ish
Transmission: T56 stage II
Axle/Gears: S60 4:10's
Re: My completed LS1/T56 swap... Money well spent! Lots of pics!
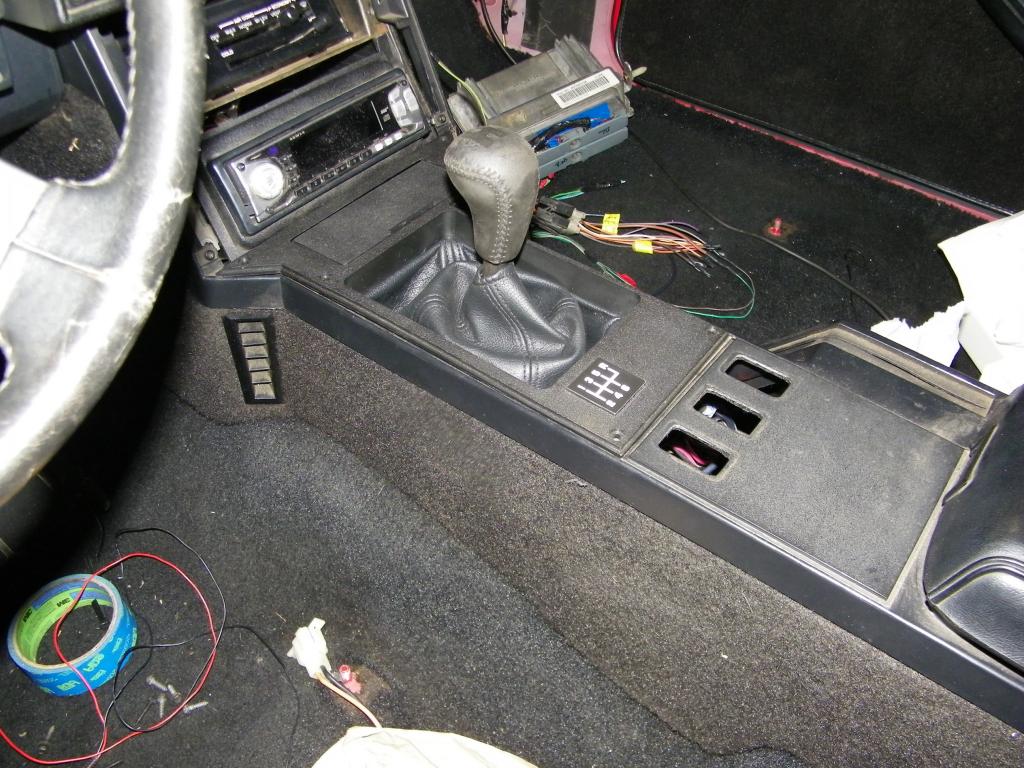
T56 Shifter hole and Lower boot:
The hardest part of going from automatic to manual for me was the shifter hole. I ended up putting the engine/trans in the car temporarily to mock it up. Jacked up the trans tight to the tunnel with the shifter on (Minus the shift lever) and marked it the best I could to get an approximate location. There are probably better ways to do it, but I got it real close on the first cut.
The next challenge for all of us I think is the lower shift boot, if you're using one. I thought about finding a factory 3rd gen one or a 4th gen one... neither worked out because I either couldn't find a decent one, or they were too damn expensive.
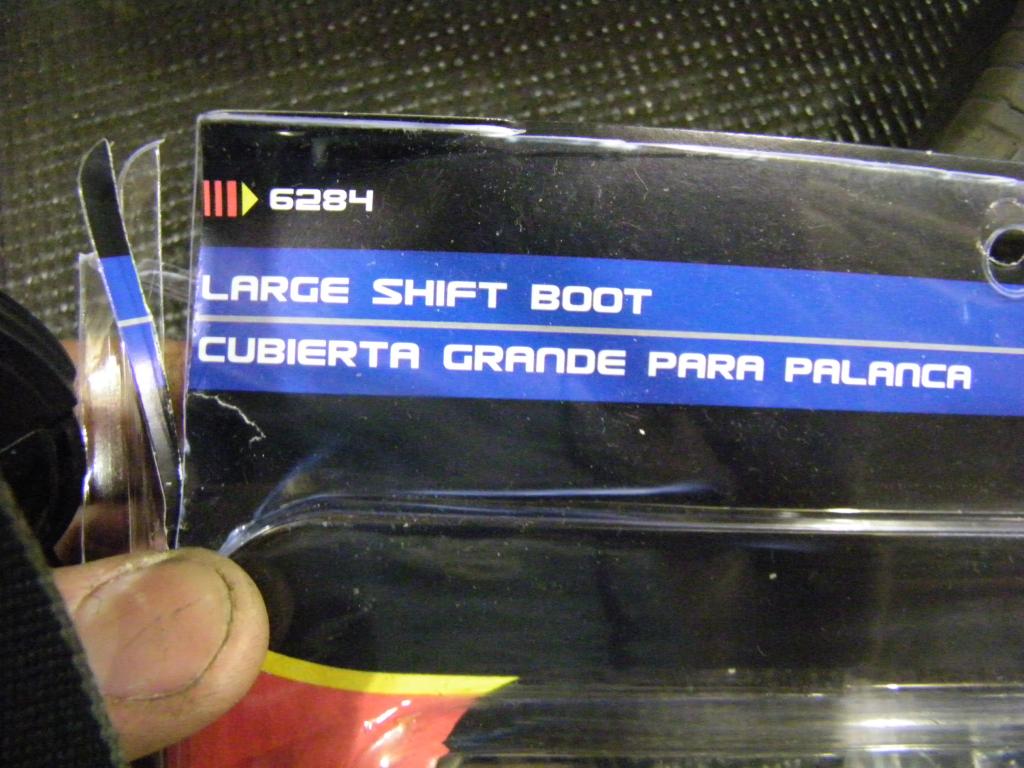
I opted for a universal one. I took a chance on the Spectre 6284 Large Shift Boot. For $15, I figured what the heck, I'll make it work. My hole for the shifter ended up being 4 3/4" x 6 3/4". This boot covers 6 3/4" x 7 3/4".
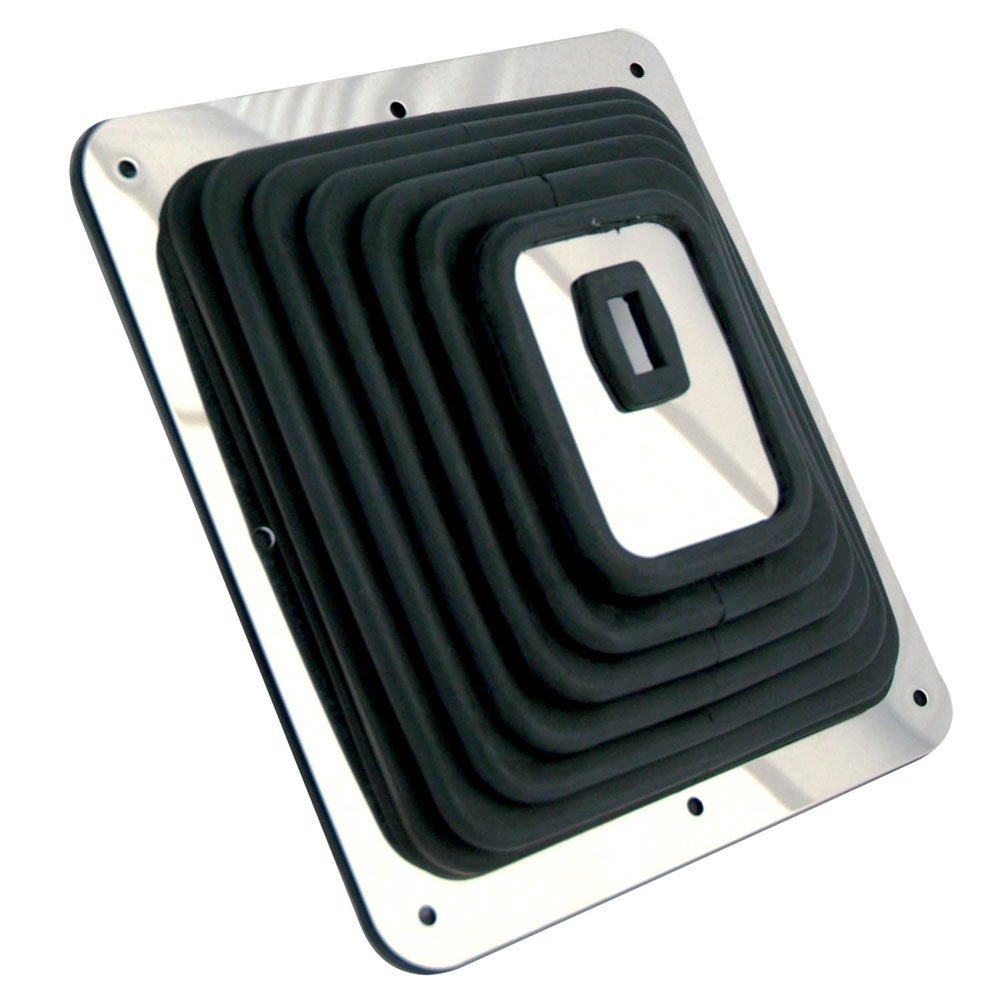
It actually worked out perfect and fit way better than I anticipated. I did have to trim the carpet slightly on the passenger side so I could get the screws in. No biggie because the console covers it, but I should have put it in before the carpet...

First thing I did to the boot was get rid of the chrome top plate and started cutting. It didn't actually have to be cut at all, it fit the stick good, but I wanted the boot to go down over the top of the shifter assembly. This is a PRO 5.0 shifter that came with my dropout, and when I rebuilt the trans, there was a lot of dirt and grime above the shifter cup where you grease the stick. I wasn't really liking the thought of that so I figured out a way to solve this problem, and here's what I did... snip, snip, snip! Streched over the top for a perfect fit. Completely seals, and is a nice tight fit.
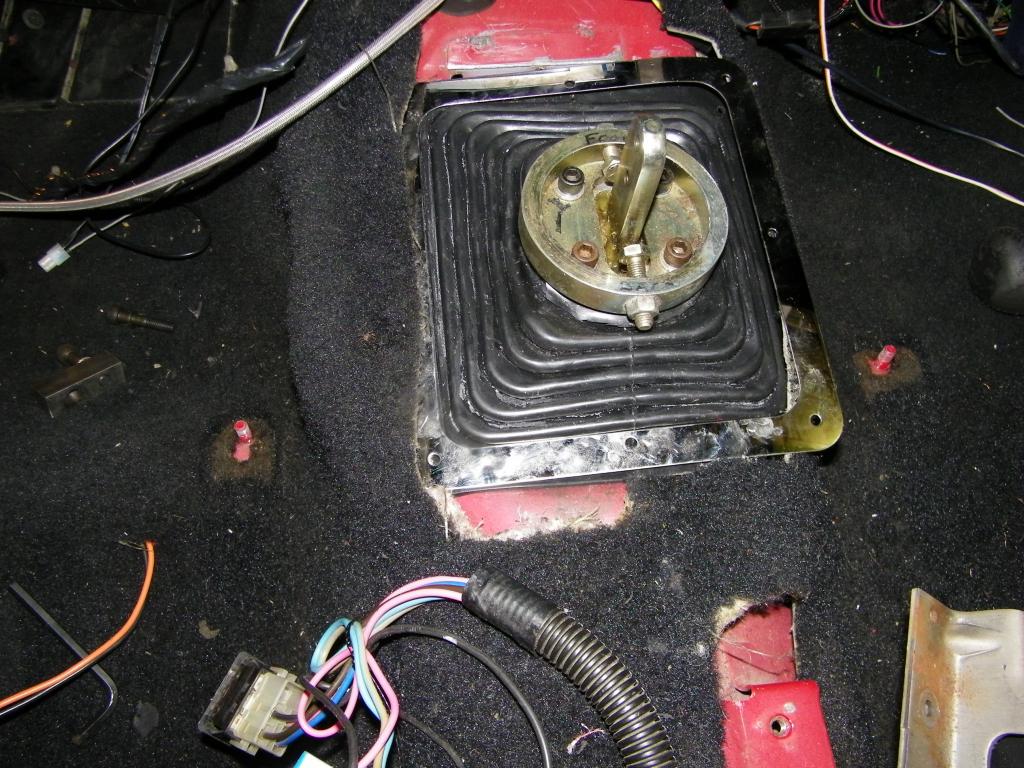
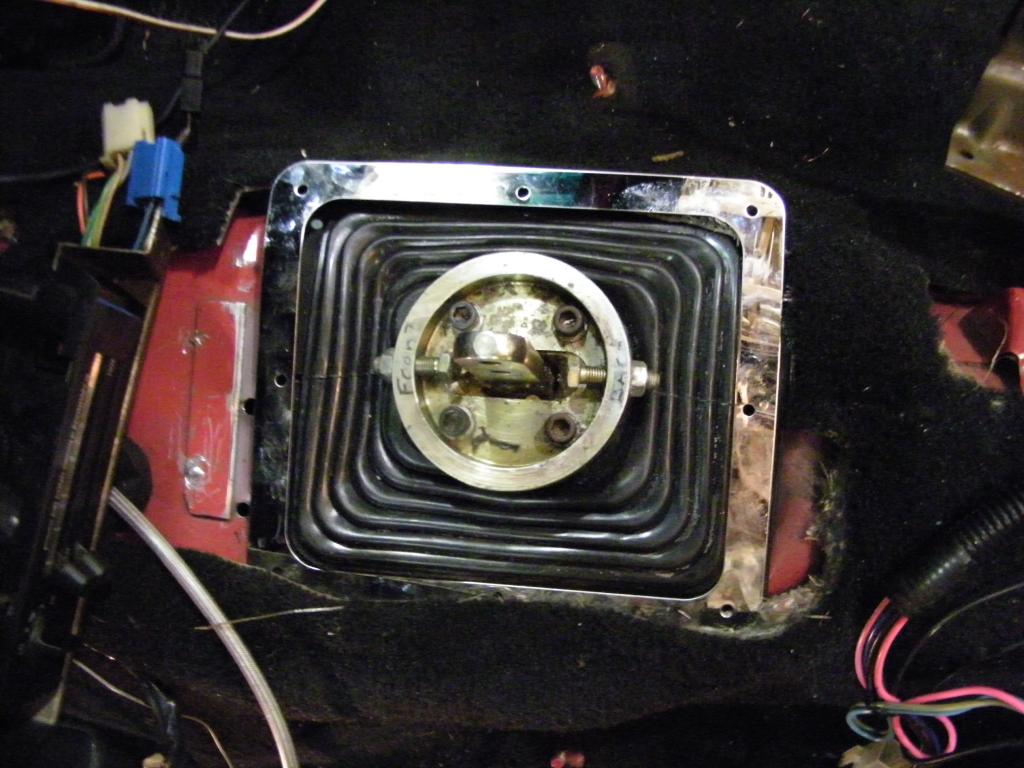
I thought about losing the lower trim and using washers with my screws, but the trim is actually pretty awesome. It's flexible enough to conform to all the curves while being strong enough to hold the gasket tight to the body all the way around. 8 short self tappers later and Voila. Well worth the $15. It actually comes with screws, but they were too long for my liking. When I show you what I did with my speedbleeder you'll understand why this is an excellent setup...
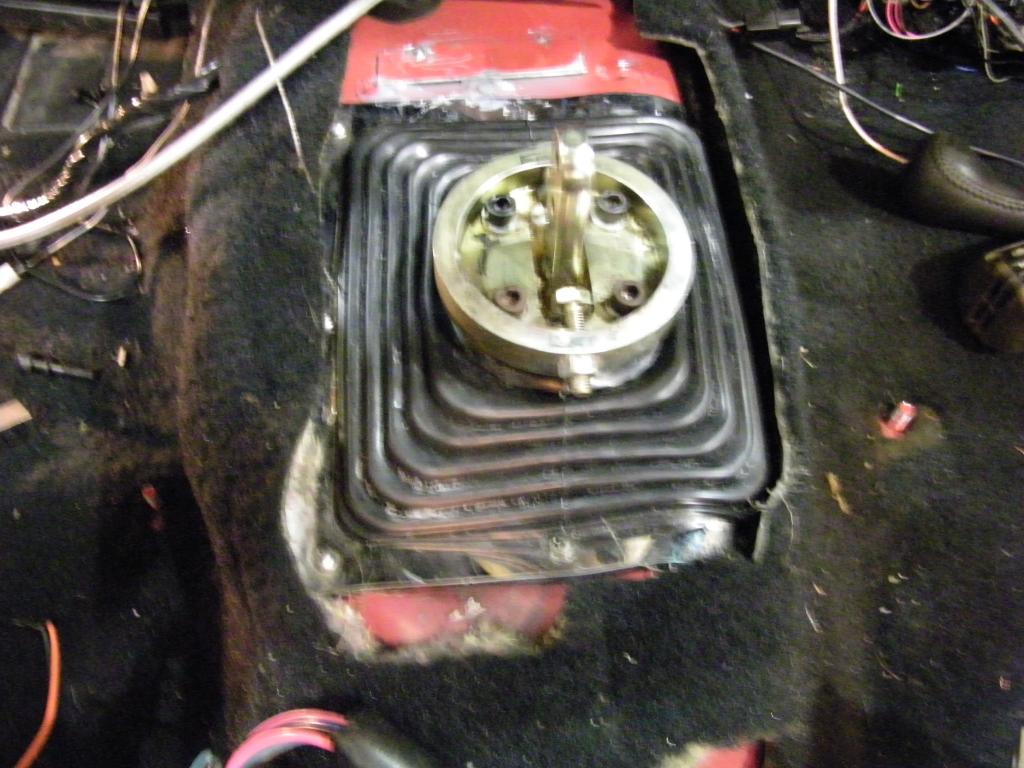
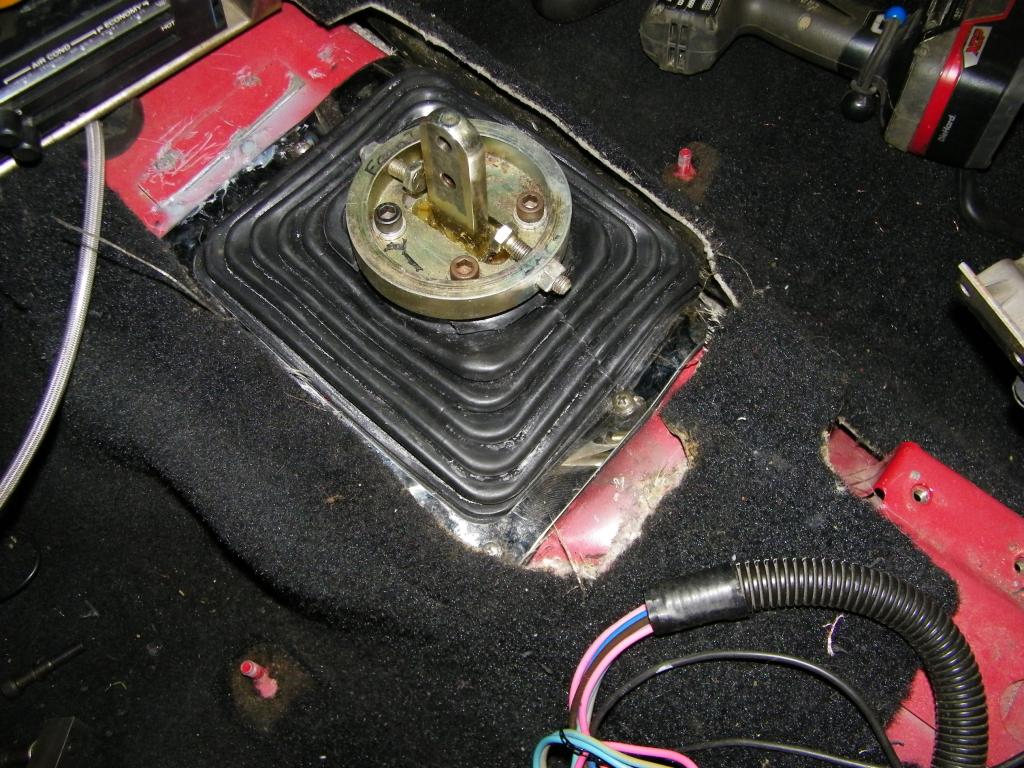
I put a slight bend on the shifter stick because it was real close to the console in 5th and 6th, which looked funny, and slightly hit in Rev. Now it is pretty much perfectly centered in the hole. This is the Hawks reproduction shifter plate and 6 speed decal. The way a sports car should look...
The hardest part of going from automatic to manual for me was the shifter hole. I ended up putting the engine/trans in the car temporarily to mock it up. Jacked up the trans tight to the tunnel with the shifter on (Minus the shift lever) and marked it the best I could to get an approximate location. There are probably better ways to do it, but I got it real close on the first cut.

The next challenge for all of us I think is the lower shift boot, if you're using one. I thought about finding a factory 3rd gen one or a 4th gen one... neither worked out because I either couldn't find a decent one, or they were too damn expensive.
I opted for a universal one. I took a chance on the Spectre 6284 Large Shift Boot. For $15, I figured what the heck, I'll make it work. My hole for the shifter ended up being 4 3/4" x 6 3/4". This boot covers 6 3/4" x 7 3/4".


It actually worked out perfect and fit way better than I anticipated. I did have to trim the carpet slightly on the passenger side so I could get the screws in. No biggie because the console covers it, but I should have put it in before the carpet...
First thing I did to the boot was get rid of the chrome top plate and started cutting. It didn't actually have to be cut at all, it fit the stick good, but I wanted the boot to go down over the top of the shifter assembly. This is a PRO 5.0 shifter that came with my dropout, and when I rebuilt the trans, there was a lot of dirt and grime above the shifter cup where you grease the stick. I wasn't really liking the thought of that so I figured out a way to solve this problem, and here's what I did... snip, snip, snip! Streched over the top for a perfect fit. Completely seals, and is a nice tight fit.


I thought about losing the lower trim and using washers with my screws, but the trim is actually pretty awesome. It's flexible enough to conform to all the curves while being strong enough to hold the gasket tight to the body all the way around. 8 short self tappers later and Voila. Well worth the $15. It actually comes with screws, but they were too long for my liking. When I show you what I did with my speedbleeder you'll understand why this is an excellent setup...


I put a slight bend on the shifter stick because it was real close to the console in 5th and 6th, which looked funny, and slightly hit in Rev. Now it is pretty much perfectly centered in the hole. This is the Hawks reproduction shifter plate and 6 speed decal. The way a sports car should look...

Last edited by coptzer; 10-22-2014 at 09:15 PM.
10-28-2014, 06:52 PM
#24
Senior Member

Re: My completed LS1/T56 swap... Money well spent! Lots of pics!
Nice work.
I tried to take more pics in my last few stages of the small stuff, but my deadline was coming up fast... I drove the car for one day before I had to leave for a few months.
I got a new Hawks shifter plate and 6spd decal as well, topped the interior off pretty good!
I tried to take more pics in my last few stages of the small stuff, but my deadline was coming up fast... I drove the car for one day before I had to leave for a few months.
I got a new Hawks shifter plate and 6spd decal as well, topped the interior off pretty good!
11-01-2014, 06:41 PM
#25
Member
Thread Starter
iTrader: (2)
Join Date: Feb 2003
Location: ME
Posts: 219
Likes: 0
Received 0 Likes
on
0 Posts
Car: 1986 IROC-Z
Engine: LS1-ish
Transmission: T56 stage II
Axle/Gears: S60 4:10's
Re: My completed LS1/T56 swap... Money well spent! Lots of pics!
Nice work.
I tried to take more pics in my last few stages of the small stuff, but my deadline was coming up fast... I drove the car for one day before I had to leave for a few months.
I got a new Hawks shifter plate and 6spd decal as well, topped the interior off pretty good!
I tried to take more pics in my last few stages of the small stuff, but my deadline was coming up fast... I drove the car for one day before I had to leave for a few months.
I got a new Hawks shifter plate and 6spd decal as well, topped the interior off pretty good!
I love the Hawks shifter plate. Great quality in the plastic, sticker, and in the shifter boot. I had an issue with the ashtray door. It didn't close all the way for a flush fit, so I adjusted it the best I could. It's fine now though. The only other thing I don't really care for is that the shifter boot is so tall you kind of have to tuck the material down, but then again my shifter is really short.
Last edited by coptzer; 11-01-2014 at 06:45 PM.
11-01-2014, 07:06 PM
#26
Junior Member
iTrader: (4)
Join Date: Apr 2005
Location: Wasilla, Alaska
Posts: 35
Likes: 0
Received 0 Likes
on
0 Posts
Car: 92 Z28
Engine: L76 in the works.....
Transmission: T56
Axle/Gears: 3:73
Re: My completed LS1/T56 swap... Money well spent! Lots of pics!
Looks great!
You did the exact same thing for your fuel system that I did, with the exception of the filter. I like changing to the braided lines. It aloud me to route them in a cleaner way than the original.
Working on getting my heads put together now. Long way to go...
Car looks great man. Good job.
You did the exact same thing for your fuel system that I did, with the exception of the filter. I like changing to the braided lines. It aloud me to route them in a cleaner way than the original.
Working on getting my heads put together now. Long way to go...
Car looks great man. Good job.

Thread
Thread Starter
Forum
Replies
Last Post
Terrell351
Engine/Drivetrain/Suspension Parts for Sale
5
06-13-2021 01:13 PM