1989 RS - LS1/T56 Build
 08-03-2013, 05:37 PM
#151
Member

Thread Starter
Join Date: May 2005
Location: Monroe, GA
Posts: 247
Likes: 0
Received 0 Likes
on
0 Posts
Car: 1989 RS
Engine: LS1 - HP Tuners Enhanced 2Bar OS
Transmission: T56 - Pro 5.0
Axle/Gears: 9 Inch - 31 Spl Tru-Trac - 4.11
Re: 1989 RS - LS1/T56 Build
...continued.


Continued...
Continued...
 08-03-2013, 05:39 PM
#152
Member
Thread Starter
Join Date: May 2005
Location: Monroe, GA
Posts: 247
Likes: 0
Received 0 Likes
on
0 Posts
Car: 1989 RS
Engine: LS1 - HP Tuners Enhanced 2Bar OS
Transmission: T56 - Pro 5.0
Axle/Gears: 9 Inch - 31 Spl Tru-Trac - 4.11
Re: 1989 RS - LS1/T56 Build
...continued.


Continued...
Continued...
Last edited by abadv8; 08-03-2013 at 05:49 PM. Reason: Added a picture missing from the series.
08-03-2013, 05:42 PM
#153
Member
Thread Starter
Join Date: May 2005
Location: Monroe, GA
Posts: 247
Likes: 0
Received 0 Likes
on
0 Posts
Car: 1989 RS
Engine: LS1 - HP Tuners Enhanced 2Bar OS
Transmission: T56 - Pro 5.0
Axle/Gears: 9 Inch - 31 Spl Tru-Trac - 4.11
Re: 1989 RS - LS1/T56 Build
...continued.


That's all for the car photos... for now.
That's all for the car photos... for now.
 08-03-2013, 05:46 PM
#155
Member
Thread Starter
Join Date: May 2005
Location: Monroe, GA
Posts: 247
Likes: 0
Received 0 Likes
on
0 Posts
Car: 1989 RS
Engine: LS1 - HP Tuners Enhanced 2Bar OS
Transmission: T56 - Pro 5.0
Axle/Gears: 9 Inch - 31 Spl Tru-Trac - 4.11
Re: 1989 RS - LS1/T56 Build
I got my cruise working. The cruise switch on the brake pedal was was adjusted way too short. It's dialed in now and working.
I really need to find a nice overflow bottle that I can hide under the plastic shield in the front. It seems like every trip requires a top off of 3 or 4 ounces of coolant.
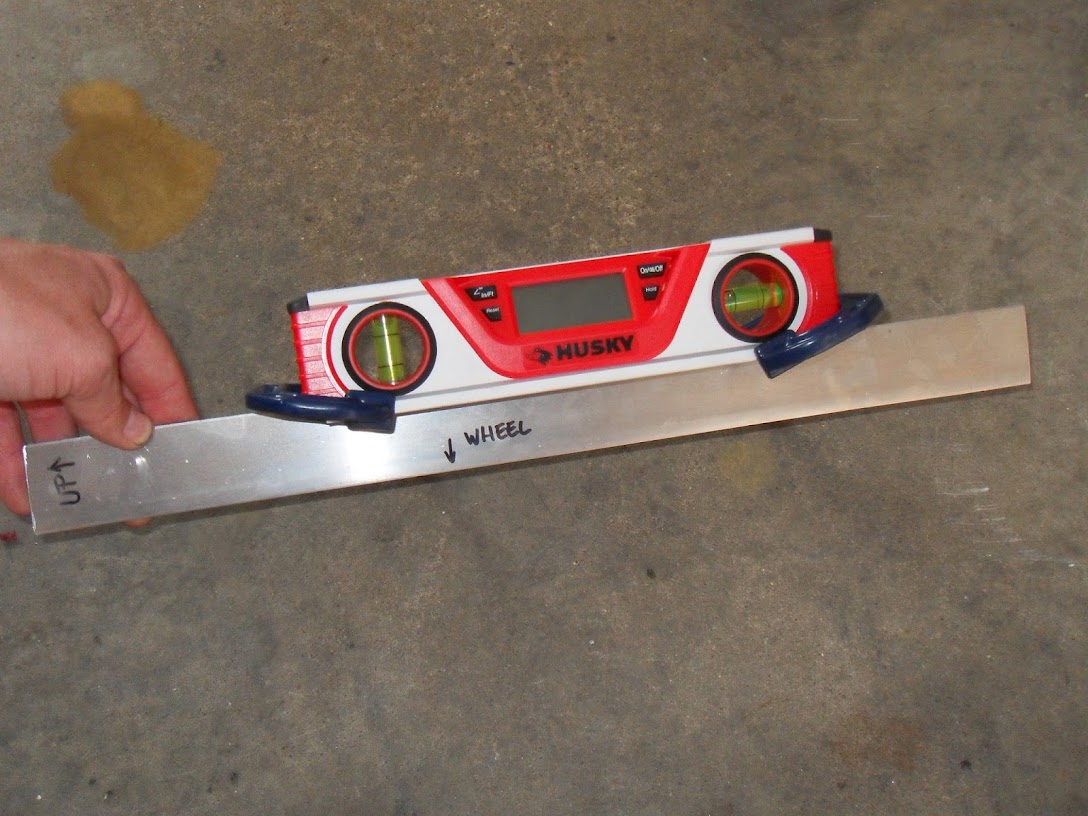
And, I got my alignment pretty dialed in. "How" you ask? Well, I invested in a state of the art alignment system...
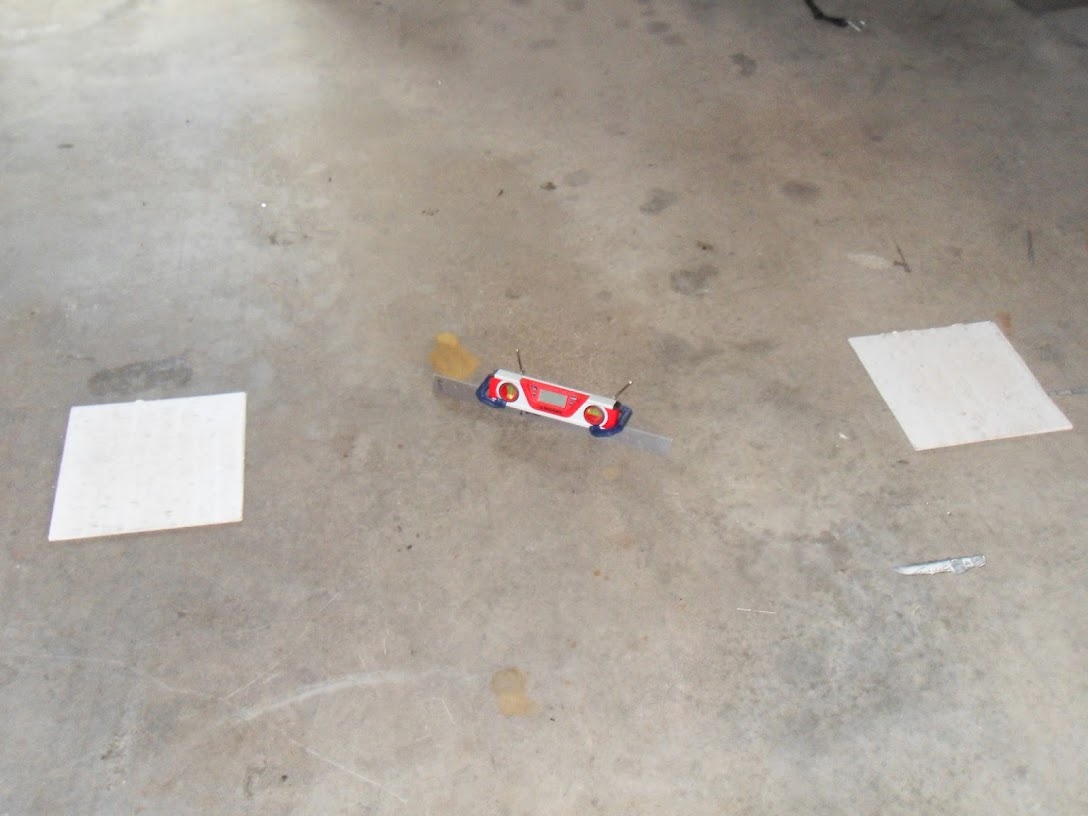

It even has markings for operator convenience.
The next couple of "to-do's" are the dash cap and the A/C. I might play around with my alignment a little more too to try ot find the sweet spot for the awful roads that I live on. Something tells me that that may be a fruitless endeavor...
I really need to find a nice overflow bottle that I can hide under the plastic shield in the front. It seems like every trip requires a top off of 3 or 4 ounces of coolant.
And, I got my alignment pretty dialed in. "How" you ask? Well, I invested in a state of the art alignment system...
It even has markings for operator convenience.
The next couple of "to-do's" are the dash cap and the A/C. I might play around with my alignment a little more too to try ot find the sweet spot for the awful roads that I live on. Something tells me that that may be a fruitless endeavor...
08-04-2013, 05:57 AM
#157
Senior Member

Join Date: Mar 2013
Location: South Carolina
Posts: 540
Likes: 0
Received 9 Likes
on
8 Posts
Car: 92 Vette, 83 Camaro
Engine: 305 going to 95 LT1
Transmission: 5 speed going to T56 6 speed
Axle/Gears: 3.73 posi with disc brakes
Re: 1989 RS - LS1/T56 Build
I'm very impressed with your project. You have inspired us to keep working on ours. When did you see the light at the end of the tunnel? We haven't seen it yet. Maybe when the engine is in place. Thanks for sharing.
08-04-2013, 08:53 AM
#159
Member
Thread Starter
Join Date: May 2005
Location: Monroe, GA
Posts: 247
Likes: 0
Received 0 Likes
on
0 Posts
Car: 1989 RS
Engine: LS1 - HP Tuners Enhanced 2Bar OS
Transmission: T56 - Pro 5.0
Axle/Gears: 9 Inch - 31 Spl Tru-Trac - 4.11
Re: 1989 RS - LS1/T56 Build
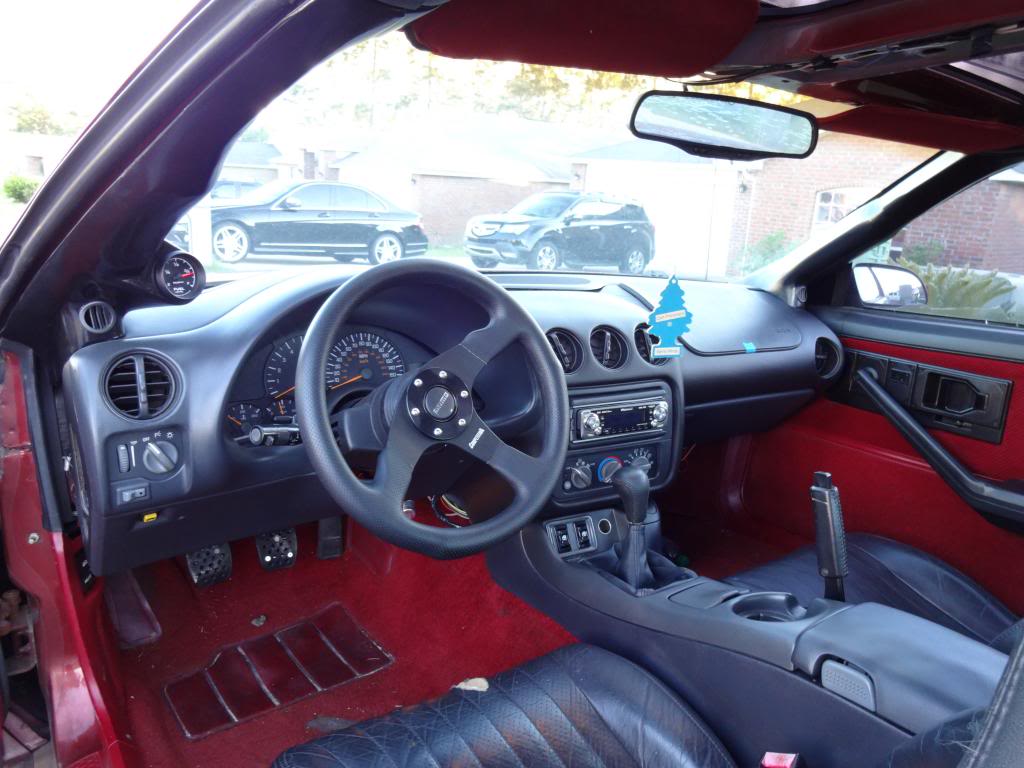
For the A-pillars, I am planning a hybridization of the fourth gen and third gen. I'm not sure yet which route I'm going to go. I really just wanted to drive it while we still had some summer left.
There are a pair of Kicker two way speakers behind those door panels as well. So, overall, even with the gaps, I am satisfied with the result.
08-04-2013, 08:57 AM
#160
Member
Thread Starter
Join Date: May 2005
Location: Monroe, GA
Posts: 247
Likes: 0
Received 0 Likes
on
0 Posts
Car: 1989 RS
Engine: LS1 - HP Tuners Enhanced 2Bar OS
Transmission: T56 - Pro 5.0
Axle/Gears: 9 Inch - 31 Spl Tru-Trac - 4.11
Re: 1989 RS - LS1/T56 Build
I think more than anything, maintaining constant forward momentum, no matter how slight, is the secret here. I created a list with about 100 items that needed to be done. I just chose a few items per day, and kept at it.
You'll be done before you know it.
08-04-2013, 09:07 AM
#161
Member
Thread Starter
Join Date: May 2005
Location: Monroe, GA
Posts: 247
Likes: 0
Received 0 Likes
on
0 Posts
Car: 1989 RS
Engine: LS1 - HP Tuners Enhanced 2Bar OS
Transmission: T56 - Pro 5.0
Axle/Gears: 9 Inch - 31 Spl Tru-Trac - 4.11
Re: 1989 RS - LS1/T56 Build
I won't say that the fourth gen box "dropped right in". But, it was a pretty good fit. There was some trimming and forming to be done in the cowl area. So, I guess you need at minimal amount of metal working equipment to pull it off.
08-04-2013, 07:04 PM
#162
Senior Member
iTrader: (16)
Join Date: Oct 2005
Location: Crestview, Florida
Posts: 651
Likes: 0
Received 0 Likes
on
0 Posts
Car: 86 IROC-Z, 98 Z28
Engine: 370 LSx, LS1
Transmission: T56's
Axle/Gears: 3.73, 3.42
Re: 1989 RS - LS1/T56 Build
Awesome job man, it looks great.
I combined the 3rd and 4th gen apillars for my dash swap. Gotta cut and fit the dash pad first, so when you make the apillars you can align the bottom up with the dash/window. Cutting the pad wasnt bad at all, but the apillars took me awhile cause of the trial and error when fitting them. If I could go back i would prolly see what it looks like using the 4th gen apillar all the way up the 3rd gen piece, and not just half way.
Heres an idea of how much i cut the dash pad. Ended up slowly trimming abit more, and cutting off the slits on the ends that the 4th gen apillars grab/lock onto.
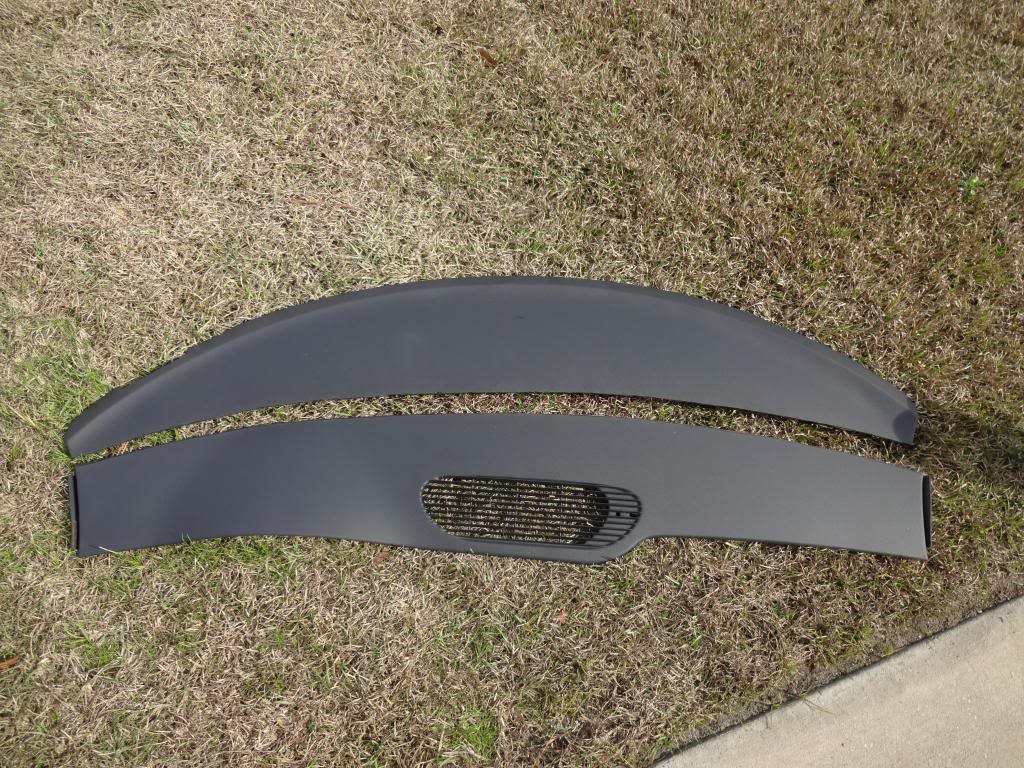

Heres an idea of how much i cut the dash pad. Ended up slowly trimming abit more, and cutting off the slits on the ends that the 4th gen apillars grab/lock onto.


 08-05-2013, 03:39 PM
#163
Member
Thread Starter
Join Date: May 2005
Location: Monroe, GA
Posts: 247
Likes: 0
Received 0 Likes
on
0 Posts
Car: 1989 RS
Engine: LS1 - HP Tuners Enhanced 2Bar OS
Transmission: T56 - Pro 5.0
Axle/Gears: 9 Inch - 31 Spl Tru-Trac - 4.11
Re: 1989 RS - LS1/T56 Build
I combined the 3rd and 4th gen apillars for my dash swap. Gotta cut and fit the dash pad first, so when you make the apillars you can align the bottom up with the dash/window. Cutting the pad wasnt bad at all, but the apillars took me awhile cause of the trial and error when fitting them. If I could go back i would prolly see what it looks like using the 4th gen apillar all the way up the 3rd gen piece, and not just half way.
Heres an idea of how much i cut the dash pad. Ended up slowly trimming abit more, and cutting off the slits on the ends that the 4th gen apillars grab/lock onto.
Heres an idea of how much i cut the dash pad. Ended up slowly trimming abit more, and cutting off the slits on the ends that the 4th gen apillars grab/lock onto.
For the pillars, I want to try to run the 4th gen pillars right up to the T-tops. This way, the splice/joint is not in my field of view.
08-05-2013, 06:50 PM
#164
Senior Member
iTrader: (16)
Join Date: Oct 2005
Location: Crestview, Florida
Posts: 651
Likes: 0
Received 0 Likes
on
0 Posts
Car: 86 IROC-Z, 98 Z28
Engine: 370 LSx, LS1
Transmission: T56's
Axle/Gears: 3.73, 3.42
Re: 1989 RS - LS1/T56 Build
Yea for the template I used a paper/fabric type sheet, so it would lay down better. I traced a thirdgens dash pad cover(the carpeted one) to get the shape of the windshield area. Put it in place in the car and traced the dash outline the best I could. This doesnt need to be exact, just good enough to locate your template onto the 4th gens dash pad for you to cut.
Remember, its easier to have to trim more off then to add some back. Those things are expensive.
Remember, its easier to have to trim more off then to add some back. Those things are expensive.
08-06-2013, 11:18 AM
#165
Member
Thread Starter
Join Date: May 2005
Location: Monroe, GA
Posts: 247
Likes: 0
Received 0 Likes
on
0 Posts
Car: 1989 RS
Engine: LS1 - HP Tuners Enhanced 2Bar OS
Transmission: T56 - Pro 5.0
Axle/Gears: 9 Inch - 31 Spl Tru-Trac - 4.11
Re: 1989 RS - LS1/T56 Build
Sounds like my plan. I have either an air body saw or an air cutoff tool. Which would you recommend? Either will be doing more melting than chip removal. So, I don't think either would be too bad.
How does yours fit up against the glass? It looks like the area immediately in front of the instrument cluster might be problematic.
How does yours fit up against the glass? It looks like the area immediately in front of the instrument cluster might be problematic.
08-06-2013, 07:33 PM
#166
Senior Member
iTrader: (16)
Join Date: Oct 2005
Location: Crestview, Florida
Posts: 651
Likes: 0
Received 0 Likes
on
0 Posts
Car: 86 IROC-Z, 98 Z28
Engine: 370 LSx, LS1
Transmission: T56's
Axle/Gears: 3.73, 3.42
Re: 1989 RS - LS1/T56 Build
I used a dremel with those fancy cutoff wheels and it worked really well. I'd lean toward the cutoff wheel. Fitment is great, you cant see where the cut line is.
Area infront of the cluster?
Area infront of the cluster?
08-06-2013, 07:56 PM
#167
Member
Thread Starter
Join Date: May 2005
Location: Monroe, GA
Posts: 247
Likes: 0
Received 0 Likes
on
0 Posts
Car: 1989 RS
Engine: LS1 - HP Tuners Enhanced 2Bar OS
Transmission: T56 - Pro 5.0
Axle/Gears: 9 Inch - 31 Spl Tru-Trac - 4.11
Re: 1989 RS - LS1/T56 Build
Oh, the instrument cluster is slightly higher than the rest of the dash. I was wondering if that part was going to be too high where it met the windshield. But, on yours, I can see that the cut was right about where that area flattens out. (If that makes sense).
08-09-2013, 01:00 AM
#168
Senior Member
Join Date: Aug 2010
Location: Lincoln, NE
Posts: 680
Likes: 0
Received 1 Like
on
1 Post
Car: 86 Iroc-Z28
Engine: 5.3
Transmission: 4l60
Re: 1989 RS - LS1/T56 Build
abadv8 im doing the 4th gen door panels 2 questions how did you get the panel to lay flat it seems on mine the middle bottom piece covered in carpet is to deep also how did you get the door lock indicators to fit(3rd gen rods to long) also the door handles?
08-09-2013, 09:12 AM
#169
Member
Thread Starter
Join Date: May 2005
Location: Monroe, GA
Posts: 247
Likes: 0
Received 0 Likes
on
0 Posts
Car: 1989 RS
Engine: LS1 - HP Tuners Enhanced 2Bar OS
Transmission: T56 - Pro 5.0
Axle/Gears: 9 Inch - 31 Spl Tru-Trac - 4.11
Re: 1989 RS - LS1/T56 Build
The bottom of the door panel does stick out about an inch. The pocket on the bottom is what causes that. With two screws in the front edge of the door, and one in the back, it holds the bottom as close as you're going to get it. If you wonder what that looks like, that's how I did mine.
For the lock rods, I cut them off at the first 90* bend. I think I cut something like 2" off of it. If you put the actuator rods through the door handle trim pieces, it's pretty obvious where you need to cut it.
The door handles are held in by one screw at the back of the lever. Not real elegant, but it works. I'll probably pull it all apart and redo it this winter.
If you need pictures of anything, let me know.
08-12-2013, 02:01 PM
#170
Junior Member
iTrader: (1)

Join Date: Nov 2012
Location: Winder, Ga
Posts: 41
Likes: 0
Received 0 Likes
on
0 Posts
Car: 1987 Camaro RS
Engine: 350
Transmission: T56
Re: 1989 RS - LS1/T56 Build
Continued from previous post.
The O2 bung showed the same porosity. This is common with improperly prepared weld joints.

The inside of the merge tells a whole different story... You can see a lot of smooth filler metal deposits, definitely MIG work. Not the cleanest of edges inside either.

The welds on the inside of the flange ports were at least cleaned up.

A few of the welds on the outside of the collectors showed quite a bit of heat tint. Again, normal with stainless welding. It looks like they might have used pulsed MIG though.
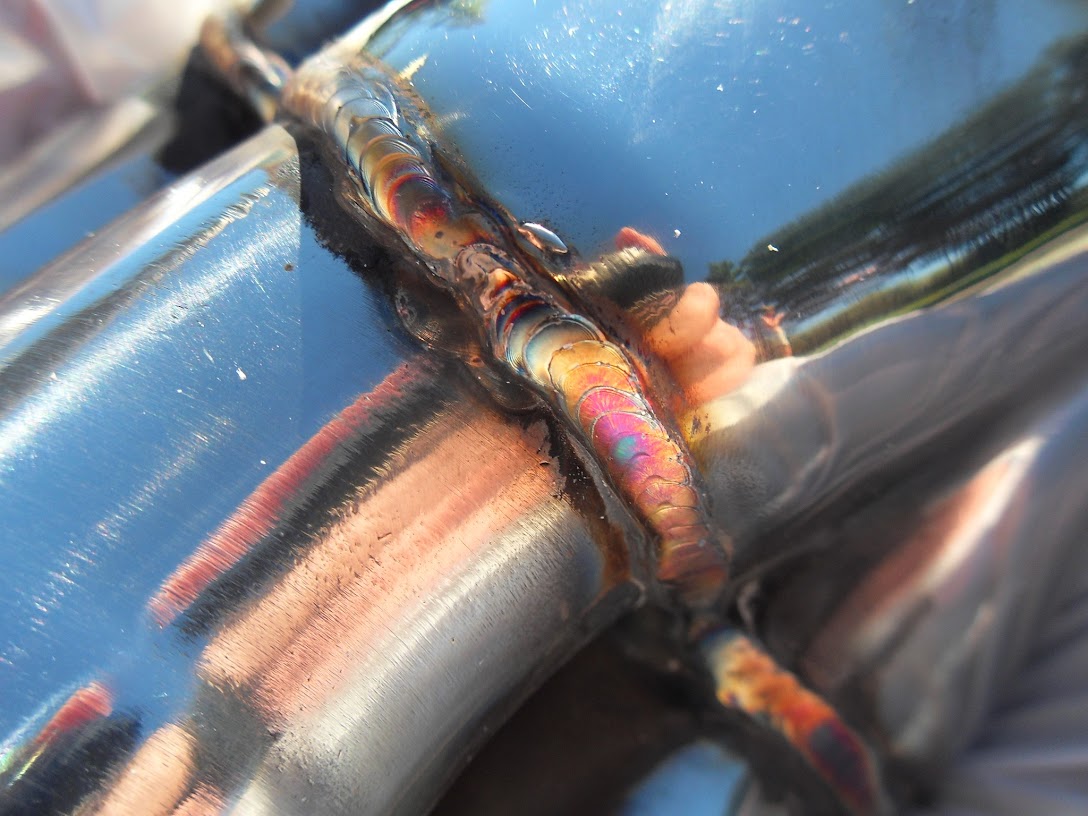
Notice the grime from the raw material. I'd guess they welded it up prior to cleaning it.

Continued... fitment...
The O2 bung showed the same porosity. This is common with improperly prepared weld joints.
The inside of the merge tells a whole different story... You can see a lot of smooth filler metal deposits, definitely MIG work. Not the cleanest of edges inside either.
The welds on the inside of the flange ports were at least cleaned up.
A few of the welds on the outside of the collectors showed quite a bit of heat tint. Again, normal with stainless welding. It looks like they might have used pulsed MIG though.
Notice the grime from the raw material. I'd guess they welded it up prior to cleaning it.
Continued... fitment...
08-12-2013, 02:34 PM
#171
Member
Thread Starter
Join Date: May 2005
Location: Monroe, GA
Posts: 247
Likes: 0
Received 0 Likes
on
0 Posts
Car: 1989 RS
Engine: LS1 - HP Tuners Enhanced 2Bar OS
Transmission: T56 - Pro 5.0
Axle/Gears: 9 Inch - 31 Spl Tru-Trac - 4.11
Re: 1989 RS - LS1/T56 Build
Now, when I build my hot side and down pipe, I may be looking for some nicer parts...
08-16-2013, 12:02 AM
#172
Junior Member

Join Date: Mar 2013
Location: San Diego,CA
Posts: 46
Likes: 0
Received 0 Likes
on
0 Posts
Car: 1989 Camaro RS
Engine: V8 5.0
Transmission: Automatic
Re: 1989 RS - LS1/T56 Build
HELPPPPP PLEASE, I HAVE A QUESTION, I HAVE A 1989 CAMARO RS. WHAT ARE THE YEARS A SEATS CAN BOLT ONTO MY CAMARO? WILL A 1995 CAMARO WORK FOR ME. THANK YOU
08-16-2013, 12:23 AM
#173
Senior Member
Join Date: Aug 2010
Location: Lincoln, NE
Posts: 680
Likes: 0
Received 1 Like
on
1 Post
Car: 86 Iroc-Z28
Engine: 5.3
Transmission: 4l60
Re: 1989 RS - LS1/T56 Build
All 93-02 camaro or firebird seats are direct replacements unless getting powered seats in which all you have to do is wire up the ground and pos. so yes a 95 will do fine
08-16-2013, 12:31 AM
#174
Junior Member
Join Date: Mar 2013
Location: San Diego,CA
Posts: 46
Likes: 0
Received 0 Likes
on
0 Posts
Car: 1989 Camaro RS
Engine: V8 5.0
Transmission: Automatic
Re: 1989 RS - LS1/T56 Build
THANK YOU 86_IROCZ-28!!!! I found some locally for 50 bucks not ripped or damaged. I wanted to know if they will work before buying.
08-22-2013, 05:11 PM
#175

Re: 1989 RS - LS1/T56 Build
Exactly. I didn't want to get too invested in the exhaust, as I do plan to go forced induction sometime in the near future. For what they cost, and the function they serve, I'm satisfied.
Now, when I build my hot side and down pipe, I may be looking for some nicer parts...
Now, when I build my hot side and down pipe, I may be looking for some nicer parts...
09-08-2013, 02:02 AM
#176
Senior Member
Join Date: Aug 2010
Location: Lincoln, NE
Posts: 680
Likes: 0
Received 1 Like
on
1 Post
Car: 86 Iroc-Z28
Engine: 5.3
Transmission: 4l60
Re: 1989 RS - LS1/T56 Build
Any updates man? Also if you could pics of the door handle on without the door panel on would be great and aprecciated there the only thing holding me up on finishing the doors
09-08-2013, 06:53 AM
#177
Member
Thread Starter
Join Date: May 2005
Location: Monroe, GA
Posts: 247
Likes: 0
Received 0 Likes
on
0 Posts
Car: 1989 RS
Engine: LS1 - HP Tuners Enhanced 2Bar OS
Transmission: T56 - Pro 5.0
Axle/Gears: 9 Inch - 31 Spl Tru-Trac - 4.11
Re: 1989 RS - LS1/T56 Build
I'll make it a priority when I get home from Germany on the 20th.
12-31-2013, 06:07 AM
#178
Member
iTrader: (5)
Join Date: Jan 2004
Location: Pittsburgh
Posts: 458
Likes: 0
Received 0 Likes
on
0 Posts
Car: 88 iroc vert
Re: 1989 RS - LS1/T56 Build
awesome write up!!! i will be referring to this a number of times when i start mine!! i just got a 98 z im going to use for my vert swap.
is there any slack on the wires for you to hide them on the pass side fender to behind the strut tower??
what was needed for the front brake swap?
can you post some pics you of the heater box fab??
finally, lol, do you have a list of additional parts you needed to finish??
GREAT JOB!!!
thanks,
mike
is there any slack on the wires for you to hide them on the pass side fender to behind the strut tower??
what was needed for the front brake swap?
can you post some pics you of the heater box fab??
finally, lol, do you have a list of additional parts you needed to finish??
GREAT JOB!!!
thanks,
mike
12-31-2013, 11:06 AM
#179
Member
Thread Starter
Join Date: May 2005
Location: Monroe, GA
Posts: 247
Likes: 0
Received 0 Likes
on
0 Posts
Car: 1989 RS
Engine: LS1 - HP Tuners Enhanced 2Bar OS
Transmission: T56 - Pro 5.0
Axle/Gears: 9 Inch - 31 Spl Tru-Trac - 4.11
Re: 1989 RS - LS1/T56 Build
awesome write up!!! i will be referring to this a number of times when i start mine!! i just got a 98 z im going to use for my vert swap.
is there any slack on the wires for you to hide them on the pass side fender to behind the strut tower??
what was needed for the front brake swap?
can you post some pics you of the heater box fab??
finally, lol, do you have a list of additional parts you needed to finish??
GREAT JOB!!!
thanks,
mike
is there any slack on the wires for you to hide them on the pass side fender to behind the strut tower??
what was needed for the front brake swap?
can you post some pics you of the heater box fab??
finally, lol, do you have a list of additional parts you needed to finish??
GREAT JOB!!!
thanks,
mike
There was not enough wire to route the harness into the fender (I did try though).
The front brake swap required cutting down the spindles per the "Luke Skaff" website. I also laser cut the caliper abutment brackets at work. The rest is pretty straightforward.
I'll have to do some digging on the heater box picks. I know i didnt take a lot because it didnt feel like i was making a lot of progress. But, the best advice i can give is to be prepared to be fully committed to the HVAC swap. there was a lot of cutting required.
I kept every one of my receipts, and maintained an excel spreadsheet to keep tabs on the project. I still need to update everything, but i can give a really good idea of what's needed.
12-31-2013, 12:31 PM
#180

Re: 1989 RS - LS1/T56 Build
Good Job! I was looking at those headers but Im not a fan of 1 5/8 primarys. I spoke to the guy that makes them and he said they only make the 1 5/8 and will be making a 2 inch in a month or so. Maybe he was wrong?
02-11-2014, 11:59 AM
#181
Member
Thread Starter
Join Date: May 2005
Location: Monroe, GA
Posts: 247
Likes: 0
Received 0 Likes
on
0 Posts
Car: 1989 RS
Engine: LS1 - HP Tuners Enhanced 2Bar OS
Transmission: T56 - Pro 5.0
Axle/Gears: 9 Inch - 31 Spl Tru-Trac - 4.11
Re: 1989 RS - LS1/T56 Build
Time to start thinking about getting this thing on the road again. Does anyone know the best place to get either a Ford 9” or a GM 12 bolt, bolt-in rear? I’d like an Auburn limited slip or a Tru-Trac carrier, and 3.70-ish gears.
I have some issues with the 10 bolt that is currently installed. For what it will cost me to get it taken care of, I would be money ahead to just install a better rear.
Other items on the list before summer are to install my SFC’s, get my A/C installed and charged, finish the sound deadening, replace the plugs, wires, and coils, and finally reinstall the MAF sensor.
02-11-2014, 04:02 PM
#182
Senior Member
Join Date: Mar 2013
Location: South Carolina
Posts: 540
Likes: 0
Received 9 Likes
on
8 Posts
Car: 92 Vette, 83 Camaro
Engine: 305 going to 95 LT1
Transmission: 5 speed going to T56 6 speed
Axle/Gears: 3.73 posi with disc brakes
Re: 1989 RS - LS1/T56 Build
I'm trying to decide which way to go with my diff. I think I'll just go with an Eaton posi to keep things simple.
02-11-2014, 04:25 PM
#183
Member
Thread Starter
Join Date: May 2005
Location: Monroe, GA
Posts: 247
Likes: 0
Received 0 Likes
on
0 Posts
Car: 1989 RS
Engine: LS1 - HP Tuners Enhanced 2Bar OS
Transmission: T56 - Pro 5.0
Axle/Gears: 9 Inch - 31 Spl Tru-Trac - 4.11
Re: 1989 RS - LS1/T56 Build
I've heard that the Posi friction disks aren't what they used to be. What does a Dana 70U use for the carrier? The one in our old Dodge diesel rocks. I think it's an Auburn... or something... conical clutch.
 02-12-2014, 07:06 AM
#185
Senior Member
Join Date: Mar 2013
Location: South Carolina
Posts: 540
Likes: 0
Received 9 Likes
on
8 Posts
Car: 92 Vette, 83 Camaro
Engine: 305 going to 95 LT1
Transmission: 5 speed going to T56 6 speed
Axle/Gears: 3.73 posi with disc brakes
Re: 1989 RS - LS1/T56 Build
Do you have any pictures of the clutch master cylinder mounted before you mounted the brake booster? My 83 had a manual linkage not a hydraulic set up and I need a little help especially what I have to do to the firewall. Thanks
My e-mail tomdank6@gmail.com
My e-mail tomdank6@gmail.com
02-17-2014, 06:41 PM
#186

Re: 1989 RS - LS1/T56 Build
well I got to get in on this build as well, awesome work my friend, question, did the headers have any leaks or anything? I'm getting a set, I'm in the same boat as you don't want to spend a bunch of money on headers when its needed somewhere else, I love to see third gens getting a make over! we need to keep this generation alive, thanks for you info and pics!
02-18-2014, 01:35 AM
#187
Member
Thread Starter
Join Date: May 2005
Location: Monroe, GA
Posts: 247
Likes: 0
Received 0 Likes
on
0 Posts
Car: 1989 RS
Engine: LS1 - HP Tuners Enhanced 2Bar OS
Transmission: T56 - Pro 5.0
Axle/Gears: 9 Inch - 31 Spl Tru-Trac - 4.11
Re: 1989 RS - LS1/T56 Build
Strick,
I don't see anything in my photos folder with just the master mounted. The easiest way that I can think of to get the location right would be to take a set of hydraulic pedals (3rd or 4th gen), bolt them up, then trace the bolt hole location to the inside of the firewall. After that, make a template of the master cylinder flange, and line it up with the markings from the pedal set. That should put you right where you need to be. That is essentially what I did with mine.
ZZ383,
Despite all the bashing on the cheap headers, they actually work just fine. There was one caveat with frame clearance on the 1-3/4" primaries. But, I don't think those are offered anymore. I think they're 1-5/8" now. I had to pull mine to gain a little more clearance between the passenger sub-frame and the #4 or #6 primary. Otherwise, they're just stainless tubes. There's not much to go wrong.
02-18-2014, 07:35 AM
#188
Senior Member
Join Date: Mar 2013
Location: South Carolina
Posts: 540
Likes: 0
Received 9 Likes
on
8 Posts
Car: 92 Vette, 83 Camaro
Engine: 305 going to 95 LT1
Transmission: 5 speed going to T56 6 speed
Axle/Gears: 3.73 posi with disc brakes
Re: 1989 RS - LS1/T56 Build
Strick,
I don't see anything in my photos folder with just the master mounted. The easiest way that I can think of to get the location right would be to take a set of hydraulic pedals (3rd or 4th gen), bolt them up, then trace the bolt hole location to the inside of the firewall. After that, make a template of the master cylinder flange, and line it up with the markings from the pedal set. That should put you right where you need to be. That is essentially what I did with mine.
I don't see anything in my photos folder with just the master mounted. The easiest way that I can think of to get the location right would be to take a set of hydraulic pedals (3rd or 4th gen), bolt them up, then trace the bolt hole location to the inside of the firewall. After that, make a template of the master cylinder flange, and line it up with the markings from the pedal set. That should put you right where you need to be. That is essentially what I did with mine.
03-15-2014, 06:02 AM
#190
Senior Member
Join Date: Mar 2013
Location: South Carolina
Posts: 540
Likes: 0
Received 9 Likes
on
8 Posts
Car: 92 Vette, 83 Camaro
Engine: 305 going to 95 LT1
Transmission: 5 speed going to T56 6 speed
Axle/Gears: 3.73 posi with disc brakes
Re: 1989 RS - LS1/T56 Build
Now we're working on the frame part of the front end. The weather has started to cooperate. Unfortunately, our engine builder is really getting busy with the circle track guys. That's where his money is. The rotating assembly came in and it looks pretty nice. I've been working on the wiring harness. Using both helms manuals, I'm identifying each wire coming out of the PCM. The wires going to the auto trans are not going to be used so I'm weeding them out. There are several wires that I don't have a clue what they do. I'll ask about them later. Does anybody know how to undo the plugs that go into the PCM? I don't want to break the plastic cover part of these plugs, but I want to get to the back of them where the wires are inserted in so I can remove the wires cleanly. More later.
03-17-2014, 09:57 AM
#191
Member
Thread Starter
Join Date: May 2005
Location: Monroe, GA
Posts: 247
Likes: 0
Received 0 Likes
on
0 Posts
Car: 1989 RS
Engine: LS1 - HP Tuners Enhanced 2Bar OS
Transmission: T56 - Pro 5.0
Axle/Gears: 9 Inch - 31 Spl Tru-Trac - 4.11
Re: 1989 RS - LS1/T56 Build
Do you mean the �LS� ECM? If so, there are 7mm screws holding the plugs to the ECM. They are in the middle of the plug. After those are off, there are just some protective covers that snap off, and you�ll have to release the individual pins by depressing a little locking tab. They make a special tool for those, but I have a piece of stainless welding wire in a plastic handle that works just fine.
Or, do you mean the 3rd Gen ECM? Those just have clips on them. The only thing I had a tough time with was the firewall bulkhead connecter on the 3rd gen harness. That had a 7mm screw in the center of the connector on the engine side of the firewall, if I remember correctly.
Or, do you mean the 3rd Gen ECM? Those just have clips on them. The only thing I had a tough time with was the firewall bulkhead connecter on the 3rd gen harness. That had a 7mm screw in the center of the connector on the engine side of the firewall, if I remember correctly.
03-27-2014, 05:57 PM
#192
Re: 1989 RS - LS1/T56 Build
I just installed mine and have the same problem on the passenger side, also the rear exhaust port has a gap between the header and the gasket so its going to be a bad leek! I hope they can send me another passenger side header, if not I got to work so magic, but other than that they look great!
03-27-2014, 09:05 PM
#194
Member
Thread Starter
Join Date: May 2005
Location: Monroe, GA
Posts: 247
Likes: 0
Received 0 Likes
on
0 Posts
Car: 1989 RS
Engine: LS1 - HP Tuners Enhanced 2Bar OS
Transmission: T56 - Pro 5.0
Axle/Gears: 9 Inch - 31 Spl Tru-Trac - 4.11
Re: 1989 RS - LS1/T56 Build
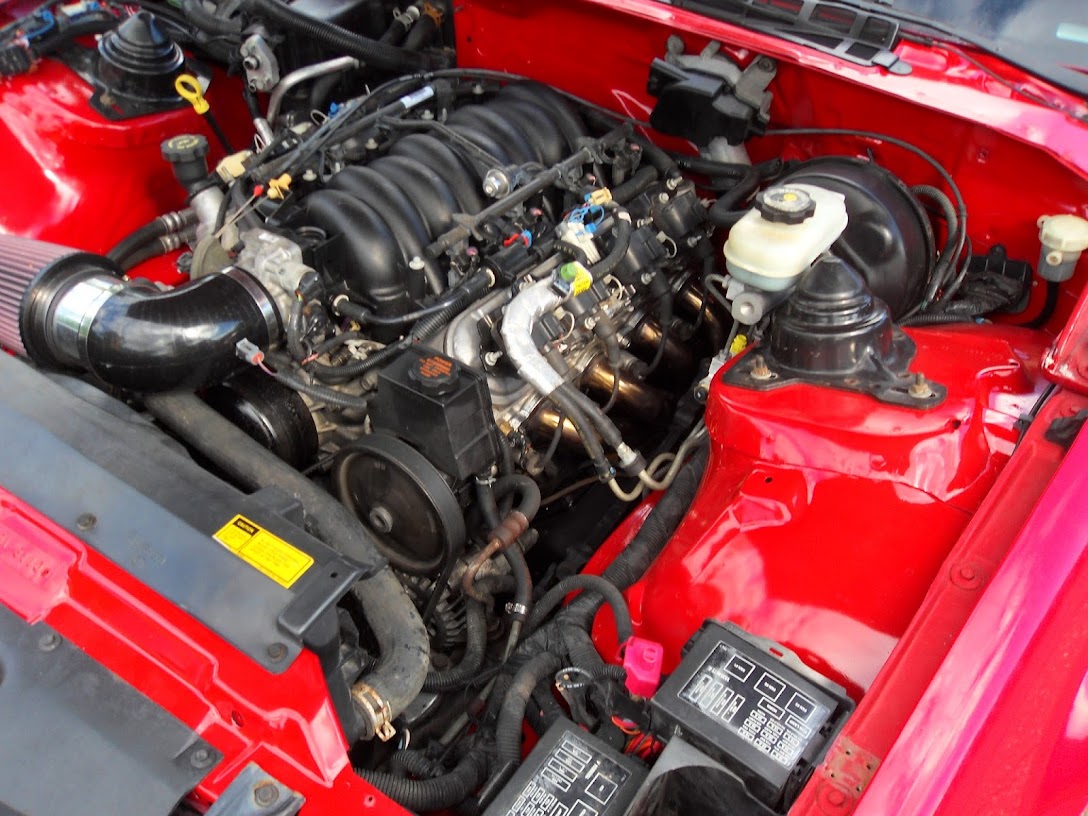
I have a stainless Flowmaster 3" catback. I need to trim it up this spring, as the pipe over the axle is little too long and pushing the muffler toward the driver's side.
04-28-2014, 12:58 AM
#195
Junior Member
Join Date: Feb 2009
Location: CALI
Posts: 24
Likes: 0
Received 0 Likes
on
0 Posts
Car: 89' RS camaro Convertible
Engine: 305 TBI
Re: 1989 RS - LS1/T56 Build
hey what proportioning valve did you use? im not sure if i missed it on your post but im going with the 4th gen booster and master with the 4th gen rear end. what did you do with the E brake cables?
04-28-2014, 08:43 AM
#196
Member
Thread Starter
Join Date: May 2005
Location: Monroe, GA
Posts: 247
Likes: 0
Received 0 Likes
on
0 Posts
Car: 1989 RS
Engine: LS1 - HP Tuners Enhanced 2Bar OS
Transmission: T56 - Pro 5.0
Axle/Gears: 9 Inch - 31 Spl Tru-Trac - 4.11
Re: 1989 RS - LS1/T56 Build
I used this valve:
AC Delco 172-2005
I just cut the bracket off the bottom, and plumbed it in.
For the e-brake, unfortunately, I do not have any photos. What I did there was pull the entire assembly (handle to rear end) from the 2000. I trimmed some of the protrusions off the 3rd gen bracket in the tunnel. This way the 4th gen bracket could sit flush. Then I started at the rear and used the cables to find an appropriate position for the bracket. Once that was set, I drilled holes though the 3rd gen bracket and tunnel, and mounted it with carriage bolts (with the nuts on the bottom of the bracket).
Hope this helps.
05-04-2014, 09:25 AM
#199
Member
Thread Starter
Join Date: May 2005
Location: Monroe, GA
Posts: 247
Likes: 0
Received 0 Likes
on
0 Posts
Car: 1989 RS
Engine: LS1 - HP Tuners Enhanced 2Bar OS
Transmission: T56 - Pro 5.0
Axle/Gears: 9 Inch - 31 Spl Tru-Trac - 4.11
Re: 1989 RS - LS1/T56 Build
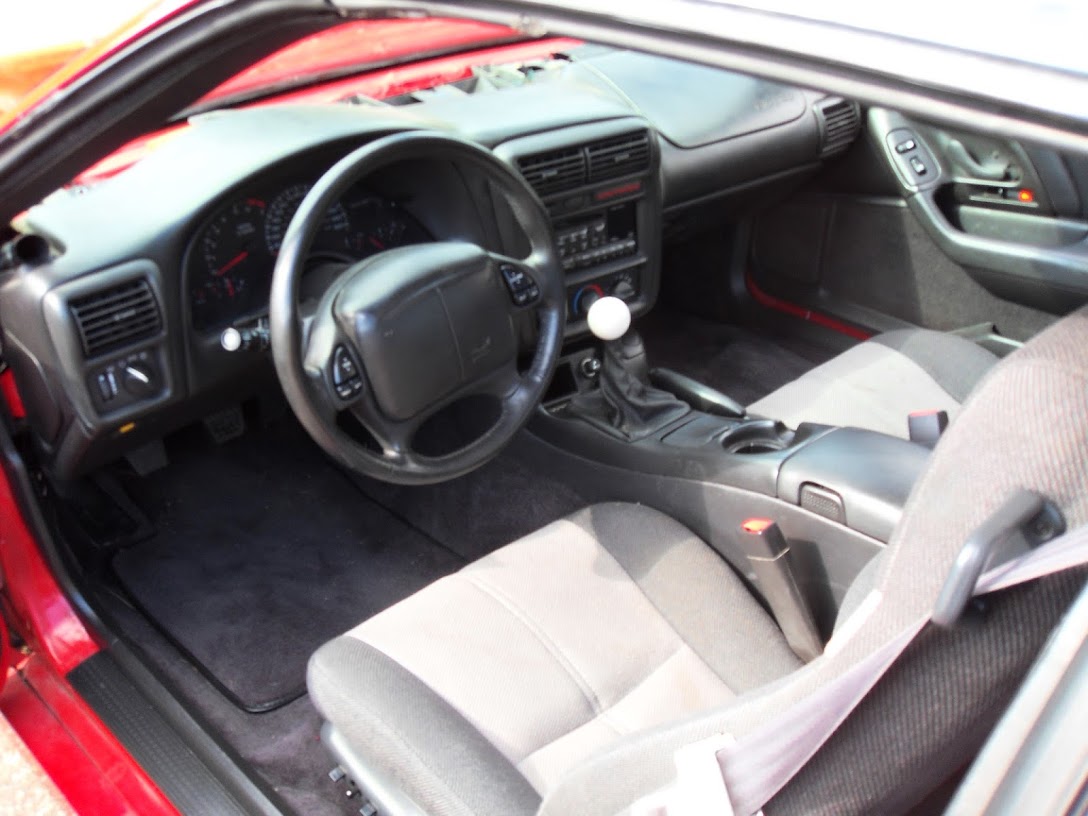
I used the fourth gen airbags as a cosmetic function only. The '89 did not have airbags or ABS. I have all of the wiring in tact for the SRS system from the 2000. However, I chose not connect the airbag modules.
My reason for not connecting the airbag was mostly due to passenger safety. The driver's side airbag deploys from the center of the steering wheel and transmits any impulse forces down the steering column and into the firewall. Since I used the 2000 steering column, the drivers side would function as designed.
However, the passenger's side airbag transmits impulse forces through both dash attachment points and windshield. Since neither of those are the same from the '89 to the 2000, I felt safer just leaving it disabled.
05-04-2014, 08:07 PM
#200
Supreme Member
Join Date: Apr 2010
Location: Modesto, California
Posts: 1,015
Likes: 0
Received 5 Likes
on
4 Posts
Car: 88 Firebird Formula
Engine: LO5 5.7 TBI/Ebl Flash
Transmission: 700R4
Axle/Gears: 2.73 stock rear end
Re: 1989 RS - LS1/T56 Build
This has got to be one of the nicest third gens ive seen. That forshure is the nicest done/looking interior!!!! great job!