LS1 swap for my '89 GTA
 06-22-2014, 10:14 AM
#751
Supreme Member

Thread Starter
iTrader: (1)
Join Date: Mar 2007
Location: Apopka, Florida
Posts: 1,237
Likes: 0
Received 7 Likes
on
6 Posts
Car: 1989 Pontiac Trans Am GTA
Engine: cammed LS1
Transmission: Monster SS 4L65E
Axle/Gears: 9 bolt posi w/ 3.70 gears
Re: LS1 swap for my '89 GTA
Here are some progress pics
All panels that were removed were scrubbed thoroughly inside and out with soap and hot water
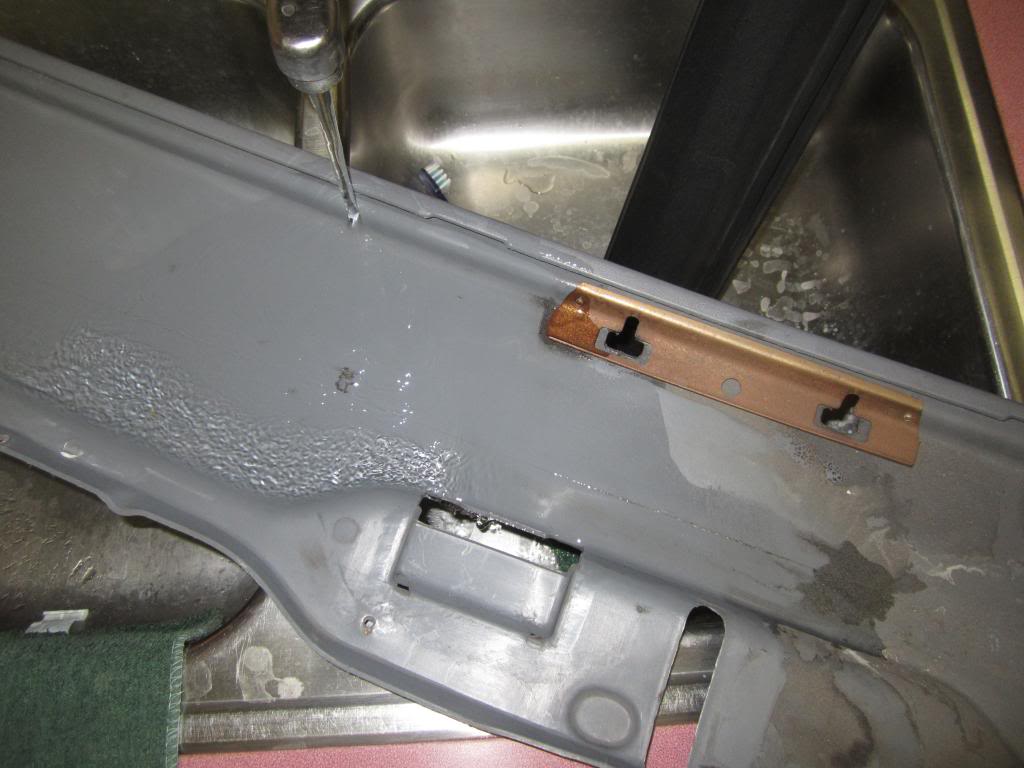
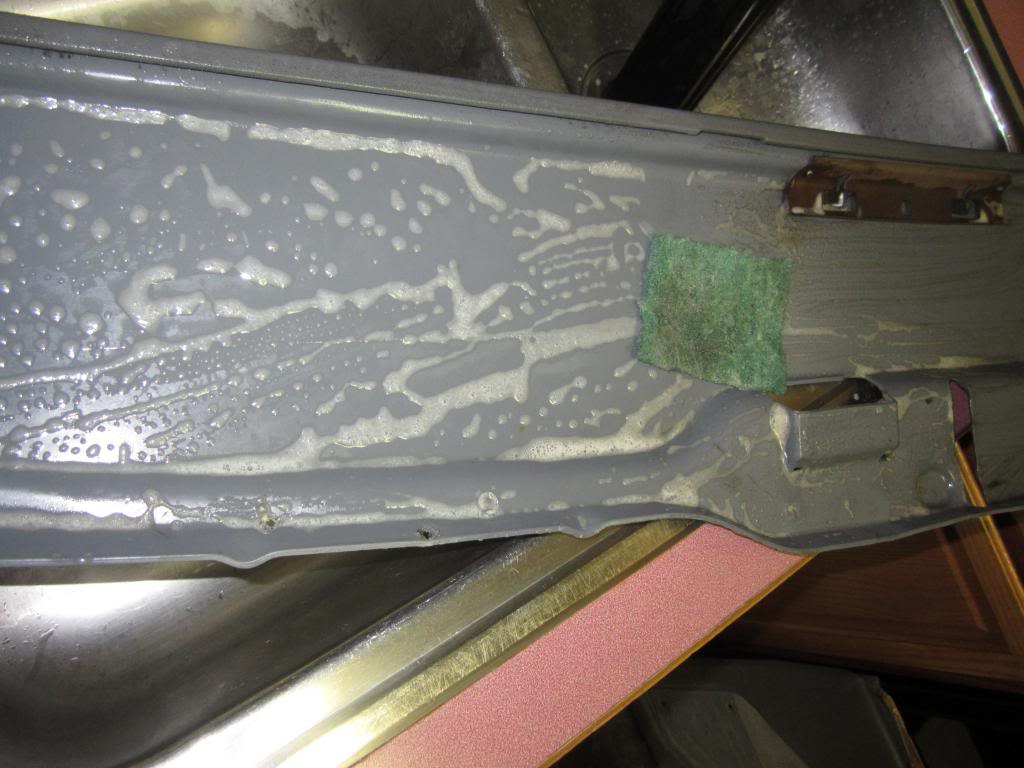
Before starting this process, it is advised to send your significant other off to the spa for the weekend. I had interior panels everywhere in my house. I will wipe each panel down with Xylene or something similar prior to painting them.
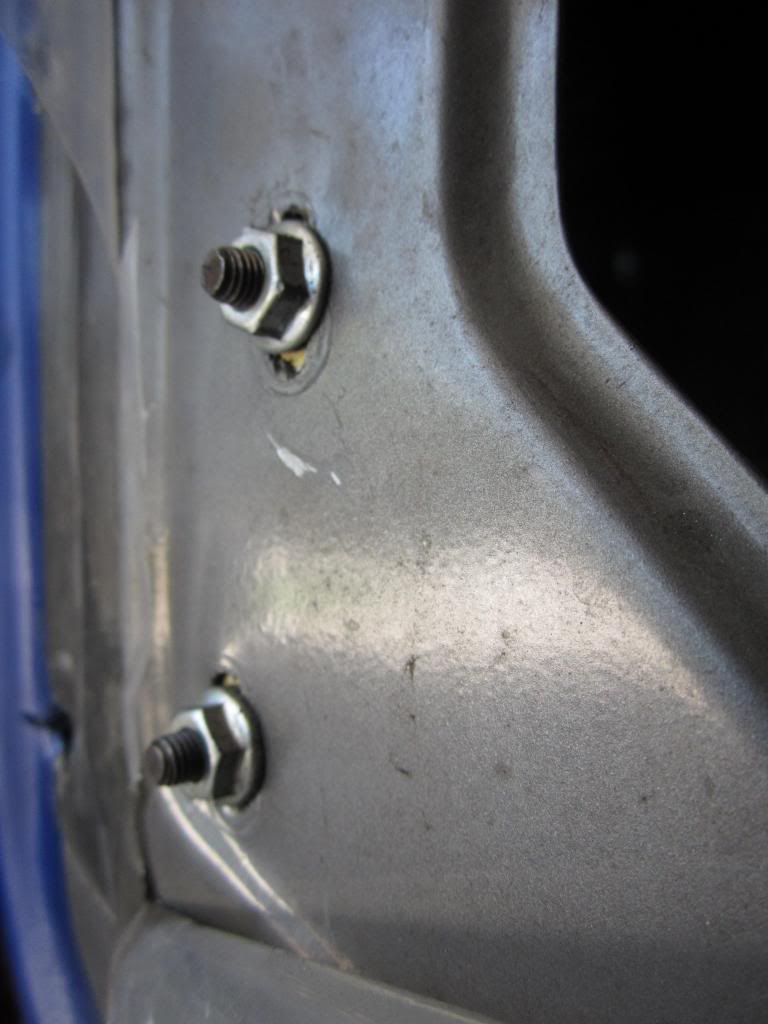
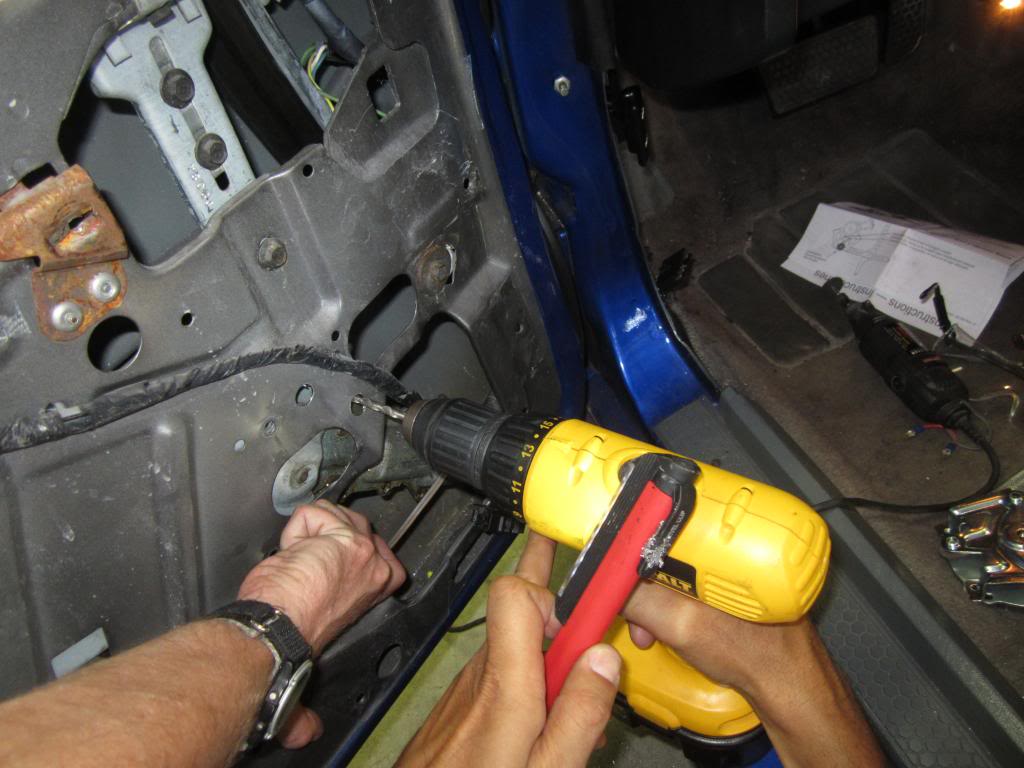
Luis and I replaced the power door lock actuators and power window motors
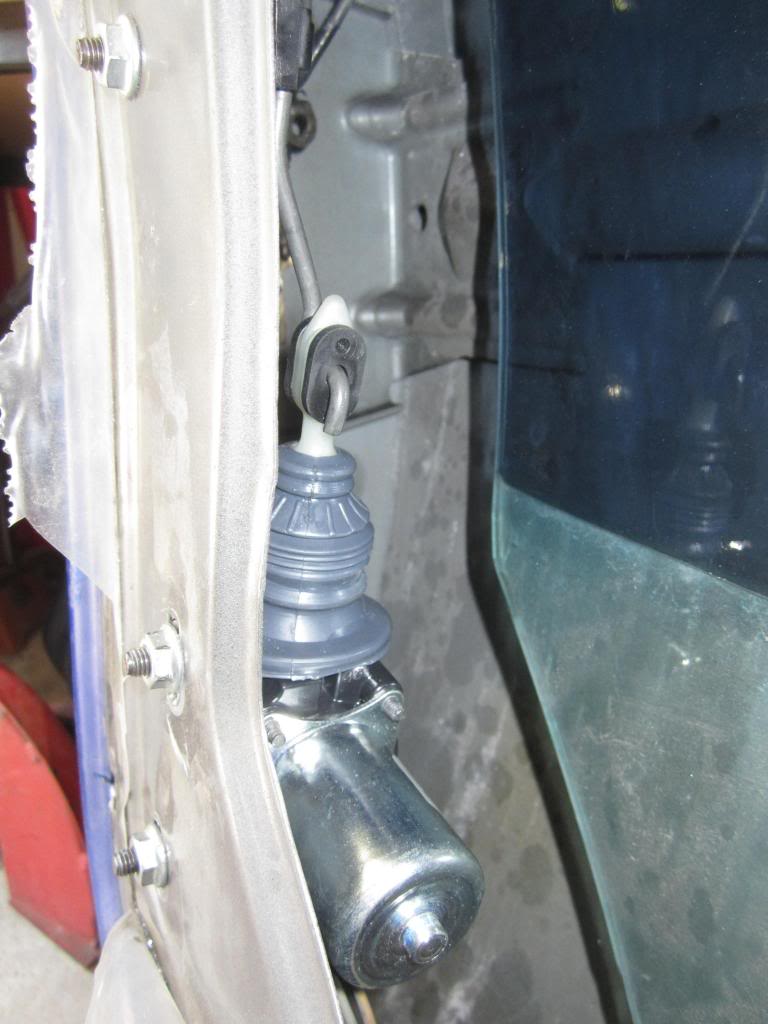
We still couldn't get the new actuators to lock the doors, so we slotted the mounting holes and slid the actuators up toward the top of the door. That solved our problem. That leads me to think that the stock actuators may have been fine. Maybe they just needed to be adjusted.
When removing the power window motors, don't drill out the rivets. Instead, drill three holes where indicated by the arrows
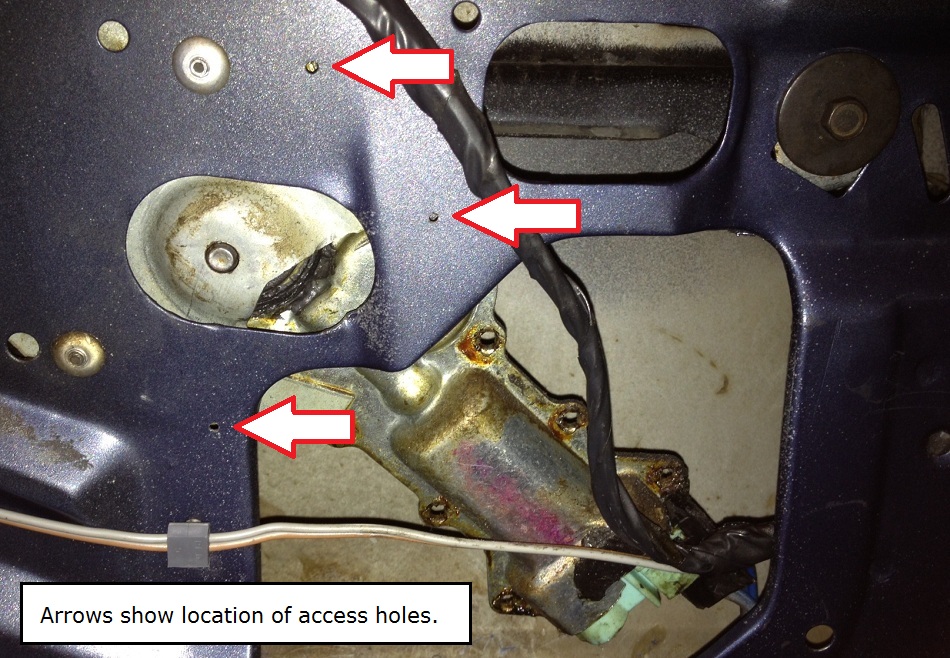
This is a pic from when we did Luis' '84. You can use a flash light from behind to see where the rivets are that will need to be drilled-out so that you drill the three holes in the right place. Don't worry if you are a little off. The holes will need to be made bigger anyway.
I had to hold the motor in place while Luis drilled-out the rivets. You can avoid having that problem by not drilling-out the rivets that connect the motor frame to the door frame. Luis had to learn that the hard way! The passenger side took about a quarter of the time to do.
All panels that were removed were scrubbed thoroughly inside and out with soap and hot water


Before starting this process, it is advised to send your significant other off to the spa for the weekend.
I had interior panels everywhere in my house. I will wipe each panel down with Xylene or something similar prior to painting them.Luis and I replaced the power door lock actuators and power window motors

We still couldn't get the new actuators to lock the doors, so we slotted the mounting holes and slid the actuators up toward the top of the door. That solved our problem. That leads me to think that the stock actuators may have been fine. Maybe they just needed to be adjusted.

When removing the power window motors, don't drill out the rivets. Instead, drill three holes where indicated by the arrows

This is a pic from when we did Luis' '84. You can use a flash light from behind to see where the rivets are that will need to be drilled-out so that you drill the three holes in the right place. Don't worry if you are a little off. The holes will need to be made bigger anyway.

I had to hold the motor in place while Luis drilled-out the rivets. You can avoid having that problem by not drilling-out the rivets that connect the motor frame to the door frame. Luis had to learn that the hard way!
The passenger side took about a quarter of the time to do.  06-22-2014, 10:31 AM
#752
Supreme Member
Thread Starter
iTrader: (1)
Join Date: Mar 2007
Location: Apopka, Florida
Posts: 1,237
Likes: 0
Received 7 Likes
on
6 Posts
Car: 1989 Pontiac Trans Am GTA
Engine: cammed LS1
Transmission: Monster SS 4L65E
Axle/Gears: 9 bolt posi w/ 3.70 gears
Re: LS1 swap for my '89 GTA
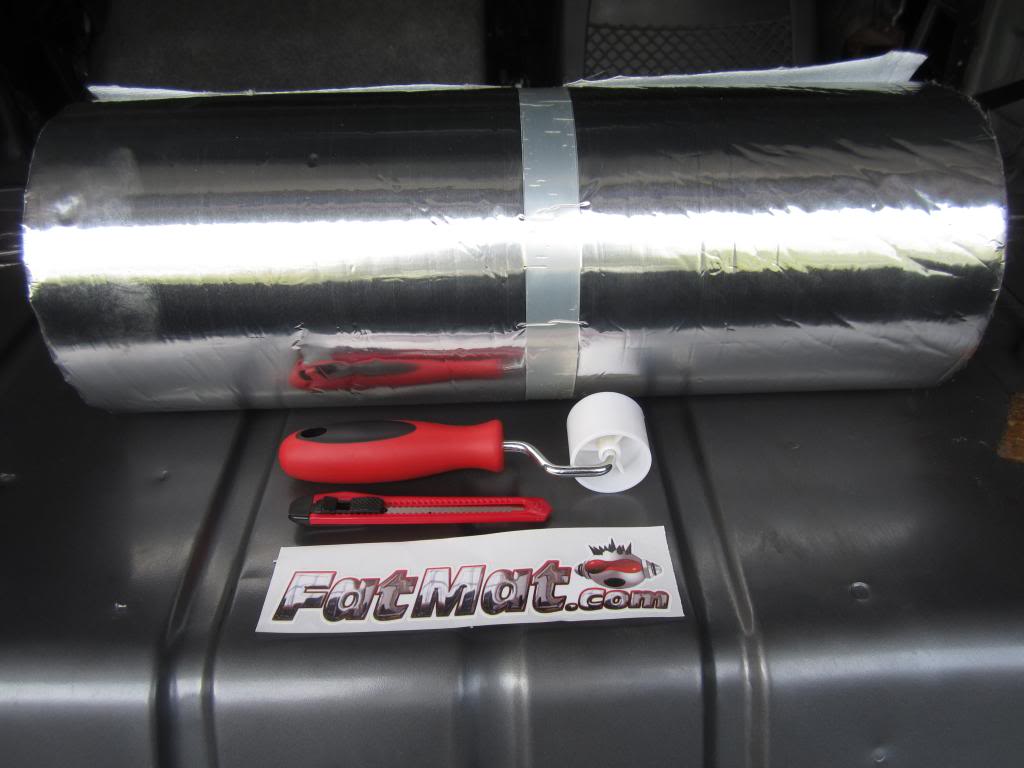
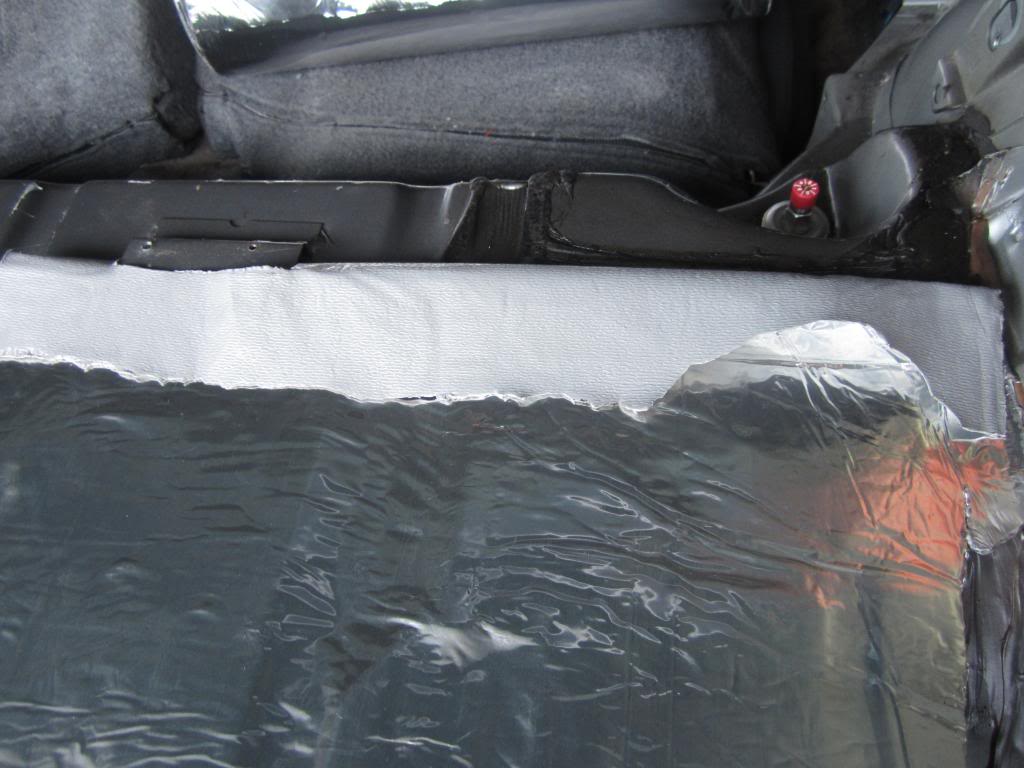
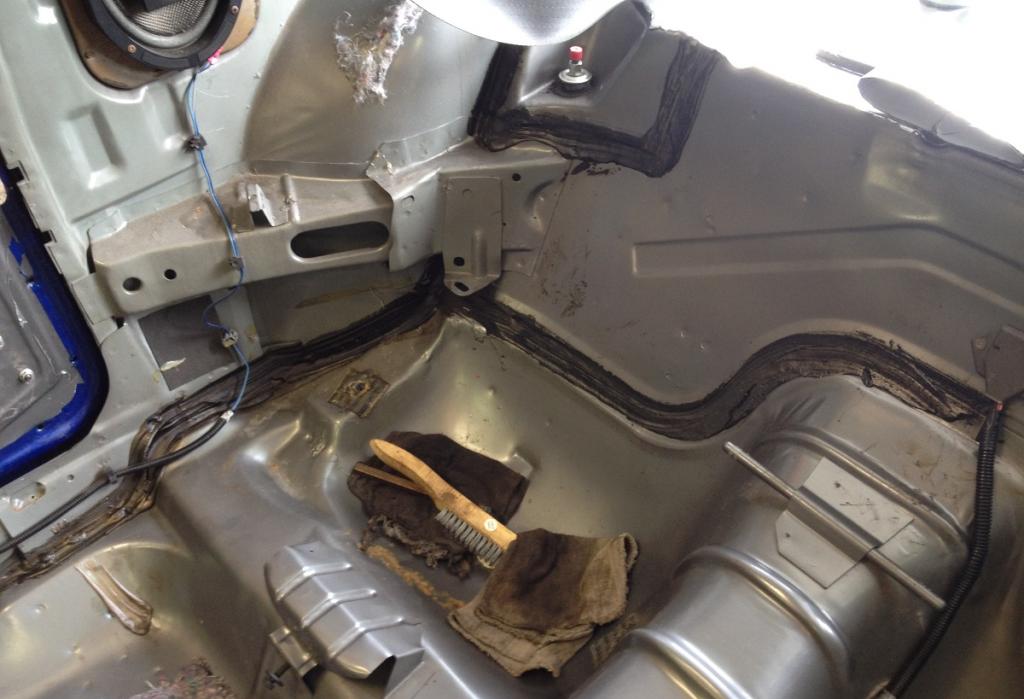
It took me awhile to clean the back end up to the point that I could start laying down the Fatmat.
After removing the carpet, some of the jute padding was left behind where the factory put down adhesive squares to cover-up body plugs. I saturated those squares with Xylene (a similar solvent would work too). After about ten minutes I used a putty knife to scrape the remaining jute padding off. Beware, this is a messy job!
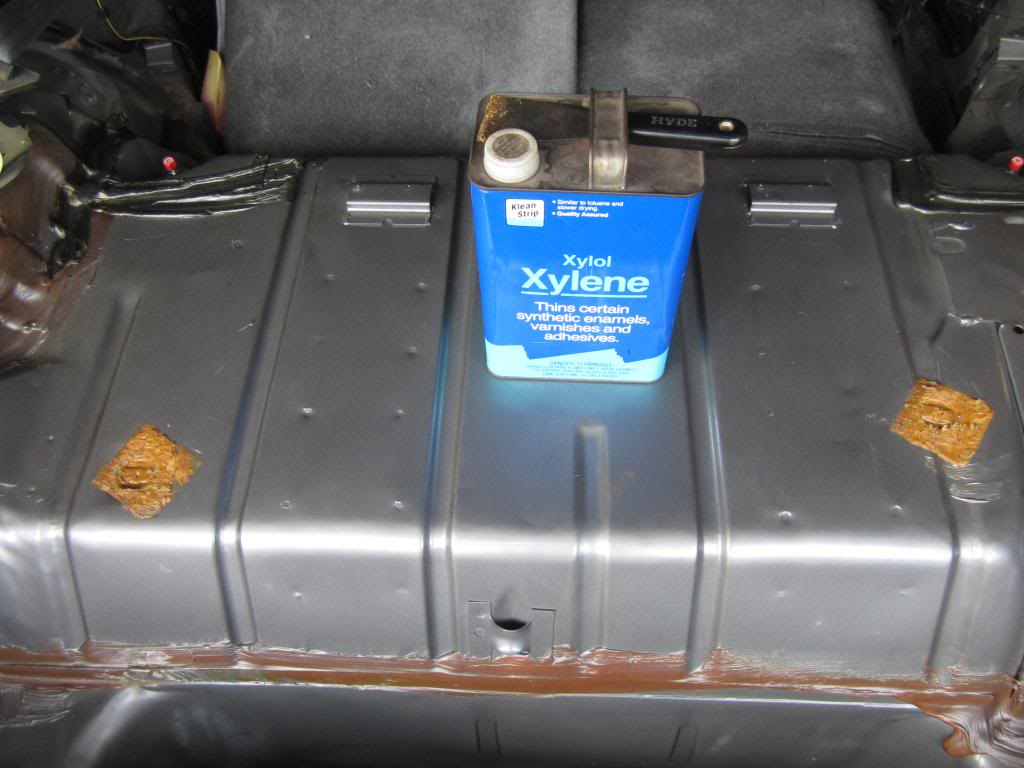
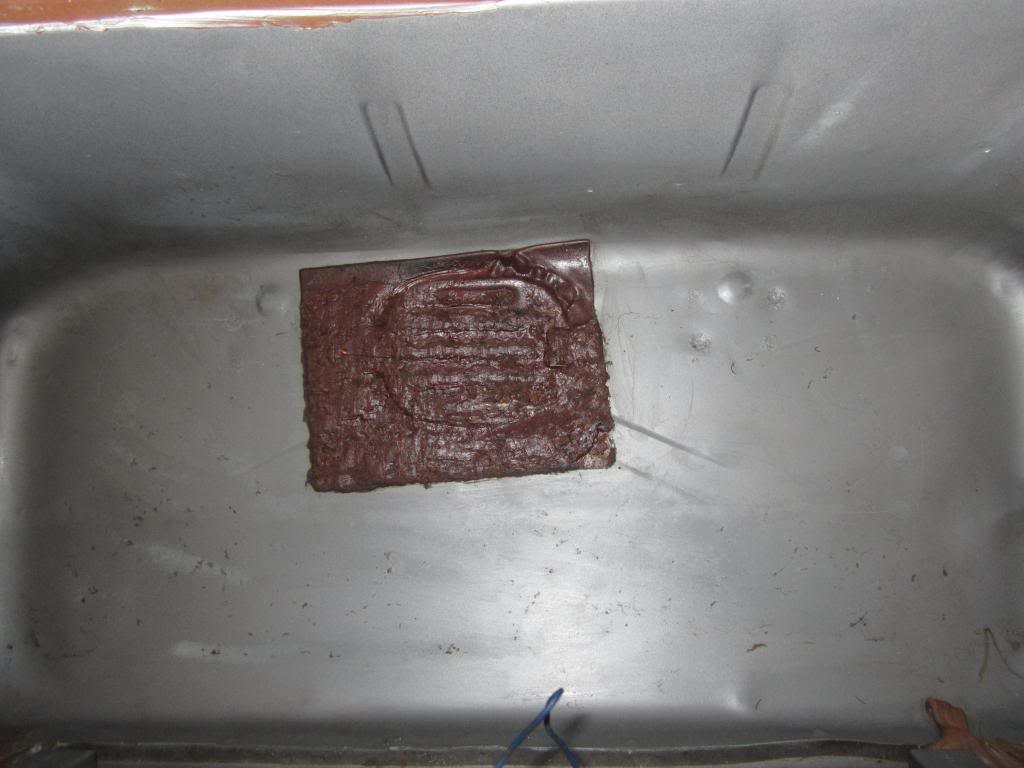
I needed to make sure all of the jute was removed so that I didn't have a massive hump under my Fatmat. The cleaner everything is, the better this stuff will stick.
After removing all of the jute, I proceeded to wipe all of the other surfaces down with the Xylene so that everything was clean.
That was as clean as I could get it after at least a half hour of cleaning it.

After removing the carpet, some of the jute padding was left behind where the factory put down adhesive squares to cover-up body plugs. I saturated those squares with Xylene (a similar solvent would work too). After about ten minutes I used a putty knife to scrape the remaining jute padding off. Beware, this is a messy job!


I needed to make sure all of the jute was removed so that I didn't have a massive hump under my Fatmat. The cleaner everything is, the better this stuff will stick.
After removing all of the jute, I proceeded to wipe all of the other surfaces down with the Xylene so that everything was clean.

That was as clean as I could get it after at least a half hour of cleaning it.
Last edited by dprest68; 12-31-2014 at 10:06 AM. Reason: updated pic
06-22-2014, 08:02 PM
#753
Member

Join Date: Aug 2007
Location: Long Island, NY
Posts: 201
Likes: 0
Received 2 Likes
on
2 Posts
Car: 1992 z28
Engine: LS1
Transmission: T-56
Re: LS1 swap for my '89 GTA
Great progress man! Really love the attention to detail in your build thread. Its the little things like the window motors and fatmat that will really set this car apart when its all said and done. I would like to think that I take a similar approach in the way I handle my projects. Cant wait to see the finished pictures of the fatmat installed. Mind me asking what it would cost to do the whole interior in the fatmat?
06-23-2014, 10:18 AM
#754
Supreme Member
Thread Starter
iTrader: (1)
Join Date: Mar 2007
Location: Apopka, Florida
Posts: 1,237
Likes: 0
Received 7 Likes
on
6 Posts
Car: 1989 Pontiac Trans Am GTA
Engine: cammed LS1
Transmission: Monster SS 4L65E
Axle/Gears: 9 bolt posi w/ 3.70 gears
Re: LS1 swap for my '89 GTA
Great progress man! Really love the attention to detail in your build thread. Its the little things like the window motors and fatmat that will really set this car apart when its all said and done. I would like to think that I take a similar approach in the way I handle my projects. Cant wait to see the finished pictures of the fatmat installed. Mind me asking what it would cost to do the whole interior in the fatmat?
I paid around $240 for the Fatmat and another $10 for the metal tape from the hardware store. So around $250 to do the whole car. Well, hopefully it will be enough to do the whole car. Here a link to the Fatmat:
06-23-2014, 11:28 AM
#755
Supreme Member
Thread Starter
iTrader: (1)
Join Date: Mar 2007
Location: Apopka, Florida
Posts: 1,237
Likes: 0
Received 7 Likes
on
6 Posts
Car: 1989 Pontiac Trans Am GTA
Engine: cammed LS1
Transmission: Monster SS 4L65E
Axle/Gears: 9 bolt posi w/ 3.70 gears
Re: LS1 swap for my '89 GTA
You guys probably already know how to use this stuff, but I'll give a few quick tips just in case. First off, the Fatmat has a backing paper on it so you can cut out the pieces you need before actually sticking them to the car.
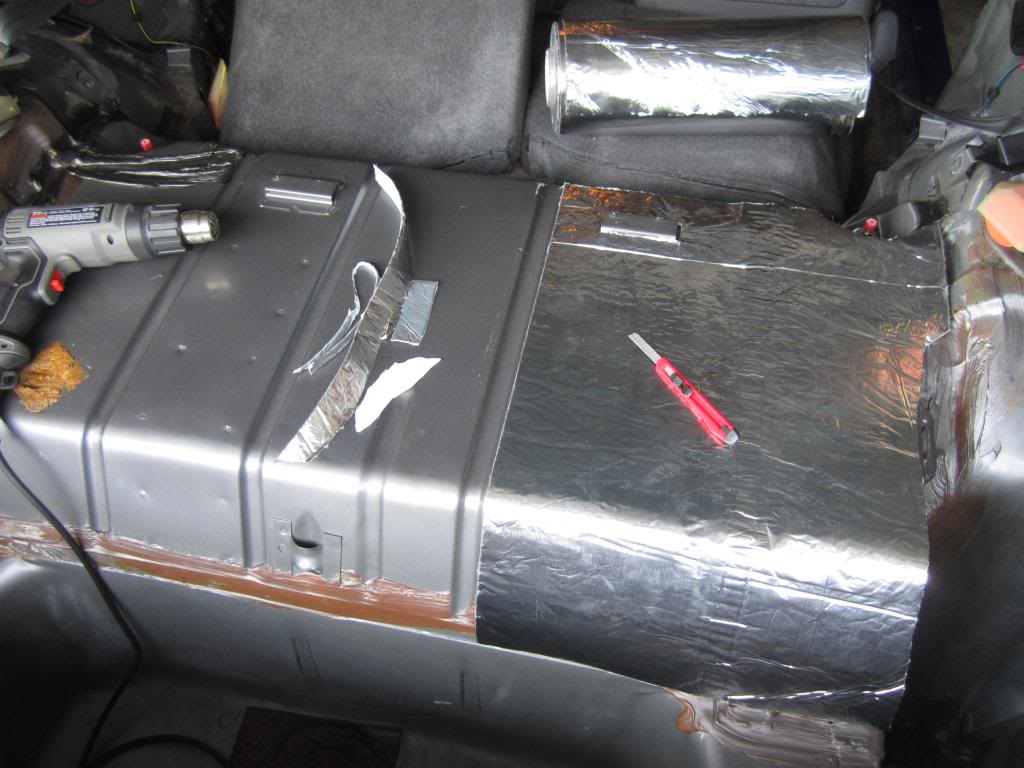
Once you have it cut out, remove some of the backing material from one end and stick it in place. Gradually pull the backing material back as you are sticking it in place. Avoid touching the sticky part of the mat with your fingers if possible since oil from your hands prevents it from sticking as well.
Here's what it looks like with the backing paper removed
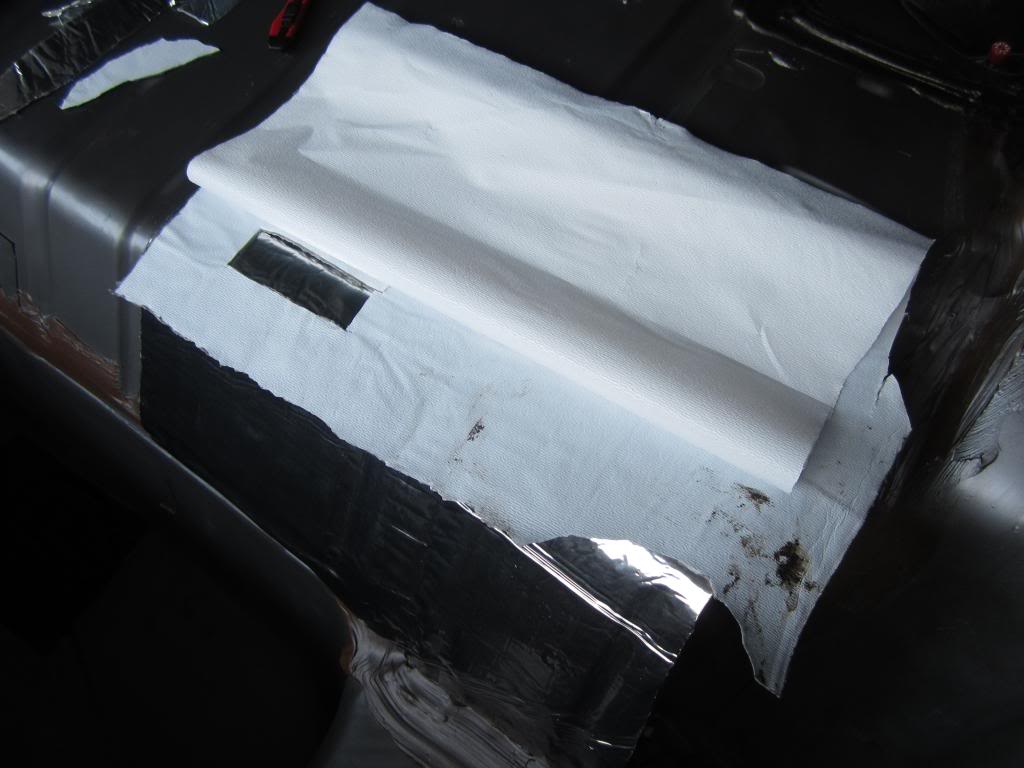
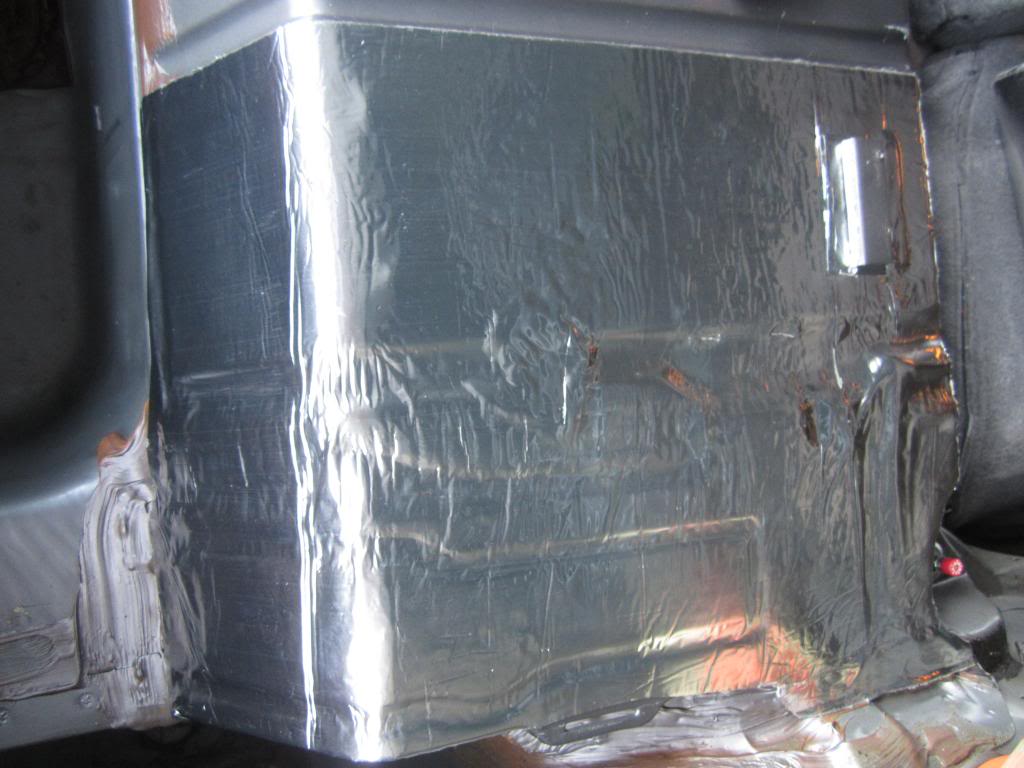
Here's the finished piece after pressing it firmly in place and working out all of the air pockets
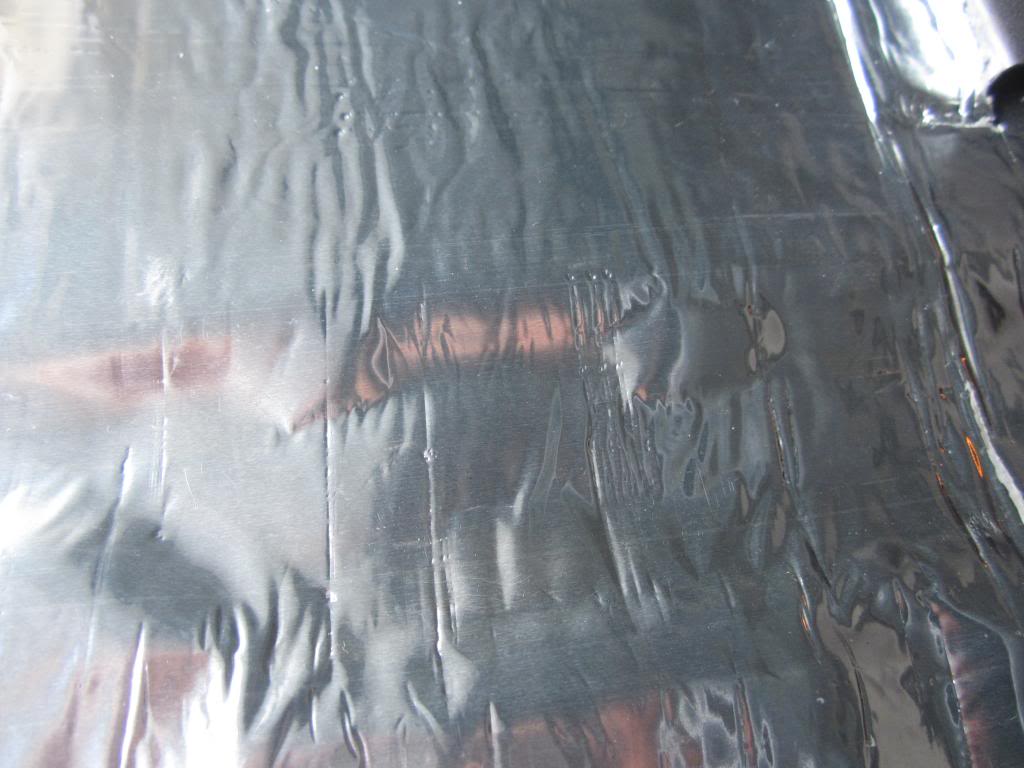
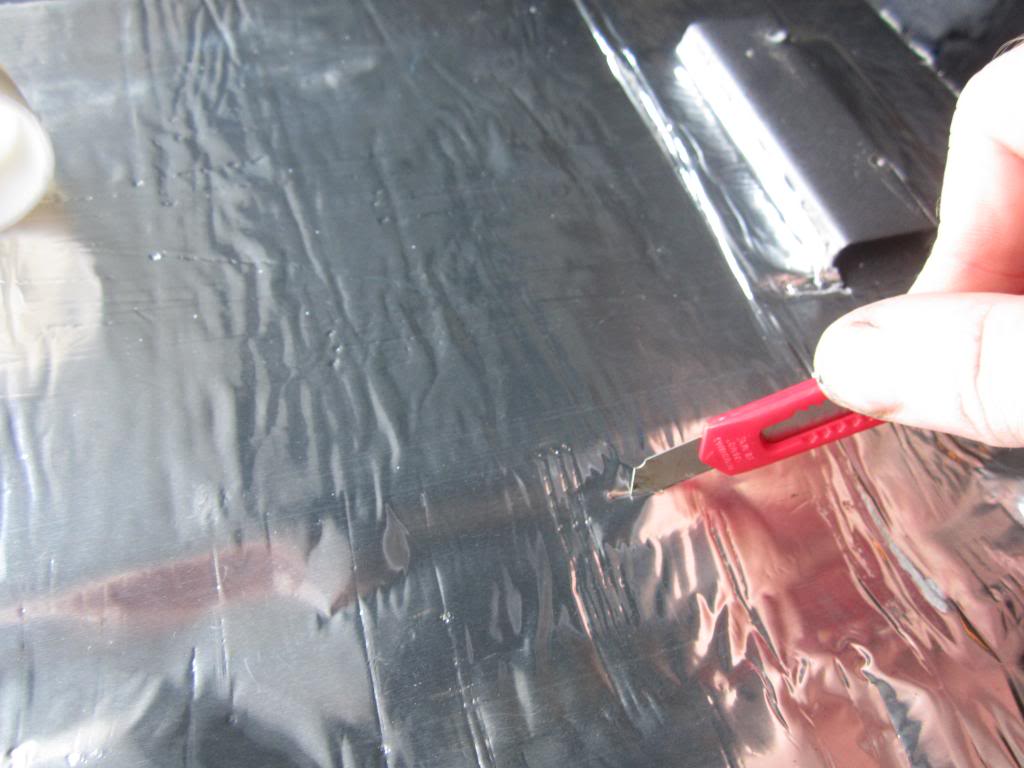
Here's an example of air pockets underneath
Simply slice a hole in the mat and work the air pockets out. No big deal.
Here are a few progress pics...
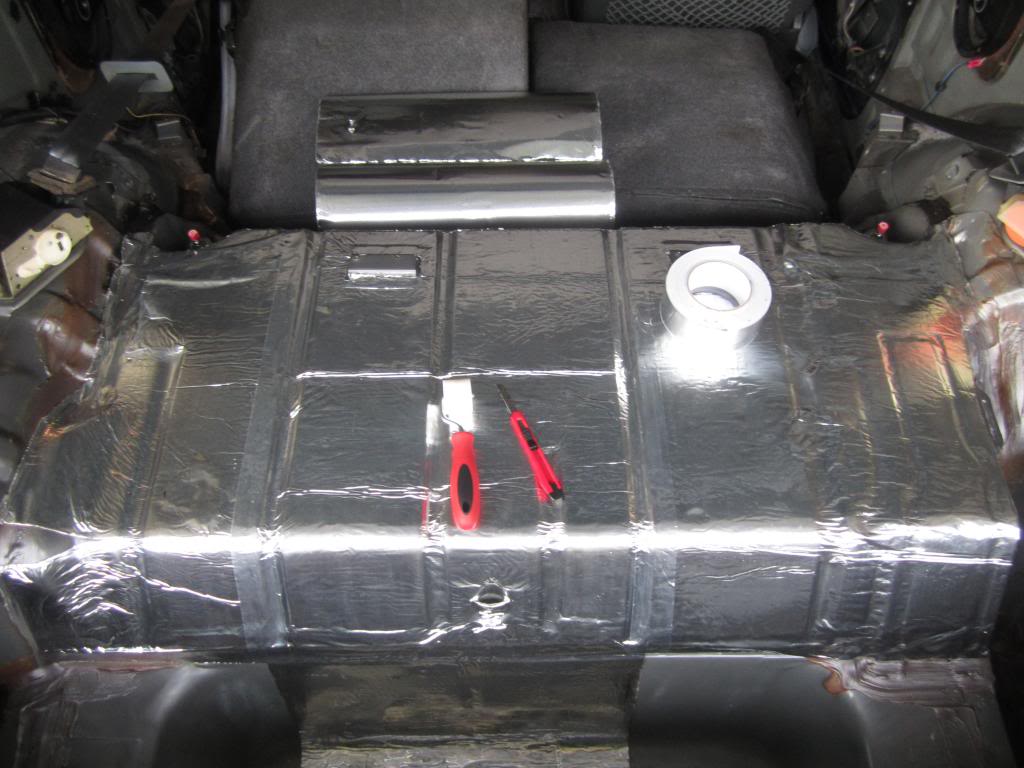
Anywhere I scratched the metal I hit it with some primer just to try to prevent it from rusting down the road.

Once you have it cut out, remove some of the backing material from one end and stick it in place. Gradually pull the backing material back as you are sticking it in place. Avoid touching the sticky part of the mat with your fingers if possible since oil from your hands prevents it from sticking as well.

Here's what it looks like with the backing paper removed

Here's the finished piece after pressing it firmly in place and working out all of the air pockets

Here's an example of air pockets underneath

Simply slice a hole in the mat and work the air pockets out. No big deal.

Here are a few progress pics...


Anywhere I scratched the metal I hit it with some primer just to try to prevent it from rusting down the road.
Last edited by dprest68; 06-23-2014 at 11:31 AM.
06-23-2014, 11:44 AM
#756
Supreme Member
Thread Starter
iTrader: (1)
Join Date: Mar 2007
Location: Apopka, Florida
Posts: 1,237
Likes: 0
Received 7 Likes
on
6 Posts
Car: 1989 Pontiac Trans Am GTA
Engine: cammed LS1
Transmission: Monster SS 4L65E
Axle/Gears: 9 bolt posi w/ 3.70 gears
Re: LS1 swap for my '89 GTA
Luis and I removed the rest of the interior over the weekend. As you can see, my carpet was totally disgusting! Needless to say it got cut up and thrown in the garbage.
Luckily we found no major rust. Just a little surface rust here and there.
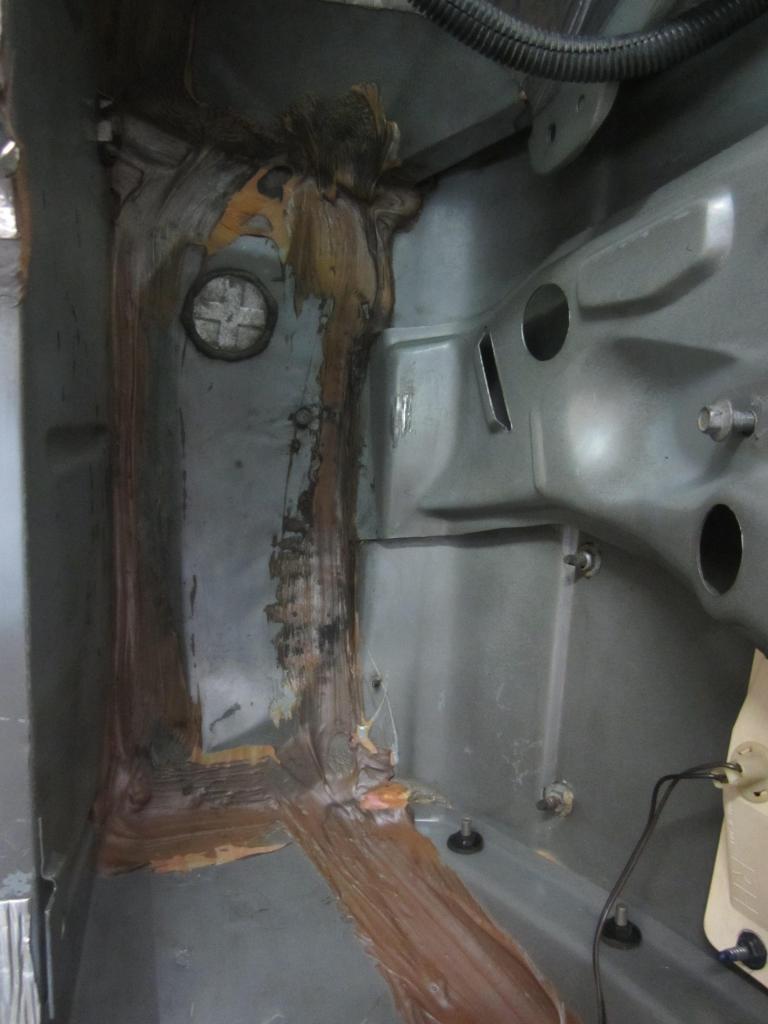
Luis went to work cleaning this black asphalt type sealer off behind the rear seats since the sound deadener doesn't stick to it very well. Meanwhile, I was in the back of the car putting down more sound deadener.
Much better!
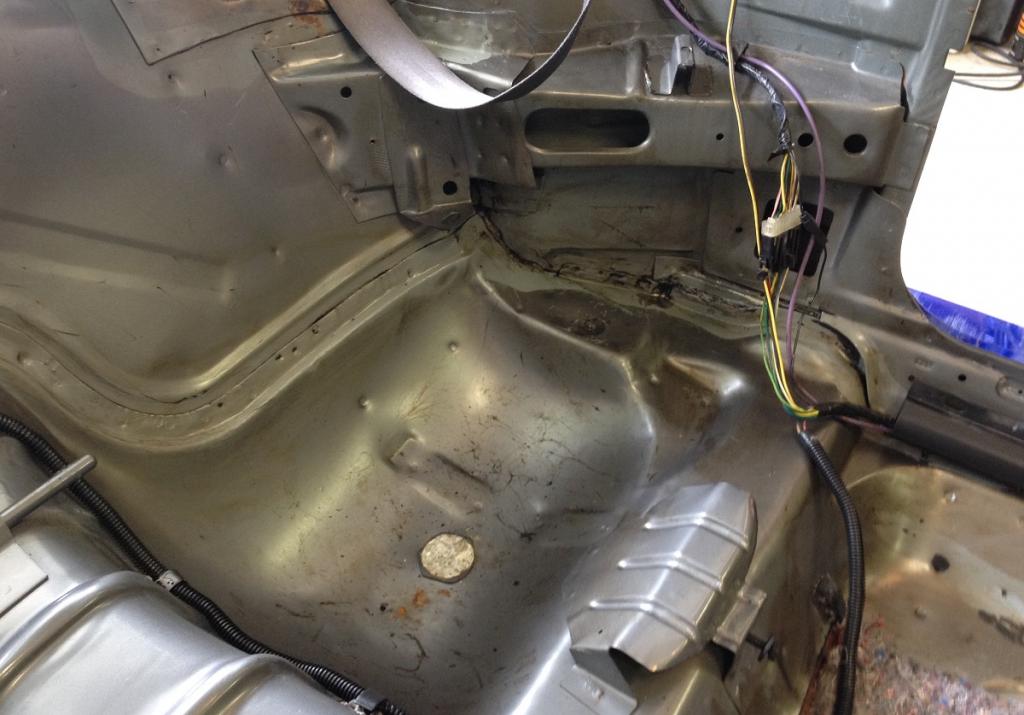
Thanks for your help Luis! It's much appreciated as always.

Luckily we found no major rust. Just a little surface rust here and there.

Luis went to work cleaning this black asphalt type sealer off behind the rear seats since the sound deadener doesn't stick to it very well. Meanwhile, I was in the back of the car putting down more sound deadener.

Much better!

Thanks for your help Luis! It's much appreciated as always.
06-23-2014, 11:54 AM
#757
Supreme Member
Thread Starter
iTrader: (1)
Join Date: Mar 2007
Location: Apopka, Florida
Posts: 1,237
Likes: 0
Received 7 Likes
on
6 Posts
Car: 1989 Pontiac Trans Am GTA
Engine: cammed LS1
Transmission: Monster SS 4L65E
Axle/Gears: 9 bolt posi w/ 3.70 gears
Re: LS1 swap for my '89 GTA
We disassembled the door panels so that they could be cleaned and painted
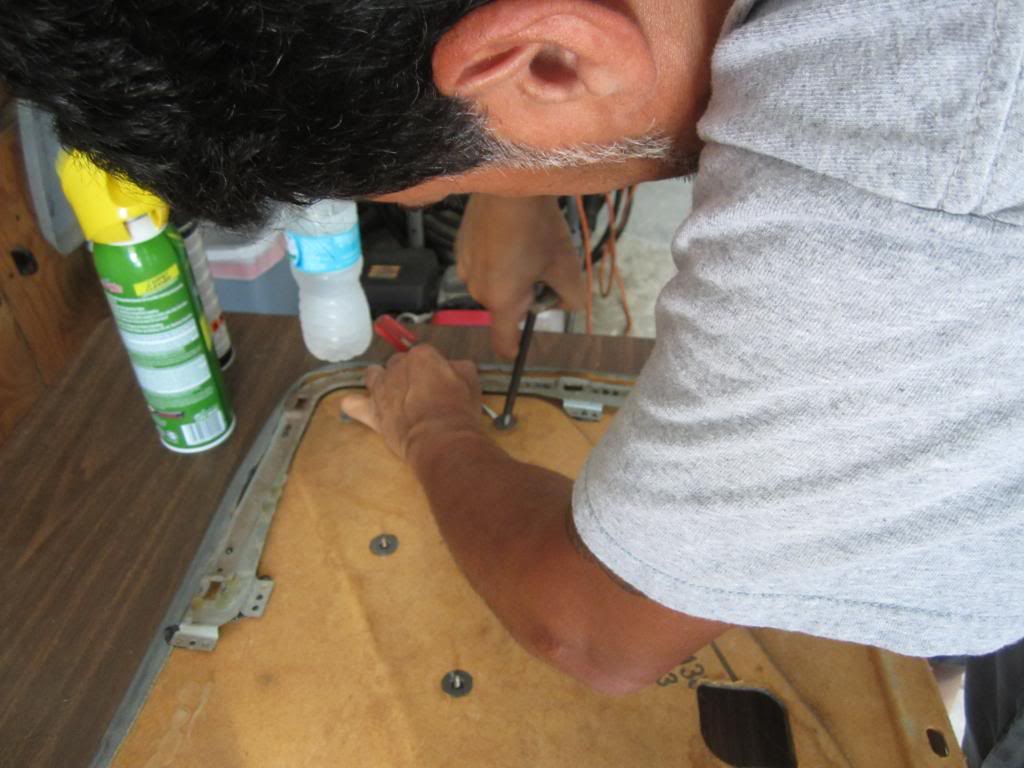
GM put these silly nuts on there to keep everything in place. They are a real pain to remove. Luis made this tool when he did his '84. It came in handy.
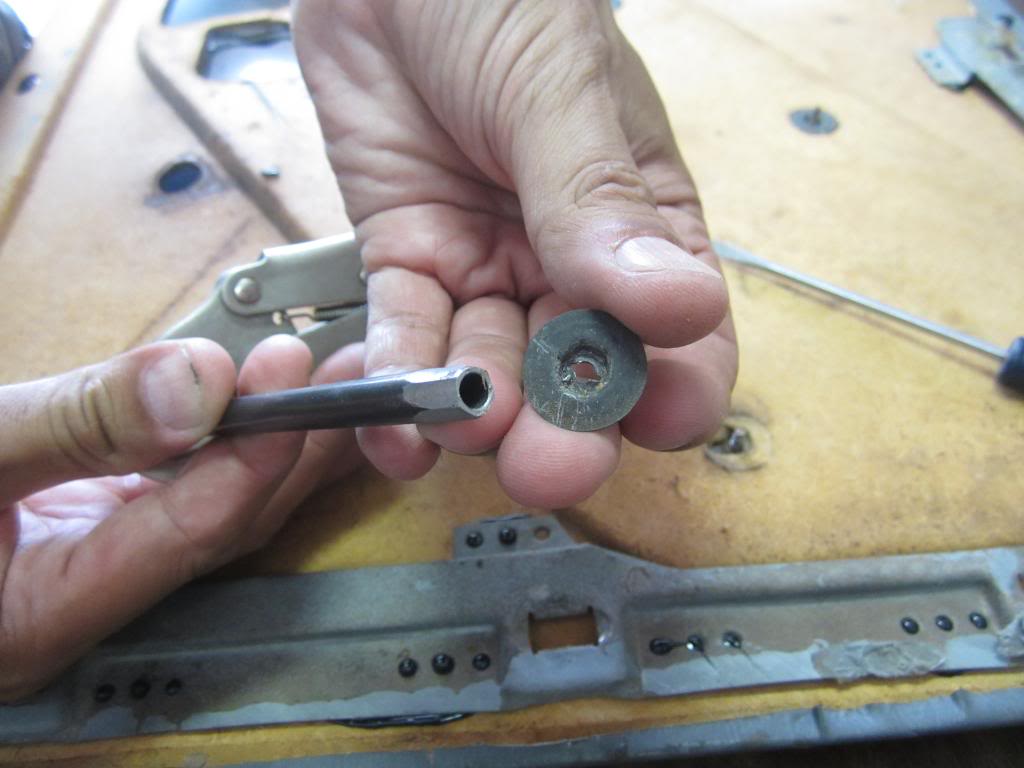
We set up this makeshift table to prep and paint some of the interior trim.
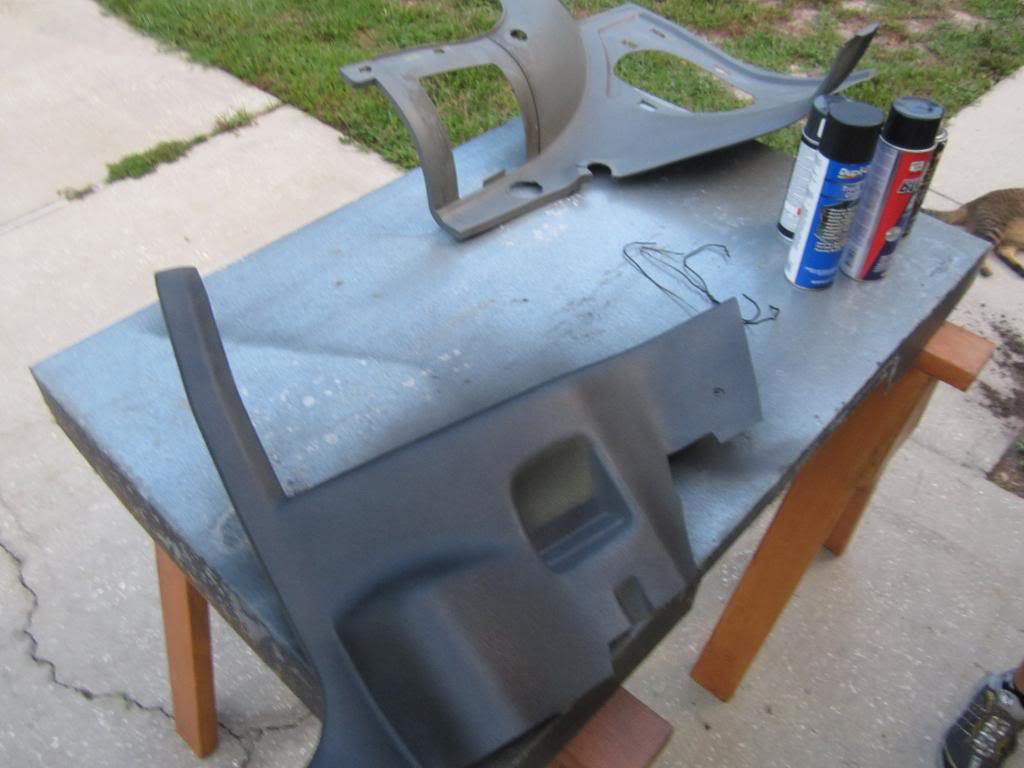
I am going a shade or two darker on the gray to match the 4th gen front seats better.
06-23-2014, 11:56 AM
#758
Supreme Member
Thread Starter
iTrader: (1)
Join Date: Mar 2007
Location: Apopka, Florida
Posts: 1,237
Likes: 0
Received 7 Likes
on
6 Posts
Car: 1989 Pontiac Trans Am GTA
Engine: cammed LS1
Transmission: Monster SS 4L65E
Axle/Gears: 9 bolt posi w/ 3.70 gears
Re: LS1 swap for my '89 GTA
Here's my car and Luis' TTA at a local cruise-in a few weeks ago.
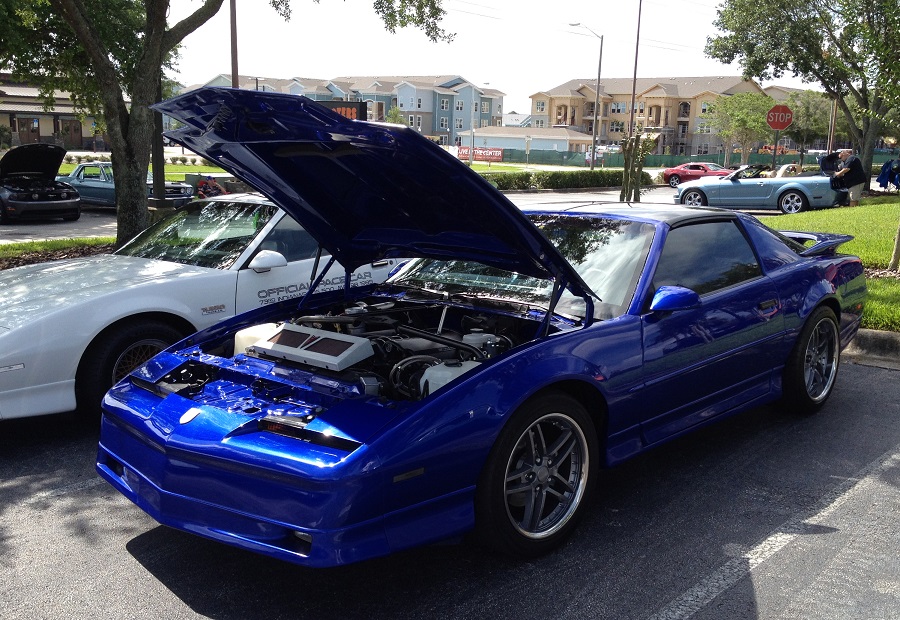
We got there early. It turned out to be a pretty decent show.


We got there early. It turned out to be a pretty decent show.
06-23-2014, 01:47 PM
#759
Re: LS1 swap for my '89 GTA
Great work, guys!
You're doing it right on the first attempt, taking care of all the little rust spots and preventing new scratches from even beginning to rust.
Keep it up
When that black stuff was off the panels, did you simply place the fatmat over those openings which it used to cover up? Will the mats seal the same way the gunk did?
Unbelievable how discolored your carpet got over the years.
I hope my black carpet doesn't play that trick on me one day
06-23-2014, 02:10 PM
#760
Supreme Member
Thread Starter
iTrader: (1)
Join Date: Mar 2007
Location: Apopka, Florida
Posts: 1,237
Likes: 0
Received 7 Likes
on
6 Posts
Car: 1989 Pontiac Trans Am GTA
Engine: cammed LS1
Transmission: Monster SS 4L65E
Axle/Gears: 9 bolt posi w/ 3.70 gears
Re: LS1 swap for my '89 GTA
Great work, guys!
You're doing it right on the first attempt, taking care of all the little rust spots and preventing new scratches from even beginning to rust.
Keep it up
When that black stuff was off the panels, did you simply place the fatmat over those openings which it used to cover up? Will the mats seal the same way the gunk did?
Unbelievable how discolored your carpet got over the years.
I hope my black carpet doesn't play that trick on me one day
You're doing it right on the first attempt, taking care of all the little rust spots and preventing new scratches from even beginning to rust.
Keep it up
When that black stuff was off the panels, did you simply place the fatmat over those openings which it used to cover up? Will the mats seal the same way the gunk did?
Unbelievable how discolored your carpet got over the years.
I hope my black carpet doesn't play that trick on me one day
I knew the carpet was bad, but didn't realize it was THAT bad until we removed the seats. I will be amazed if you have the same problem.
Hopefully yours doesn't do the opposite and turn gray!  06-26-2014, 08:40 PM
#763
06-27-2014, 11:19 PM
#764
Supreme Member
Thread Starter
iTrader: (1)
Join Date: Mar 2007
Location: Apopka, Florida
Posts: 1,237
Likes: 0
Received 7 Likes
on
6 Posts
Car: 1989 Pontiac Trans Am GTA
Engine: cammed LS1
Transmission: Monster SS 4L65E
Axle/Gears: 9 bolt posi w/ 3.70 gears
Re: LS1 swap for my '89 GTA
I am going to use these guys http://www.stockinteriors.com/AutoCa...23&ModelId=384
They have many different colors to choose from and will send you samples for free to make sure you get the color you are looking for.
They have many different colors to choose from and will send you samples for free to make sure you get the color you are looking for.
07-03-2014, 09:55 AM
#765
Supreme Member
Thread Starter
iTrader: (1)
Join Date: Mar 2007
Location: Apopka, Florida
Posts: 1,237
Likes: 0
Received 7 Likes
on
6 Posts
Car: 1989 Pontiac Trans Am GTA
Engine: cammed LS1
Transmission: Monster SS 4L65E
Axle/Gears: 9 bolt posi w/ 3.70 gears
Re: LS1 swap for my '89 GTA
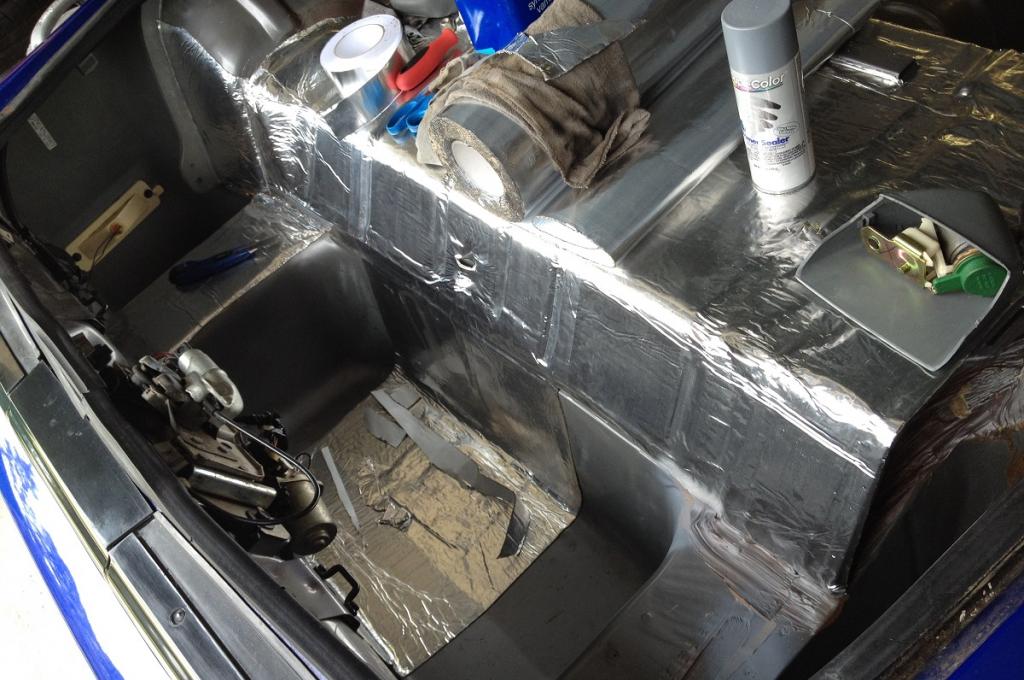
Not much of an update. I have just been working on the Fatmat and getting the asphalt seem sealer removed. Here are a few progress pics...
Before:

After:
The body plug in the well under the rear seat had rust on it. I removed all of the rust and sprayed some primer on there.
On the other side I used a strip of Fatmat to replace the seam sealer. It was pretty much unnecessary, but oh well.
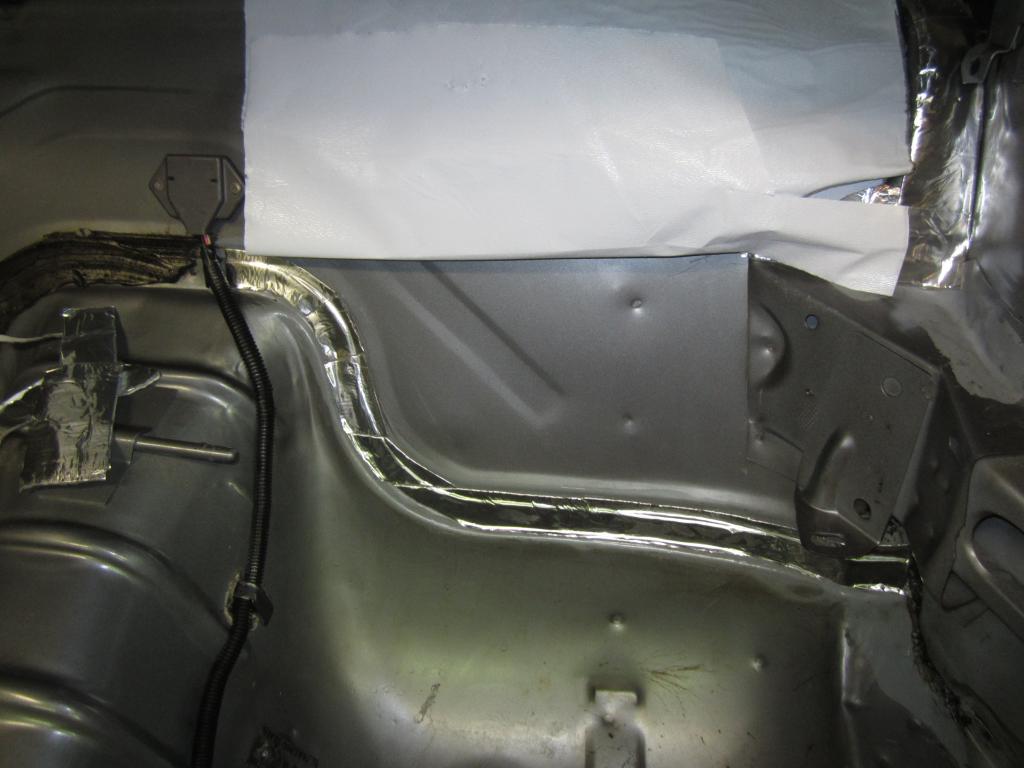
Luis had the idea of stuffing the empty cavities with the old jute padding from the back of the carpet. Every little bit should help cut down on noise.

Before:
After:

The body plug in the well under the rear seat had rust on it. I removed all of the rust and sprayed some primer on there.
On the other side I used a strip of Fatmat to replace the seam sealer. It was pretty much unnecessary, but oh well.

Luis had the idea of stuffing the empty cavities with the old jute padding from the back of the carpet. Every little bit should help cut down on noise.


 07-03-2014, 06:26 PM
#769
Supreme Member
Thread Starter
iTrader: (1)
Join Date: Mar 2007
Location: Apopka, Florida
Posts: 1,237
Likes: 0
Received 7 Likes
on
6 Posts
Car: 1989 Pontiac Trans Am GTA
Engine: cammed LS1
Transmission: Monster SS 4L65E
Axle/Gears: 9 bolt posi w/ 3.70 gears
Re: LS1 swap for my '89 GTA
Thank you sir!
Thanks Antony!
Thanks Luis! I'll have my people contact your people. 
Stupid weather! We'll see what happens
By the way, I ordered my carpet samples today. I should have them next week. They are sending me 6 samples (4 plush & 2 ultra-plush samples). The lady said shipping would be under $50 and it would take them about three days to make it.
Dave, I should've let you install the sound-deadening material in my car. Guess we can always add a second layer of the stuff for good measure. Let me know which weekend works for you.
Looks awesome man!
Hope the weather will be okay this weekend so we can take the cars to a show or two, but I am having serious doubts about that. Pretty much 50% chance of thunderstorms all over CFL well into next week.
Looks awesome man!
Hope the weather will be okay this weekend so we can take the cars to a show or two, but I am having serious doubts about that. Pretty much 50% chance of thunderstorms all over CFL well into next week.
Stupid weather!
We'll see what happensBy the way, I ordered my carpet samples today. I should have them next week. They are sending me 6 samples (4 plush & 2 ultra-plush samples). The lady said shipping would be under $50 and it would take them about three days to make it.
07-09-2014, 12:43 PM
#770
Supreme Member
Thread Starter
iTrader: (1)
Join Date: Mar 2007
Location: Apopka, Florida
Posts: 1,237
Likes: 0
Received 7 Likes
on
6 Posts
Car: 1989 Pontiac Trans Am GTA
Engine: cammed LS1
Transmission: Monster SS 4L65E
Axle/Gears: 9 bolt posi w/ 3.70 gears
Re: LS1 swap for my '89 GTA
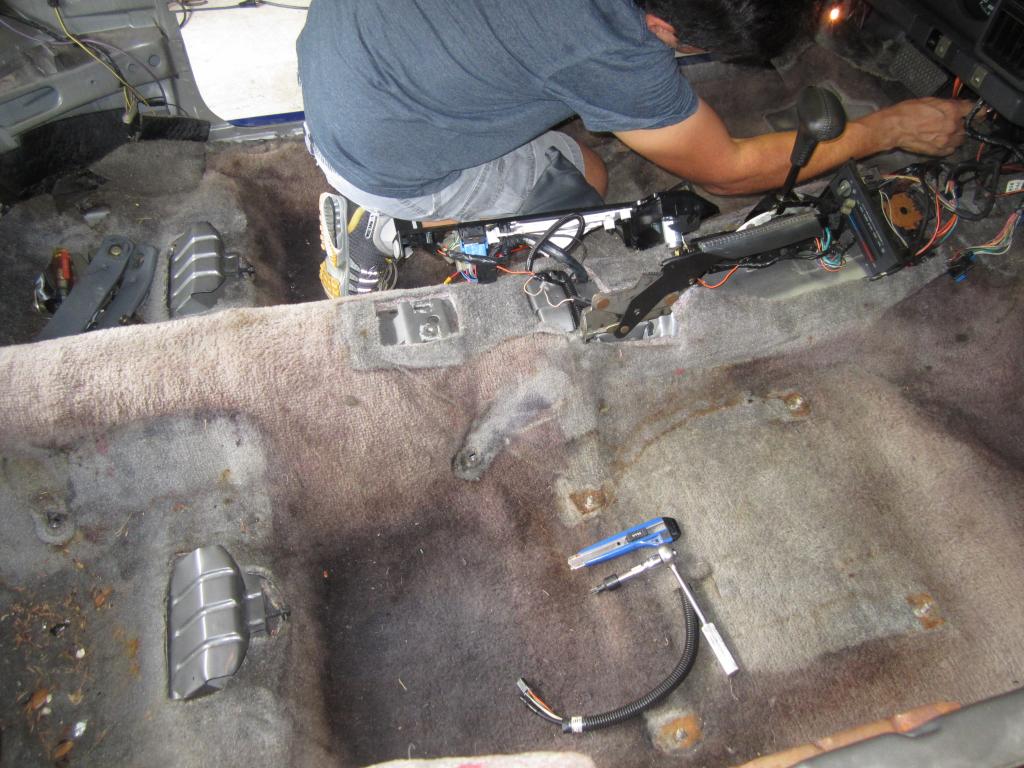
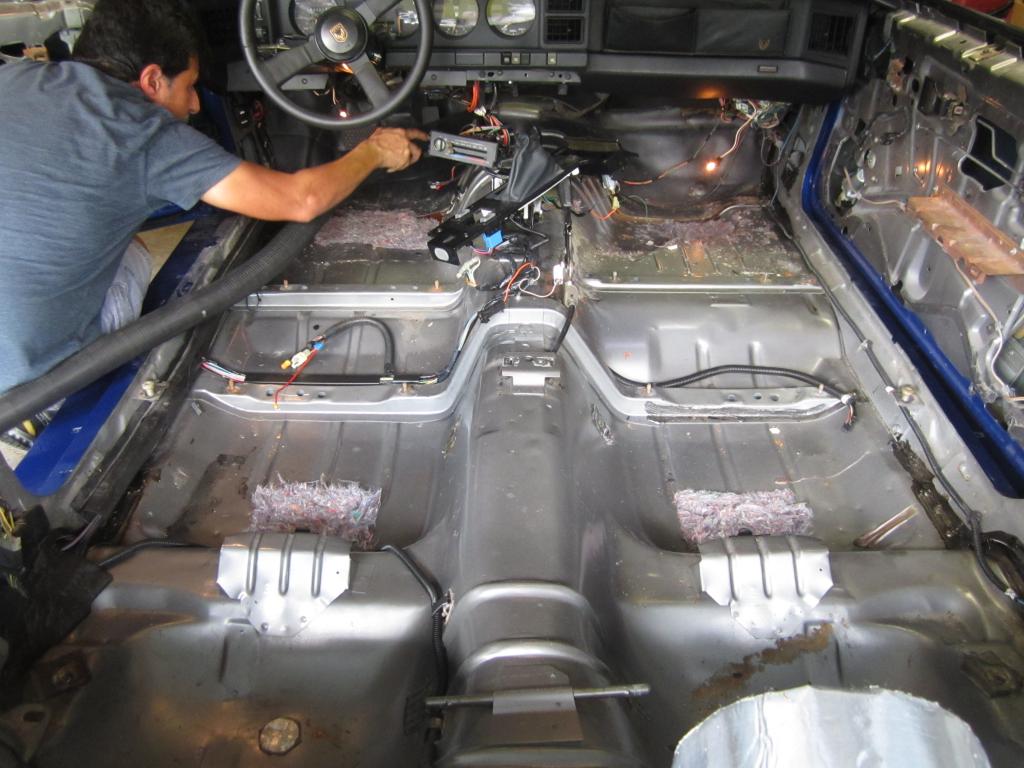
I decided I better mock-up my stereo system before I get too far along with the sound deadener. Here are a few progress pics...
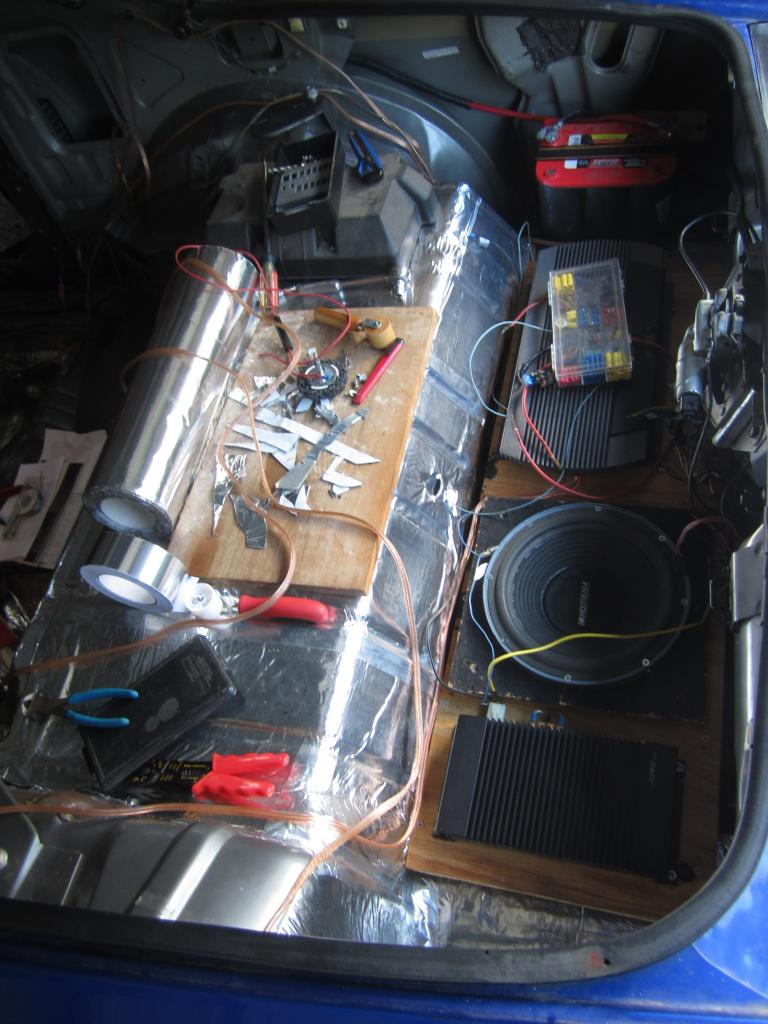
I bought a nice battery relocation tray from a local guy awhile back. So I think I am going to relocate the battery to the back as shown. I've had the amps and woofer for forever. It will be nice to finally get some use out of them. There will be 100 watts RMS mono to the sub & 50 watts RMS to the separates front & rear. I am still working all of the wiring out.
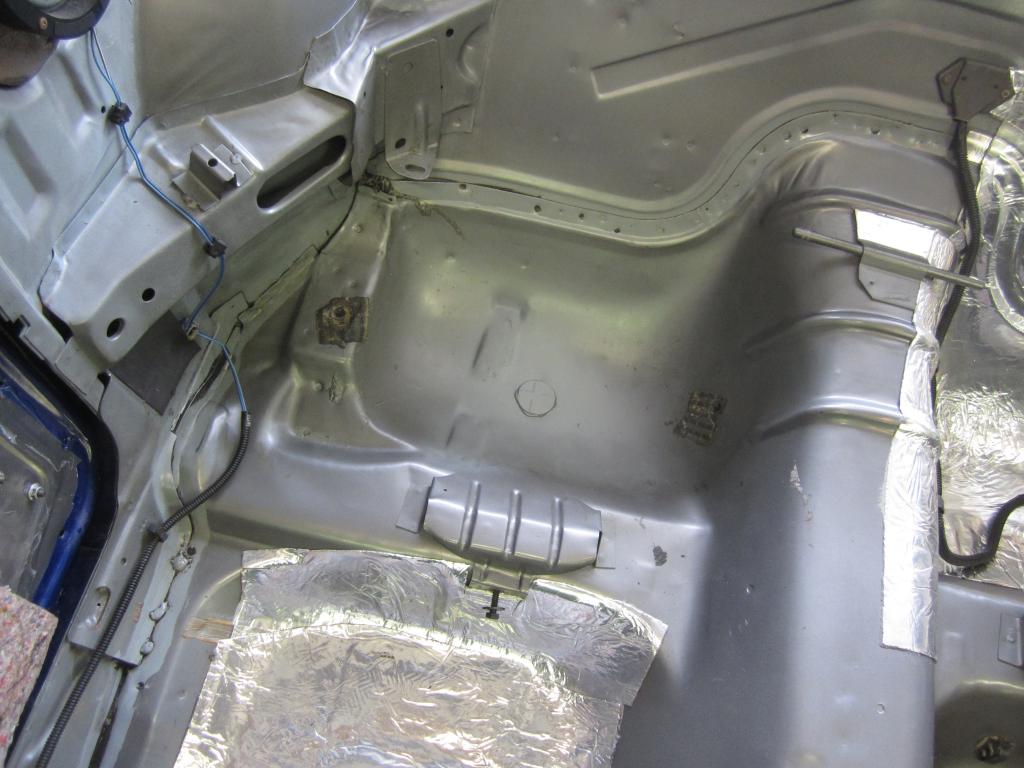
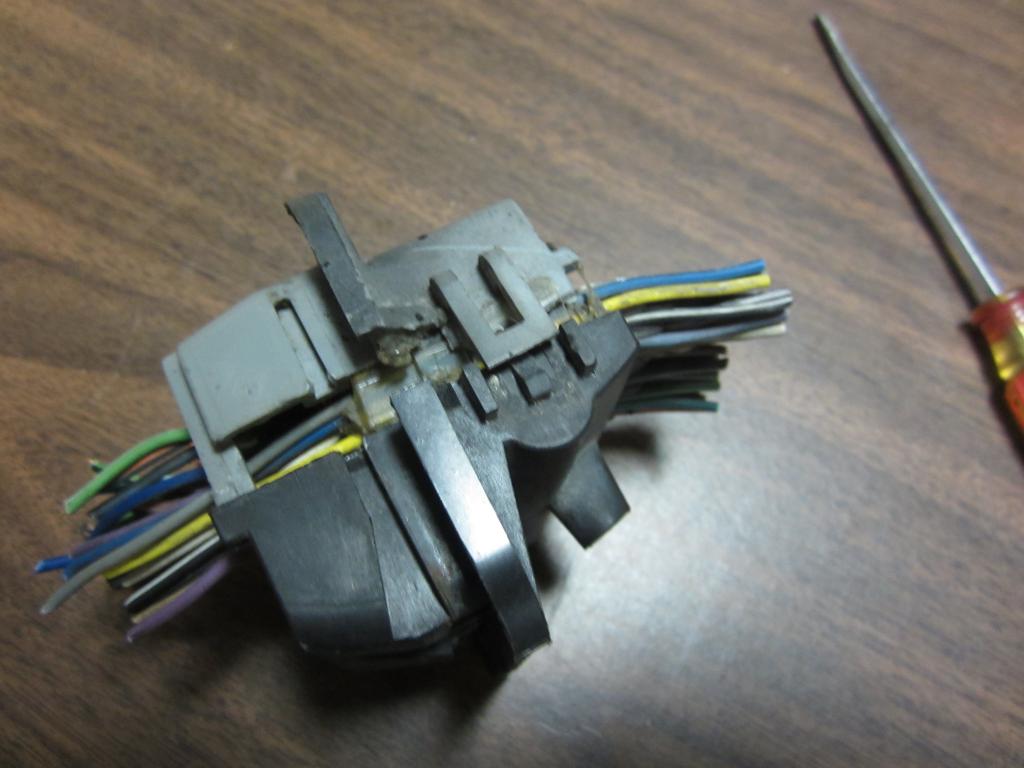
What a mess! I ran the 0 gauge battery cable up the right side and through the bulkhead that the old ECM harness used to pass through.

I got my radio to turn on a few days ago. So that was nice. I am going to connect the HU mount light to the dimmer wire so that it will work with the dimmer switch. I still need to put the metal tape on the white parts of the HU mount to keep the light from scattering everywhere.
At the top of the pic you can see where the new battery cable is routed into the opening and runs behind the speaker. Hopefully I won't get any noise from it out of the speaker. I put some loom on the cable for extra protection. On the right you can see the funky speaker mount that I pulled out. I will probably keep it in there. I am assuming there is some GM engineering behind it. I'll probably just stuff it with Jute or Poly-Fil. I am going to relocate the speaker wires for the right side to go up the center so there is no noise interference from the battery cable.
Here's the old ECM bulkhead. I tried to drill it out without taking it apart, but it wasn't working. So I had to take it apart. I just used a small screw driver to separate the housing. The I used different drill bit sizes to get it up to the size I wanted which was around 7/16"
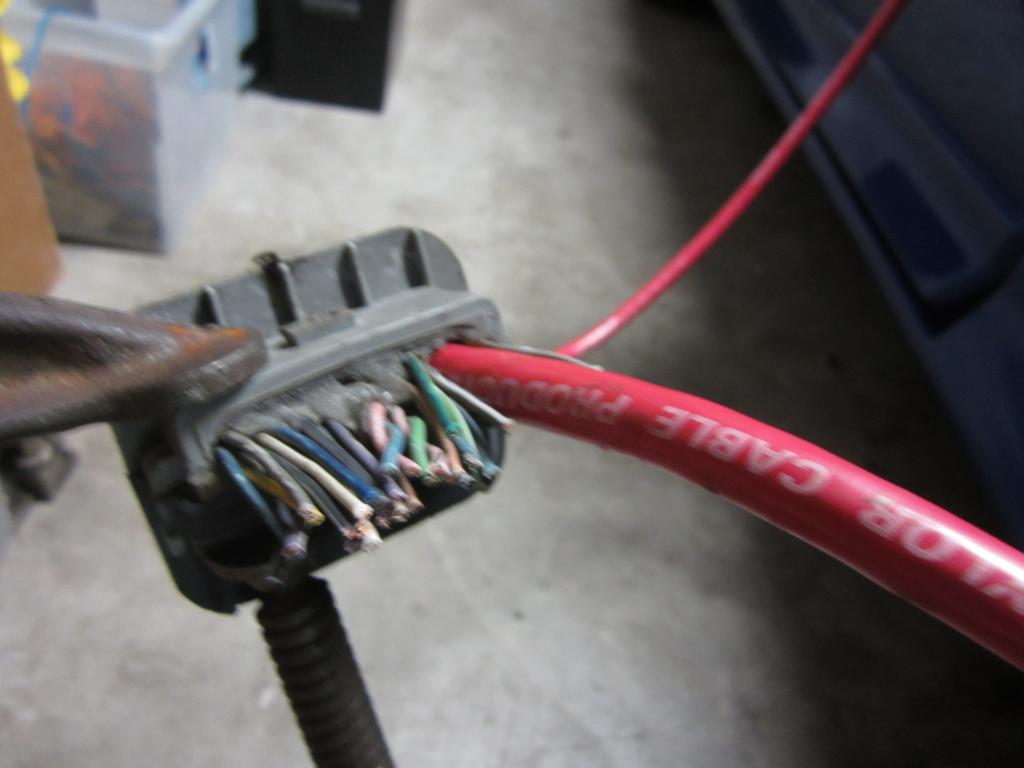
Here's what it looks like after it's all back together. Sorry for the blurry pic. I used a C clamp to compress the housing back together. It squeezes that wire tight too. So you need to have it exactly where you want it on the cable before you put it back together. I will show finished pics once I get it all the way I want it.
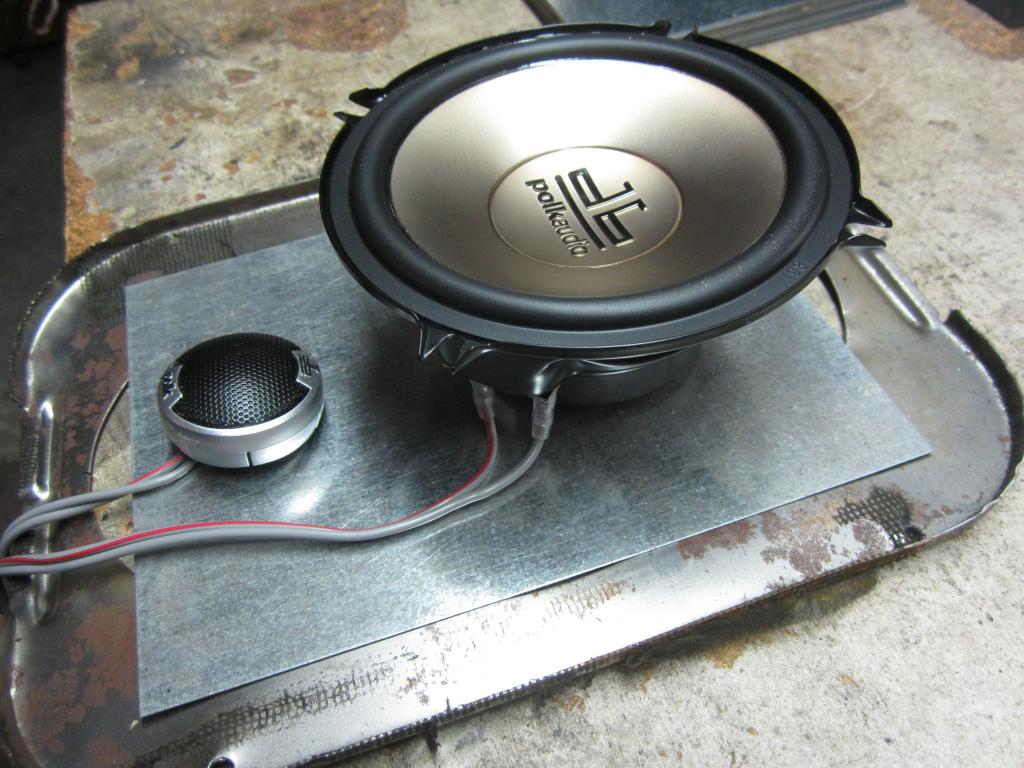
Yesterday I ordered 2 pairs of Polk Audio 5�" separates for the front and rear, (3) 17' long RCA cables to connect the head unit to the amps, Q Logic kick panels & a nice 200 amp fuse for the new battery cable. Hopefully that will be everything I need to wrap-up the stereo system & battery relocation.

I bought a nice battery relocation tray from a local guy awhile back. So I think I am going to relocate the battery to the back as shown. I've had the amps and woofer for forever. It will be nice to finally get some use out of them. There will be 100 watts RMS mono to the sub & 50 watts RMS to the separates front & rear. I am still working all of the wiring out.

What a mess!
I ran the 0 gauge battery cable up the right side and through the bulkhead that the old ECM harness used to pass through.
I got my radio to turn on a few days ago. So that was nice. I am going to connect the HU mount light to the dimmer wire so that it will work with the dimmer switch. I still need to put the metal tape on the white parts of the HU mount to keep the light from scattering everywhere.

At the top of the pic you can see where the new battery cable is routed into the opening and runs behind the speaker. Hopefully I won't get any noise from it out of the speaker. I put some loom on the cable for extra protection. On the right you can see the funky speaker mount that I pulled out. I will probably keep it in there. I am assuming there is some GM engineering behind it. I'll probably just stuff it with Jute or Poly-Fil. I am going to relocate the speaker wires for the right side to go up the center so there is no noise interference from the battery cable.

Here's the old ECM bulkhead. I tried to drill it out without taking it apart, but it wasn't working. So I had to take it apart. I just used a small screw driver to separate the housing. The I used different drill bit sizes to get it up to the size I wanted which was around 7/16"

Here's what it looks like after it's all back together. Sorry for the blurry pic. I used a C clamp to compress the housing back together. It squeezes that wire tight too. So you need to have it exactly where you want it on the cable before you put it back together. I will show finished pics once I get it all the way I want it.
Yesterday I ordered 2 pairs of Polk Audio 5�" separates for the front and rear, (3) 17' long RCA cables to connect the head unit to the amps, Q Logic kick panels & a nice 200 amp fuse for the new battery cable. Hopefully that will be everything I need to wrap-up the stereo system & battery relocation.
Last edited by dprest68; 12-31-2014 at 10:13 AM. Reason: typo
07-09-2014, 06:18 PM
#771
Senior Member
iTrader: (2)

Join Date: Dec 2004
Location: Orlando,FL
Posts: 682
Likes: 0
Received 1 Like
on
1 Post
Car: 1987 GTA Trans Am
Engine: 350 TPI
Transmission: 700R4
Axle/Gears: Borg Warner 9-Bolt 3.27
Re: LS1 swap for my '89 GTA
Hey Dave it's Spence. Gotta say guys I saw this car in person today and WOW! Really has done an amazing job with it.
Dave and Luis are some outstanding people and extremely helpful. Was definitely a pleasure.
Dave and Luis are some outstanding people and extremely helpful. Was definitely a pleasure.
07-09-2014, 11:50 PM
#773
Supreme Member
Thread Starter
iTrader: (1)
Join Date: Mar 2007
Location: Apopka, Florida
Posts: 1,237
Likes: 0
Received 7 Likes
on
6 Posts
Car: 1989 Pontiac Trans Am GTA
Engine: cammed LS1
Transmission: Monster SS 4L65E
Axle/Gears: 9 bolt posi w/ 3.70 gears
Re: LS1 swap for my '89 GTA
Your car seems to have a good foundation. I look forward to seeing your progress with it.
The Longwood cruise-in is this Saturday afternoon from 5 to 8 and the Hooters cruise-in is on Sunday from 11 to 2 in case you are interested.
Last edited by dprest68; 07-09-2014 at 11:54 PM.
07-11-2014, 11:46 PM
#774
Supreme Member
Thread Starter
iTrader: (1)
Join Date: Mar 2007
Location: Apopka, Florida
Posts: 1,237
Likes: 0
Received 7 Likes
on
6 Posts
Car: 1989 Pontiac Trans Am GTA
Engine: cammed LS1
Transmission: Monster SS 4L65E
Axle/Gears: 9 bolt posi w/ 3.70 gears
Re: LS1 swap for my '89 GTA
The 5�" separates came in yesterday. So of course I had to go right to work adapting them into the car. I just happened to have some sheets of galvanized steel laying around that worked pretty well.
This is the mocked-up arrangement
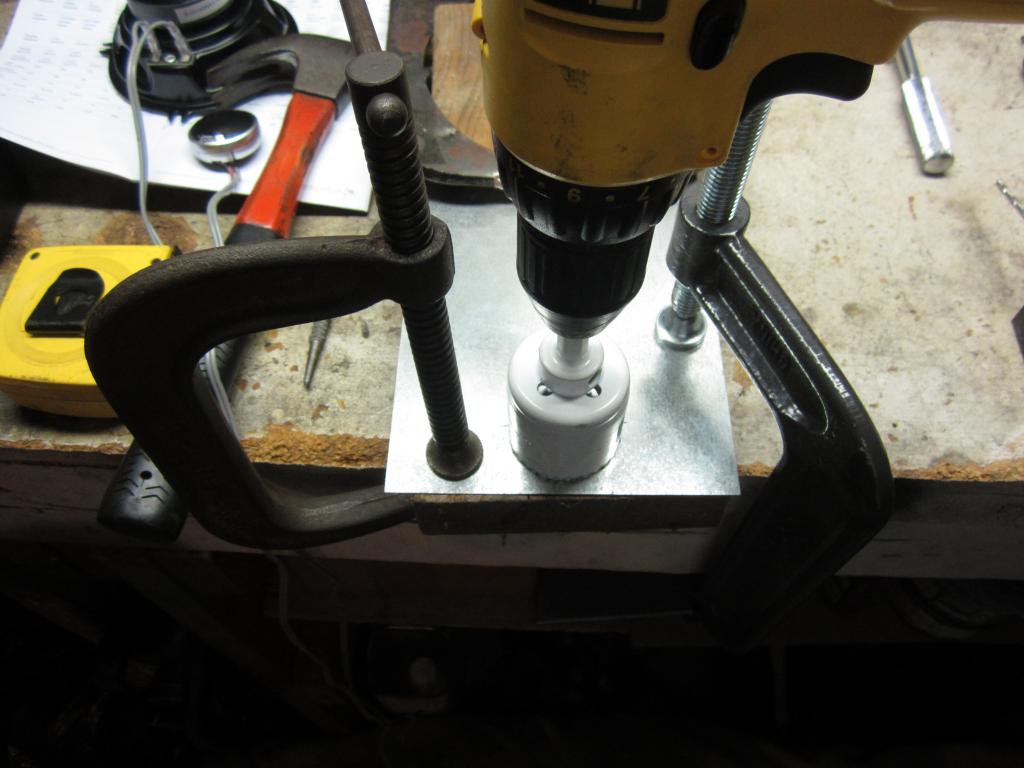
I marked the center line of the tweeter hole, used a punch to dimple the metal, then proceeded to drill it out with a 2" hole saw.

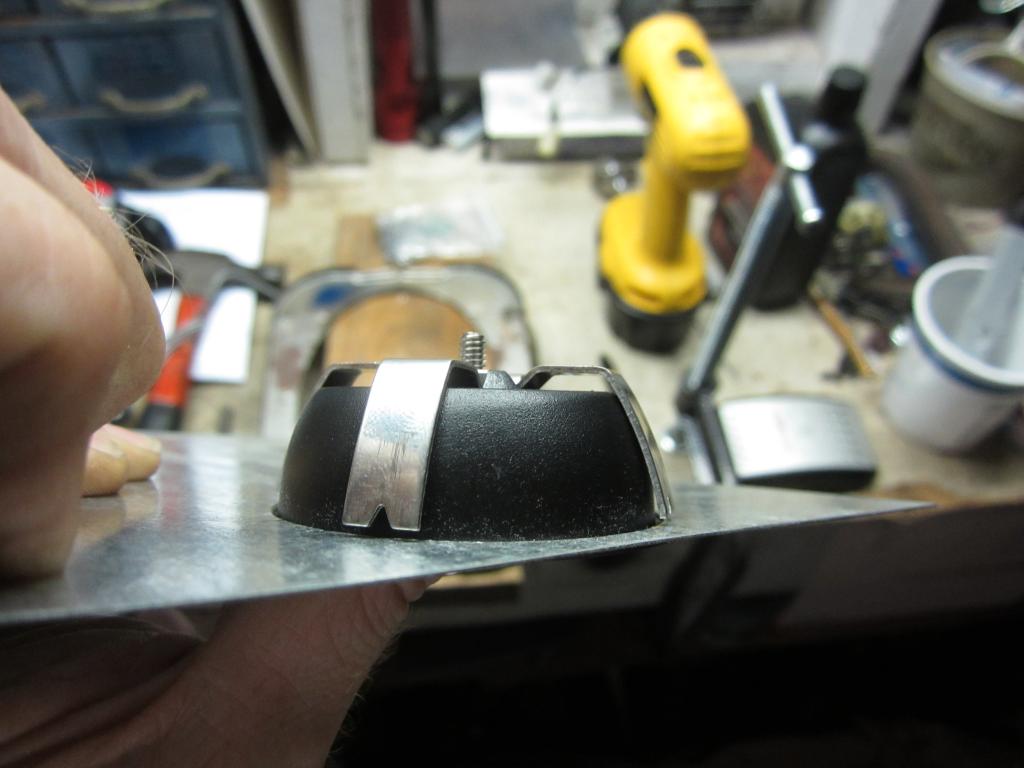
Unfortunately the bracket that holds the tweeter in had to be pretty extensively reworked since it was not long enough to hold the tweeter cup in tight against the metal.

I pretty much had to straighten the tabs, then rebend them to get it to work. This took what seemed like forever.

I finally got it right, then added some dum dum on the ends just for good measure.
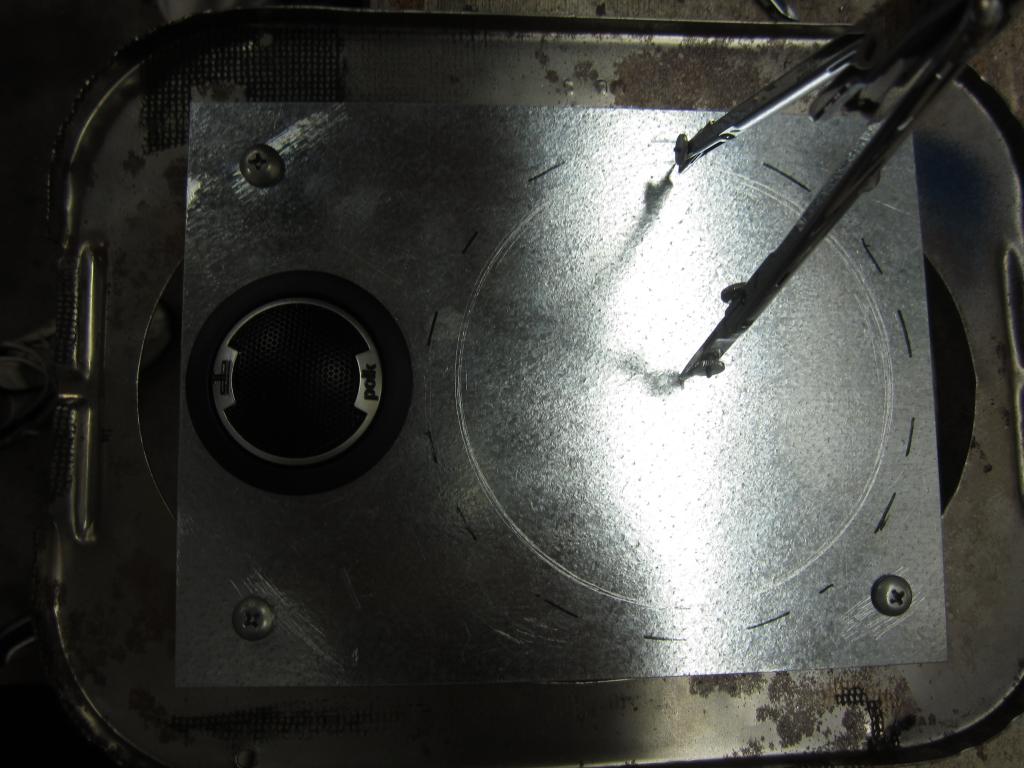
Next I had to break out some of the old drafting equipment to mark the hole for the other speaker which was 4�" in diameter. I used the compass to scribe the circle into the metal.
Next I used the cut-off wheel on the Dremel tool to cut out the hole. I broke many cut-off disks before I realized that I needed to double up the disks to make them strong enough to do the job.
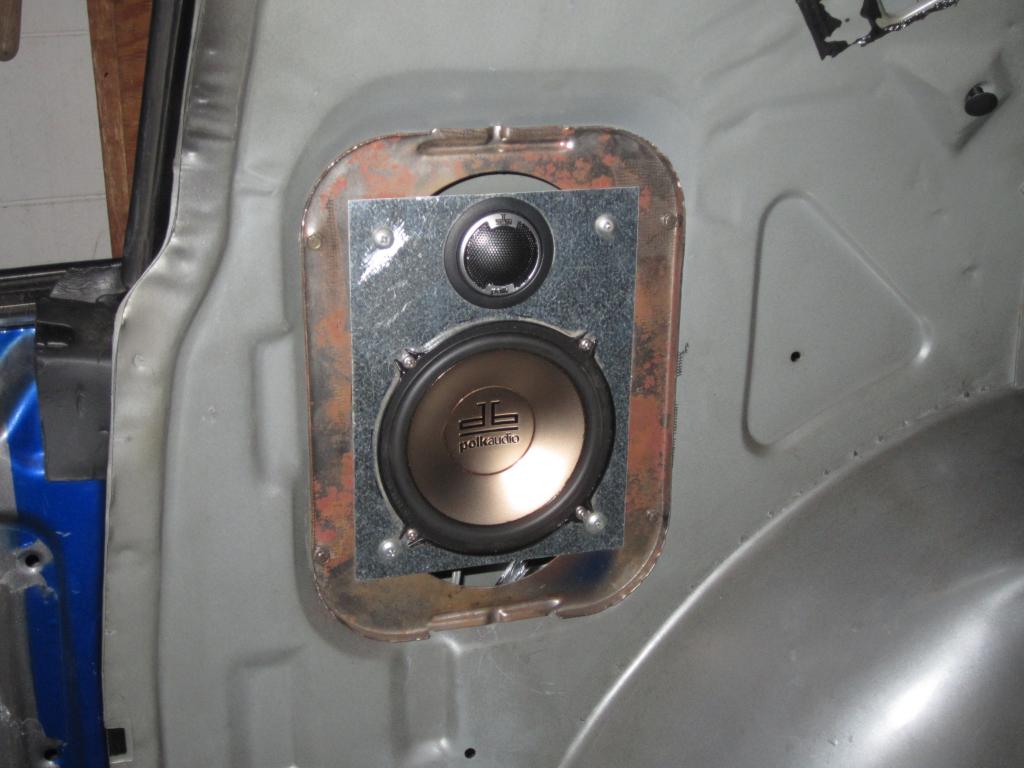
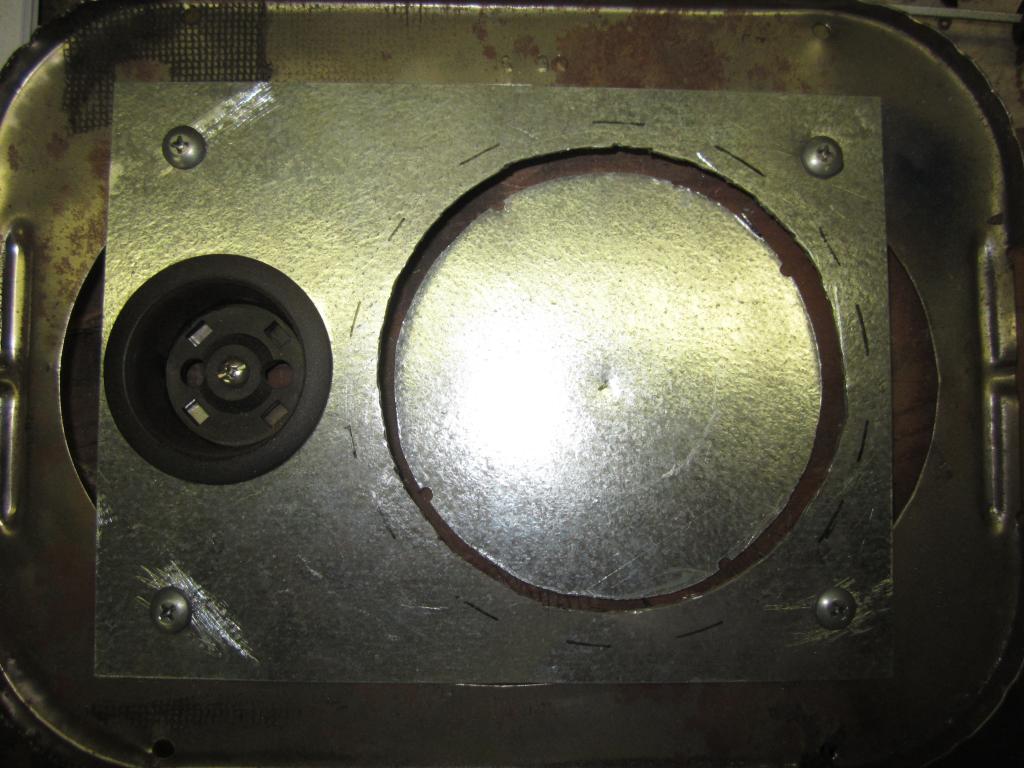
Installed finished product. I'm really glad I went with the 5�" set instead of the 6�" set. The other side should go much faster now that I have a template I can use.
I just happened to have some sheets of galvanized steel laying around that worked pretty well.
This is the mocked-up arrangement

I marked the center line of the tweeter hole, used a punch to dimple the metal, then proceeded to drill it out with a 2" hole saw.


Unfortunately the bracket that holds the tweeter in had to be pretty extensively reworked since it was not long enough to hold the tweeter cup in tight against the metal.

I pretty much had to straighten the tabs, then rebend them to get it to work. This took what seemed like forever.

I finally got it right, then added some dum dum on the ends just for good measure.

Next I had to break out some of the old drafting equipment to mark the hole for the other speaker which was 4�" in diameter. I used the compass to scribe the circle into the metal.

Next I used the cut-off wheel on the Dremel tool to cut out the hole. I broke many cut-off disks before I realized that I needed to double up the disks to make them strong enough to do the job.

Installed finished product. I'm really glad I went with the 5�" set instead of the 6�" set. The other side should go much faster now that I have a template I can use.
Last edited by dprest68; 07-11-2014 at 11:49 PM.
07-12-2014, 12:17 AM
#775
Supreme Member
Thread Starter
iTrader: (1)
Join Date: Mar 2007
Location: Apopka, Florida
Posts: 1,237
Likes: 0
Received 7 Likes
on
6 Posts
Car: 1989 Pontiac Trans Am GTA
Engine: cammed LS1
Transmission: Monster SS 4L65E
Axle/Gears: 9 bolt posi w/ 3.70 gears
Re: LS1 swap for my '89 GTA
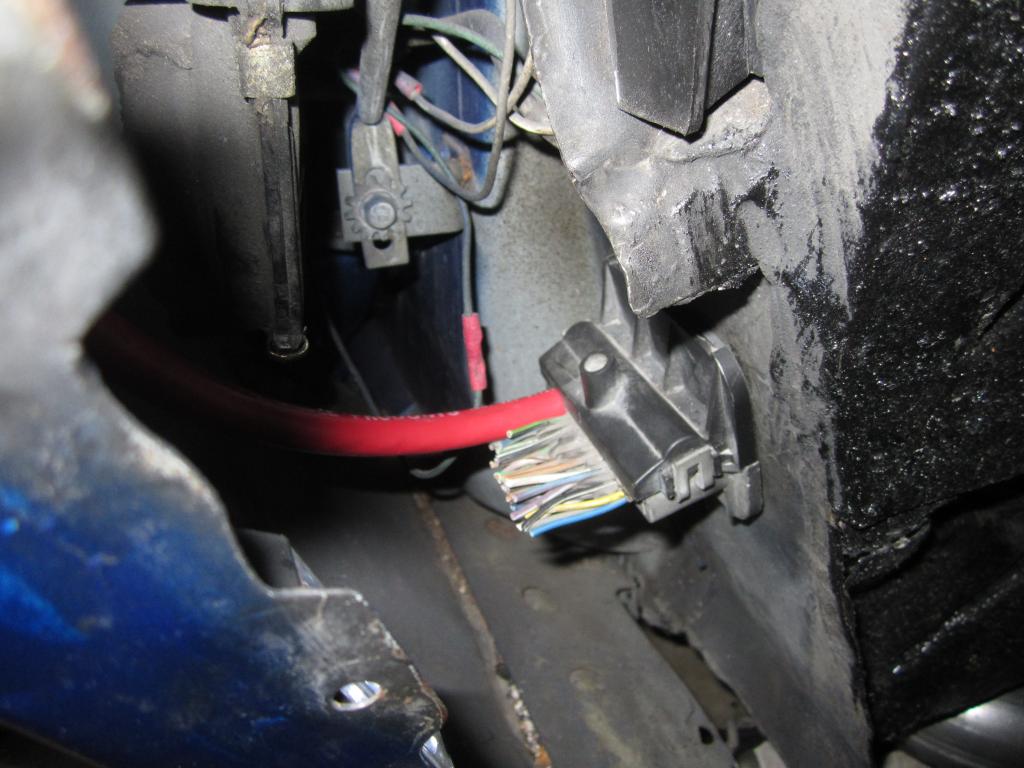
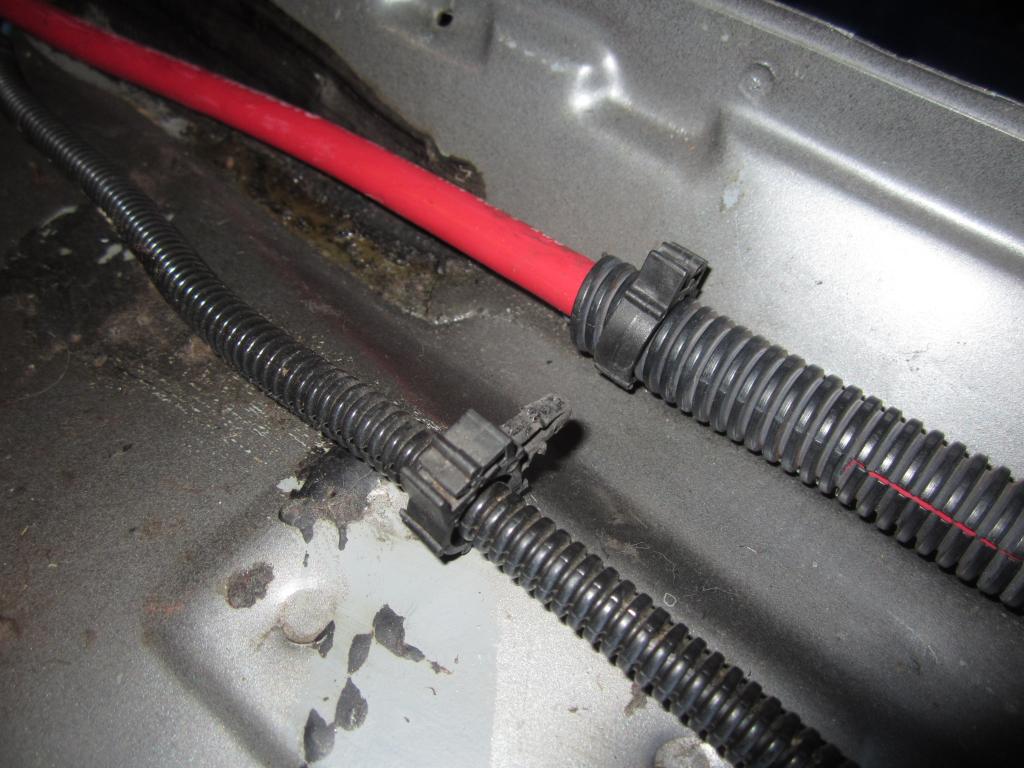
Here are some pics of the battery cable routing as requested by IROCgiraffe...
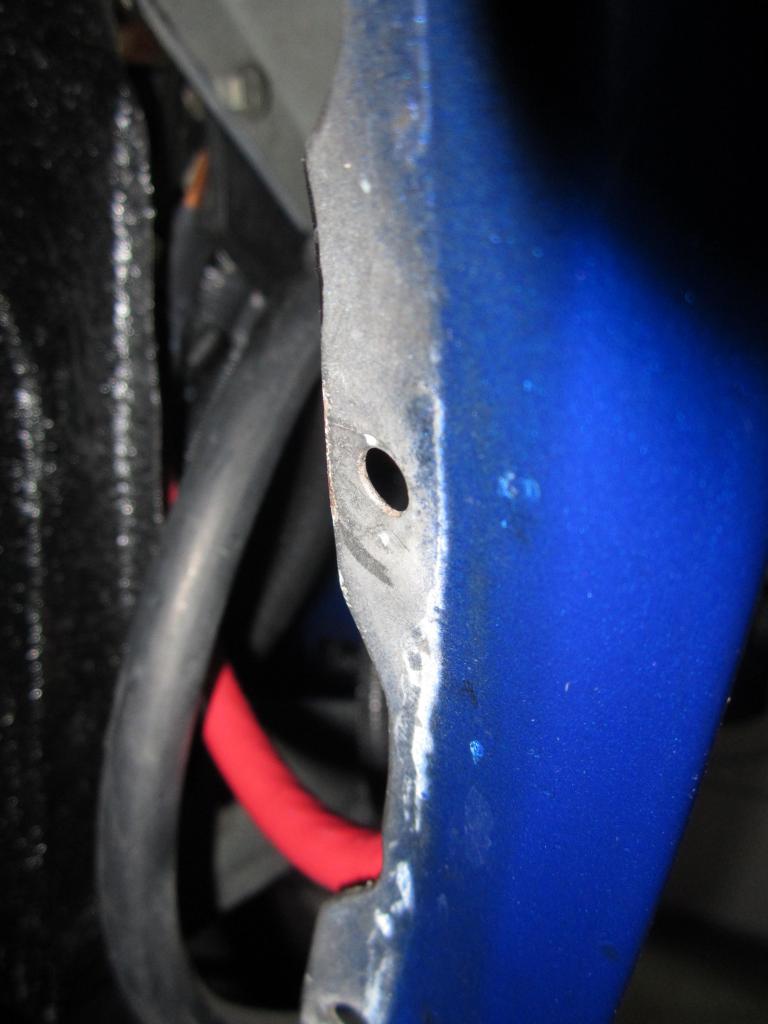
Here's the cable coming from the distribution block and running over to the lip around the wheel opening. I used the metal tape that I was using on the Fatmat to secure the cable to the fender.
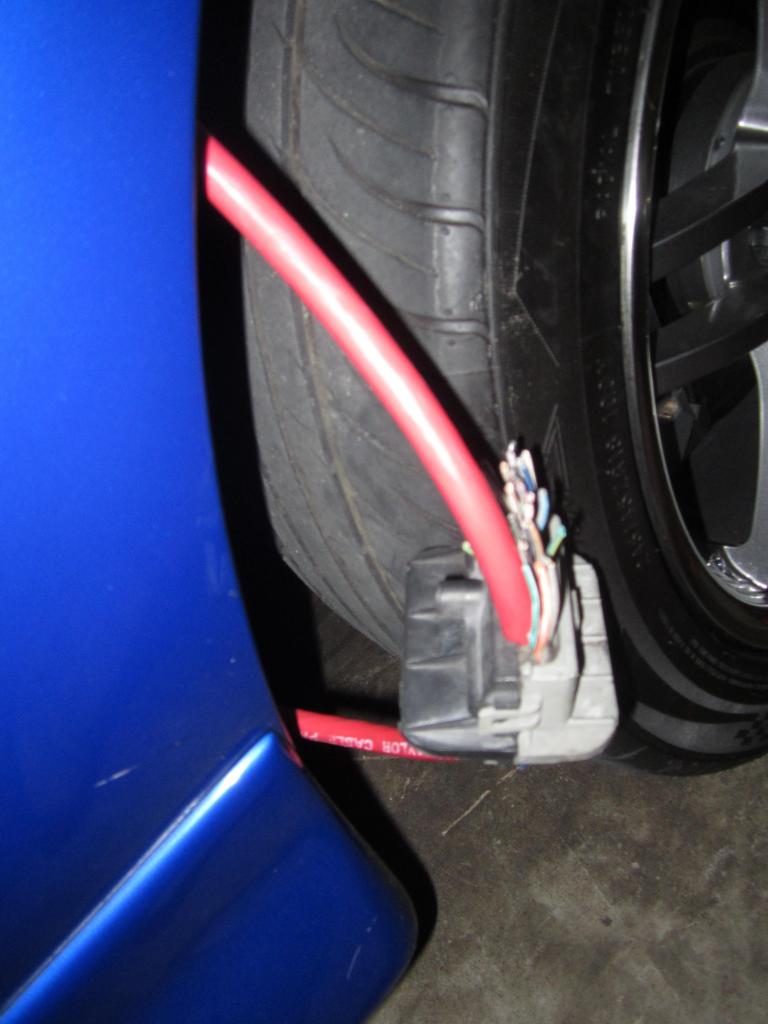
I mocked-up the cable going through the bulkhead so that I could get the bulkhead in the correct spot on the cable. Then I pulled it out as shown and installed the other half of the housing. Once the other half is installed the bulkhead will not slide on the cable anymore.
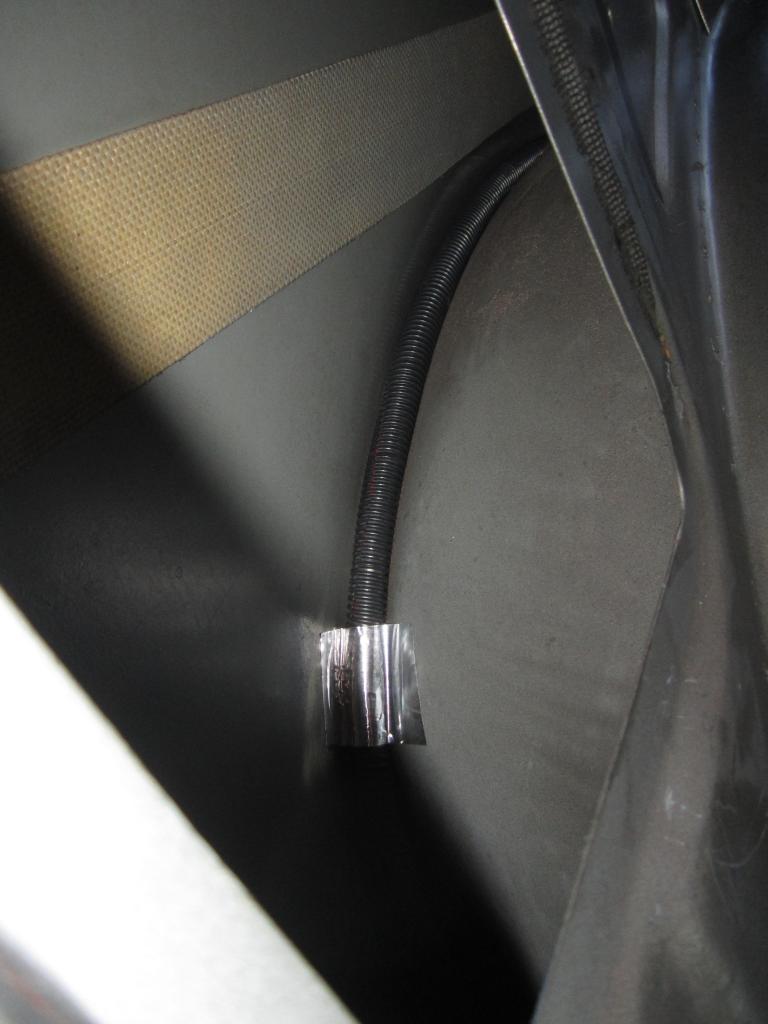
finished product. If your harness is still going through there or you don't want to drill out the bulkhead, you could just drill a hole below the bulkhead and run the cable below it using a grommet.
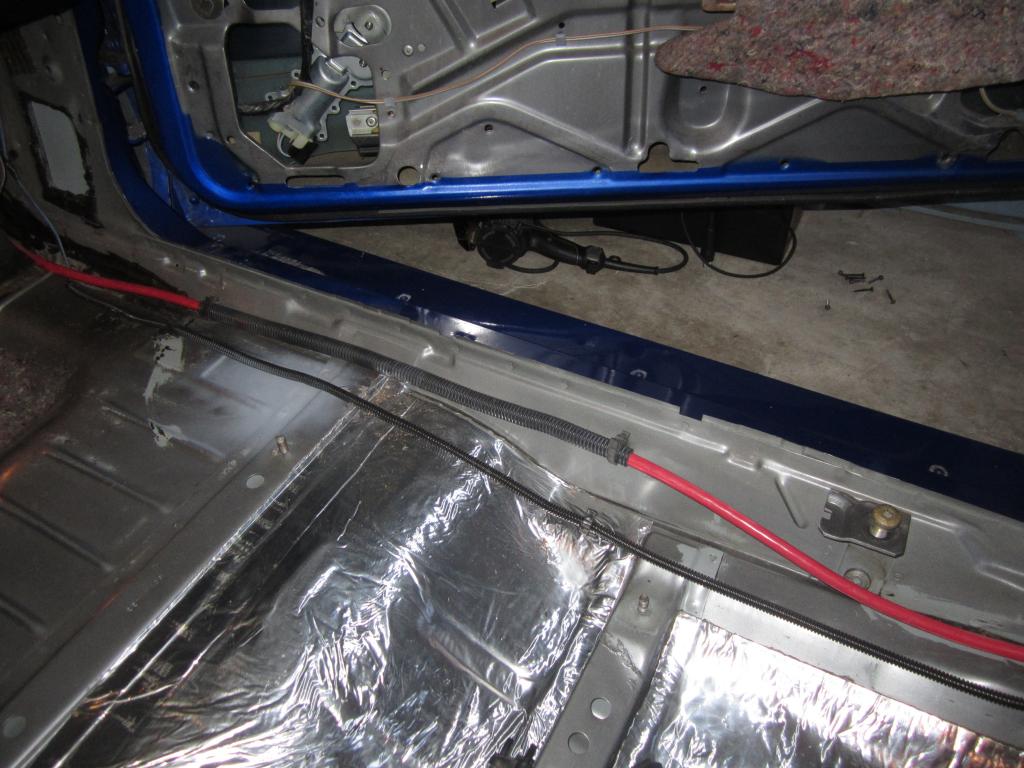
Following the cable into the car...
That blue speaker wire will be relocated.
Next I removed the clips that held the speaker wire in place and replaced them with larger clips to hold the battery cable in place where the speaker wire used to be.

Here's the cable coming from the distribution block and running over to the lip around the wheel opening. I used the metal tape that I was using on the Fatmat to secure the cable to the fender.

I mocked-up the cable going through the bulkhead so that I could get the bulkhead in the correct spot on the cable. Then I pulled it out as shown and installed the other half of the housing. Once the other half is installed the bulkhead will not slide on the cable anymore.

finished product. If your harness is still going through there or you don't want to drill out the bulkhead, you could just drill a hole below the bulkhead and run the cable below it using a grommet.
Following the cable into the car...

That blue speaker wire will be relocated.

Next I removed the clips that held the speaker wire in place and replaced them with larger clips to hold the battery cable in place where the speaker wire used to be.


Last edited by dprest68; 07-12-2014 at 12:21 AM.
07-12-2014, 12:31 AM
#776
Supreme Member
Thread Starter
iTrader: (1)
Join Date: Mar 2007
Location: Apopka, Florida
Posts: 1,237
Likes: 0
Received 7 Likes
on
6 Posts
Car: 1989 Pontiac Trans Am GTA
Engine: cammed LS1
Transmission: Monster SS 4L65E
Axle/Gears: 9 bolt posi w/ 3.70 gears
Re: LS1 swap for my '89 GTA
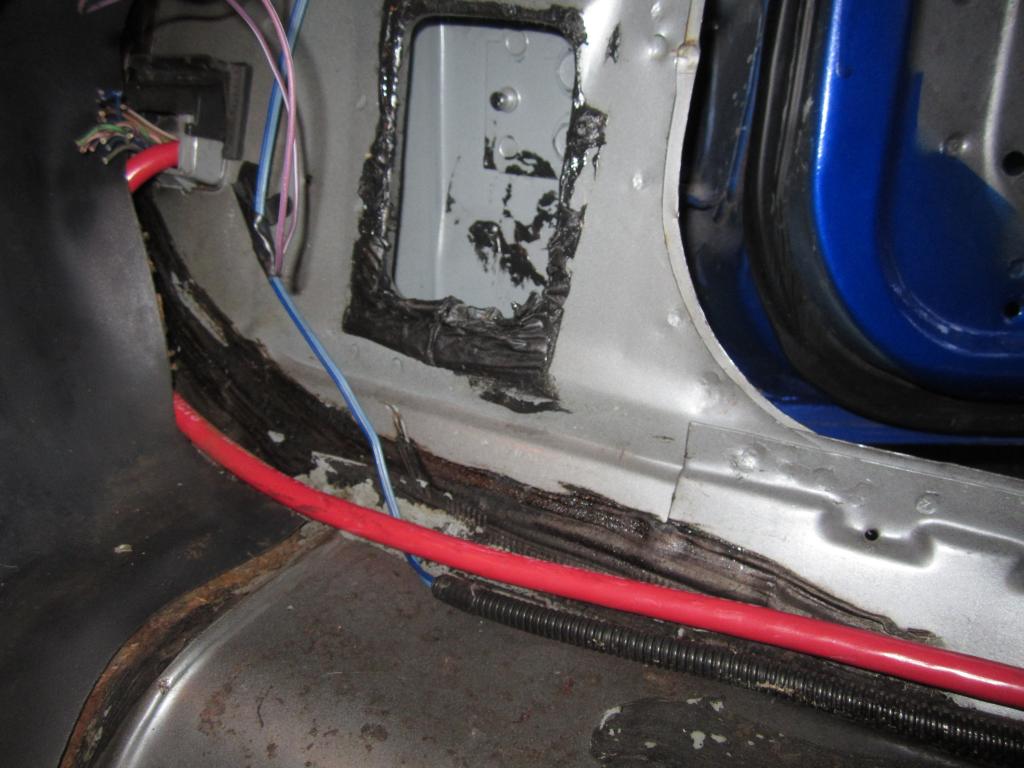
Continued...
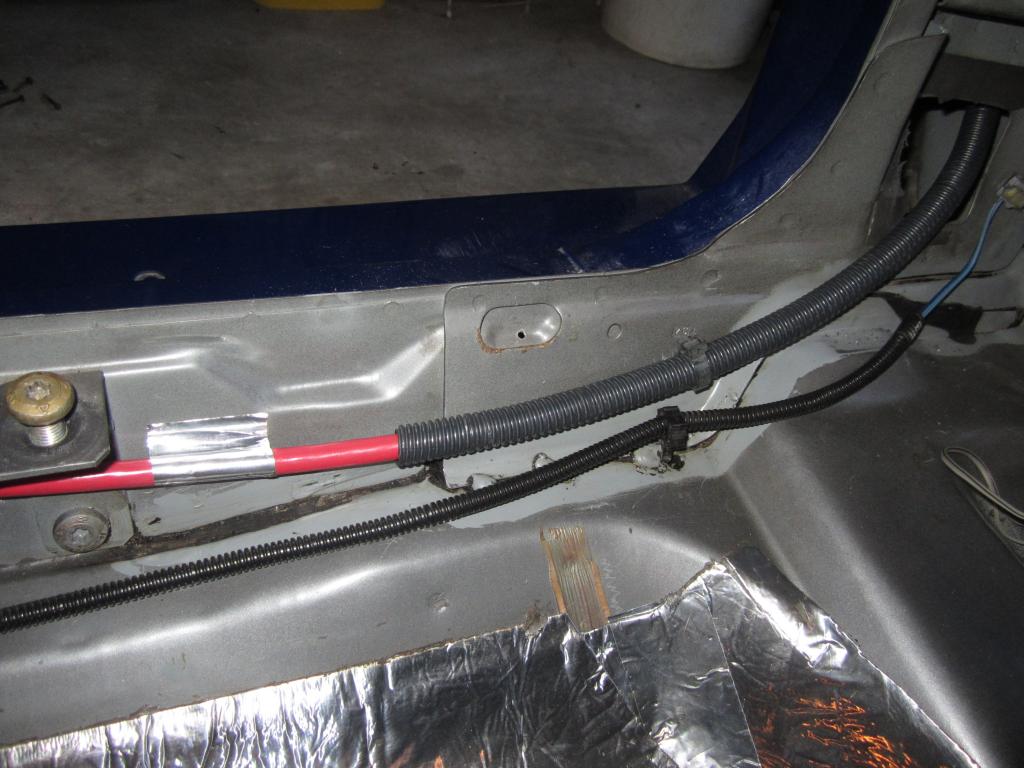
This is the view through the speaker opening. The cable is tucked nicely up in the corner.
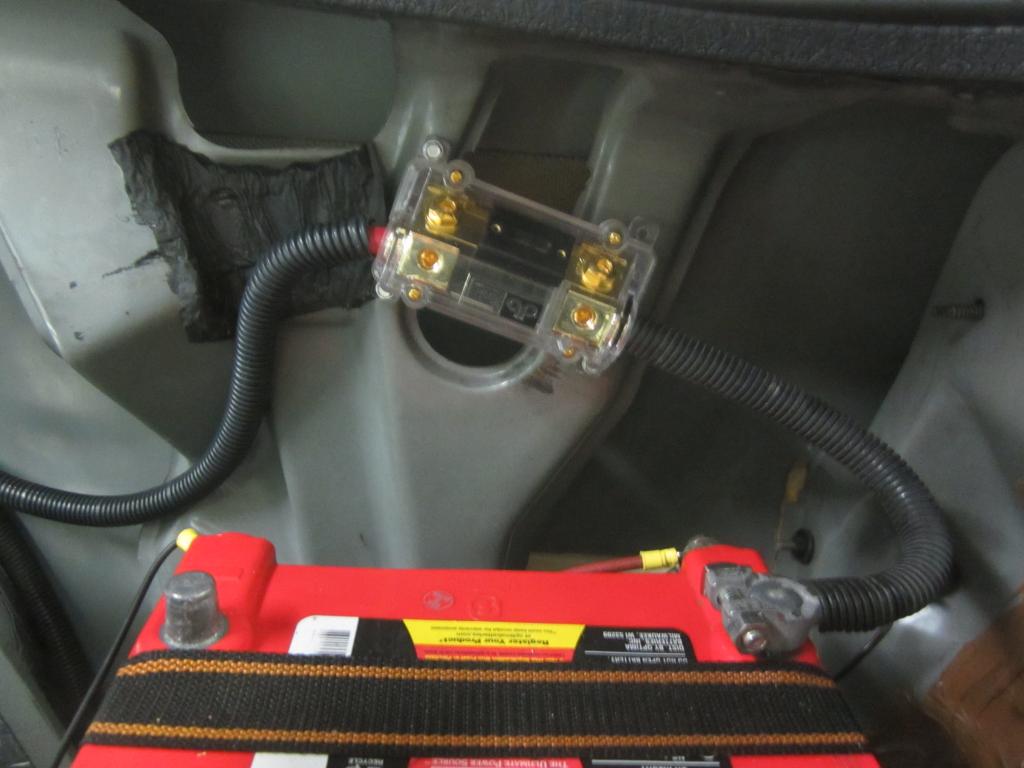
And finally it reaches the battery. I bought a nice fuse holder to install on this cable, but the actual fuse hasn't arrived yet. I should have bought the one that was Amazon Prime eligible! Oh well.
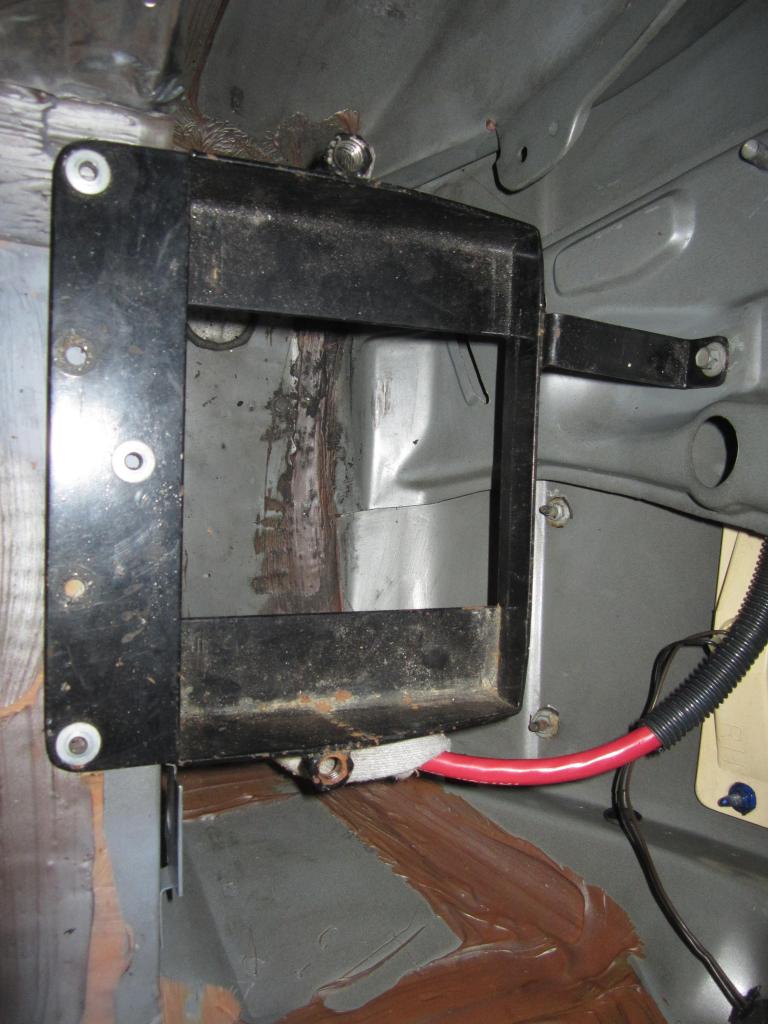
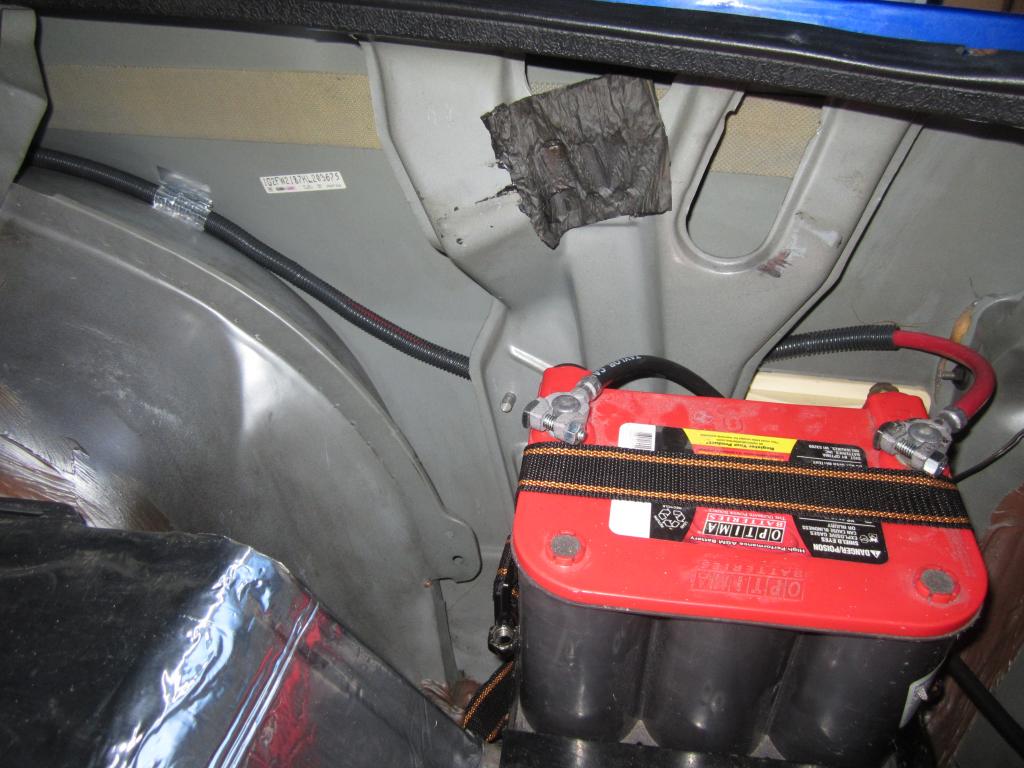
Here's a shot of the battery tray. The battery fits really tight in it. I actually have to push the battery down in it.

This is the view through the speaker opening. The cable is tucked nicely up in the corner.

And finally it reaches the battery. I bought a nice fuse holder to install on this cable, but the actual fuse hasn't arrived yet. I should have bought the one that was Amazon Prime eligible!
Oh well.
Here's a shot of the battery tray. The battery fits really tight in it. I actually have to push the battery down in it.
07-12-2014, 07:22 AM
#778
Member

Join Date: Mar 2013
Location: gladstone
Posts: 325
Likes: 0
Received 0 Likes
on
0 Posts
Car: 72 nova/ 90 camaro rs,04 suburban
Engine: blown 327/ 355/306/355/5.3
Transmission: muncie 4 speed/T5/powerglide,4l80e
Axle/Gears: 342/411/456/ moser axles
Re: LS1 swap for my '89 GTA
nice job!
07-12-2014, 08:27 AM
#779
Supreme Member
Thread Starter
iTrader: (1)
Join Date: Mar 2007
Location: Apopka, Florida
Posts: 1,237
Likes: 0
Received 7 Likes
on
6 Posts
Car: 1989 Pontiac Trans Am GTA
Engine: cammed LS1
Transmission: Monster SS 4L65E
Axle/Gears: 9 bolt posi w/ 3.70 gears
Re: LS1 swap for my '89 GTA
That's looking very nice, Dave!
For the speaker holes I would recommend a hole cutter, but you need a drill press to use them safely. They are NOT to be used with hand-held drills.
But, if your Dremel approach is working, then I guess that is OK, too.
Like I told you earlier, I think relocating the battery was a brilliant decision, as much as a PITA it was. Glad to see you're doing so and using all those parts you've bought in the past. There was a reason for it. lol.
Yeah, it was after hours when I cut the hole so all of the stores were closed. I will buy a hole saw for the rest of the holes. I wasn't sure if they made a 4�" hole saw, but I checked online and they do. But I like the one you posted a link to. Thanks. I'll get one the next time I stop by the hardware store.
Relocating the battery was a bit of a pain in the ****, but I know there are quite a few benefits to doing so. So no big deal.
There's only a 30% chance of rain this evening. Maybe the weather will cooperate and we can attend the Longwood show.
Thanks!
07-13-2014, 12:18 PM
#781
Member
Join Date: Aug 2007
Location: Long Island, NY
Posts: 201
Likes: 0
Received 2 Likes
on
2 Posts
Car: 1992 z28
Engine: LS1
Transmission: T-56
Re: LS1 swap for my '89 GTA
Cool video! Car sounds really healthy and looks even nicer! Pretty jealous haha wish I could fast forward my project to where yours is at right now lol.
Now lets see some video of it stretching its legs!
Now lets see some video of it stretching its legs!
12-24-2014, 01:12 AM
#785
Supreme Member
Thread Starter
iTrader: (1)
Join Date: Mar 2007
Location: Apopka, Florida
Posts: 1,237
Likes: 0
Received 7 Likes
on
6 Posts
Car: 1989 Pontiac Trans Am GTA
Engine: cammed LS1
Transmission: Monster SS 4L65E
Axle/Gears: 9 bolt posi w/ 3.70 gears
Re: LS1 swap for my '89 GTA
I know it's been awhile since my last update. 2014 has been a busy year for me. I will be getting my thread caught back up over the next few days. I have tons of pics to post. There has been a lot going on. Luis & I are working on polishing the car this week. The paint on the car is 12 years old, but it's turning out pretty decent. I can't wait to get it done and see it out in the daylight. Luis even polished the tail lights and they look brand new. I was amazed.
Believe it or not, I am still working on putting Fatmat throughout the interior of the car and still working on the stereo system. It's taking forever, but it will be totally worth it in the end. Stay tuned...
12-24-2014, 02:07 AM
#786
Supreme Member
Thread Starter
iTrader: (1)
Join Date: Mar 2007
Location: Apopka, Florida
Posts: 1,237
Likes: 0
Received 7 Likes
on
6 Posts
Car: 1989 Pontiac Trans Am GTA
Engine: cammed LS1
Transmission: Monster SS 4L65E
Axle/Gears: 9 bolt posi w/ 3.70 gears
Re: LS1 swap for my '89 GTA
Well, it's 3am and I'm still awake, so I guess I will just go ahead and start posting some pics. Since the last pics I posted were of the battery cable routing I'll just go ahead and post another of the same.
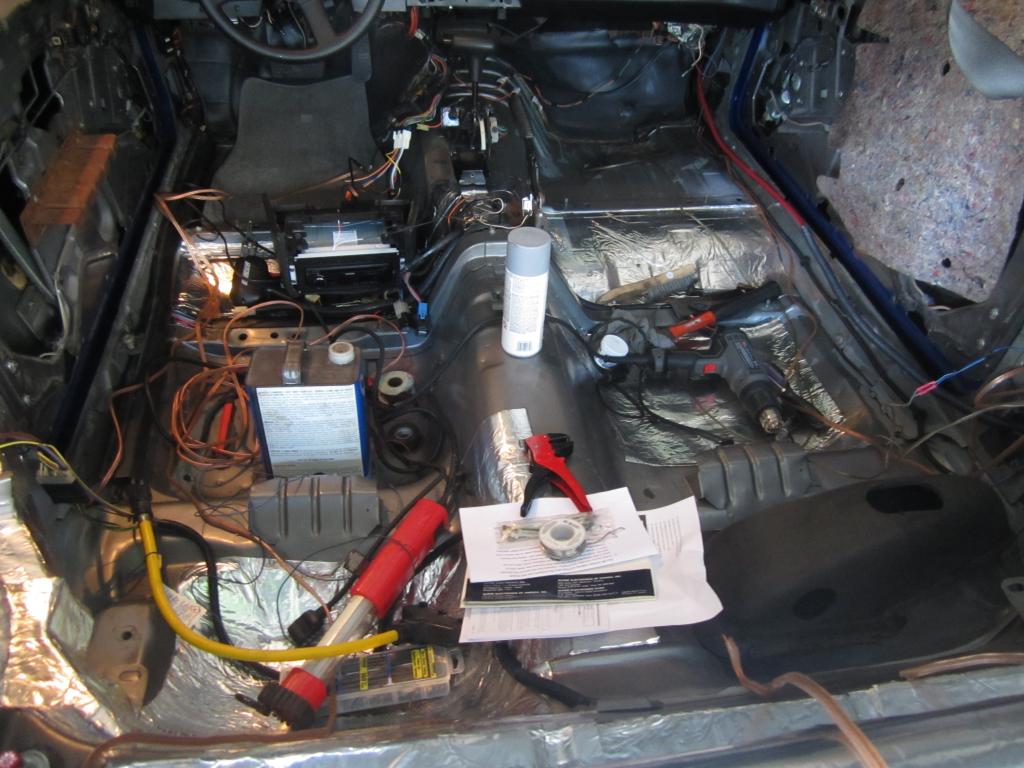
I added a nice fuse holder to the positive cable. As you can see by the lack of negative battery cable, I have yet to connect this battery to the system. I haven't had time to research to see if there are any problems having two batteries connected to the system at the same time or if there is anything special I have to do to make that happen. Any advice on making it happen? Eventually the one in the engine bay will be removed.

I added a nice fuse holder to the positive cable. As you can see by the lack of negative battery cable, I have yet to connect this battery to the system. I haven't had time to research to see if there are any problems having two batteries connected to the system at the same time or if there is anything special I have to do to make that happen. Any advice on making it happen? Eventually the one in the engine bay will be removed.
12-24-2014, 02:13 AM
#787
Supreme Member
Thread Starter
iTrader: (1)
Join Date: Mar 2007
Location: Apopka, Florida
Posts: 1,237
Likes: 0
Received 7 Likes
on
6 Posts
Car: 1989 Pontiac Trans Am GTA
Engine: cammed LS1
Transmission: Monster SS 4L65E
Axle/Gears: 9 bolt posi w/ 3.70 gears
Re: LS1 swap for my '89 GTA
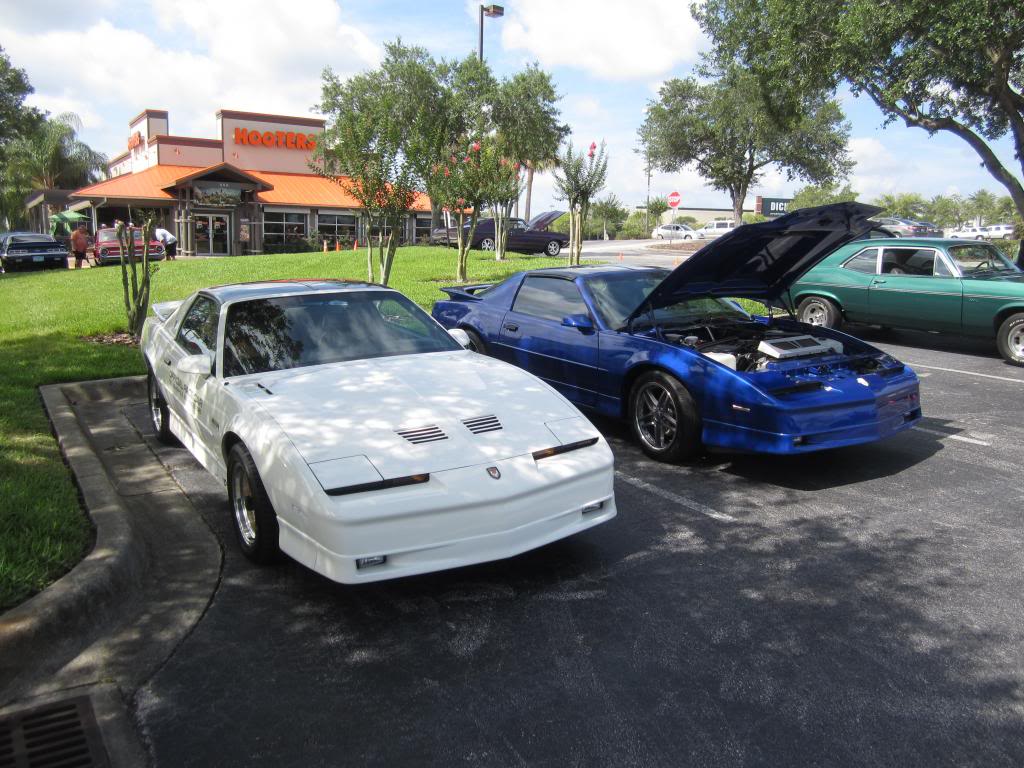
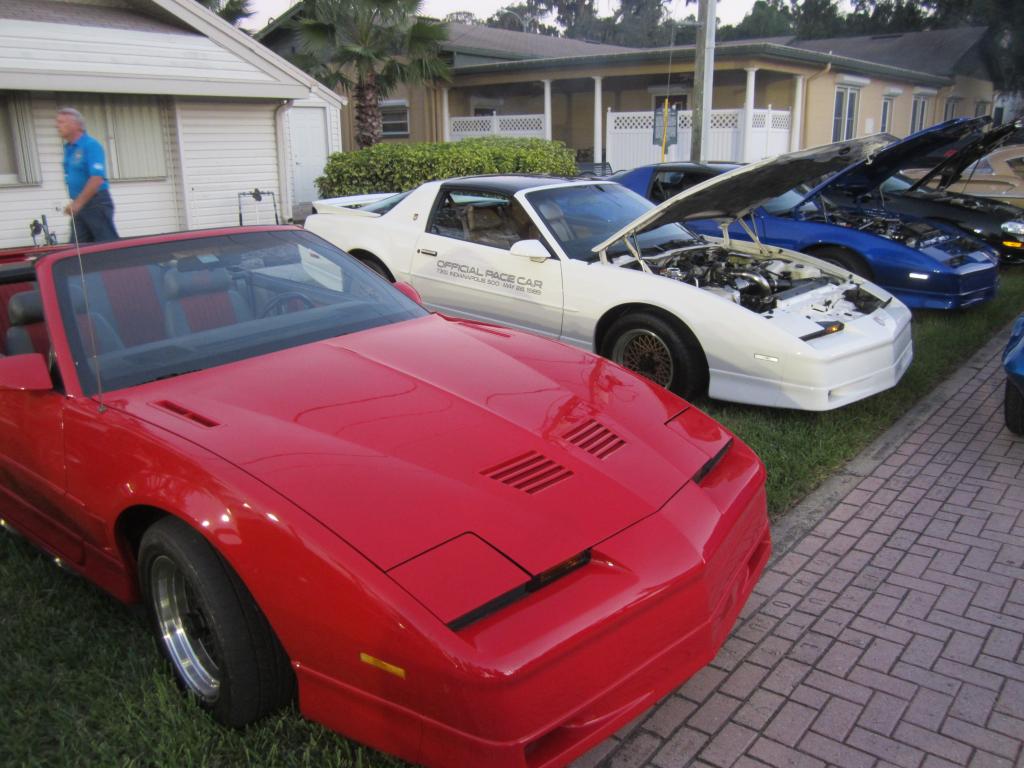
I thought this was a pretty cool pic from a recent car show. Red, white and blue T/A's
 12-24-2014, 02:23 AM
#788
Supreme Member
Thread Starter
iTrader: (1)
Join Date: Mar 2007
Location: Apopka, Florida
Posts: 1,237
Likes: 0
Received 7 Likes
on
6 Posts
Car: 1989 Pontiac Trans Am GTA
Engine: cammed LS1
Transmission: Monster SS 4L65E
Axle/Gears: 9 bolt posi w/ 3.70 gears
Re: LS1 swap for my '89 GTA
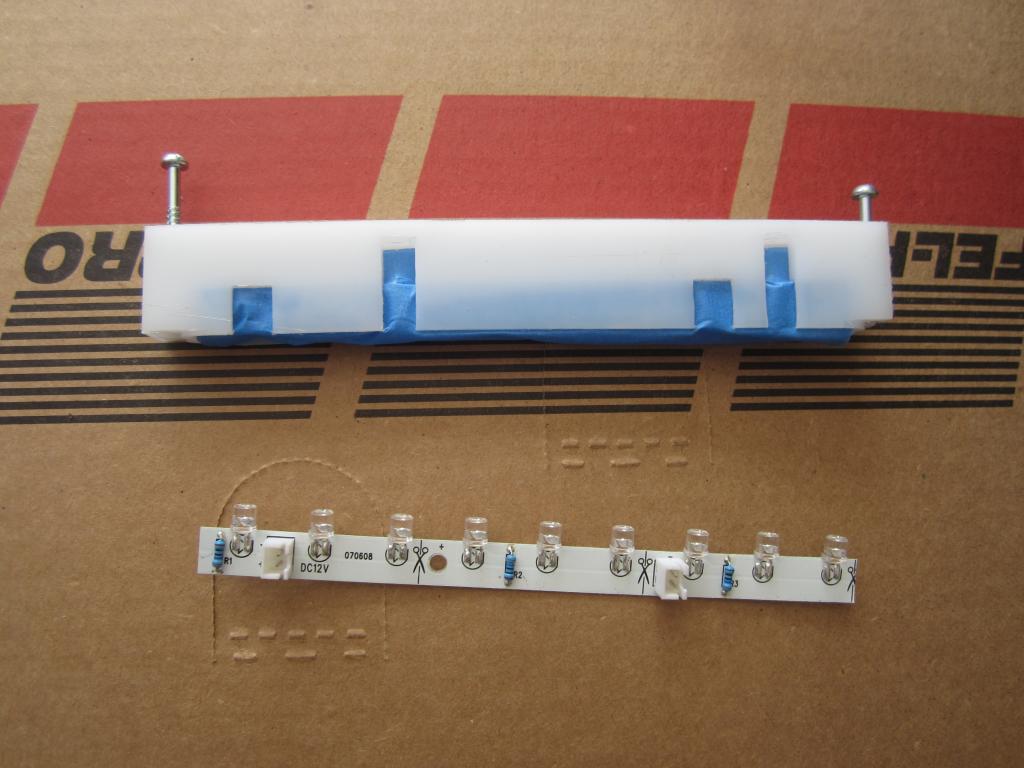
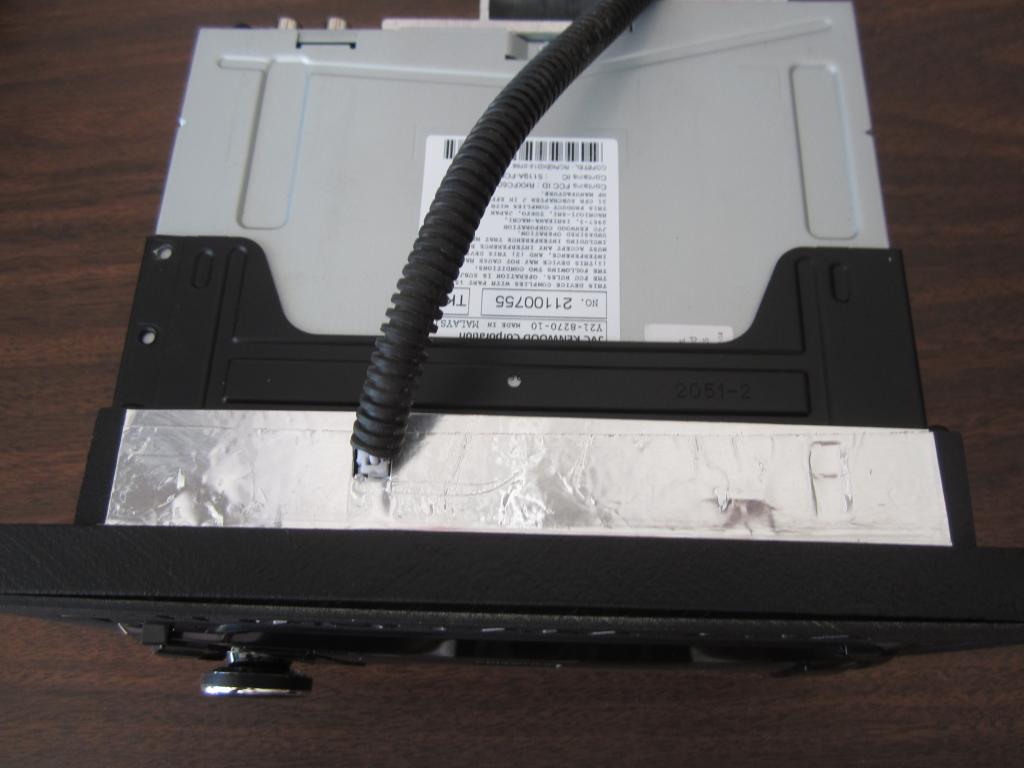
I love my HUmount for my head unit, but the light scatter from the housing was too much for my liking. So I decided I would paint the housing black to eliminate the problem.
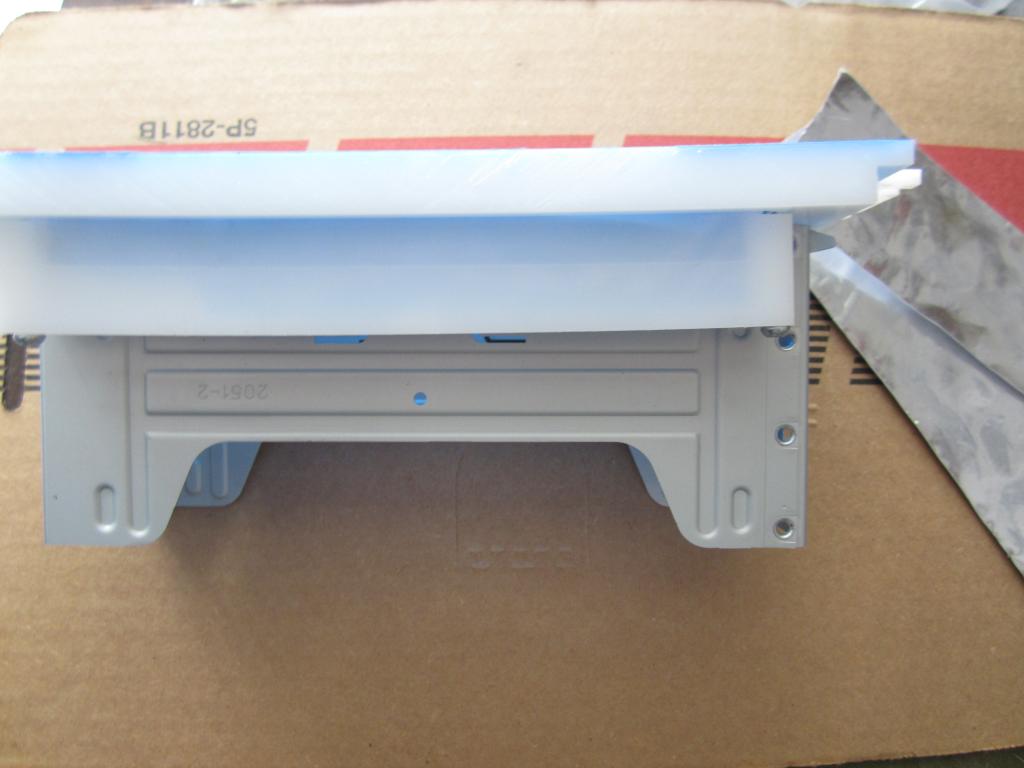
The silver tape is what they give you to help cut down on the light scatter. That's just not going to cut it though.
I disassembled everything and taped-up what I didn't want painted
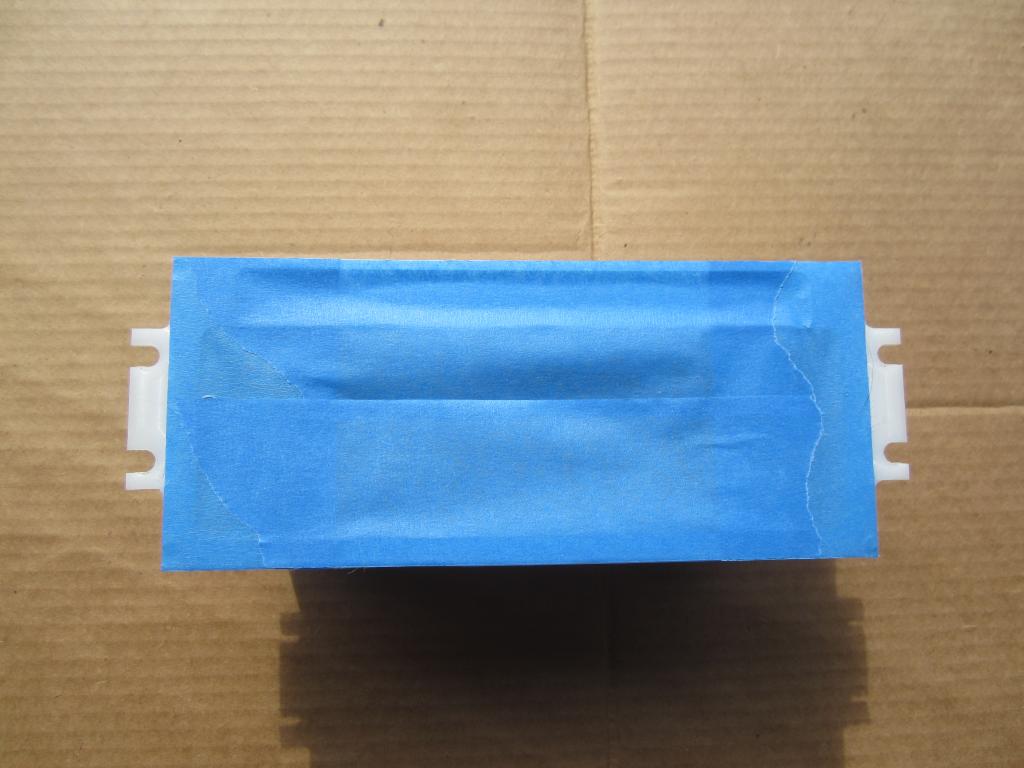
I didn't take enough pics on this process, but jumping forward, here it is painted
And here's the finished product with the silver tape

The silver tape is what they give you to help cut down on the light scatter. That's just not going to cut it though.
I disassembled everything and taped-up what I didn't want painted


I didn't take enough pics on this process, but jumping forward, here it is painted

And here's the finished product with the silver tape
 12-24-2014, 10:17 AM
#791
Supreme Member
Thread Starter
iTrader: (1)
Join Date: Mar 2007
Location: Apopka, Florida
Posts: 1,237
Likes: 0
Received 7 Likes
on
6 Posts
Car: 1989 Pontiac Trans Am GTA
Engine: cammed LS1
Transmission: Monster SS 4L65E
Axle/Gears: 9 bolt posi w/ 3.70 gears
Re: LS1 swap for my '89 GTA
Here's a before and after pic of the front wheel well liners.
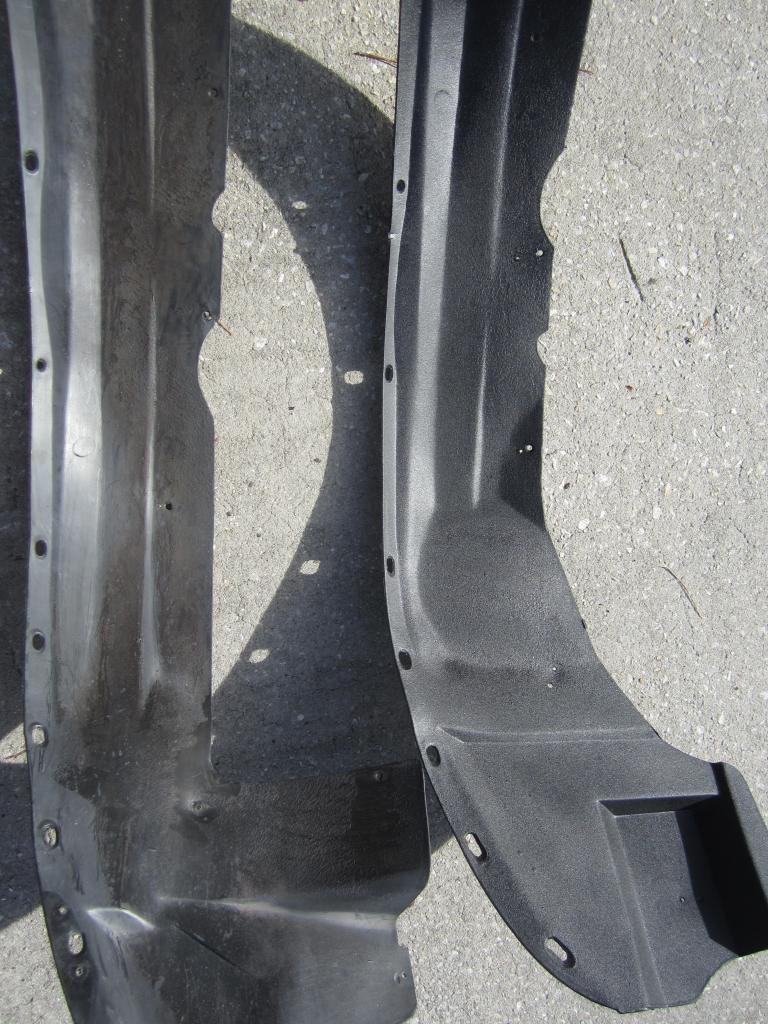
I used the Duplicolor Bedliner paint on them.
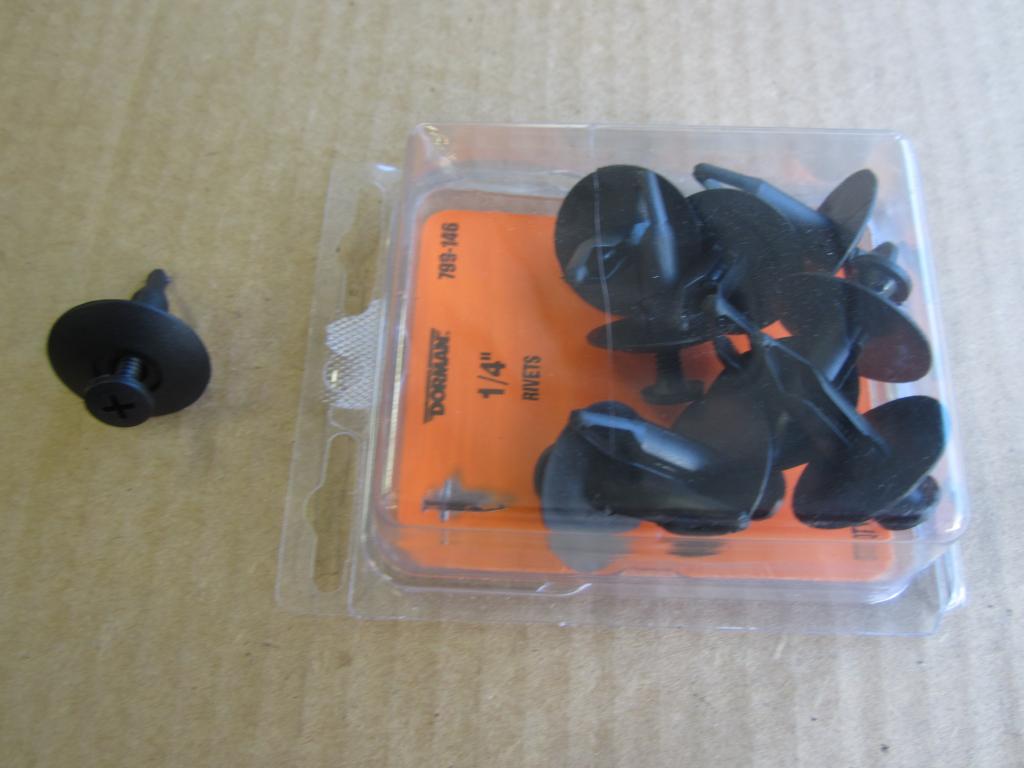
I used these to attach them to the car so that they can be easily removed in the future.
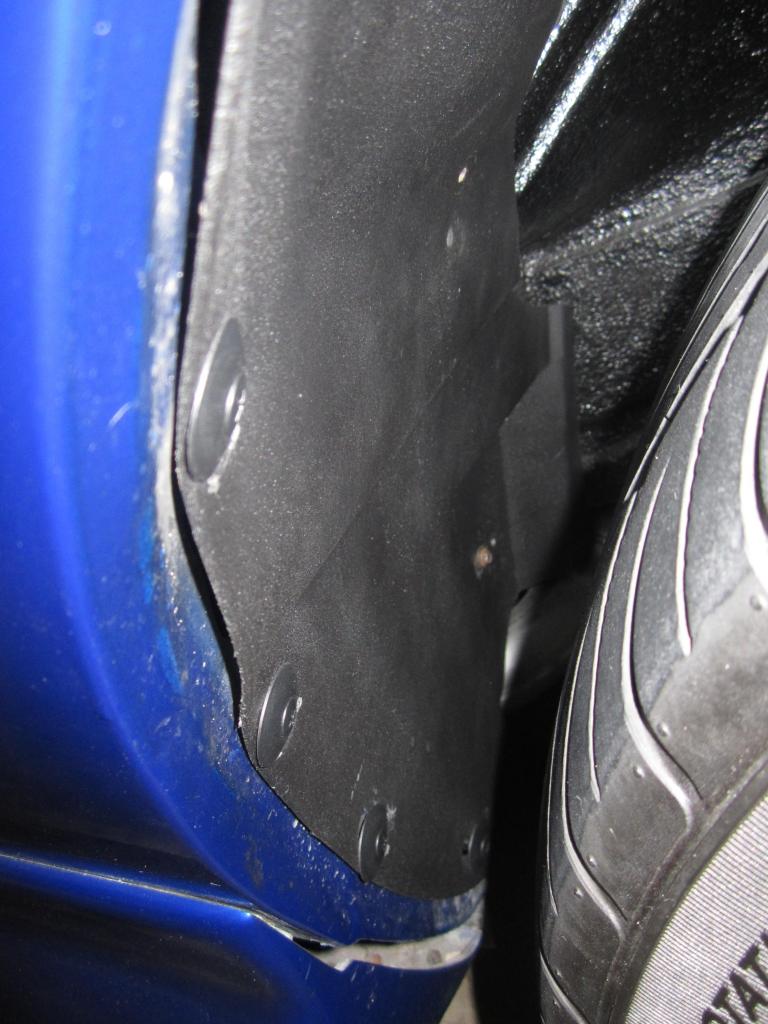
Installed back on the car

I used the Duplicolor Bedliner paint on them.
I used these to attach them to the car so that they can be easily removed in the future.

Installed back on the car
 12-24-2014, 10:37 AM
#792
Supreme Member
Thread Starter
iTrader: (1)
Join Date: Mar 2007
Location: Apopka, Florida
Posts: 1,237
Likes: 0
Received 7 Likes
on
6 Posts
Car: 1989 Pontiac Trans Am GTA
Engine: cammed LS1
Transmission: Monster SS 4L65E
Axle/Gears: 9 bolt posi w/ 3.70 gears
Re: LS1 swap for my '89 GTA
While cleaning the car the other day I realized that my window triangles (not sure what they are actually called) looked terrible. They had over spray on them from when the car was painted and they just looked tired. So I removed them from the car and cleaned them up and slapped a fresh coat of paint on them. Here's the finished product.
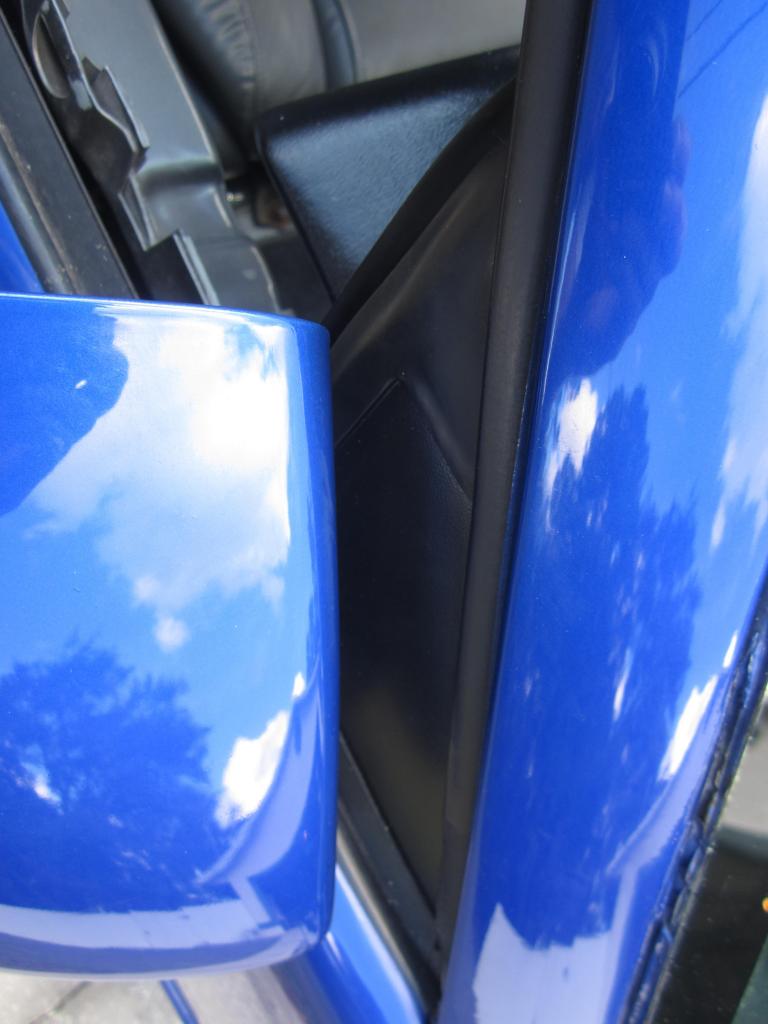
Man, what a pain in the butt they were to get back in the right place so that they weren't crushing the weather stripping when you close the door. I probably spent at least a half hour getting each one aligned properly.
My besty gave me new door jamb vents for Christmas. Thanks Luis!
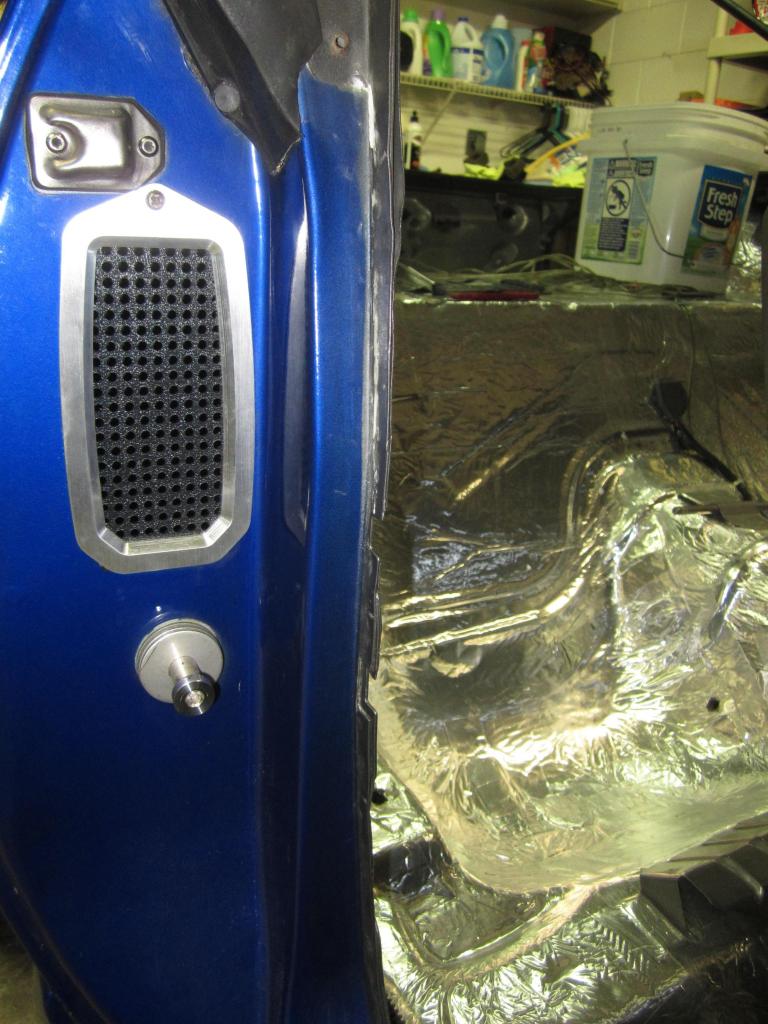
I had to silicone the black screens in place since there were no provisions made to keep them from falling out of the back side. No big deal. They add a nice touch to the jamb. Too bad they will barely get seen.
Last edited by dprest68; 12-24-2014 at 10:42 AM.
12-24-2014, 11:38 AM
#793
Senior Member
Re: LS1 swap for my '89 GTA
HAHAHA so I see you are quite the night owl too, I frequently work into the late hours on my "Z". Gotta start my LS thread it's about time I've started putting together the parts, just need to take the time to do the thread.
Love the door jamb vents.
Love the door jamb vents.
Last edited by 92BLKL98; 12-24-2014 at 11:46 AM.
12-24-2014, 11:15 PM
#794
Supreme Member
Thread Starter
iTrader: (1)
Join Date: Mar 2007
Location: Apopka, Florida
Posts: 1,237
Likes: 0
Received 7 Likes
on
6 Posts
Car: 1989 Pontiac Trans Am GTA
Engine: cammed LS1
Transmission: Monster SS 4L65E
Axle/Gears: 9 bolt posi w/ 3.70 gears
Re: LS1 swap for my '89 GTA
Yeah, definitely a night owl. It's not uncommon for me to be out there working on the car until 2 or 3am before I even realize it.
I will be looking for your swap thread in the near future. I enjoy watching everyone's builds.
12-24-2014, 11:33 PM
#795
Member
Join Date: Dec 2008
Location: Tyler, Tx
Posts: 401
Likes: 0
Received 0 Likes
on
0 Posts
Car: 1991 Z28 Vert
Engine: 305 TPI
Re: LS1 swap for my '89 GTA
As long as you're in there, I'd fab up some fiberglass buckets for those 5 1/4s. Taking the time to isolate the rear of the speaker can really tighten up their response.
Great build man! I don't even know what kind of dough you have rolled up in that baby.
Great build man! I don't even know what kind of dough you have rolled up in that baby.
12-25-2014, 01:50 PM
#797
Senior Member
iTrader: (3)

Join Date: Oct 2012
Location: SC
Posts: 725
Likes: 0
Received 0 Likes
on
0 Posts
Car: '87 IROC-Z | '99 SS
Engine: LB9 | LS1
Transmission: 700R4 | T56
Re: LS1 swap for my '89 GTA
Well, it's 3am and I'm still awake, so I guess I will just go ahead and start posting some pics. Since the last pics I posted were of the battery cable routing I'll just go ahead and post another of the same.

I added a nice fuse holder to the positive cable. As you can see by the lack of negative battery cable, I have yet to connect this battery to the system. I haven't had time to research to see if there are any problems having two batteries connected to the system at the same time or if there is anything special I have to do to make that happen. Any advice on making it happen? Eventually the one in the engine bay will be removed.
I added a nice fuse holder to the positive cable. As you can see by the lack of negative battery cable, I have yet to connect this battery to the system. I haven't had time to research to see if there are any problems having two batteries connected to the system at the same time or if there is anything special I have to do to make that happen. Any advice on making it happen? Eventually the one in the engine bay will be removed.
12-25-2014, 03:18 PM
#798
Supreme Member
Thread Starter
iTrader: (1)
Join Date: Mar 2007
Location: Apopka, Florida
Posts: 1,237
Likes: 0
Received 7 Likes
on
6 Posts
Car: 1989 Pontiac Trans Am GTA
Engine: cammed LS1
Transmission: Monster SS 4L65E
Axle/Gears: 9 bolt posi w/ 3.70 gears
Re: LS1 swap for my '89 GTA
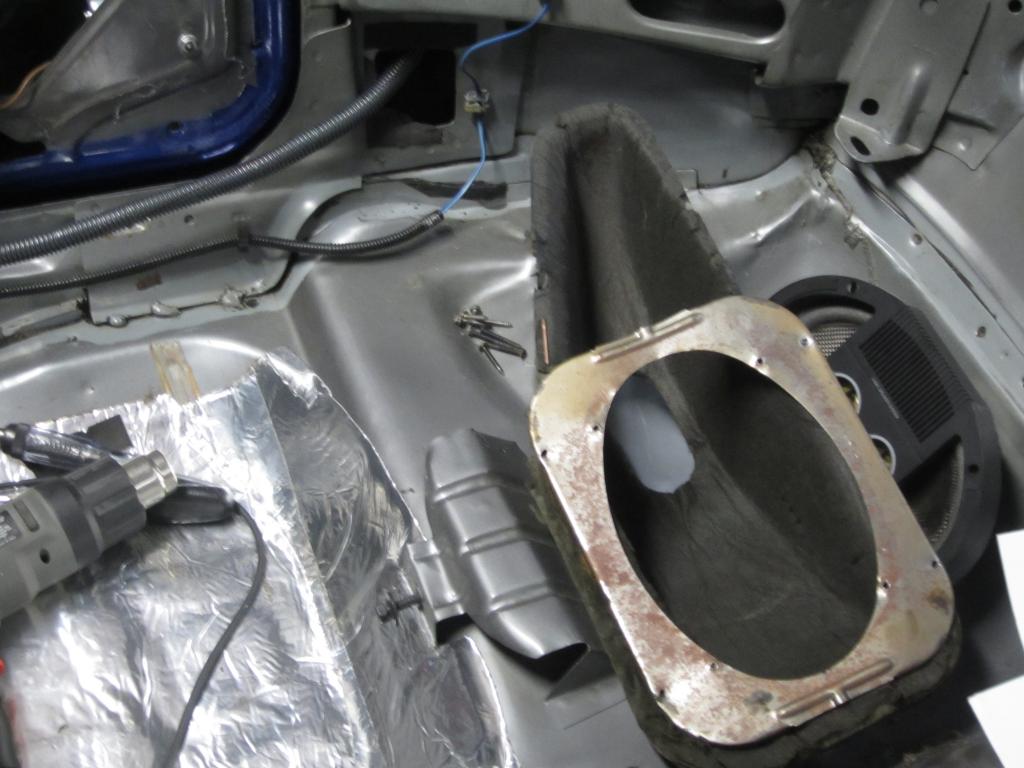
If you are talking about the rear speakers, I reused the funky factory baffles
and stuffed them with Poly-fil. I think that will do the trick.
Here's a before and after pic
 12-25-2014, 03:22 PM
#799
Supreme Member
Thread Starter
iTrader: (1)
Join Date: Mar 2007
Location: Apopka, Florida
Posts: 1,237
Likes: 0
Received 7 Likes
on
6 Posts
Car: 1989 Pontiac Trans Am GTA
Engine: cammed LS1
Transmission: Monster SS 4L65E
Axle/Gears: 9 bolt posi w/ 3.70 gears
Re: LS1 swap for my '89 GTA
So I guess that means you still haven't ordered your carpet yet. I think I am going to order my carpet this week if all goes as planned.