LS1 swap for my '89 GTA

 04-08-2014, 09:11 AM
#702
Supreme Member

Thread Starter
iTrader: (1)
Join Date: Mar 2007
Location: Apopka, Florida
Posts: 1,237
Likes: 0
Received 7 Likes
on
6 Posts
Car: 1989 Pontiac Trans Am GTA
Engine: cammed LS1
Transmission: Monster SS 4L65E
Axle/Gears: 9 bolt posi w/ 3.70 gears
Re: LS1 swap for my '89 GTA
Thanks Antony 
You and me both! Yep, just a few more things before the swap is done. Next up will be the interior.
Same here
No doubt! Thanks!
Same here
No doubt! Thanks!
04-08-2014, 09:17 AM
#703
Supreme Member
Thread Starter
iTrader: (1)
Join Date: Mar 2007
Location: Apopka, Florida
Posts: 1,237
Likes: 0
Received 7 Likes
on
6 Posts
Car: 1989 Pontiac Trans Am GTA
Engine: cammed LS1
Transmission: Monster SS 4L65E
Axle/Gears: 9 bolt posi w/ 3.70 gears
Re: LS1 swap for my '89 GTA
Thanks Jason! Me too. The idler pulley is still squealing; even after a i put a new pulley on it. The new pulley didn't squeal for a minute or so, then it started to squeal as well. Not sure what to make of it.
I was going to tow it over to my mechanic, but decided to drive it instead.
I was going to tow it over to my mechanic, but decided to drive it instead.
04-08-2014, 09:59 AM
#704
Re: LS1 swap for my '89 GTA
Does the pulley rotate freely when you take the belt off?
I once received a pulley that wouldn't even turn when I tightened the bolt and it was just bad quality.
Perhaps the bearing on yours is also bad, but... I don't think you'd go for the cheapest pulley on the market
I once received a pulley that wouldn't even turn when I tightened the bolt and it was just bad quality.
Perhaps the bearing on yours is also bad, but... I don't think you'd go for the cheapest pulley on the market
04-08-2014, 10:35 AM
#705
Supreme Member
Thread Starter
iTrader: (1)
Join Date: Mar 2007
Location: Apopka, Florida
Posts: 1,237
Likes: 0
Received 7 Likes
on
6 Posts
Car: 1989 Pontiac Trans Am GTA
Engine: cammed LS1
Transmission: Monster SS 4L65E
Axle/Gears: 9 bolt posi w/ 3.70 gears
Re: LS1 swap for my '89 GTA
Does the pulley rotate freely when you take the belt off?
I once received a pulley that wouldn't even turn when I tightened the bolt and it was just bad quality.
Perhaps the bearing on yours is also bad, but... I don't think you'd go for the cheapest pulley on the market
I once received a pulley that wouldn't even turn when I tightened the bolt and it was just bad quality.
Perhaps the bearing on yours is also bad, but... I don't think you'd go for the cheapest pulley on the market

Luis suggested that maybe it's a pulley alignment issue. We shall see.
04-10-2014, 05:38 AM
#706
Supreme Member
iTrader: (30)

Join Date: Jul 2000
Location: Fort Myers, FL
Posts: 1,514
Received 17 Likes
on
10 Posts
Car: 91 Firebird
Engine: 6.0
Transmission: T56
Axle/Gears: 3.73
Re: LS1 swap for my '89 GTA
I just noticed that your water pump still has its pretty black paint on it. I wonder if that has anything to do with the squeal?
I never really had that issue.... so hopefully it is something simple.
I never really had that issue.... so hopefully it is something simple.
04-10-2014, 11:48 PM
#707
Supreme Member
Thread Starter
iTrader: (1)
Join Date: Mar 2007
Location: Apopka, Florida
Posts: 1,237
Likes: 0
Received 7 Likes
on
6 Posts
Car: 1989 Pontiac Trans Am GTA
Engine: cammed LS1
Transmission: Monster SS 4L65E
Axle/Gears: 9 bolt posi w/ 3.70 gears
Re: LS1 swap for my '89 GTA
Yeah, let's hope. Looking at it with the mechanic, it looks like maybe the belt tensioner may need to be adjusted back toward the engine to get the pulley to better align with the other pulleys. Hopefully that's all it is.
04-12-2014, 02:06 AM
#708
Member

Join Date: Sep 2004
Location: Bay Area California
Posts: 127
Likes: 0
Received 0 Likes
on
0 Posts
Car: '88 trans am GTA
Engine: 5.7L 355 TPI L98
Transmission: T5
Axle/Gears: eaton posi 3.73 gears
Re: LS1 swap for my '89 GTA
where did you get those cats??
did you have to recheck the bearings when you swapped the cap bolts?
Are you going to take it through emission?
did you have to recheck the bearings when you swapped the cap bolts?
Are you going to take it through emission?
04-15-2014, 10:55 PM
#710
Supreme Member
Thread Starter
iTrader: (1)
Join Date: Mar 2007
Location: Apopka, Florida
Posts: 1,237
Likes: 0
Received 7 Likes
on
6 Posts
Car: 1989 Pontiac Trans Am GTA
Engine: cammed LS1
Transmission: Monster SS 4L65E
Axle/Gears: 9 bolt posi w/ 3.70 gears
Re: LS1 swap for my '89 GTA
No, I didn't have to recheck the bearings. I only removed one bearing cap bolt at a time. The other bolt stayed torqued so that the caps wouldn't move.
No emissions. Just trying to keep it "green" to some extent.
04-15-2014, 11:14 PM
#711
Supreme Member
Thread Starter
iTrader: (1)
Join Date: Mar 2007
Location: Apopka, Florida
Posts: 1,237
Likes: 0
Received 7 Likes
on
6 Posts
Car: 1989 Pontiac Trans Am GTA
Engine: cammed LS1
Transmission: Monster SS 4L65E
Axle/Gears: 9 bolt posi w/ 3.70 gears
Re: LS1 swap for my '89 GTA
04-15-2014, 11:27 PM
#712
Supreme Member
Thread Starter
iTrader: (1)
Join Date: Mar 2007
Location: Apopka, Florida
Posts: 1,237
Likes: 0
Received 7 Likes
on
6 Posts
Car: 1989 Pontiac Trans Am GTA
Engine: cammed LS1
Transmission: Monster SS 4L65E
Axle/Gears: 9 bolt posi w/ 3.70 gears
Re: LS1 swap for my '89 GTA
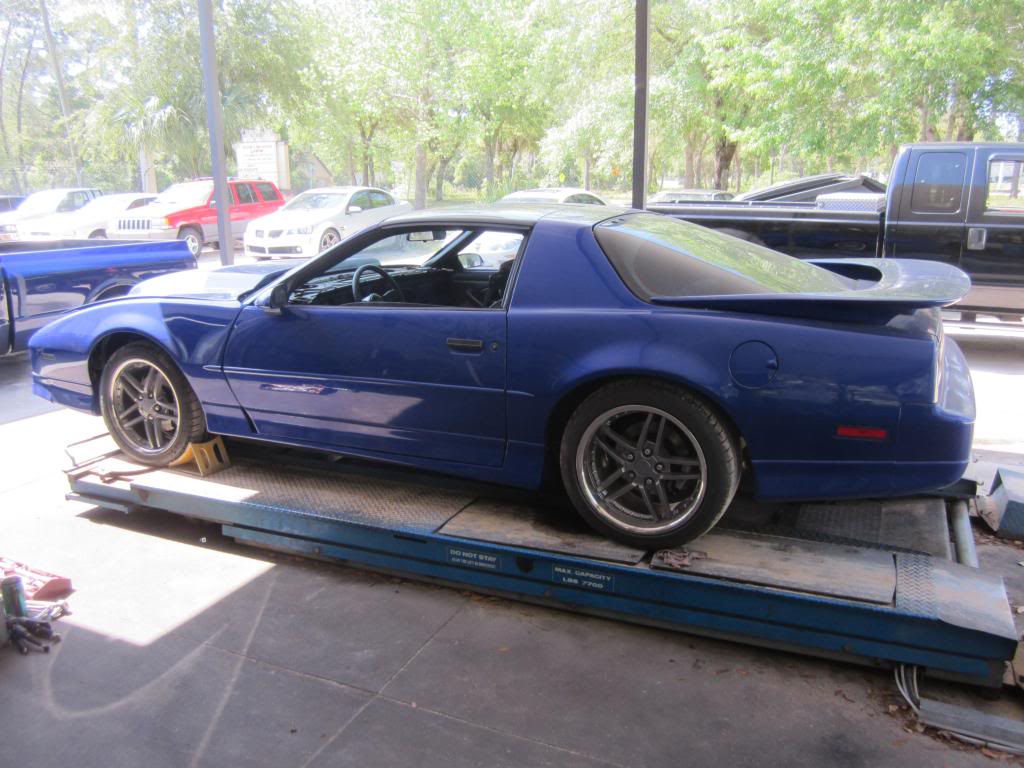
The car has been over at the mechanic's shop this week
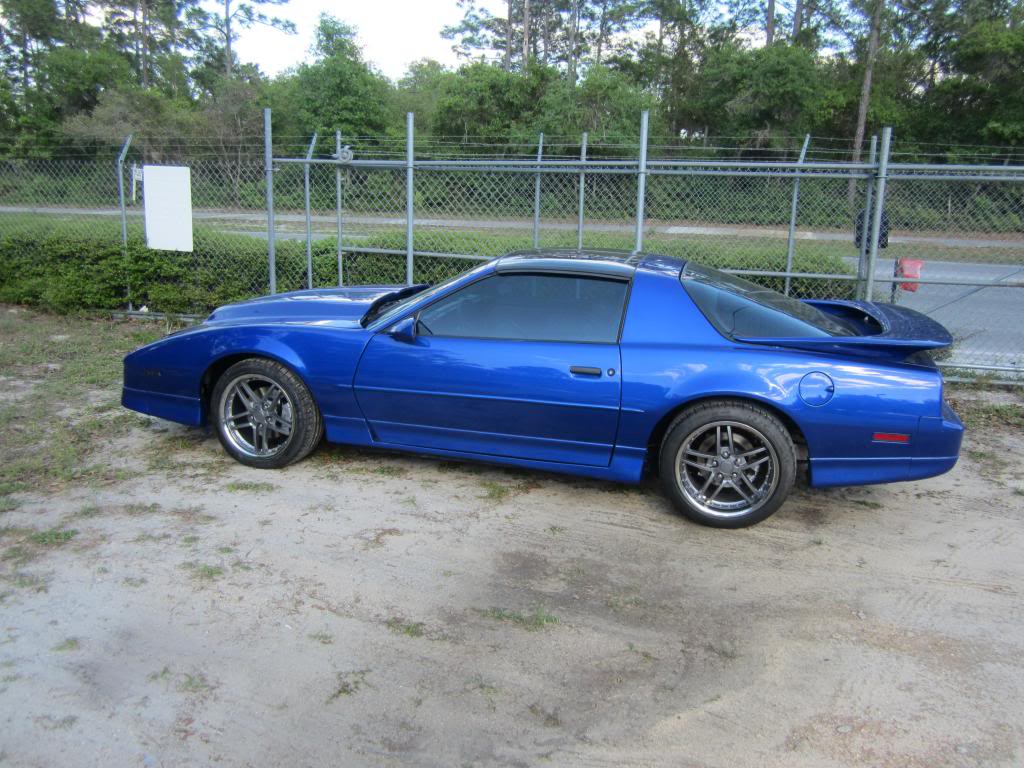
He determined that the pulley squeal was because the pulley was out of alignment with the others. The reason for this is because the belt tensioner needs to be replaced. the pulleys align with no belt installed. Adding the belt on moves it out of alignment by about an 1/8"
He also got the driver's side SFC installed.

And he found this...
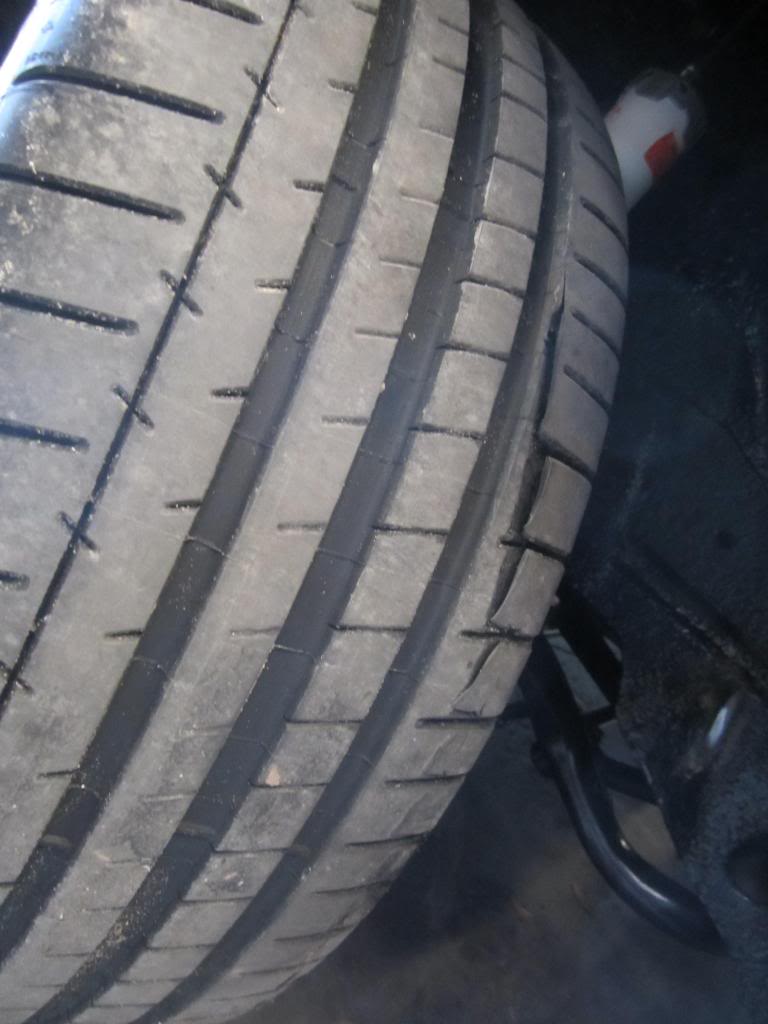
Big nasty gash in the tire. The tires literally have 5 miles or less on them!
Luis and I had an issue with the shifter cable trying to get the car over to the mechanic's shop. Turns out the shifter cable was bad. The mechanic let me come by on Saturday to use his lift and swap out the cable. So that was cool of him.
 04-15-2014, 11:33 PM
#713
Supreme Member
Thread Starter
iTrader: (1)
Join Date: Mar 2007
Location: Apopka, Florida
Posts: 1,237
Likes: 0
Received 7 Likes
on
6 Posts
Car: 1989 Pontiac Trans Am GTA
Engine: cammed LS1
Transmission: Monster SS 4L65E
Axle/Gears: 9 bolt posi w/ 3.70 gears
Re: LS1 swap for my '89 GTA
I've been detailing the headlight assemblies while the car's been in the shop. Some progress pics...
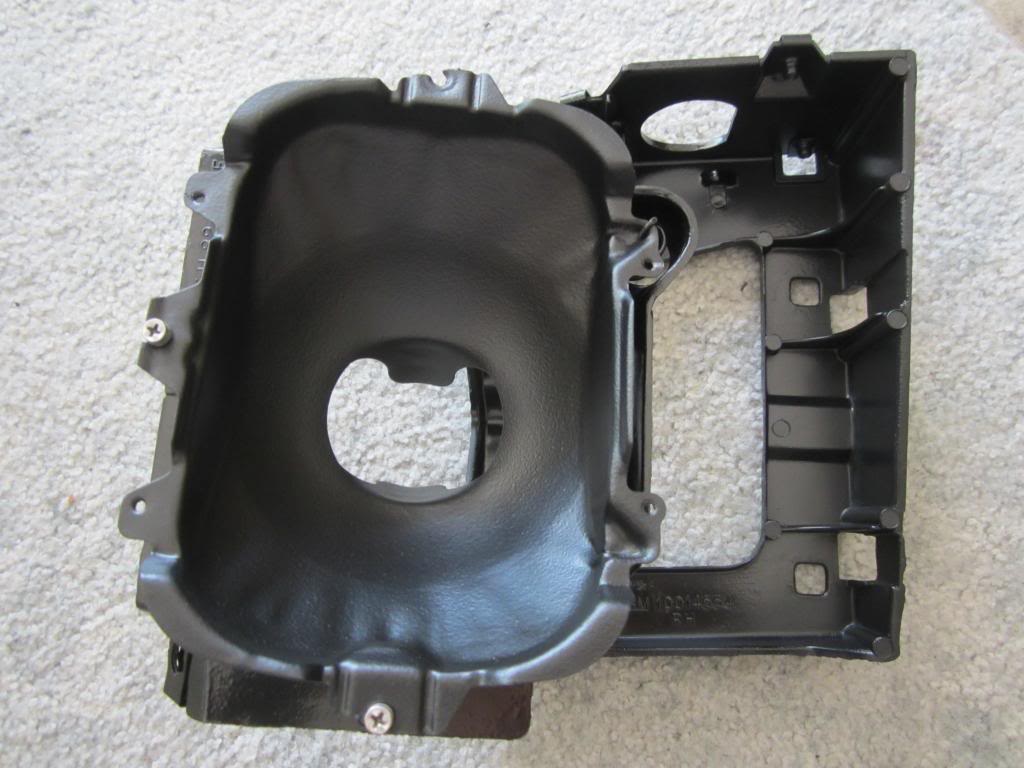
I sanded the headlight buckets down and applied some Ospho to neutralize the rust. Then I hit them with some primer and finally some bed liner paint
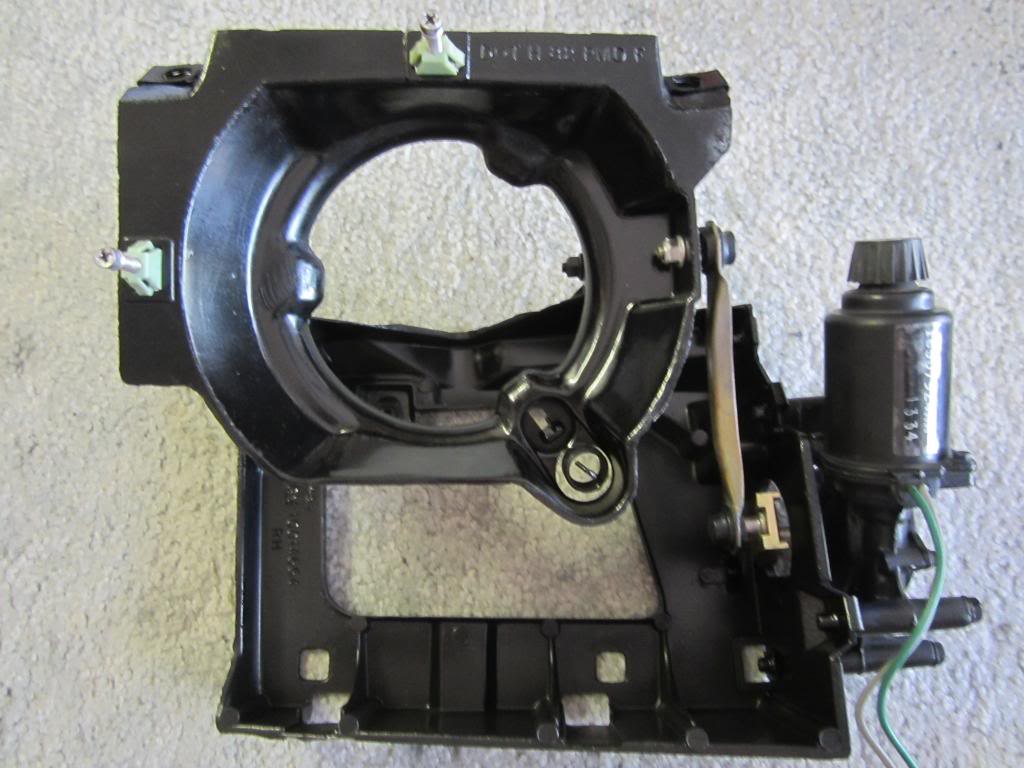
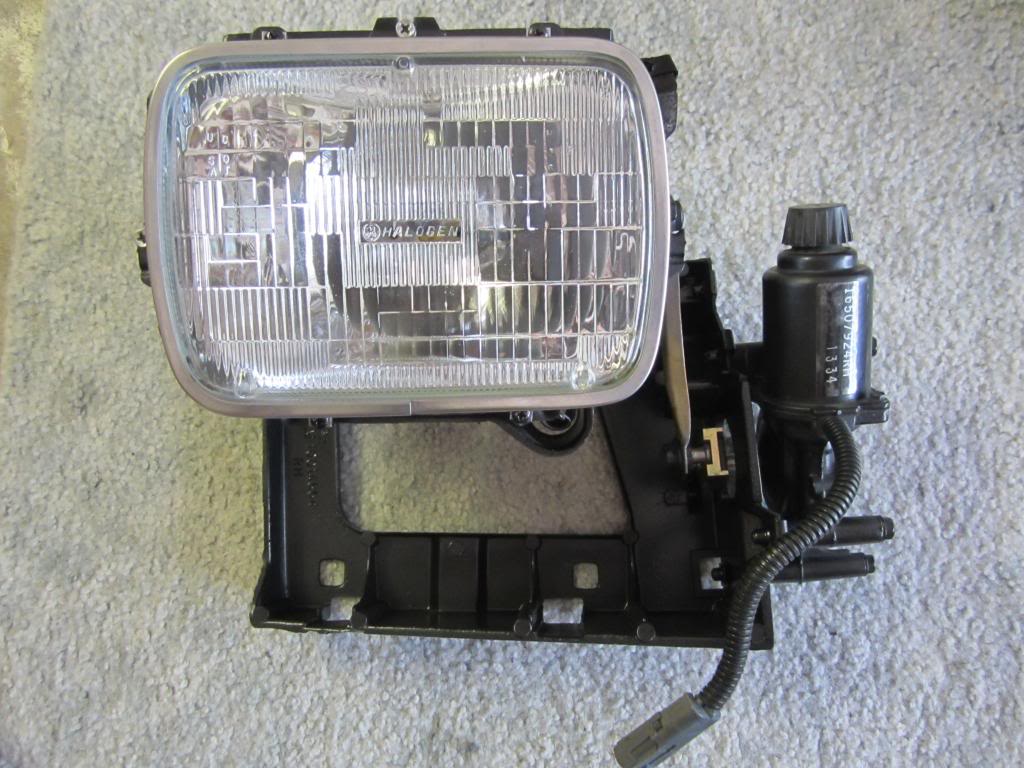
I'm still working on the cover and bezel.

I sanded the headlight buckets down and applied some Ospho to neutralize the rust. Then I hit them with some primer and finally some bed liner paint


I'm still working on the cover and bezel.
Last edited by dprest68; 04-15-2014 at 11:36 PM.
04-16-2014, 06:14 AM
#714
Supreme Member
iTrader: (30)
Join Date: Jul 2000
Location: Fort Myers, FL
Posts: 1,514
Received 17 Likes
on
10 Posts
Car: 91 Firebird
Engine: 6.0
Transmission: T56
Axle/Gears: 3.73
Re: LS1 swap for my '89 GTA
I'm glad to see more progress being made
plus that mechanic is very cool to let you swap out the shifter cable on his lift....
Who is doing your exhaust work?
plus that mechanic is very cool to let you swap out the shifter cable on his lift....
Who is doing your exhaust work?
04-16-2014, 07:56 AM
#715
Supreme Member
Thread Starter
iTrader: (1)
Join Date: Mar 2007
Location: Apopka, Florida
Posts: 1,237
Likes: 0
Received 7 Likes
on
6 Posts
Car: 1989 Pontiac Trans Am GTA
Engine: cammed LS1
Transmission: Monster SS 4L65E
Axle/Gears: 9 bolt posi w/ 3.70 gears
Re: LS1 swap for my '89 GTA
I was going to take it to a local shop, Muffler Man. Why, do you have a better option for me?
04-17-2014, 06:36 AM
#716
Supreme Member
iTrader: (30)
Join Date: Jul 2000
Location: Fort Myers, FL
Posts: 1,514
Received 17 Likes
on
10 Posts
Car: 91 Firebird
Engine: 6.0
Transmission: T56
Axle/Gears: 3.73
Re: LS1 swap for my '89 GTA
I used a guy in sanford for my exhaust and I am extremely pleased with it.
Mr Muffler
2421 South French Ave
Sanford, FL
407-323-3811
The owner/installer owns f-bodies, so he knows what needs to be done so there are no rattles or anything hanging below the car
Mr Muffler
2421 South French Ave
Sanford, FL
407-323-3811
The owner/installer owns f-bodies, so he knows what needs to be done so there are no rattles or anything hanging below the car
04-17-2014, 03:15 PM
#717
Member
Join Date: Sep 2004
Location: Bay Area California
Posts: 127
Likes: 0
Received 0 Likes
on
0 Posts
Car: '88 trans am GTA
Engine: 5.7L 355 TPI L98
Transmission: T5
Axle/Gears: eaton posi 3.73 gears
Re: LS1 swap for my '89 GTA
The driver's side is stock from a fourth gen. I bought the passenger's side cat. I believe it was this one: http://www.autopartswarehouse.com/sk...132010009.html
No, I didn't have to recheck the bearings. I only removed one bearing cap bolt at a time. The other bolt stayed torqued so that the caps wouldn't move.
No emissions. Just trying to keep it "green" to some extent.
No, I didn't have to recheck the bearings. I only removed one bearing cap bolt at a time. The other bolt stayed torqued so that the caps wouldn't move.
No emissions. Just trying to keep it "green" to some extent.
Do they fit well? I am really hoping i can find some "factory" style cats without having to fab them up since CA emissions are very strict about modifying cats.
Build looks awesome so far!
05-14-2014, 11:32 PM
#718
Supreme Member
Thread Starter
iTrader: (1)
Join Date: Mar 2007
Location: Apopka, Florida
Posts: 1,237
Likes: 0
Received 7 Likes
on
6 Posts
Car: 1989 Pontiac Trans Am GTA
Engine: cammed LS1
Transmission: Monster SS 4L65E
Axle/Gears: 9 bolt posi w/ 3.70 gears
Re: LS1 swap for my '89 GTA
Yeah, that guy was a dick to me the last time I was in there. I think he was trying to impress the girl that was there when I was there. So I vowed to never go back. This guy that I am using near my house (Muffler Man in Deltona) came highly recommended. I was impressed when Luis and I took the car over to him today. He spent quite a bit of time with us going over the whole system trying to accommodate me and design the best system possible for ground clearance. We shall see tomorrow, Thursday, how it turned out.
05-14-2014, 11:45 PM
#719
Supreme Member
Thread Starter
iTrader: (1)
Join Date: Mar 2007
Location: Apopka, Florida
Posts: 1,237
Likes: 0
Received 7 Likes
on
6 Posts
Car: 1989 Pontiac Trans Am GTA
Engine: cammed LS1
Transmission: Monster SS 4L65E
Axle/Gears: 9 bolt posi w/ 3.70 gears
Re: LS1 swap for my '89 GTA
Thanks for the kind words Jay!
05-15-2014, 12:12 AM
#720
Supreme Member
Thread Starter
iTrader: (1)
Join Date: Mar 2007
Location: Apopka, Florida
Posts: 1,237
Likes: 0
Received 7 Likes
on
6 Posts
Car: 1989 Pontiac Trans Am GTA
Engine: cammed LS1
Transmission: Monster SS 4L65E
Axle/Gears: 9 bolt posi w/ 3.70 gears
Re: LS1 swap for my '89 GTA
Finally an update...
The exhaust should be done today. I plan on running the car over to the tire shop after picking it up from the exhaust shop to get the alignment done. After that, my tuner is supposed to come by this evening to put the final tune on it. After that it's road worthy. Woohoo!
Here are a few of the items I have been dealing with over the past few weeks:
I thought I had an alternator issue. Not sure, but it's charging now. I do know that my volt gauge isn't reading correctly. It's showing that it's charging less than 13 volts, but there is 14+ volts at the battery when the car is running.
The next issue was the car loading up with fuel on the RH side of the engine. Checking the computer showed that it was adding 25% more fuel to the RH side and leaning-out the LH side by about the same amount. Come to find out I had a bad oxygen sensor on the RH side causing all of the problems. Now it runs much better. My tuner had to come over and stick the computer on it to help me figure out the problem.
I had to take the front wheels over to the tire shop to have them replace my damaged tires with two good ones that came off of my G8. Tire Rack finally called me back and said that they couldn't help me with the damaged tires, but offered a 20% discount if I buy the replacement tires from them within the next 30 days. So I will be taking advantage of that.
Other than all of that I have just been working on a few little items on the interior and detailing the exterior of the car.
I ordered FatMat Megamat & a new turn signal lever for it today. New carpet will be next on the agenda.
Stay tuned for an exhaust video & pics
05-15-2014, 04:35 AM
#721
Supreme Member
iTrader: (30)
Join Date: Jul 2000
Location: Fort Myers, FL
Posts: 1,514
Received 17 Likes
on
10 Posts
Car: 91 Firebird
Engine: 6.0
Transmission: T56
Axle/Gears: 3.73
Re: LS1 swap for my '89 GTA
woohooooooooo
let me know when you are ordering carpet.... its next on my agenda too....
btw, the seats have been recovered and my headliner is redone.....
let me know when you are ordering carpet.... its next on my agenda too....
btw, the seats have been recovered and my headliner is redone.....
05-15-2014, 08:00 AM
#722
Member
iTrader: (2)
Join Date: Feb 2010
Posts: 460
Likes: 0
Received 3 Likes
on
3 Posts
Car: '89 Camaro
Engine: LS1
Transmission: 4L65/70E
Axle/Gears: 9 Inch, 3.70 gears
Re: LS1 swap for my '89 GTA
Dave, I had a similar issue with my voltage gauge. I didn't notice earlier, but the charge wire was undersized, maybe 10 or 12 gauge. I replaced that with two 10 gauge wires, then replaced the battery positive wire that connected to the power distribution box and the negative ground. Both of the other wires had about 4 butt connectors each on them. Before, I had really funky readings on my gauge, but my multimeter read fine, not my gauge reads 13 volts steady all the time, even though the multimeter shows 14.x
05-15-2014, 08:27 AM
#724
Supreme Member
Thread Starter
iTrader: (1)
Join Date: Mar 2007
Location: Apopka, Florida
Posts: 1,237
Likes: 0
Received 7 Likes
on
6 Posts
Car: 1989 Pontiac Trans Am GTA
Engine: cammed LS1
Transmission: Monster SS 4L65E
Axle/Gears: 9 bolt posi w/ 3.70 gears
Re: LS1 swap for my '89 GTA
Dave, I had a similar issue with my voltage gauge. I didn't notice earlier, but the charge wire was undersized, maybe 10 or 12 gauge. I replaced that with two 10 gauge wires, then replaced the battery positive wire that connected to the power distribution box and the negative ground. Both of the other wires had about 4 butt connectors each on them. Before, I had really funky readings on my gauge, but my multimeter read fine, not my gauge reads 13 volts steady all the time, even though the multimeter shows 14.x
I found this information on another thread. I will have to check into this first. If that's not the problem, I will check a few other things, like grounds, in the rest of my wiring.
05-15-2014, 09:09 AM
#725
Member
iTrader: (2)
Join Date: Feb 2010
Posts: 460
Likes: 0
Received 3 Likes
on
3 Posts
Car: '89 Camaro
Engine: LS1
Transmission: 4L65/70E
Axle/Gears: 9 Inch, 3.70 gears
Re: LS1 swap for my '89 GTA
I wasn't saying that was your issue, didn't think that it was. I just couldn't remember back 15 pages to when you did your wiring. Just giving some input. Looking forward to seeing some pics when you get your car back.
05-15-2014, 10:34 AM
#726
Supreme Member
Thread Starter
iTrader: (1)
Join Date: Mar 2007
Location: Apopka, Florida
Posts: 1,237
Likes: 0
Received 7 Likes
on
6 Posts
Car: 1989 Pontiac Trans Am GTA
Engine: cammed LS1
Transmission: Monster SS 4L65E
Axle/Gears: 9 bolt posi w/ 3.70 gears
Re: LS1 swap for my '89 GTA
The exhaust guy came across two weak studs on the RH exhaust manifold. So he has basically made no progress other than replacing one of the studs. He is working on the other stud now. It sucks, but it tells me that the guy cares and wants to do the job correctly for me. One of his customers saw my cut-out and inquired about it. So maybe I can sell that off. And the exhaust guy was interested in the cats as well.
05-15-2014, 10:01 PM
#727
Supreme Member
Thread Starter
iTrader: (1)
Join Date: Mar 2007
Location: Apopka, Florida
Posts: 1,237
Likes: 0
Received 7 Likes
on
6 Posts
Car: 1989 Pontiac Trans Am GTA
Engine: cammed LS1
Transmission: Monster SS 4L65E
Axle/Gears: 9 bolt posi w/ 3.70 gears
Re: LS1 swap for my '89 GTA
Yay... progress!
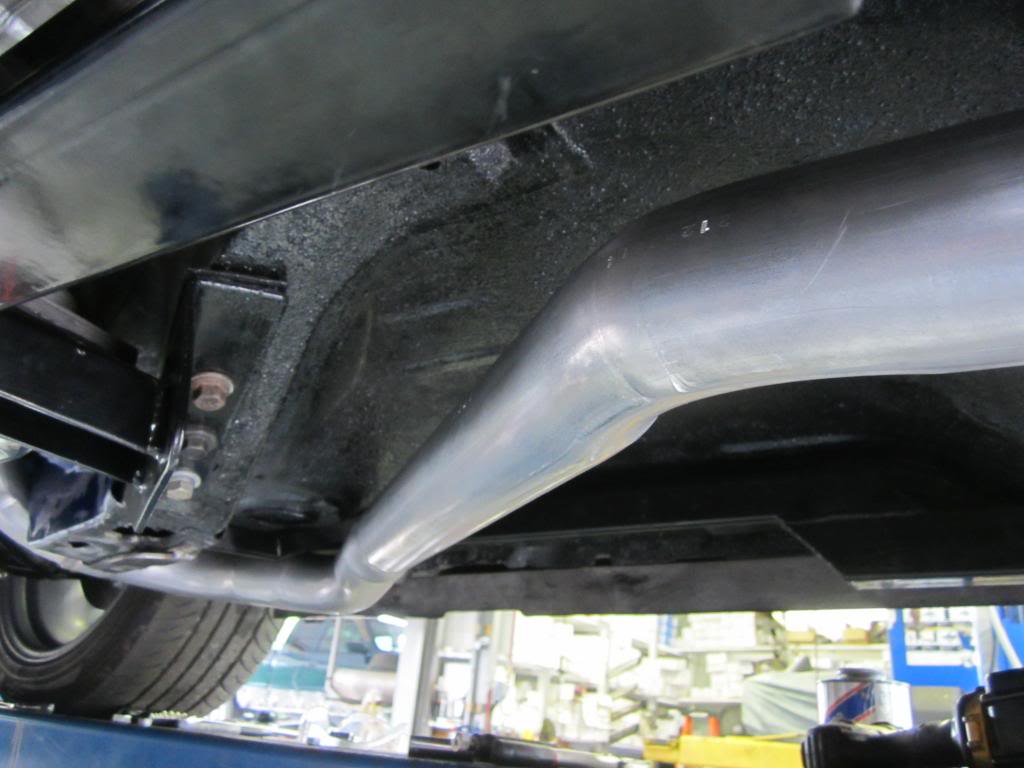
RH side routing followed the stock location keeping it nice and tight.

RH side is done
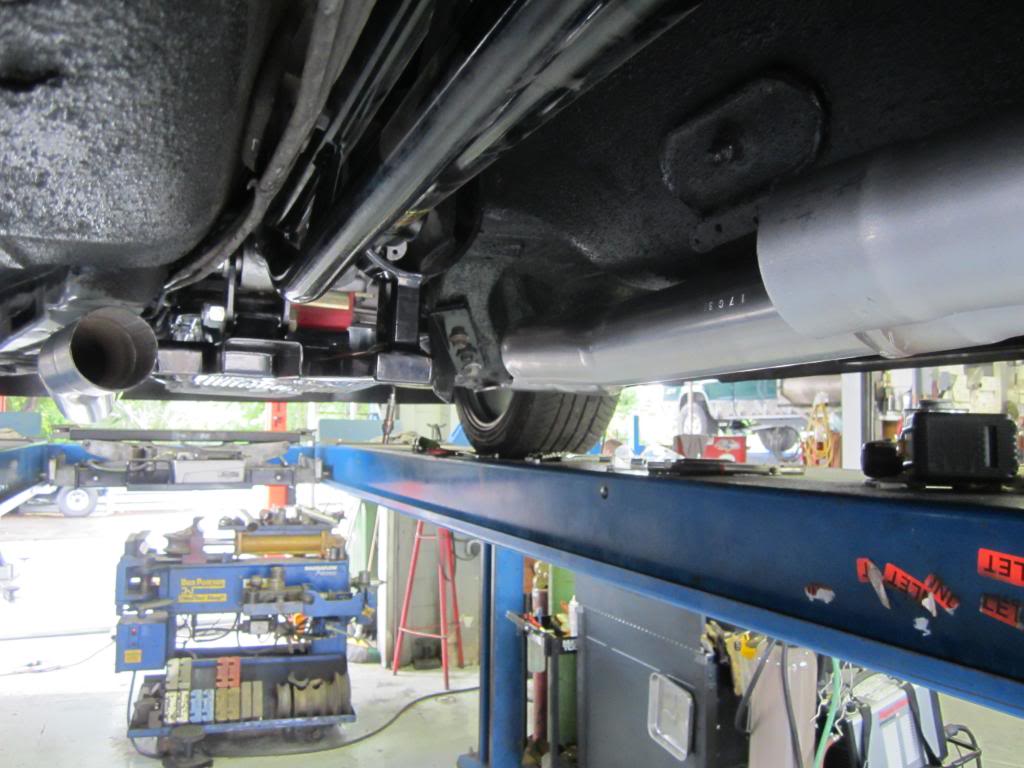
One more connection to be made on the LH side.
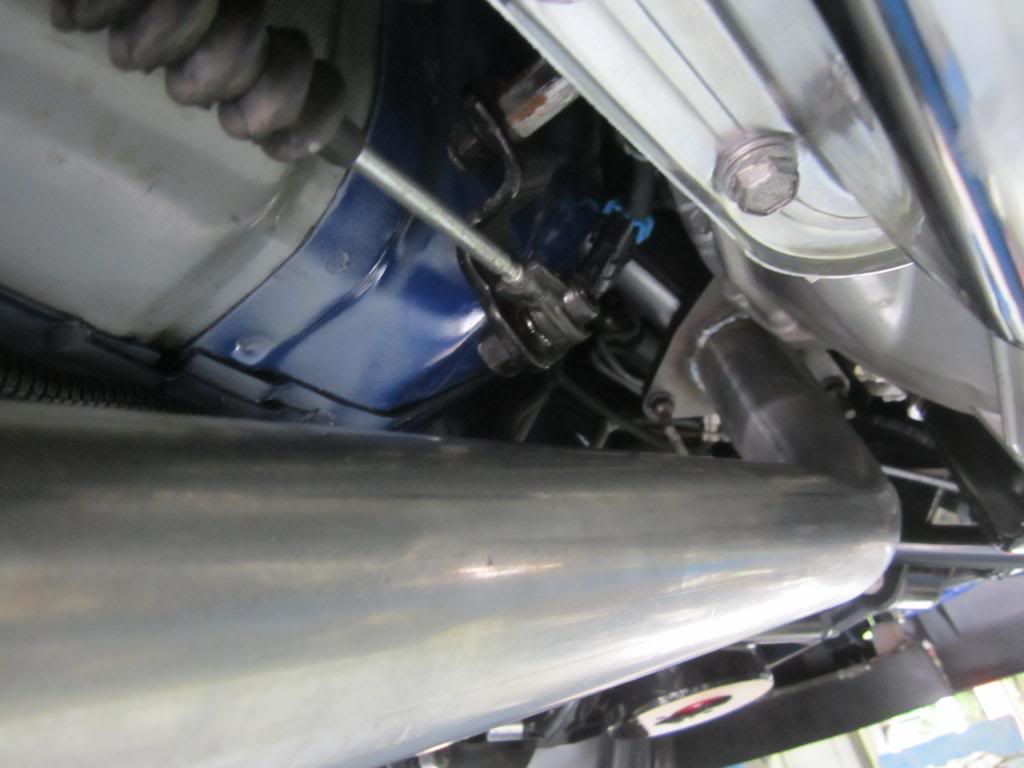
LH side down pipe. I am having a hard time focusing. Oh wait, maybe it's the camera!
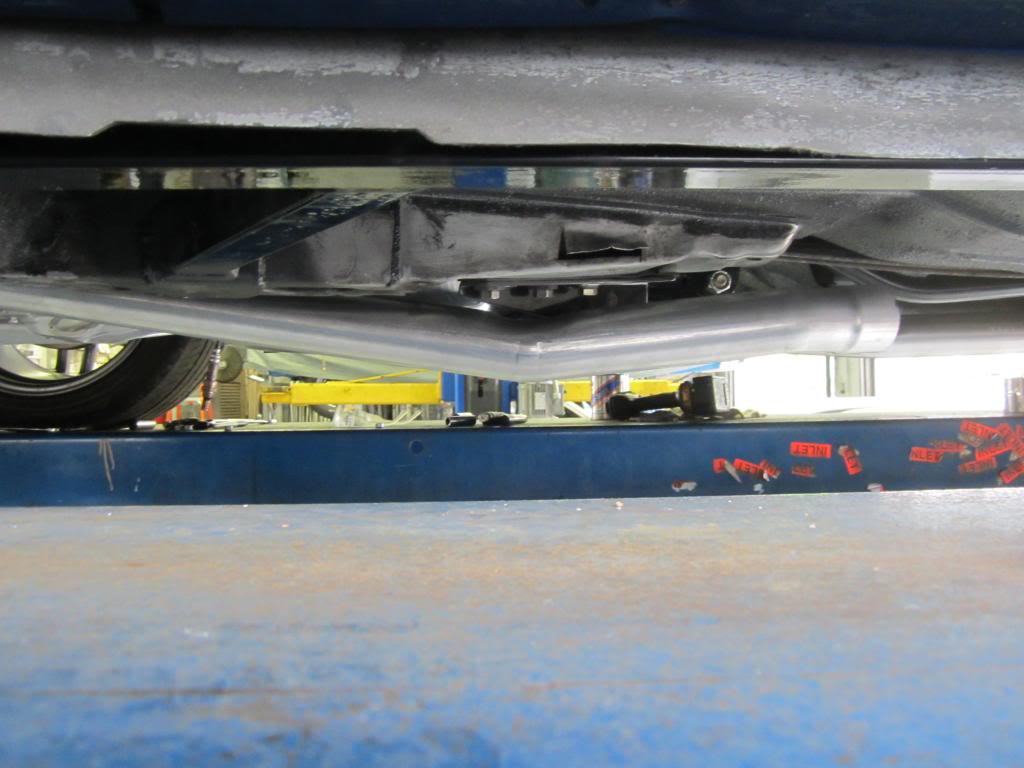
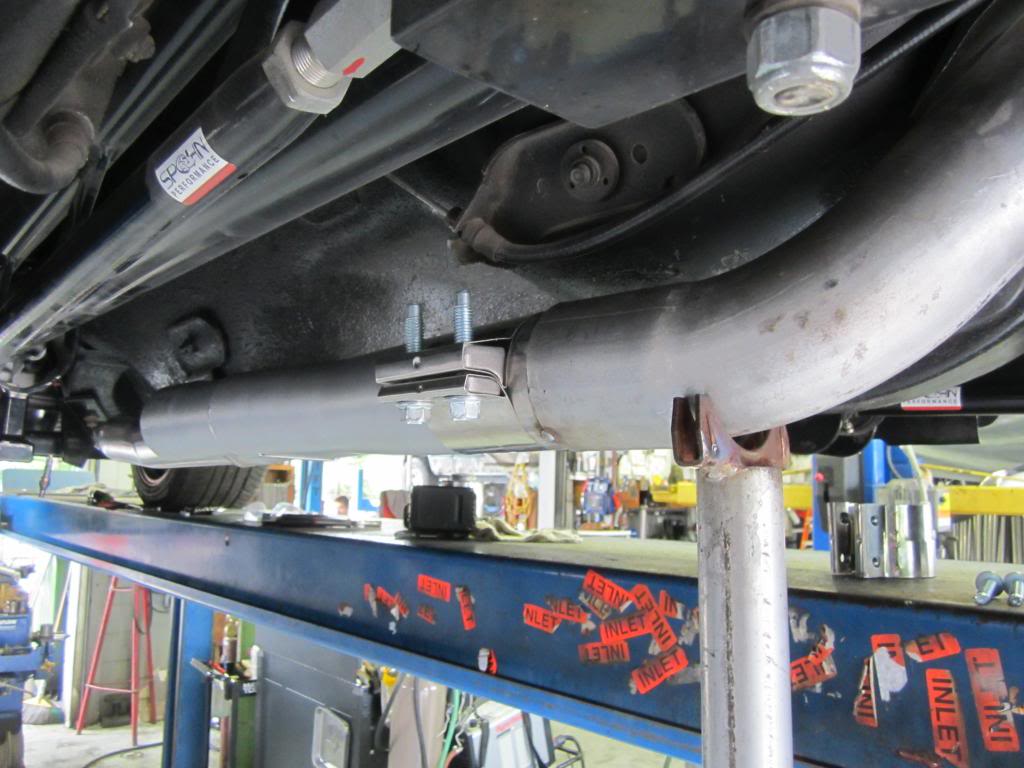
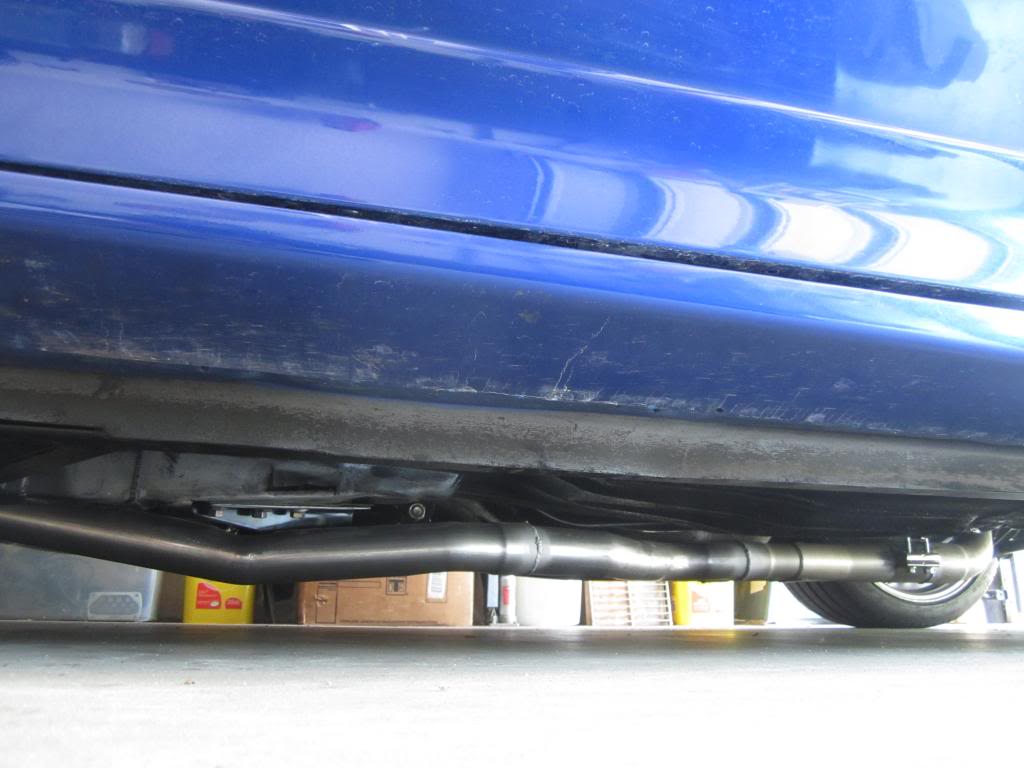
My exhaust at it's lowest. Not much else we could do about it. That Spohn trany cross member isn't real exhaust friendly.
All of the new piping is aluminized, so that's a nice bonus. This guy does awesome work. I am real glad that I used him.

RH side routing followed the stock location keeping it nice and tight.

RH side is done

One more connection to be made on the LH side.

LH side down pipe. I am having a hard time focusing. Oh wait, maybe it's the camera!

My exhaust at it's lowest. Not much else we could do about it. That Spohn trany cross member isn't real exhaust friendly.
All of the new piping is aluminized, so that's a nice bonus. This guy does awesome work. I am real glad that I used him.
Last edited by dprest68; 05-15-2014 at 10:06 PM.
05-15-2014, 10:27 PM
#728
Supreme Member
Thread Starter
iTrader: (1)
Join Date: Mar 2007
Location: Apopka, Florida
Posts: 1,237
Likes: 0
Received 7 Likes
on
6 Posts
Car: 1989 Pontiac Trans Am GTA
Engine: cammed LS1
Transmission: Monster SS 4L65E
Axle/Gears: 9 bolt posi w/ 3.70 gears
Re: LS1 swap for my '89 GTA
Here's a brief summary of what I had to do to the cats to make them work on the car. Just in case anyone needs to know.
Here's the stock LH side cat
I had to cut the end off as shown because it was hitting the frame rail. I didn't end up needing the outlet for the O2 sensor due to the outlet on the stock exhaust manifold and the use of the UMI tubular K-member. The O2 sensor on the manifold would not work with the stock k-member, just FYI.
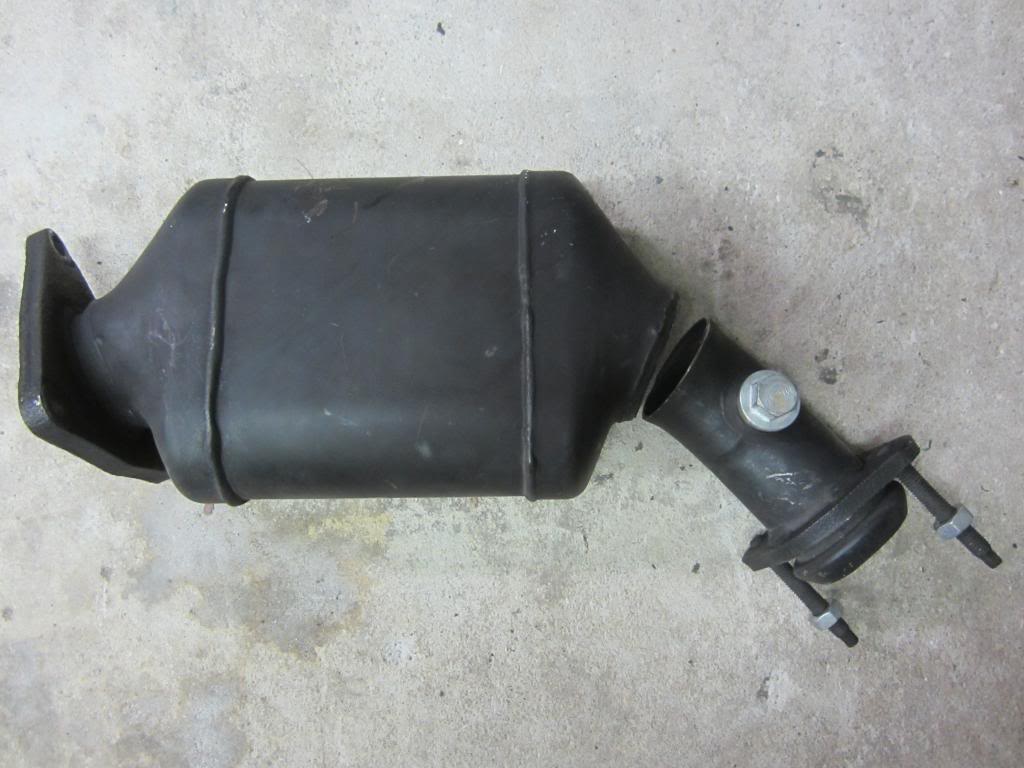
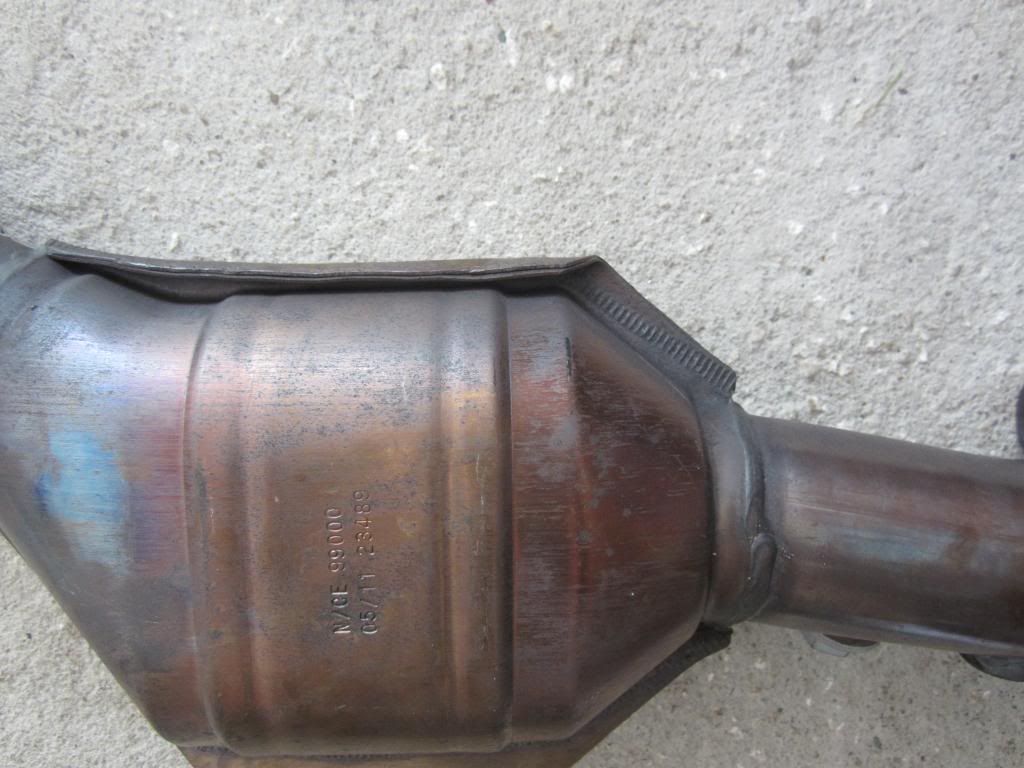
Here's the aftermarket RH side cat that's been modified.
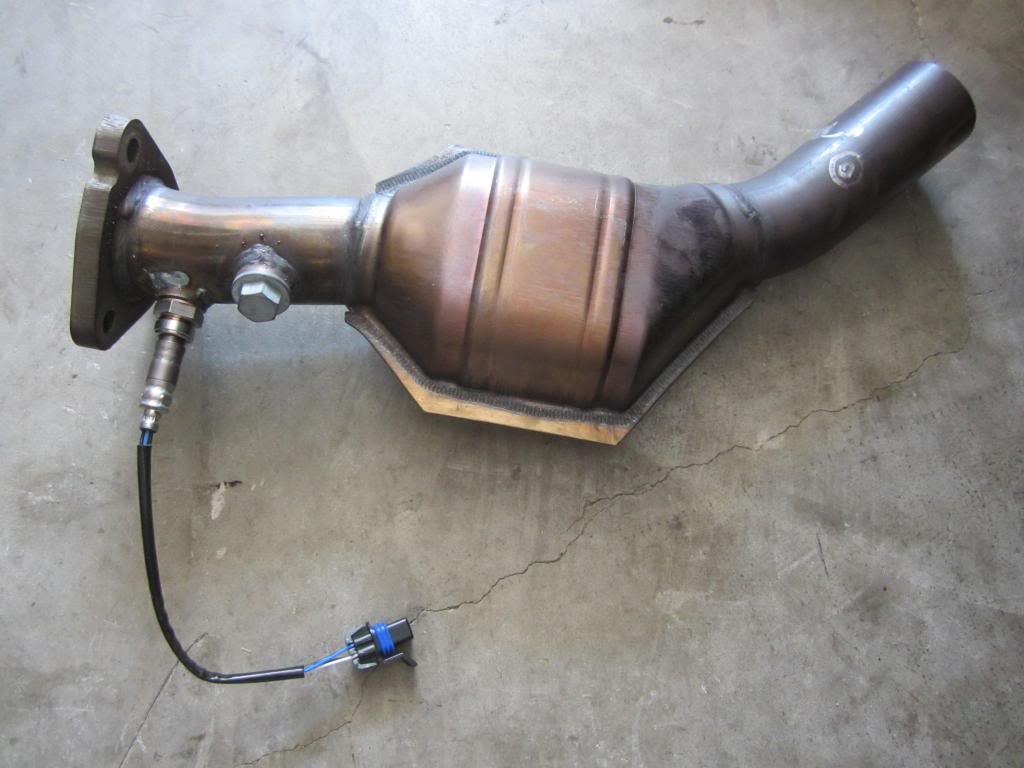
neither of the O2 sensor outlets worked on this pipe. I think the may have been hitting the crack pipe the day they welded them on. Must have been a Friday! The upper outlet was angled right at the bell housing. The lower outlet was angled right at the trany oil pan.  So, as you can see, I had my own outlet installed, but I had him put it on a little too high. I wanted it on the engine side of the cat to match the LH side. This cat also had a non-stationary flange on the end that always rotated down and would drag the road. I removed that end along with the lower O2 outlet.
As you can see, I also had to bend the lip of the shell down because it was hitting the firewall. Once it was bend down, you could stick your pinky in between it and the firewall. So there was plenty of clearance.
So, other than those few items, the cats worked pretty decent and quieted down the car enough to be able to drive it over to the exhaust shop. I am not sure if I am going to sell these cats on here or sell them to the guy doing my exhaust. Anyone interested in them? Let me know.
Here's the stock LH side cat

I had to cut the end off as shown because it was hitting the frame rail. I didn't end up needing the outlet for the O2 sensor due to the outlet on the stock exhaust manifold and the use of the UMI tubular K-member. The O2 sensor on the manifold would not work with the stock k-member, just FYI.
Here's the aftermarket RH side cat that's been modified.

neither of the O2 sensor outlets worked on this pipe. I think the may have been hitting the crack pipe the day they welded them on. Must have been a Friday!
The upper outlet was angled right at the bell housing. The lower outlet was angled right at the trany oil pan. So, as you can see, I had my own outlet installed, but I had him put it on a little too high. I wanted it on the engine side of the cat to match the LH side. This cat also had a non-stationary flange on the end that always rotated down and would drag the road. I removed that end along with the lower O2 outlet.
As you can see, I also had to bend the lip of the shell down because it was hitting the firewall. Once it was bend down, you could stick your pinky in between it and the firewall. So there was plenty of clearance.
So, other than those few items, the cats worked pretty decent and quieted down the car enough to be able to drive it over to the exhaust shop. I am not sure if I am going to sell these cats on here or sell them to the guy doing my exhaust. Anyone interested in them? Let me know.
Last edited by dprest68; 05-15-2014 at 10:56 PM.
05-15-2014, 10:50 PM
#729
Supreme Member
Thread Starter
iTrader: (1)
Join Date: Mar 2007
Location: Apopka, Florida
Posts: 1,237
Likes: 0
Received 7 Likes
on
6 Posts
Car: 1989 Pontiac Trans Am GTA
Engine: cammed LS1
Transmission: Monster SS 4L65E
Axle/Gears: 9 bolt posi w/ 3.70 gears
Re: LS1 swap for my '89 GTA
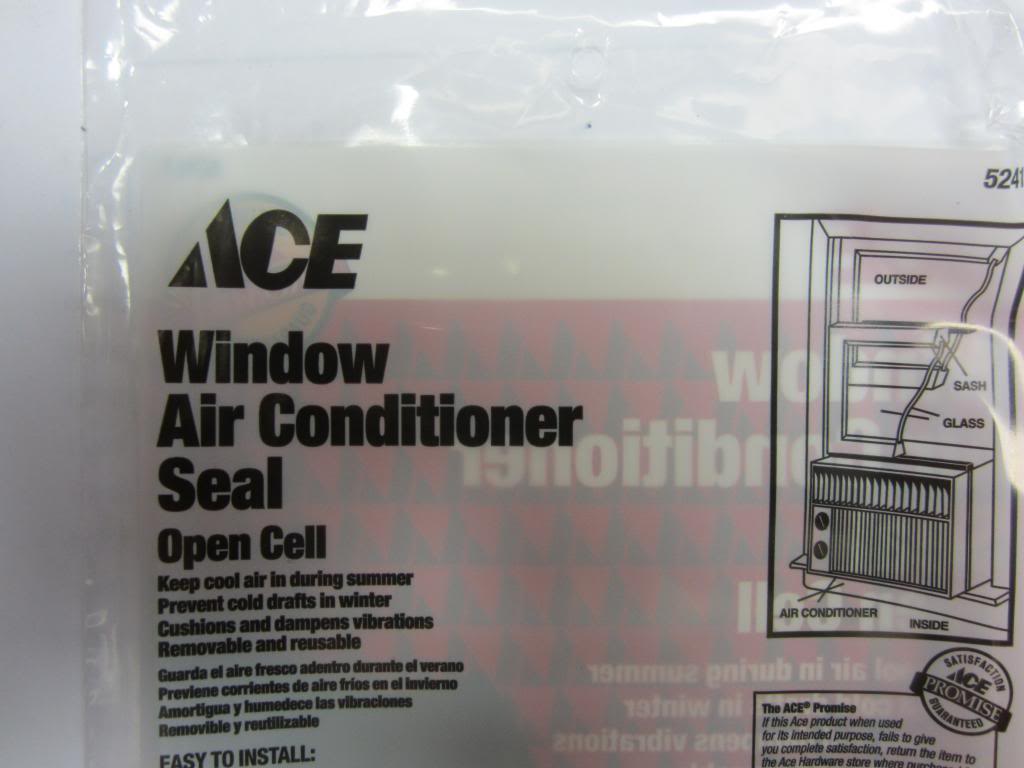
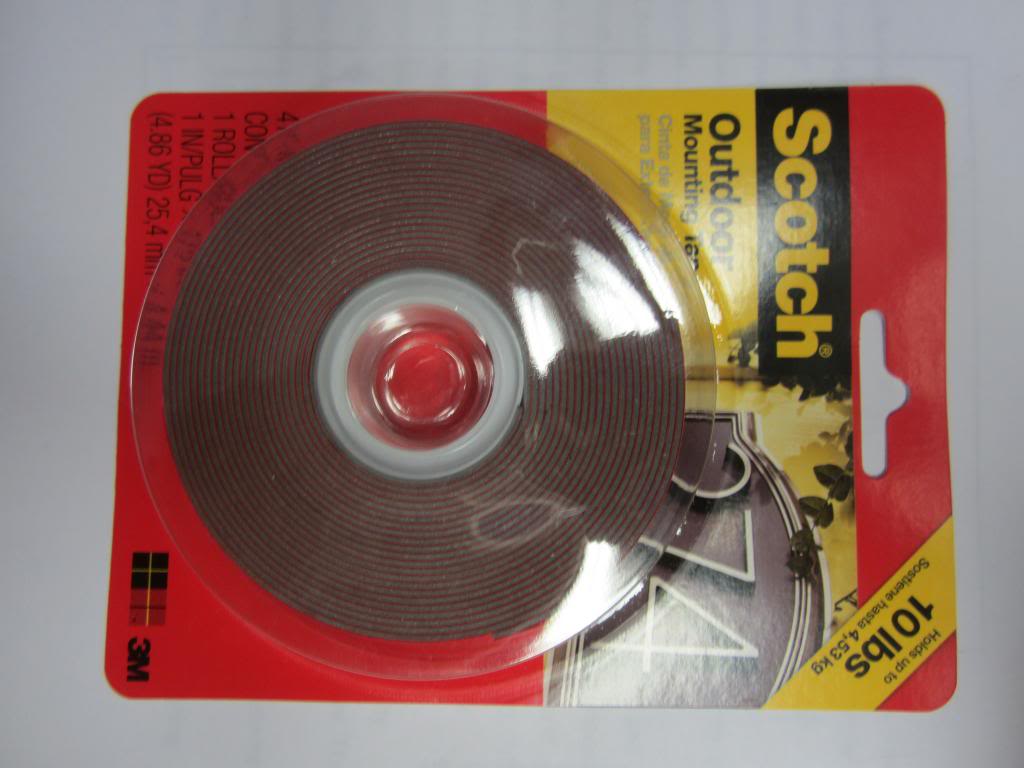
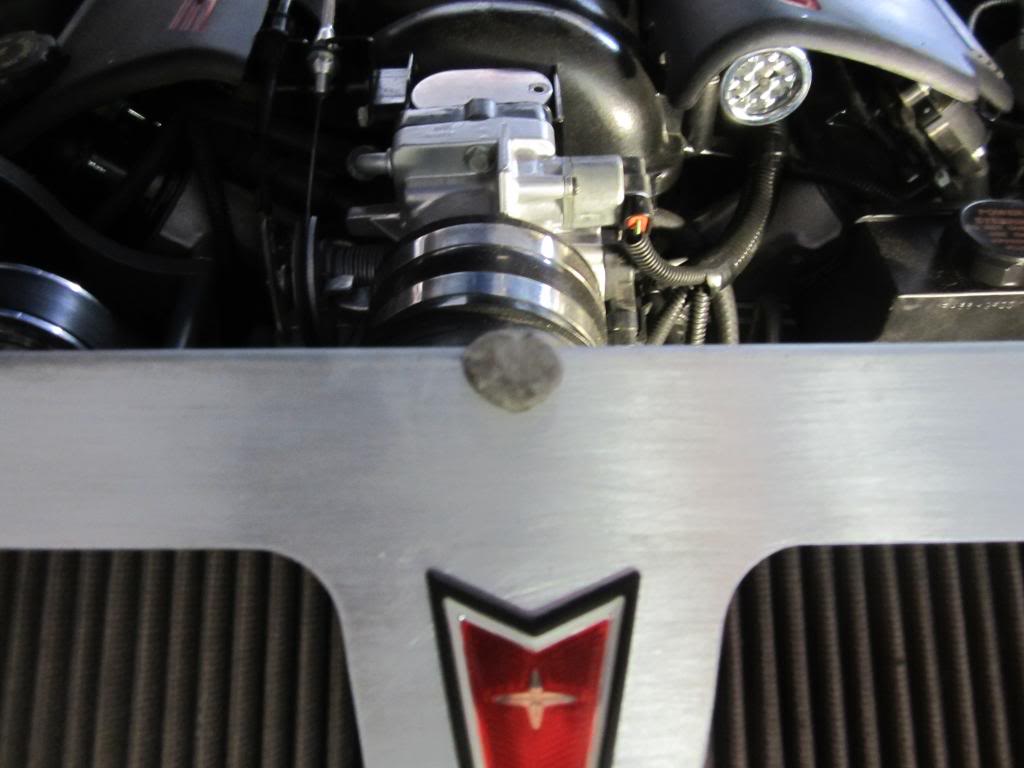
One last update for the evening. I was working on this last week, but I am just now getting around to putting it on here. Anyway, I wanted to install a seal for the top of the air cleaner lid to the hood hoping that it will help direct just a little more air into the air cleaner. So I went over to Ace and picked up a few items to accomplish this.
I started by putting a spot of clay on the lid and closing the hood. the center of the box is pretty tight against the hump in the center of the hood. It also located the top of the lid on the hood for me.
Once I had the measurement, I laid out the tape guidelines for where my two-sided tape would go.
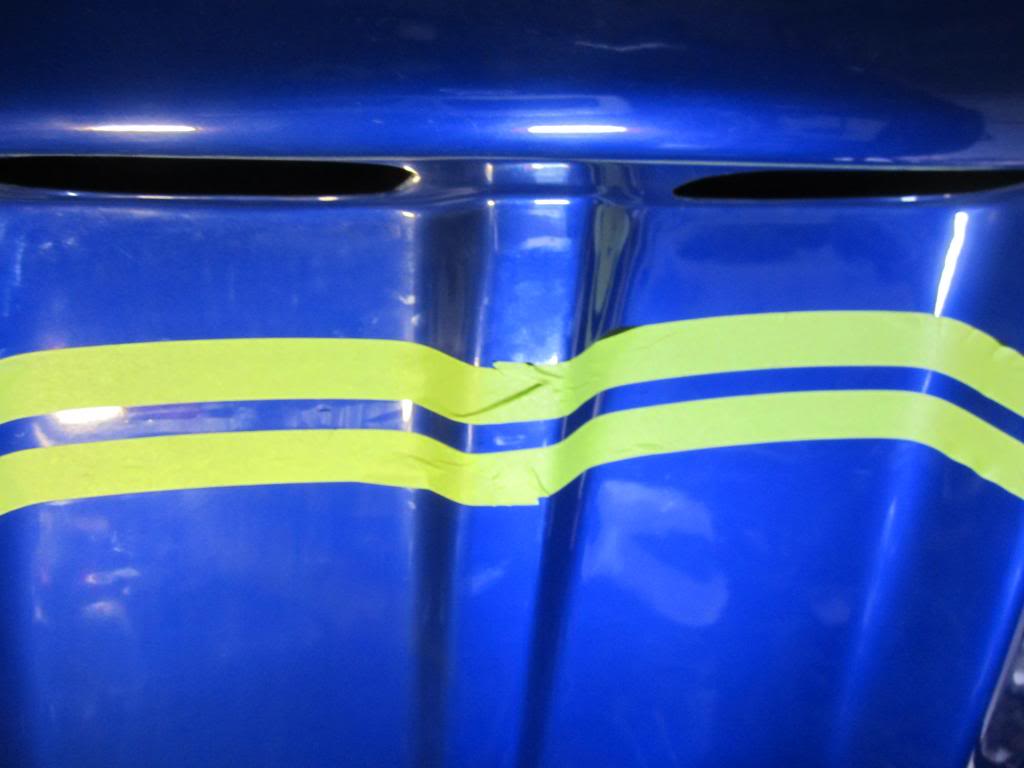
The camera angle makes it look crooked, but it's not.
Then I took some 2000 grit sandpaper and lightly scuffed the surface hoping that it will help the two-sided tape adhere better.
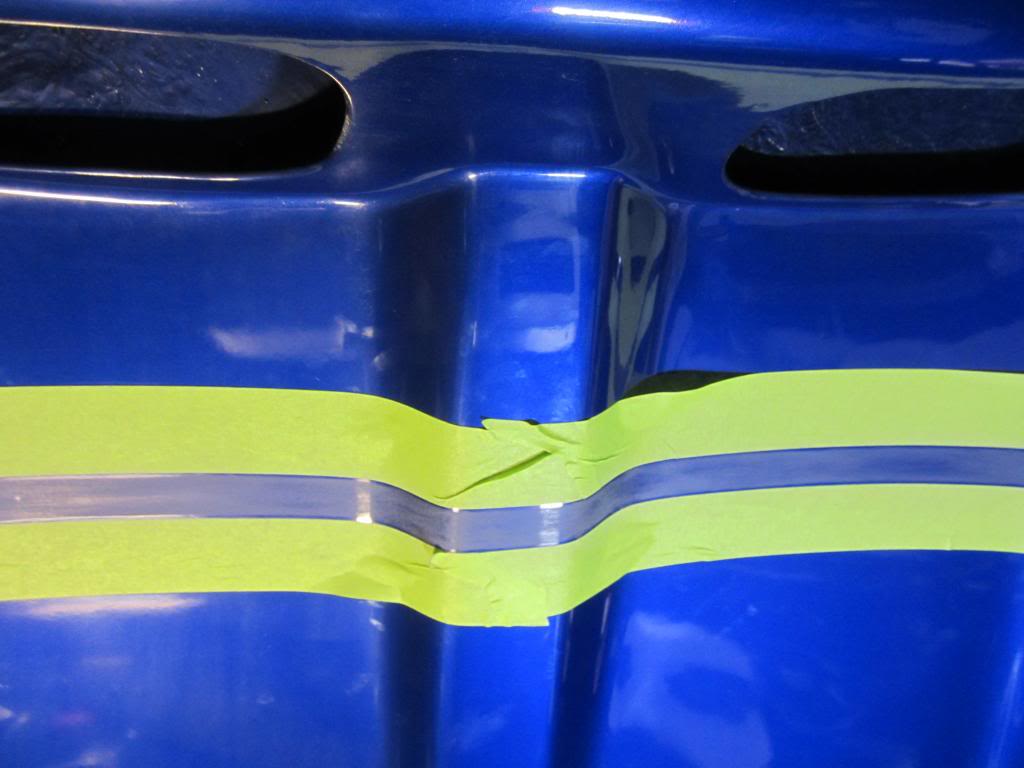
Next I installed the two-sided tape, then removed the masking tape. I also used the heat gun a little on the two-sided tape also in hope that it will help the adhesion process.
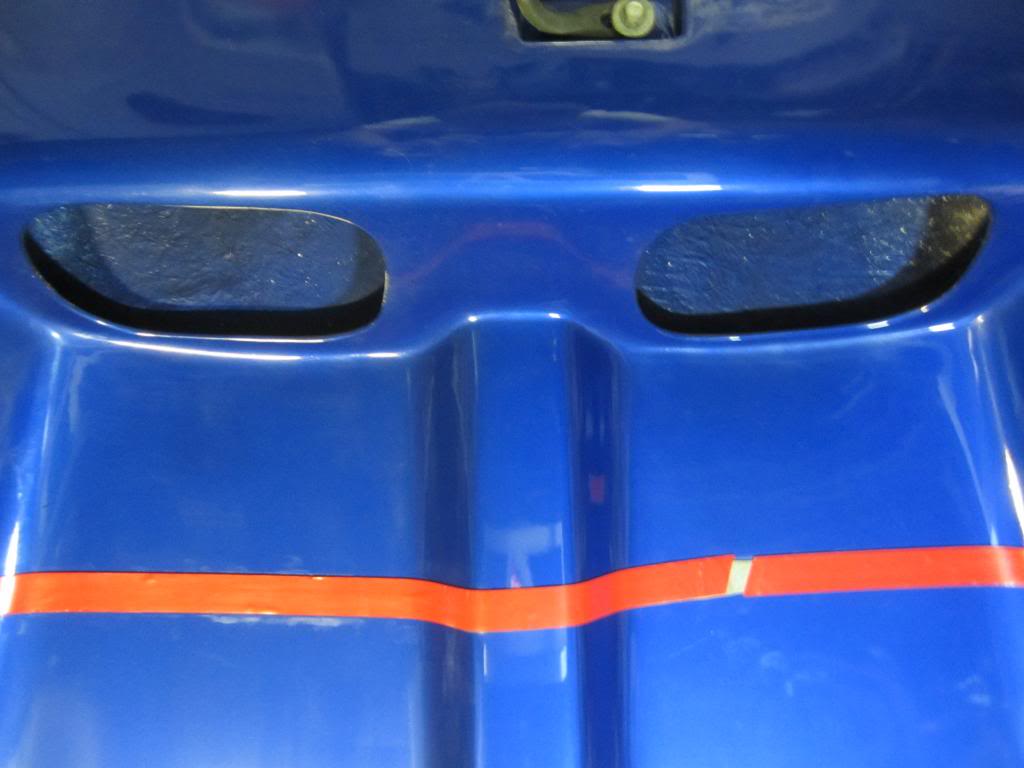
And here's the finished product with the foam seal installed.
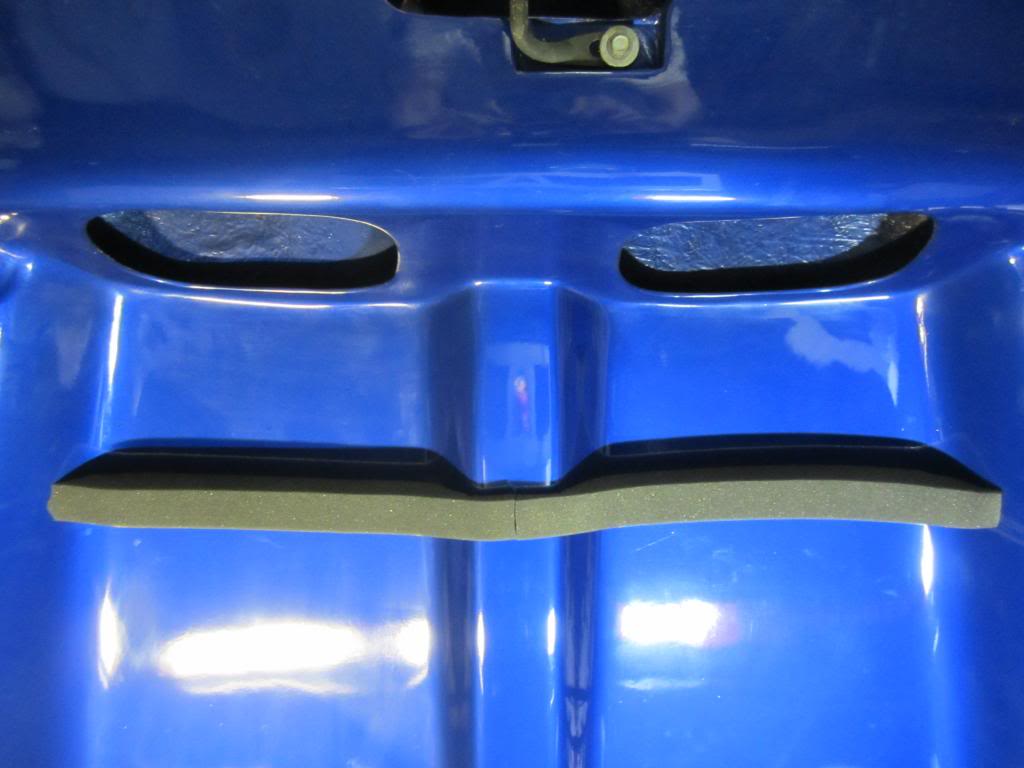
With the hood closed it seals nicely along the top of the air cleaner lid. Mission accomplished!


I started by putting a spot of clay on the lid and closing the hood. the center of the box is pretty tight against the hump in the center of the hood. It also located the top of the lid on the hood for me.

Once I had the measurement, I laid out the tape guidelines for where my two-sided tape would go.

The camera angle makes it look crooked, but it's not.
Then I took some 2000 grit sandpaper and lightly scuffed the surface hoping that it will help the two-sided tape adhere better.

Next I installed the two-sided tape, then removed the masking tape. I also used the heat gun a little on the two-sided tape also in hope that it will help the adhesion process.

And here's the finished product with the foam seal installed.

With the hood closed it seals nicely along the top of the air cleaner lid. Mission accomplished!
05-16-2014, 12:37 AM
#730
Senior Member
Re: LS1 swap for my '89 GTA
Any pics of the completed exhaust system, I too have the Spohn torque arm and really do not want to lose it to set up my exhaust system. At this point I am where you were in 2011. I am in the planning stage with my Z with a busted transmission and a 275,000 mile L98.
Last edited by 92BLKL98; 05-16-2014 at 12:40 AM.
05-16-2014, 01:25 AM
#731
Supreme Member
Thread Starter
iTrader: (1)
Join Date: Mar 2007
Location: Apopka, Florida
Posts: 1,237
Likes: 0
Received 7 Likes
on
6 Posts
Car: 1989 Pontiac Trans Am GTA
Engine: cammed LS1
Transmission: Monster SS 4L65E
Axle/Gears: 9 bolt posi w/ 3.70 gears
Re: LS1 swap for my '89 GTA
I feel for you man! It took me TONS of work to get from where I was in 2011 to where I am with it today. You have your work cut-out for you!
Just take your time with it and you will eventuially get through it just like I did. Good luck with it. Do you have a swap thread started yet?
05-16-2014, 04:15 PM
#733
Senior Member
Re: LS1 swap for my '89 GTA
I will have pics of the completed exhaust system in the morning. I may even take a video of it. Yeah, I like my Spohn torque arm and didn't want to lose mine either. I have some ideas for my exhaust system if I end up having clearance issues with this system. Hopefully that won't be the case.
I feel for you man! It took me TONS of work to get from where I was in 2011 to where I am with it today. You have your work cut-out for you! Just take your time with it and you will eventuially get through it just like I did. Good luck with it. Do you have a swap thread started yet?
I feel for you man! It took me TONS of work to get from where I was in 2011 to where I am with it today. You have your work cut-out for you!
Just take your time with it and you will eventuially get through it just like I did. Good luck with it. Do you have a swap thread started yet?
05-16-2014, 05:02 PM
#734
Senior Member
Re: LS1 swap for my '89 GTA
I am looking to get about 400+ rwhp/torque. Have you had it dynoed yet? I looked back but couldn't find anything on it.
05-22-2014, 10:25 AM
#736
Supreme Member
Thread Starter
iTrader: (1)
Join Date: Mar 2007
Location: Apopka, Florida
Posts: 1,237
Likes: 0
Received 7 Likes
on
6 Posts
Car: 1989 Pontiac Trans Am GTA
Engine: cammed LS1
Transmission: Monster SS 4L65E
Axle/Gears: 9 bolt posi w/ 3.70 gears
Re: LS1 swap for my '89 GTA
No thread yet, I'm just doing my homework right now. I have not bought the engine/trans yet but am working on the rest of the car. Replaced my rearend with a 10 bolt pull from Hawks. So far the direction I'm taking is for an automatic trans. I am replacing the rear suspension with coil overs (already purchased). All rear suspension stuff is already tubular with rod ends. We'll see how it turns out. Yours turned out great, I love the wheels, those are what I have planned for my build up.
I decided on the automatic trany because of cost and figured I could always switch it over to manual down the road if I so desire. It sounds like you already have a pretty decent start. Thanks for the compliments. Don't use 2" spacers if you are going with the "dished" wheels. I had to find that out the hard way.400rwhp should be fairly easy. I haven't had mine dyno'd yet. It's probably going to be awhile before that happens. I will probably wait for a local Dyno Day to get it done. My tuner came to my house last weekend and we drove the car around for about two hours tuning it. I think I like having it tuned that way using real world conditions vs. having it dyno-tuned.
05-22-2014, 11:05 AM
#737
Supreme Member
Thread Starter
iTrader: (1)
Join Date: Mar 2007
Location: Apopka, Florida
Posts: 1,237
Likes: 0
Received 7 Likes
on
6 Posts
Car: 1989 Pontiac Trans Am GTA
Engine: cammed LS1
Transmission: Monster SS 4L65E
Axle/Gears: 9 bolt posi w/ 3.70 gears
Re: LS1 swap for my '89 GTA
Luis and I went over to the exhaust shop last Friday to pick-up my car. The exhaust system turned-out great, but the guy didn't leave the car up on the lift for me like he said he would. So I was unable to get pics of the exhaust with the car up in the air. Here are two of the final pics
Everything looks good except for where he had to cross the cross member. It's the best we could come up with without having to do some custom fabrication. I will drive it for awhile to see if I have any problems with it.

He welded the two tail pipes on to the muffler and got them aligned perfectly. And we left two of the band clamps on the pipe over the axle in case the fuel tank needs to be removed again.
So there is more to this story... They had moved the car out of their garage and it was sitting outside. So we went out there to hear the new exhaust and the car wouldn't start. Just my luck! They took the car back inside and checked a few things. It turns out that the starter relay wasn't getting energized. So we assumed that the starter relay had gone bad. So we drove around to a few of the local parts stores looking for a new relay. Of course no one had one. So we went back to my house and pulled the relay off of the red '89. We were pretty sure that relay worked since we had recently turned that engine over. With that relay and a few tools, we went back to the exhaust shop. I plugged that relay in and it still wouldn't turn the engine over. At this point we decided to take the relays over to NAPA to have them tested. The test showed that they were both working fine. Tired and ready to throw in the towel, we headed back over to the exhaust shop again. This time I removed the relay all together and just used a jumper to start the car so that we could get it over to the tire shop to have the alignment done.
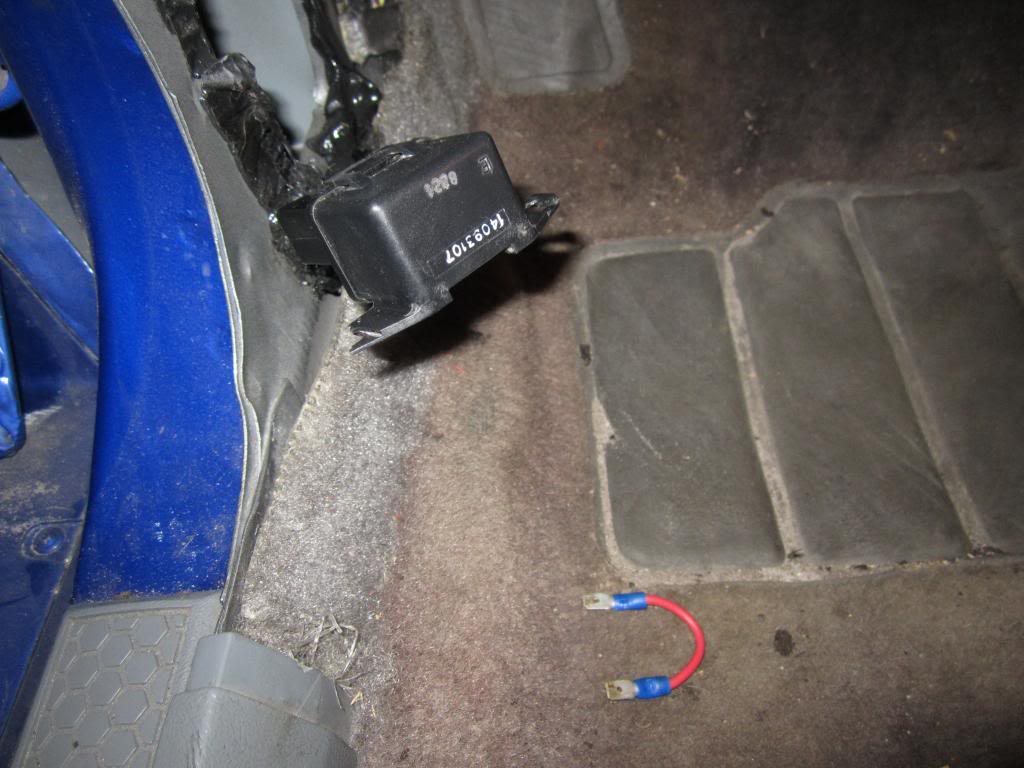
Here's the location of the starter relay
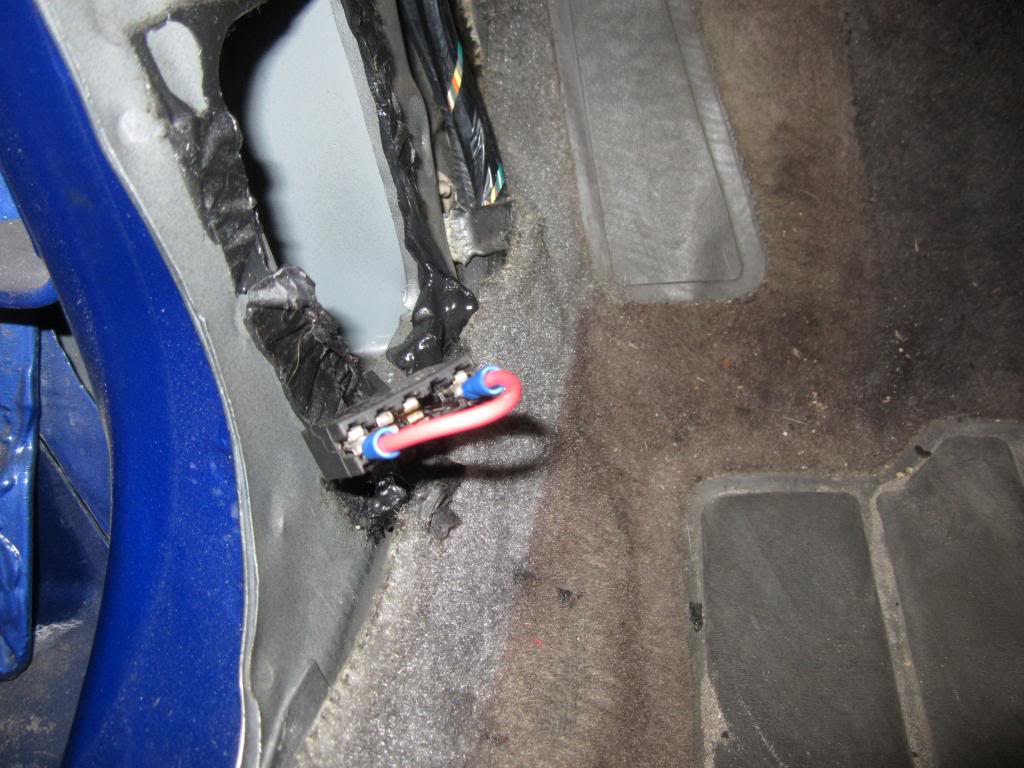
And here's the jumper wire installed
Once we finally got the car back home at around 5pm, keeping in mind that we started this little adventure at 9am, Luis removed the park/nuetral safety switch and proceeded to refurbish it. I installed two different other spare P/N switches that I had laying around while he was doing that. None of them solved the problem. So, knowing that neither the relay nor the P/N switch is the problem, we have no idea what the problem actually is. Maybe the ignition switch or the wiring? Any ideas?
 I don't know enough about the wiring inside the car to know what to look for.

Everything looks good except for where he had to cross the cross member. It's the best we could come up with without having to do some custom fabrication. I will drive it for awhile to see if I have any problems with it.

He welded the two tail pipes on to the muffler and got them aligned perfectly.
And we left two of the band clamps on the pipe over the axle in case the fuel tank needs to be removed again.So there is more to this story... They had moved the car out of their garage and it was sitting outside. So we went out there to hear the new exhaust and the car wouldn't start.
Just my luck! They took the car back inside and checked a few things. It turns out that the starter relay wasn't getting energized. So we assumed that the starter relay had gone bad. So we drove around to a few of the local parts stores looking for a new relay. Of course no one had one. So we went back to my house and pulled the relay off of the red '89. We were pretty sure that relay worked since we had recently turned that engine over. With that relay and a few tools, we went back to the exhaust shop. I plugged that relay in and it still wouldn't turn the engine over. At this point we decided to take the relays over to NAPA to have them tested. The test showed that they were both working fine. Tired and ready to throw in the towel, we headed back over to the exhaust shop again. This time I removed the relay all together and just used a jumper to start the car so that we could get it over to the tire shop to have the alignment done.
Here's the location of the starter relay

And here's the jumper wire installed
Once we finally got the car back home at around 5pm, keeping in mind that we started this little adventure at 9am, Luis removed the park/nuetral safety switch and proceeded to refurbish it. I installed two different other spare P/N switches that I had laying around while he was doing that. None of them solved the problem. So, knowing that neither the relay nor the P/N switch is the problem, we have no idea what the problem actually is. Maybe the ignition switch or the wiring? Any ideas?
I don't know enough about the wiring inside the car to know what to look for.
05-22-2014, 11:32 AM
#738
Supreme Member
Thread Starter
iTrader: (1)
Join Date: Mar 2007
Location: Apopka, Florida
Posts: 1,237
Likes: 0
Received 7 Likes
on
6 Posts
Car: 1989 Pontiac Trans Am GTA
Engine: cammed LS1
Transmission: Monster SS 4L65E
Axle/Gears: 9 bolt posi w/ 3.70 gears
Re: LS1 swap for my '89 GTA
The guy at the tire shop that did my alignment said that he could only get about 6� of caster angle because the new front springs hadn't fully settled yet. He said that it could take upwards of a thousand miles for new front springs to fully settle. Not sure if he knows what he is talking about or not. He told me to bring the car back to get it re-aligned after a thousand miles.
Here's the alignment sheet they gave me
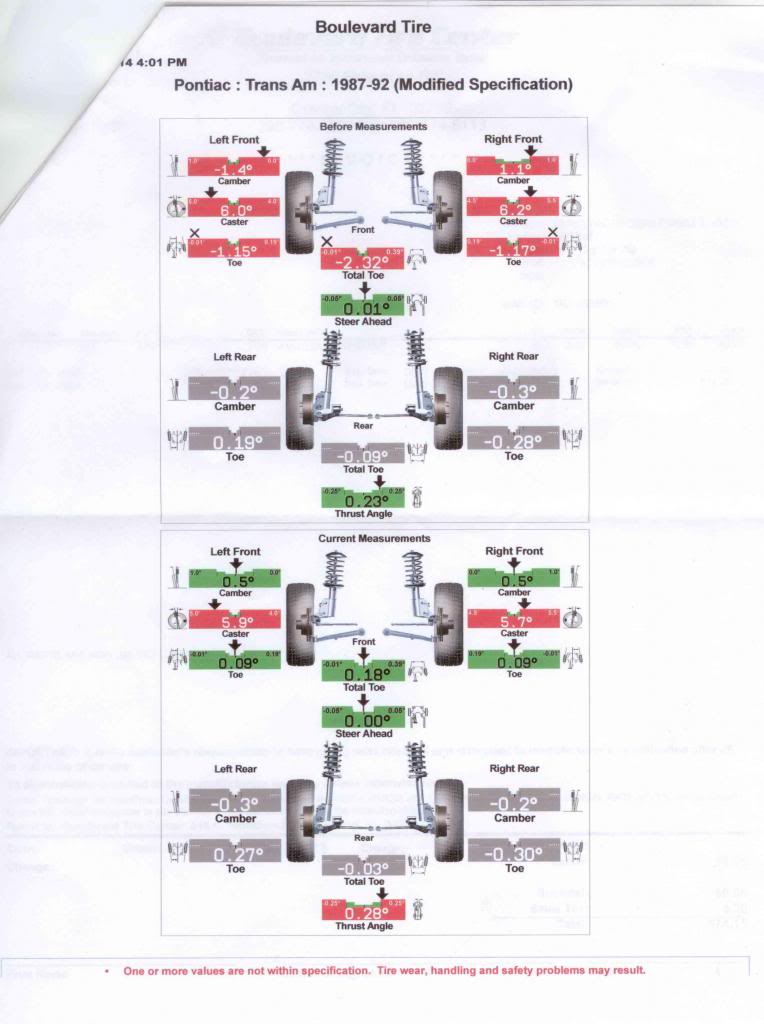
You can see how far out of whack everything was. I was shooting for 4.5� of caster on the left side and 5� on the right side based on settings that I found on this site.
Here's the alignment sheet they gave me

You can see how far out of whack everything was. I was shooting for 4.5� of caster on the left side and 5� on the right side based on settings that I found on this site.
05-22-2014, 11:48 AM
#739
Supreme Member
Thread Starter
iTrader: (1)
Join Date: Mar 2007
Location: Apopka, Florida
Posts: 1,237
Likes: 0
Received 7 Likes
on
6 Posts
Car: 1989 Pontiac Trans Am GTA
Engine: cammed LS1
Transmission: Monster SS 4L65E
Axle/Gears: 9 bolt posi w/ 3.70 gears
Re: LS1 swap for my '89 GTA
My tuner came to the house Saturday morning to do the final tune on the car. That was a long process. We had a few issues, but the car is running great now. We probably drove the car around for about two hours getting it tuned to real world conditions. I think I like that better than the dyno-tuning that some companies do.
He said my injectors are running at a 46% duty cycle. Plenty of room to grow for future engine upgrades.
Here's his information in case anyone local needs a good tune
Nomad Mobile Tuning & Performance
Matthew Page
407-312-9874
He said my injectors are running at a 46% duty cycle.
Plenty of room to grow for future engine upgrades.Here's his information in case anyone local needs a good tune
Nomad Mobile Tuning & Performance
Matthew Page
407-312-9874
05-22-2014, 12:01 PM
#740
Member
iTrader: (2)
Join Date: Feb 2010
Posts: 460
Likes: 0
Received 3 Likes
on
3 Posts
Car: '89 Camaro
Engine: LS1
Transmission: 4L65/70E
Axle/Gears: 9 Inch, 3.70 gears
Re: LS1 swap for my '89 GTA
Your alignment specs are pretty close to what I got yesterday, just slightly more caster on mine. I think mine was 6.2 and 6.7, left and right. I threw them through a loop when I asked them to put my weight in the drivers seat when they did it, I guess their normal customer doesn't ask for that.
05-22-2014, 02:42 PM
#741
Supreme Member
Thread Starter
iTrader: (1)
Join Date: Mar 2007
Location: Apopka, Florida
Posts: 1,237
Likes: 0
Received 7 Likes
on
6 Posts
Car: 1989 Pontiac Trans Am GTA
Engine: cammed LS1
Transmission: Monster SS 4L65E
Axle/Gears: 9 bolt posi w/ 3.70 gears
Re: LS1 swap for my '89 GTA
Your alignment specs are pretty close to what I got yesterday, just slightly more caster on mine. I think mine was 6.2 and 6.7, left and right. I threw them through a loop when I asked them to put my weight in the drivers seat when they did it, I guess their normal customer doesn't ask for that.
05-22-2014, 03:40 PM
#742
Supreme Member
Thread Starter
iTrader: (1)
Join Date: Mar 2007
Location: Apopka, Florida
Posts: 1,237
Likes: 0
Received 7 Likes
on
6 Posts
Car: 1989 Pontiac Trans Am GTA
Engine: cammed LS1
Transmission: Monster SS 4L65E
Axle/Gears: 9 bolt posi w/ 3.70 gears
Re: LS1 swap for my '89 GTA
My bad luck continues...
So, by the end of our tuning session, the car had developed a miss and had a noise coming from the LH side valve cover. After removing that valve cover I found that the third rocker from the front had worked itself loose somehow. So much so that it only took one or two revolutions of the nut to remove it from the stud. I found this odd because I know I tightened all of them down correctly. I removed the rocker arm to check everything and it all looked fine. So I put the rocker arm back on and tried to tighten the poly lock nut down on the rocker. I kept on tightening and tightening, but it never got tight at all, then this happened
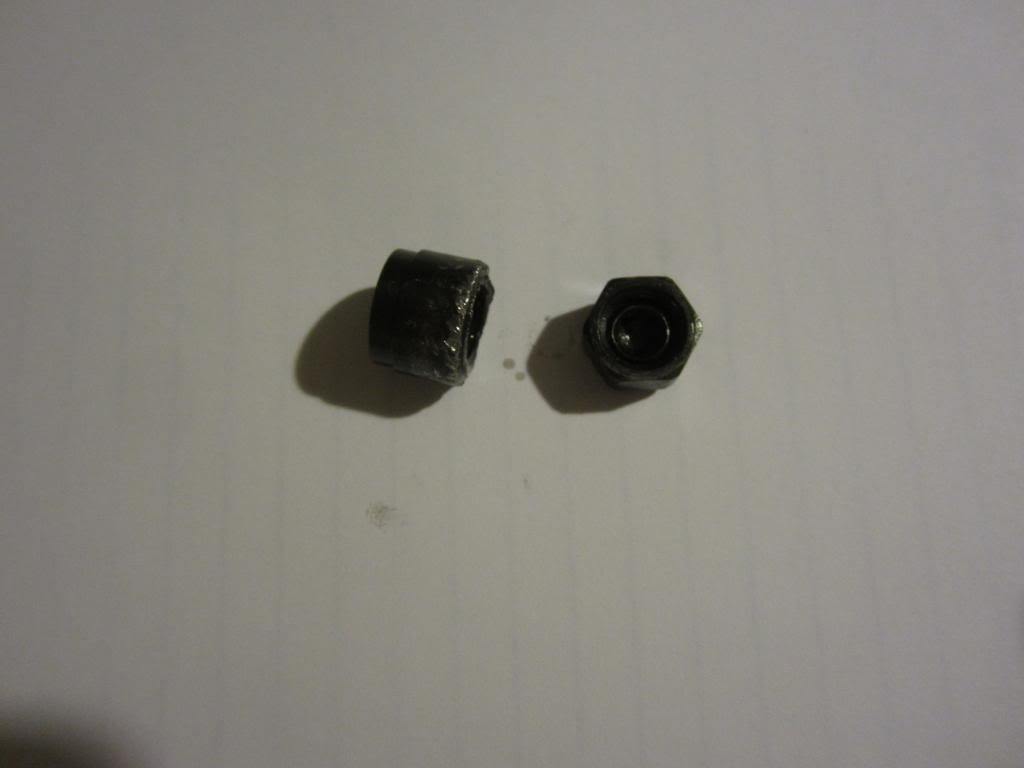
The hex end popped off the end of the nut! " You have got to be kidding me!" I have been trying to find someone that carries them in stock. No luck. I ended up having to call Comp Cams this morning about it. The warranty manager couldn't give me one for free since I didn't actually buy them new, but he gave me two of them for a discounted price & is overnighting them to me for tomorrow so that I can get the car back on the road for the weekend. All said and done, it cost me $4.16. That's pretty decent since the shipping alone was going to be around $25.
So, by the end of our tuning session, the car had developed a miss and had a noise coming from the LH side valve cover. After removing that valve cover I found that the third rocker from the front had worked itself loose somehow. So much so that it only took one or two revolutions of the nut to remove it from the stud. I found this odd because I know I tightened all of them down correctly. I removed the rocker arm to check everything and it all looked fine. So I put the rocker arm back on and tried to tighten the poly lock nut down on the rocker. I kept on tightening and tightening, but it never got tight at all, then this happened

The hex end popped off the end of the nut! " You have got to be kidding me!"
I have been trying to find someone that carries them in stock. No luck. I ended up having to call Comp Cams this morning about it. The warranty manager couldn't give me one for free since I didn't actually buy them new, but he gave me two of them for a discounted price & is overnighting them to me for tomorrow so that I can get the car back on the road for the weekend. All said and done, it cost me $4.16. That's pretty decent since the shipping alone was going to be around $25.
05-22-2014, 04:06 PM
#743
Supreme Member
Thread Starter
iTrader: (1)
Join Date: Mar 2007
Location: Apopka, Florida
Posts: 1,237
Likes: 0
Received 7 Likes
on
6 Posts
Car: 1989 Pontiac Trans Am GTA
Engine: cammed LS1
Transmission: Monster SS 4L65E
Axle/Gears: 9 bolt posi w/ 3.70 gears
Re: LS1 swap for my '89 GTA
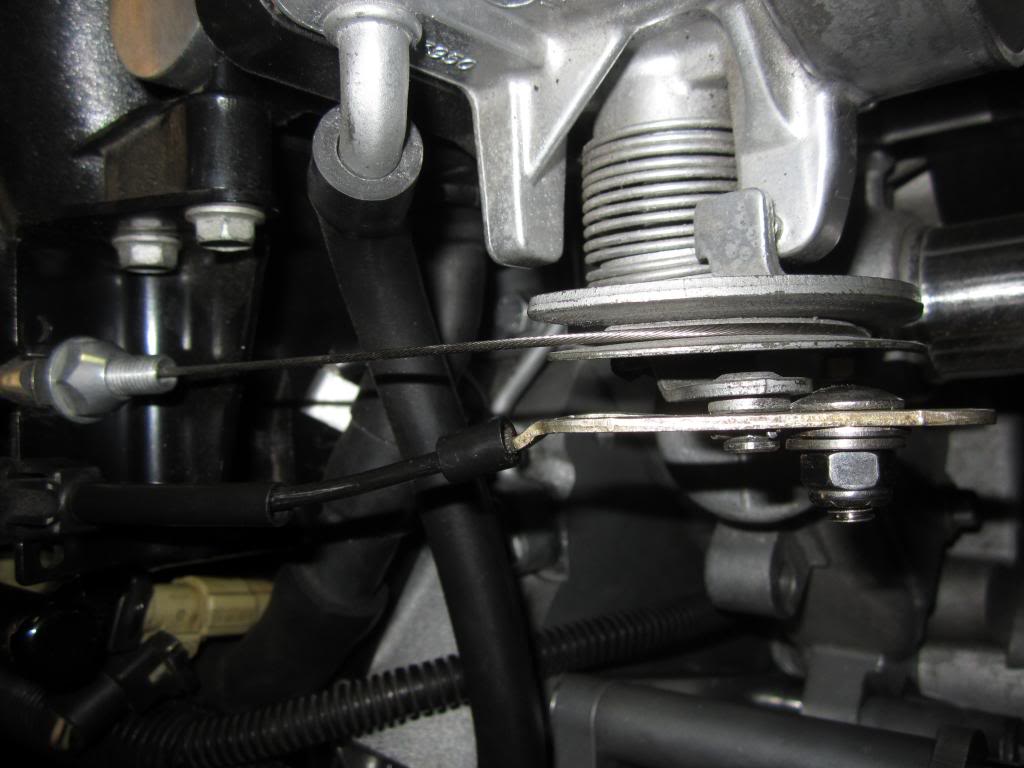
While we were out driving around for the tune I decided it would be a good time to test the cruise control. To my surprise, it actually worked at around 40mph. So I was pretty happy about that. When we got it out on the higher speed roads though it didn't work. So I proceeded to investigate the other day. As you can see in this pic, the cable has to travel pretty far before the cruise starts to work.
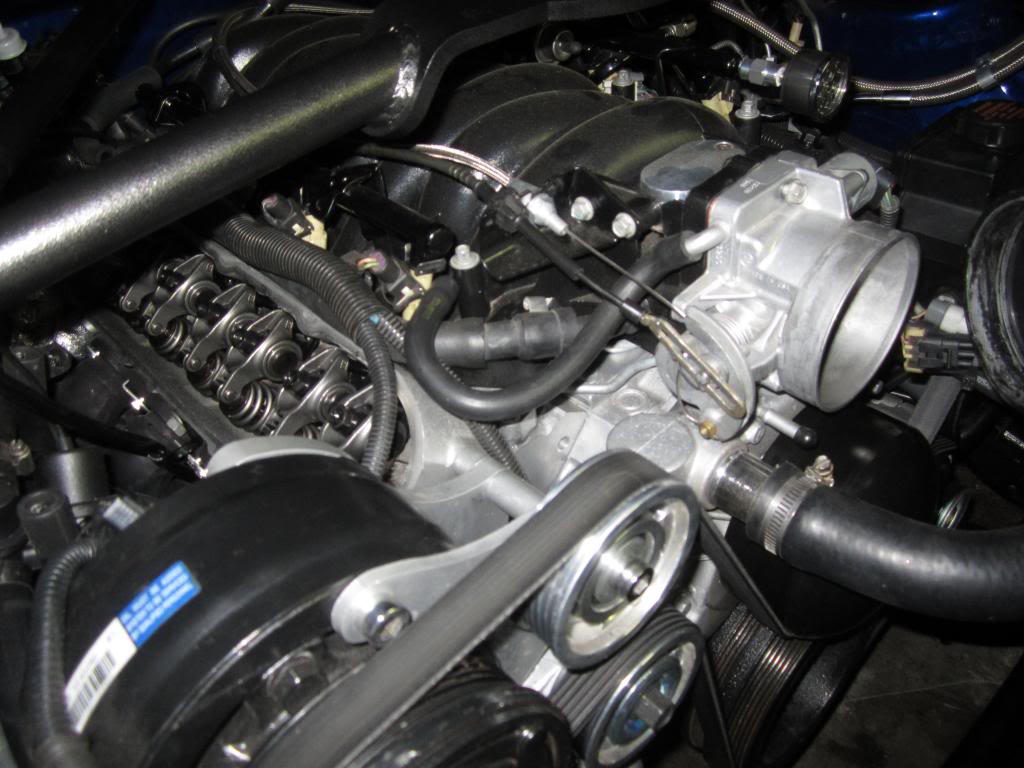
I tried adjusting the cable at the vacuum thingamajig (highly technical term there!), but it barely had an effect. And I could see why it was only working at low speeds. So Luis & I brainstormed about it (it was pretty scary! lol) and came up with this idea.
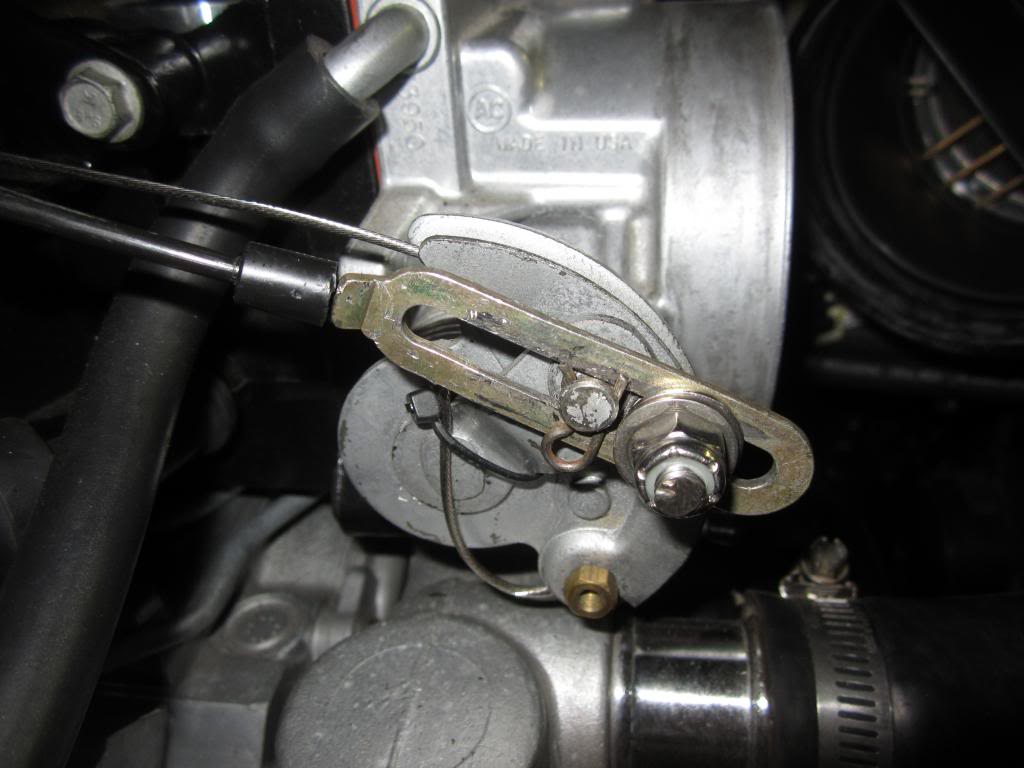
It's a �"x�" long carriage bolt. So now my cruise should work at pretty much any speed. I still need to find a better pin to hold the cable in place though. The pin that's on there works okay, but binds just a little at one point. Hopefully the hardware store will have something that works better.
Here's a top view of it.
And here it is with the throttle almost all of the way open.
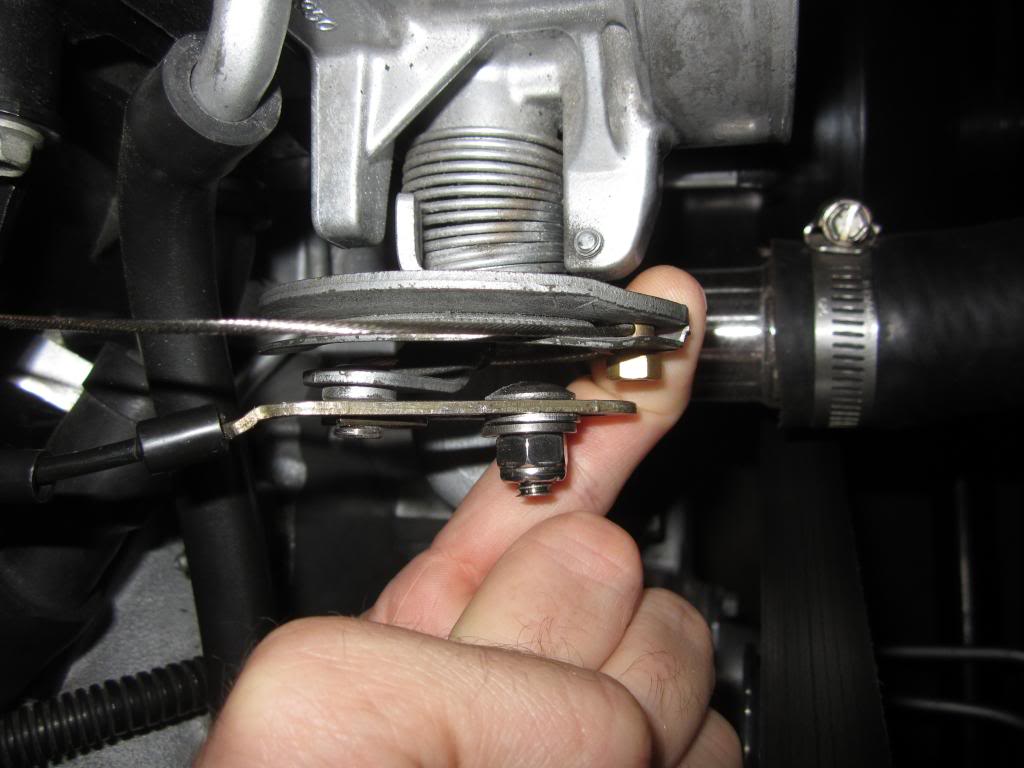
So there shouldn't be any contact between the throttle cable nut & the cruise cable.
The Fatmat arrived this week. So maybe this weekend I will start on the interior... after I get the car running again of course.

I tried adjusting the cable at the vacuum thingamajig (highly technical term there!
), but it barely had an effect. And I could see why it was only working at low speeds. So Luis & I brainstormed about it (it was pretty scary! lol) and came up with this idea.
It's a �"x�" long carriage bolt. So now my cruise should work at pretty much any speed. I still need to find a better pin to hold the cable in place though. The pin that's on there works okay, but binds just a little at one point. Hopefully the hardware store will have something that works better.
Here's a top view of it.

And here it is with the throttle almost all of the way open.

So there shouldn't be any contact between the throttle cable nut & the cruise cable.
The Fatmat arrived this week. So maybe this weekend I will start on the interior... after I get the car running again of course.
05-22-2014, 11:38 PM
#744
Senior Member
Re: LS1 swap for my '89 GTA
How about going to a GM dealer and see if they have any of the round spring clips used by the factory on these throttle bodies
05-23-2014, 06:12 AM
#745
Supreme Member
iTrader: (30)
Join Date: Jul 2000
Location: Fort Myers, FL
Posts: 1,514
Received 17 Likes
on
10 Posts
Car: 91 Firebird
Engine: 6.0
Transmission: T56
Axle/Gears: 3.73
Re: LS1 swap for my '89 GTA
Well in the grand scheme of things that could have gone wrong, that loose rocker nut isn't too terrible. Especially since you caught it early.
When I used the factory cruise setup on my LT1 swap years ago, I just bent the bracket at the vacuum actuator to take up the slack in the cable.... I like your idea better!
also, your starter relay isn't getting a signal. So its prolly a vats issue..... Yes, You dont' have the ecm, but the relay is part of the circuit of the VATS. So you can do a vats bypass, or just clean the contacts and see what happens.
06-02-2014, 01:34 PM
#746
Supreme Member
Thread Starter
iTrader: (1)
Join Date: Mar 2007
Location: Apopka, Florida
Posts: 1,237
Likes: 0
Received 7 Likes
on
6 Posts
Car: 1989 Pontiac Trans Am GTA
Engine: cammed LS1
Transmission: Monster SS 4L65E
Axle/Gears: 9 bolt posi w/ 3.70 gears
Re: LS1 swap for my '89 GTA
Well in the grand scheme of things that could have gone wrong, that loose rocker nut isn't too terrible. Especially since you caught it early.
When I used the factory cruise setup on my LT1 swap years ago, I just bent the bracket at the vacuum actuator to take up the slack in the cable.... I like your idea better!
also, your starter relay isn't getting a signal. So its prolly a vats issue..... Yes, You dont' have the ecm, but the relay is part of the circuit of the VATS. So you can do a vats bypass, or just clean the contacts and see what happens.
When I used the factory cruise setup on my LT1 swap years ago, I just bent the bracket at the vacuum actuator to take up the slack in the cable.... I like your idea better!
also, your starter relay isn't getting a signal. So its prolly a vats issue..... Yes, You dont' have the ecm, but the relay is part of the circuit of the VATS. So you can do a vats bypass, or just clean the contacts and see what happens.
Yeah, I was wondering if it was a VATS issue. I will have to do a search on here for it. Thanks for the input Jason.
06-02-2014, 03:05 PM
#747
Senior Member
Re: LS1 swap for my '89 GTA
dave, the nut or "keeper" for the cruise bracket are common "e-clips" you should be able to source them at a good parts or hardware store. you might take a caliper to find the size of the stud and then go from there.
06-03-2014, 04:38 PM
#748
Supreme Member
Thread Starter
iTrader: (1)
Join Date: Mar 2007
Location: Apopka, Florida
Posts: 1,237
Likes: 0
Received 7 Likes
on
6 Posts
Car: 1989 Pontiac Trans Am GTA
Engine: cammed LS1
Transmission: Monster SS 4L65E
Axle/Gears: 9 bolt posi w/ 3.70 gears
Re: LS1 swap for my '89 GTA
Good idea. Or I may just look for one the next time I go to the junk yard. We'll see. Thanks man.
06-22-2014, 09:26 AM
#749
Supreme Member
Thread Starter
iTrader: (1)
Join Date: Mar 2007
Location: Apopka, Florida
Posts: 1,237
Likes: 0
Received 7 Likes
on
6 Posts
Car: 1989 Pontiac Trans Am GTA
Engine: cammed LS1
Transmission: Monster SS 4L65E
Axle/Gears: 9 bolt posi w/ 3.70 gears
Re: LS1 swap for my '89 GTA
Nice! Glad to hear you are making progress on your interior. Have you posted any pics yet?
06-22-2014, 09:46 AM
#750
Supreme Member
Thread Starter
iTrader: (1)
Join Date: Mar 2007
Location: Apopka, Florida
Posts: 1,237
Likes: 0
Received 7 Likes
on
6 Posts
Car: 1989 Pontiac Trans Am GTA
Engine: cammed LS1
Transmission: Monster SS 4L65E
Axle/Gears: 9 bolt posi w/ 3.70 gears
Re: LS1 swap for my '89 GTA
I started on the interior a few weeks ago. Luis has been helping me here and there. We removed all of the interior from the rear of the car, but haven't messed with the front yet.


All that is left to remove from the front are the seats and carpet.
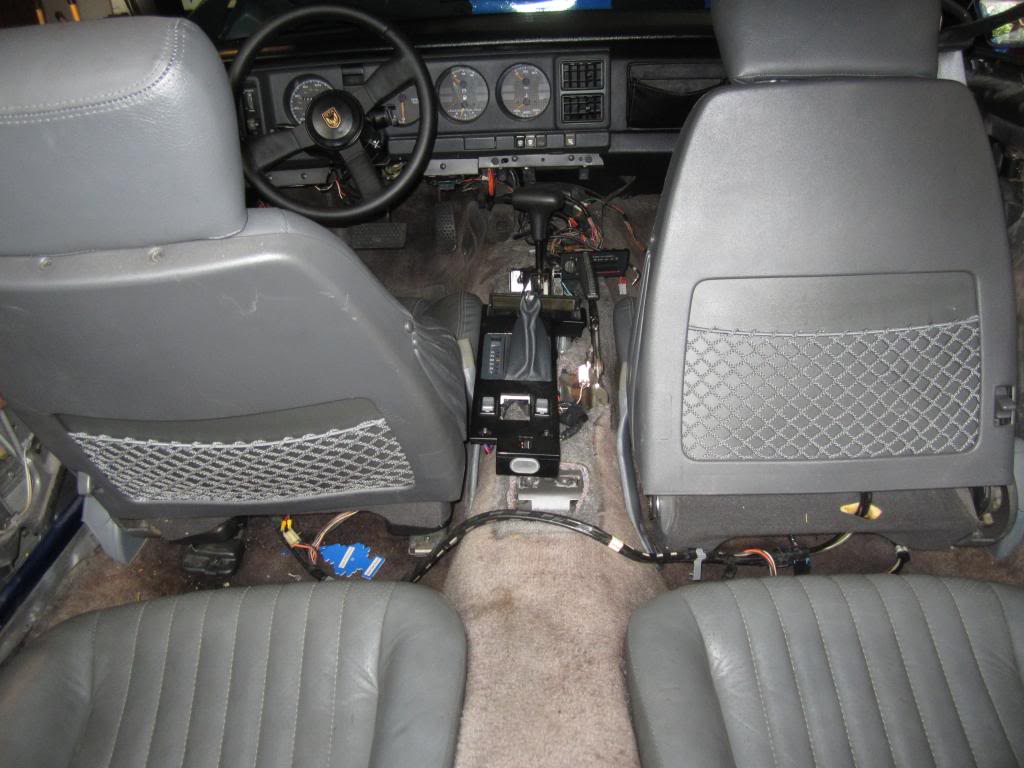
Luis and I may tackle that today.


All that is left to remove from the front are the seats and carpet.

Luis and I may tackle that today.