My first interior resto


 02-03-2014, 09:31 AM
#52
Member
Thread Starter
Join Date: Apr 2010
Location: Royse City, Tx
Posts: 118
Likes: 0
Received 0 Likes
on
0 Posts
Car: 89 IROC-Z
Engine: L98 TPI
Re: My first interior resto
WOW and I thought my floors where clean and I live in Canada where they salt everything like its goin out of style.
I like the heated set idea for sure man. Where did you ge the kit and switches for it as its something Id like to do as I was working on my car last week when it was -22 out. Had the car running for heat but it would be nice to have the warmers as well
Thanks
I like the heated set idea for sure man. Where did you ge the kit and switches for it as its something Id like to do as I was working on my car last week when it was -22 out. Had the car running for heat but it would be nice to have the warmers as well
Thanks
http://www.ebay.com/itm/261375774930...84.m1497.l2649
02-03-2014, 09:34 AM
#53
Member
Thread Starter
Join Date: Apr 2010
Location: Royse City, Tx
Posts: 118
Likes: 0
Received 0 Likes
on
0 Posts
Car: 89 IROC-Z
Engine: L98 TPI
Re: My first interior resto
I'm not to fond of the light blue piping on the sides. The stitching is a much darker blue so I picked up a can of Dupi-color vinyl & fabric blue to see if I can get it darker to match the stitching.
02-14-2014, 02:53 PM
#54
Junior Member
Join Date: Mar 2012
Location: NEW YORK
Posts: 31
Likes: 0
Received 0 Likes
on
0 Posts
Car: 1988 IROC-Z
Engine: 305 tbi
Transmission: automatic
Re: My first interior resto
where did you get the seat foam??? need to get mine done this spring thanks
Last edited by nychevyguy; 02-14-2014 at 03:14 PM.
02-16-2014, 06:33 PM
#55
Member
Thread Starter
Join Date: Apr 2010
Location: Royse City, Tx
Posts: 118
Likes: 0
Received 0 Likes
on
0 Posts
Car: 89 IROC-Z
Engine: L98 TPI
Re: My first interior resto
camarocentral.com was the cheapest place I could find it at. Although it wasn't very cheap.
02-17-2014, 04:50 PM
#56
Junior Member
Join Date: Mar 2012
Location: NEW YORK
Posts: 31
Likes: 0
Received 0 Likes
on
0 Posts
Car: 1988 IROC-Z
Engine: 305 tbi
Transmission: automatic
Re: My first interior resto
thanks going to check them out .. whats the brand on the sfc?? that's the next thing i have to do this spring ,,my car is 100% stock and i'm worried about the clearance issues..is your car stock height? and if it is how the clearance any issue thanks again for the info looks real good so far..
02-18-2014, 07:20 PM
#57
Member
Thread Starter
Join Date: Apr 2010
Location: Royse City, Tx
Posts: 118
Likes: 0
Received 0 Likes
on
0 Posts
Car: 89 IROC-Z
Engine: L98 TPI
Re: My first interior resto
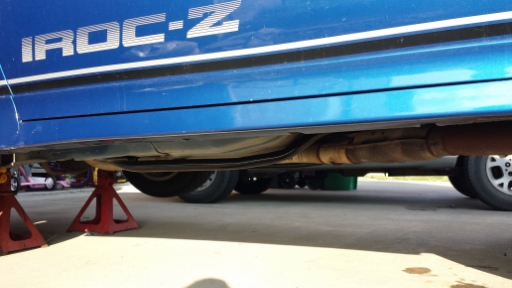
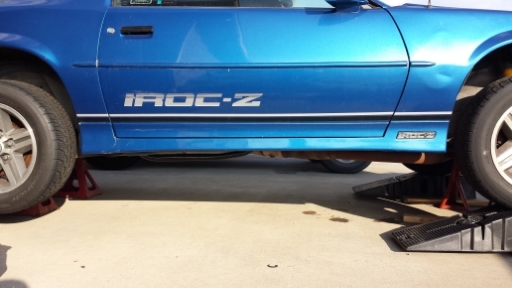
They are Alston SFC's and they run a little bit lower than the exhaust.
I still have it off the ground because it makes it easier climbing in and out while working on the interior.
I still have it off the ground because it makes it easier climbing in and out while working on the interior.


 02-23-2014, 08:50 PM
#60
Member
Thread Starter
Join Date: Apr 2010
Location: Royse City, Tx
Posts: 118
Likes: 0
Received 0 Likes
on
0 Posts
Car: 89 IROC-Z
Engine: L98 TPI
Re: My first interior resto
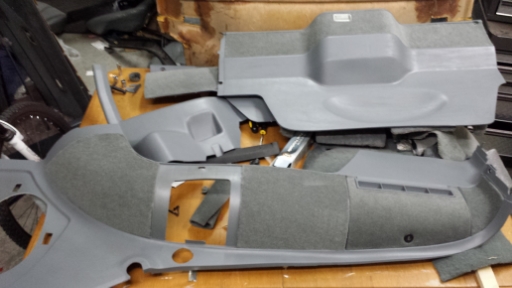
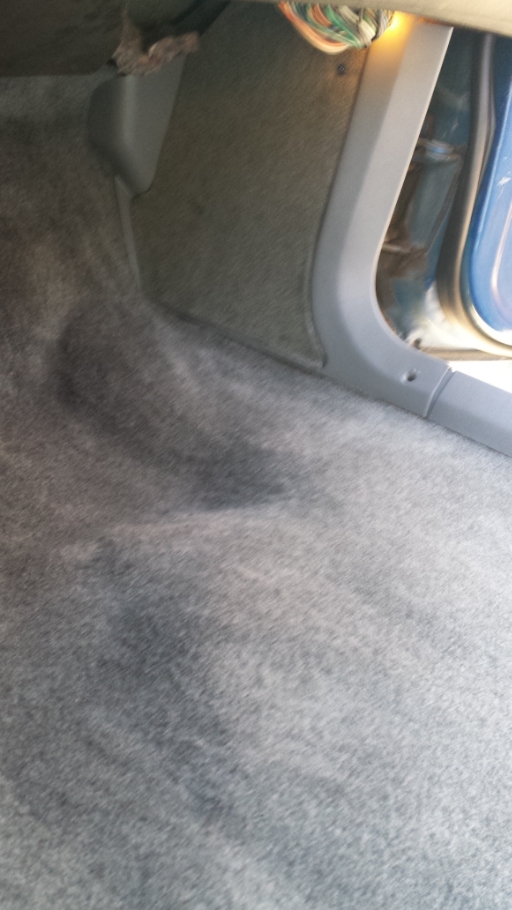
I have all the plastics repainted and new carpet kit from Thirdgenranch.com installed. I must say I am very impressed with how it turned out. I actually like this carpet better than the original. When installing, a sharp razor and a little patience goes a long way.
I will have better pics when I get them in the car.
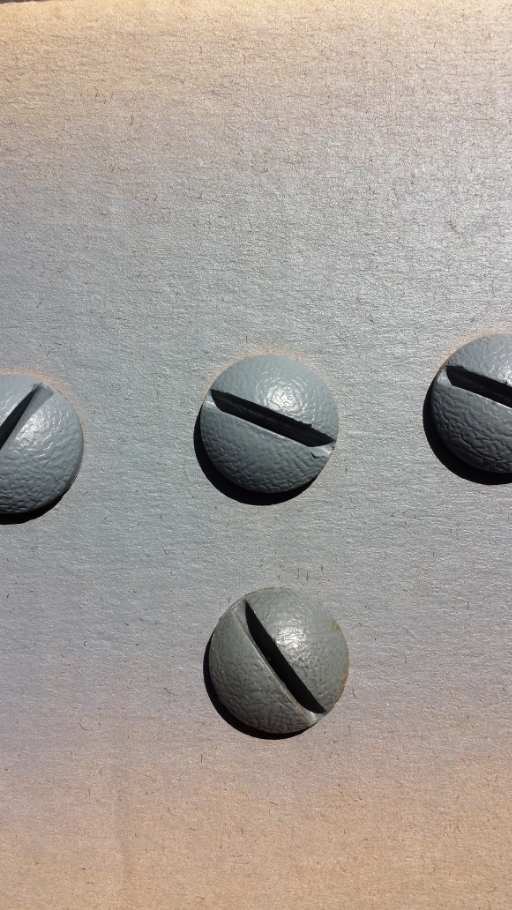
The large plastic screws were repainted as well. Here you can see the original color, or maybe that's just years of dirt and grime. Not too much of a difference but it does brighten it up some.
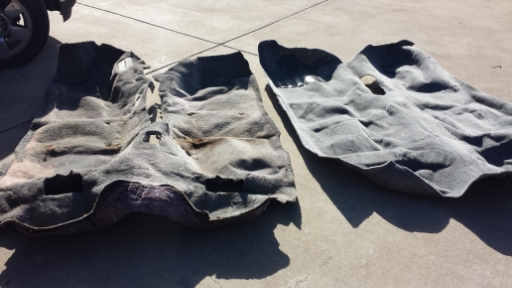
Old and new carpet
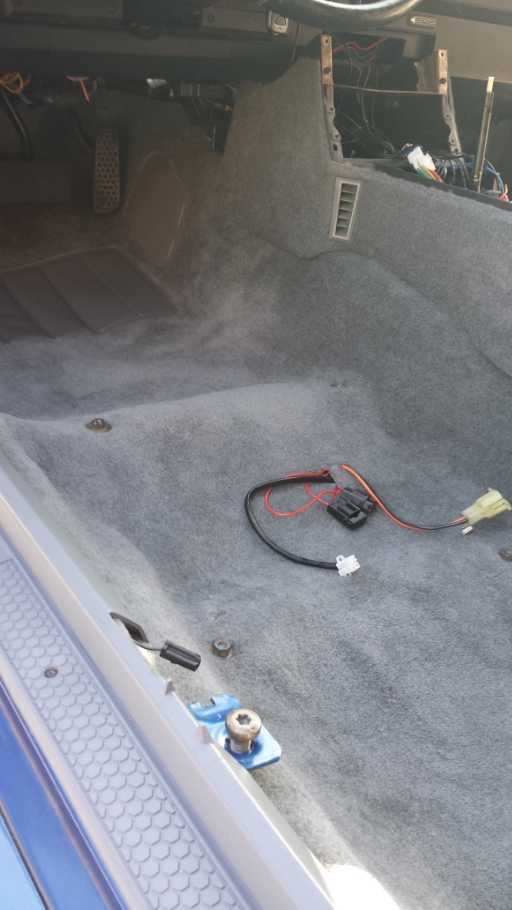
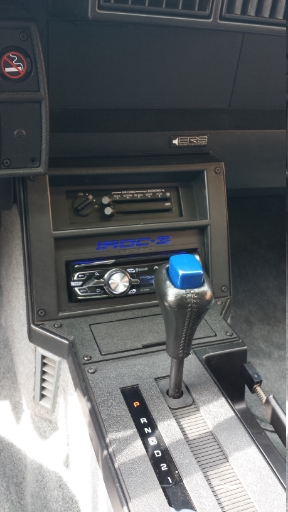
I have all the wires run for the new audio system.
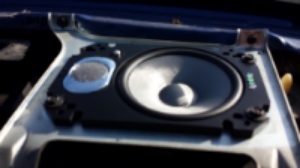
Here are the Infinity 4x6's.
I want to eventually shave the antenna off so I bought a hidden low profile one that has a built in signal amplifier. I have it in the center of the dash and test fitted with the dash pad. Perfect!
Floor carpet back in and lower part of center console in.

Here is the kick panel with new carpet and fresh paint. Hard part of having new carpet is trying to put a screw hole in the carpet without it twisting up on you.
I was going to use the old rear carpet because it wasn't too dirty but after having the new one up front I can't put the rear back in. Just doesn't look right so I ordered a new one from 1aauto.com. Waiting on that before I install the rest of the plastic pieces.
In the meantime I need to work on the driver window. It seems to be out of alignment. When rolling up it goes too far up. And now my passenger door will not open from the outside after it has been locked. I may just need to spray some more lubricant in there. Fix one thing and 2 more issues pop up.
I will have better pics when I get them in the car.

The large plastic screws were repainted as well. Here you can see the original color, or maybe that's just years of dirt and grime. Not too much of a difference but it does brighten it up some.

Old and new carpet

I have all the wires run for the new audio system.
Here are the Infinity 4x6's.

I want to eventually shave the antenna off so I bought a hidden low profile one that has a built in signal amplifier. I have it in the center of the dash and test fitted with the dash pad. Perfect!

Floor carpet back in and lower part of center console in.


Here is the kick panel with new carpet and fresh paint. Hard part of having new carpet is trying to put a screw hole in the carpet without it twisting up on you.

I was going to use the old rear carpet because it wasn't too dirty but after having the new one up front I can't put the rear back in. Just doesn't look right so I ordered a new one from 1aauto.com. Waiting on that before I install the rest of the plastic pieces.
In the meantime I need to work on the driver window. It seems to be out of alignment. When rolling up it goes too far up. And now my passenger door will not open from the outside after it has been locked. I may just need to spray some more lubricant in there. Fix one thing and 2 more issues pop up.
02-23-2014, 10:32 PM
#61
Junior Member
iTrader: (1)
Join Date: Nov 2013
Location: North Adams, MA
Posts: 41
Likes: 0
Received 0 Likes
on
0 Posts
Car: 1985 Camaro SC
Engine: 2.8L V6
Re: My first interior resto
Dieseldog, where did you buy them paints from and how much of each can did you use? I would like to do this as I also have a grey interior in nearly mint condition but this would be a cool project. I went on SEMproducts.com and saw the item # 15413 is called "Thomas Bus Grey". Is that what all the grey interiors were?
02-24-2014, 07:52 AM
#62
Member
Thread Starter
Join Date: Apr 2010
Location: Royse City, Tx
Posts: 118
Likes: 0
Received 0 Likes
on
0 Posts
Car: 89 IROC-Z
Engine: L98 TPI
Re: My first interior resto
Yes, I used Thomas Bus Grey from SEM. I got them from O'reilly Auto parts. It's not on the shelf so I called ahead and they ordered it for me. I've used almost 2 cans so far of the paint but the prep and adhesion spray I'm still on the first can of each.
02-25-2014, 01:24 PM
#63
Junior Member
iTrader: (1)
Join Date: Nov 2013
Location: North Adams, MA
Posts: 41
Likes: 0
Received 0 Likes
on
0 Posts
Car: 1985 Camaro SC
Engine: 2.8L V6
Re: My first interior resto
Okay thanks for the info. Just let us know how much of the product you've used when all complete! Nice job so far, the picture you've shown us previously looks amazing.
 04-04-2014, 04:09 PM
#65
Member
Thread Starter
Join Date: Apr 2010
Location: Royse City, Tx
Posts: 118
Likes: 0
Received 0 Likes
on
0 Posts
Car: 89 IROC-Z
Engine: L98 TPI
Re: My first interior resto
Audio complete.
Check it out here https://www.thirdgen.org/forums/car-...ml#post5742762
Check it out here https://www.thirdgen.org/forums/car-...ml#post5742762
04-04-2014, 04:15 PM
#66
Member
Thread Starter
Join Date: Apr 2010
Location: Royse City, Tx
Posts: 118
Likes: 0
Received 0 Likes
on
0 Posts
Car: 89 IROC-Z
Engine: L98 TPI
Re: My first interior resto
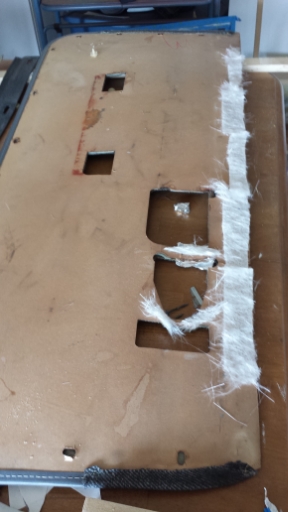
Since I was fiberglassing the sub box I decided to fiberglass the door panels where they were ripped.
I forgot to take an after shot.
Seats, door panels, headliner, and sail panels are now at the upholstery shop.
I forgot to take an after shot.

Seats, door panels, headliner, and sail panels are now at the upholstery shop.
04-06-2014, 05:21 PM
#69
Member
Thread Starter
Join Date: Apr 2010
Location: Royse City, Tx
Posts: 118
Likes: 0
Received 0 Likes
on
0 Posts
Car: 89 IROC-Z
Engine: L98 TPI
Re: My first interior resto
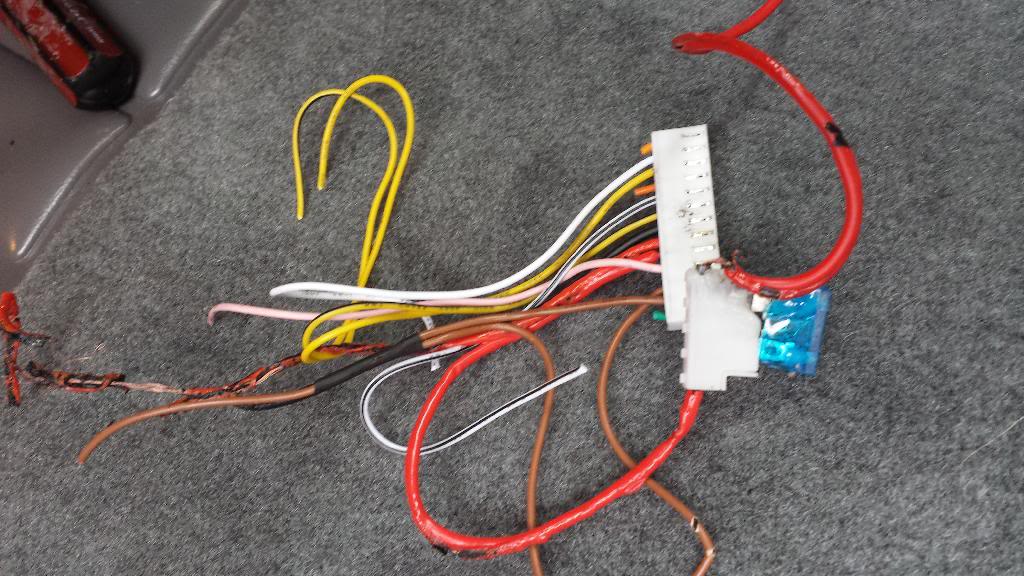
Minor set back. My keyless entry system decided it wanted all the wires to be joined to each other and started melting. That what I get when I buy the cheapest thing.
You can see the red and orange wire started to become one.
You can see the red and orange wire started to become one.
 04-07-2014, 12:01 AM
#71
Banned

iTrader: (2)

Join Date: Mar 2008
Location: Colorado
Posts: 135
Received 0 Likes
on
0 Posts
Car: 1985 Camaro Sport Coupe
Engine: 2.8 - Bored/Stroked, Pacesetters
Transmission: 5 spd Manual
Axle/Gears: Stock
Re: My first interior resto
**** bro, did the fuse even blow before everything started to melt? Scary stuff right there!!!
04-13-2014, 11:53 AM
#72
Member
Thread Starter
Join Date: Apr 2010
Location: Royse City, Tx
Posts: 118
Likes: 0
Received 0 Likes
on
0 Posts
Car: 89 IROC-Z
Engine: L98 TPI
04-13-2014, 12:32 PM
#73
Member
Thread Starter
Join Date: Apr 2010
Location: Royse City, Tx
Posts: 118
Likes: 0
Received 0 Likes
on
0 Posts
Car: 89 IROC-Z
Engine: L98 TPI
Re: My first interior resto
Ok, so here is what was going on this week.
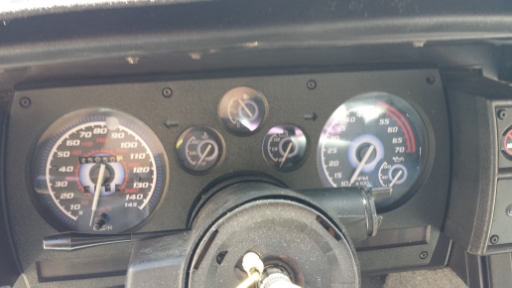
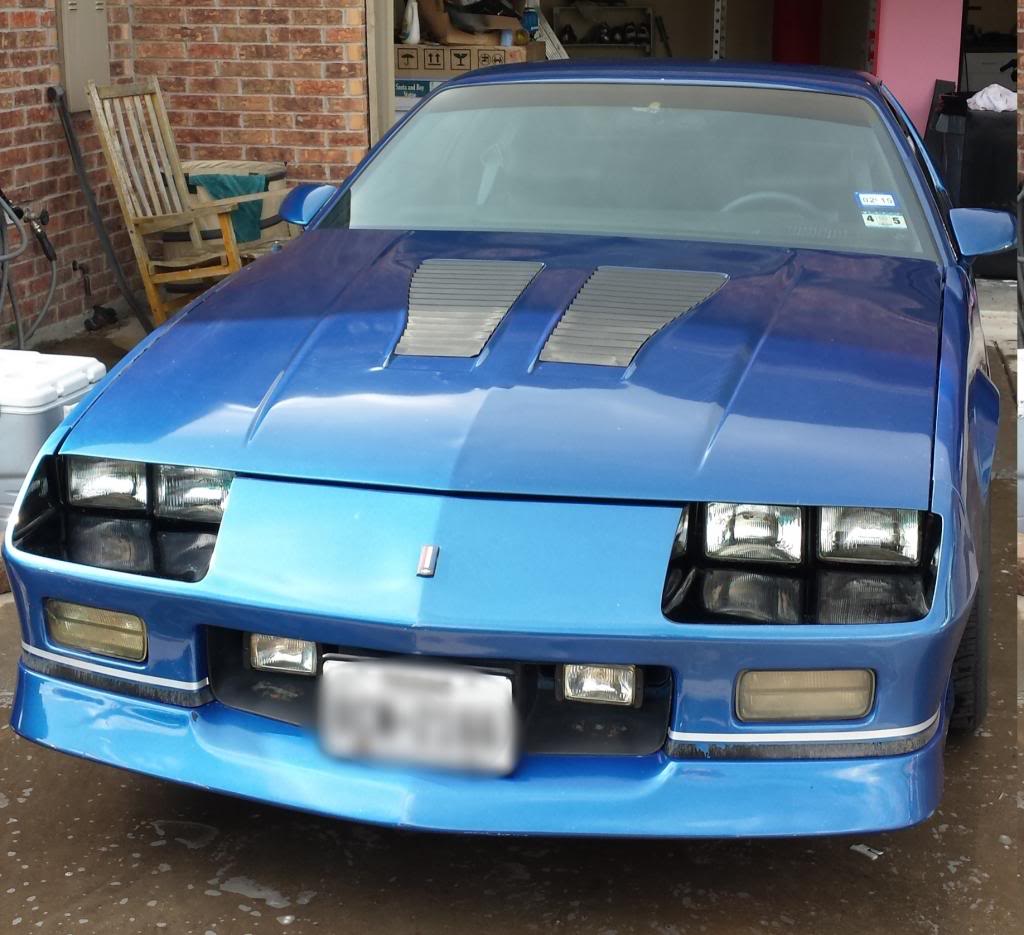
Overlays going back on my gauges, this time gluing them on. I knew my cluster circuit board was getting tore up from age and losing tabs but I didn't want to spend the money to get another. So guess what I did? I spent the money to get another. The SES light kept coming on giving me a VSS error so I'm hoping it was just a connection problem because before I started messing with the cluster I never had an issue. So after the new board was put on I put all the gauges back in with the overlays. I wanted to give the overlays a quick test before installing the cluster, and I have a short in 3 overlays, FIGURES! So now I have to order new overlays and somehow get the glued ones off. This is getting expensive $$$.
Now onto the keyless entry. Ordered a Clifford security system so I know it was well built and more than likely will not melt on me. This was a major pain getting in there and connecting all the wires. I even removed some old wires the PO had installed. It looks like he had an alarm in at one time but was removed prior to me buying it. It was difficult getting trying to get my hands under the dash to install the "brain". I would post a picture of where I have it but then that would defeat the purpose of hiding it. I also attached the 2 relays to the body so they are not just hanging or tied up somewhere. It makes for a cleaner looking install and a more difficult one trying to hold a drill with one hand laying on your side. I also install a terminal block for all the added powered devices I have already installed. One side is constant power and the other is for ground. I have a 20 amp fuse on the main power wire.
I want to get this back on the ground but before I do I wanted to flush the brake lines. First up was the backs, and nothing was coming out. First I thought it was the rubber brake lines due to the age. Then after doing some research here I found a thread about disk brakes not having much stopping power due to a spring in the proportioning valve. Long story short I picked up a pack of 1NCR5 springs. I just got that installed right before
the heavens opened up and released a flood. Can't test to see if it helped yet.
Other new items ordered, new floor mats and a dash mat (to protect my near mint dash pad I need to install).
Did I mention this was getting expensive?!?
Overlays going back on my gauges, this time gluing them on. I knew my cluster circuit board was getting tore up from age and losing tabs but I didn't want to spend the money to get another. So guess what I did? I spent the money to get another.
The SES light kept coming on giving me a VSS error so I'm hoping it was just a connection problem because before I started messing with the cluster I never had an issue. So after the new board was put on I put all the gauges back in with the overlays. I wanted to give the overlays a quick test before installing the cluster, and I have a short in 3 overlays, FIGURES! So now I have to order new overlays and somehow get the glued ones off. This is getting expensive $$$. Now onto the keyless entry. Ordered a Clifford security system so I know it was well built and more than likely will not melt on me. This was a major pain getting in there and connecting all the wires. I even removed some old wires the PO had installed. It looks like he had an alarm in at one time but was removed prior to me buying it. It was difficult getting trying to get my hands under the dash to install the "brain". I would post a picture of where I have it but then that would defeat the purpose of hiding it.
I also attached the 2 relays to the body so they are not just hanging or tied up somewhere. It makes for a cleaner looking install and a more difficult one trying to hold a drill with one hand laying on your side. I also install a terminal block for all the added powered devices I have already installed. One side is constant power and the other is for ground. I have a 20 amp fuse on the main power wire.I want to get this back on the ground but before I do I wanted to flush the brake lines. First up was the backs, and nothing was coming out. First I thought it was the rubber brake lines due to the age. Then after doing some research here I found a thread about disk brakes not having much stopping power due to a spring in the proportioning valve. Long story short I picked up a pack of 1NCR5 springs. I just got that installed right before
the heavens opened up and released a flood. Can't test to see if it helped yet.
Other new items ordered, new floor mats and a dash mat (to protect my near mint dash pad I need to install).
Did I mention this was getting expensive?!?
Last edited by dieseldog; 04-13-2014 at 12:39 PM.
05-05-2014, 09:24 AM
#74
Member
Thread Starter
Join Date: Apr 2010
Location: Royse City, Tx
Posts: 118
Likes: 0
Received 0 Likes
on
0 Posts
Car: 89 IROC-Z
Engine: L98 TPI
Re: My first interior resto
It's back on the ground and I have driven it a couple of times, once was to get it inspected. IT PASSED!
Before that I had to get another panhard bar since the one I had was bent due to me resting the car on it for 5 months.
BMR adjustable, I like it!
I got the overlays on and the look great, however with the new circuit board on the back of the cluster it has to be pushed back into the connector really really tight or some of the gauges will not work. Right now my voltage gauge doesn't work. I installed a new electronic flasher relay so now my blinkers go faster or should I say normal.
I have the steering wheel installed but since it was plasti dipped when I installed the screws it grabbed the plasti dip and twisted it with the screws. So that will come off and it will be painted.
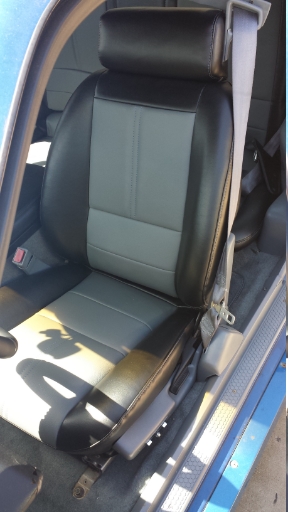
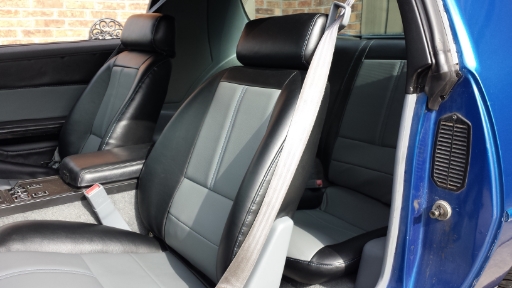
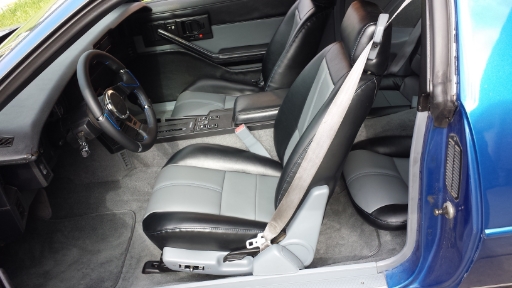
Seats and door panels are done but I'm having issues with my drivers side window so can't put those on until that is working perfectly. The windows is not sealing very good with the weatherstipping.
Here's the seats.
Headliner and sail panels were taken back to the upholster because the color didn't match. Should be done this week.
The rear hatch was taken off to realign it and that sucked. After I re-installed it, it leaked so I had to do it again. Now the spoiler is straight but it still takes 3 pushes of the hatch release button to pop the hatch.
I also noticed my speedometer needle bouncing when I drive. It's not too bad but it is annoying. I checked both ends and they look clean, but I ordered a new one anyway. Hopefully that will take care of that problem.
Almost done, I can see the end!
Before that I had to get another panhard bar since the one I had was bent due to me resting the car on it for 5 months.
BMR adjustable, I like it!
I got the overlays on and the look great, however with the new circuit board on the back of the cluster it has to be pushed back into the connector really really tight or some of the gauges will not work. Right now my voltage gauge doesn't work. I installed a new electronic flasher relay so now my blinkers go faster or should I say normal.
I have the steering wheel installed but since it was plasti dipped when I installed the screws it grabbed the plasti dip and twisted it with the screws. So that will come off and it will be painted.
Seats and door panels are done but I'm having issues with my drivers side window so can't put those on until that is working perfectly. The windows is not sealing very good with the weatherstipping.
Here's the seats.

Headliner and sail panels were taken back to the upholster because the color didn't match. Should be done this week.
The rear hatch was taken off to realign it and that sucked. After I re-installed it, it leaked so I had to do it again. Now the spoiler is straight but it still takes 3 pushes of the hatch release button to pop the hatch.
I also noticed my speedometer needle bouncing when I drive. It's not too bad but it is annoying. I checked both ends and they look clean, but I ordered a new one anyway. Hopefully that will take care of that problem.
Almost done, I can see the end!
05-28-2014, 11:27 AM
#75
Member

Join Date: Aug 2012
Posts: 128
Likes: 0
Received 0 Likes
on
0 Posts
Re: My first interior resto
Looks killer man! Be sure to keep us posted with plenty of pics when it all comes together. Might I get a general idea of what a proper restoration like this would costs?
05-28-2014, 02:33 PM
#76
Senior Member
iTrader: (3)
Join Date: Jan 2012
Location: Clark NJ
Posts: 877
Likes: 0
Received 2 Likes
on
2 Posts
Car: 1988 Pontiac Transam GTA Notchback
Engine: 2003 Chevy 5.3 Vortec (325 cu)
Transmission: 4L60E
Axle/Gears: 3.27
Re: My first interior resto
I went through two key-less entry boxes, one was an automate that was horribly installed in the 90's (it went bad when my dad gave me the car -go figure) and the last one I installed about 10 months ago. Needless to say it lasted half that time and I ultimately switched to a gm key less entry/alarm from an 02 firebird. It is great because if it ever goes bad, I can got to a junkyard and get a new one. And it has proven the most reliable yet.
also the interior looks really good, I hope the painting of the plastics turns out okay
(mine peeled ugh)
also the interior looks really good, I hope the painting of the plastics turns out okay
(mine peeled ugh)
Last edited by alex722607; 05-28-2014 at 02:37 PM.
05-29-2014, 06:55 PM
#78
Member
Thread Starter
Join Date: Apr 2010
Location: Royse City, Tx
Posts: 118
Likes: 0
Received 0 Likes
on
0 Posts
Car: 89 IROC-Z
Engine: L98 TPI
Re: My first interior resto

I'm estimating upwards of $3000, 35-40% was upholstery.
Last edited by dieseldog; 06-01-2014 at 04:21 PM.
05-29-2014, 07:00 PM
#79
Member
Thread Starter
Join Date: Apr 2010
Location: Royse City, Tx
Posts: 118
Likes: 0
Received 0 Likes
on
0 Posts
Car: 89 IROC-Z
Engine: L98 TPI
Re: My first interior resto
I washed mine with soap and water, then used the prep spray, adhesion promoter, followed by 3 coats of paint. I'm hoping it wont rub off. I've been thinking of doing the arm rests too but afraid it may rub off on my clothes.
05-29-2014, 07:18 PM
#80
Member
Thread Starter
Join Date: Apr 2010
Location: Royse City, Tx
Posts: 118
Likes: 0
Received 0 Likes
on
0 Posts
Car: 89 IROC-Z
Engine: L98 TPI
Re: My first interior resto
I'M FINISHED!!!
After 6 months I'm finished.
minus getting the shifter **** and e-brake handle recovered.
I have the HU mount that lights up at night, however I don't like a bright cabin so using a relay I switched it. It's on during the day and when I turn my lights on it goes off.
Also in the picture below the no smoking sign you can see the microphone for my hands free calling.
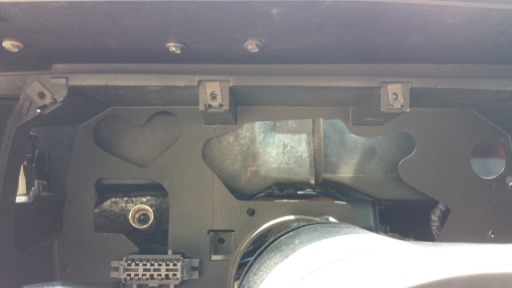
While working on the gauge overlay's I found the heart of my car.
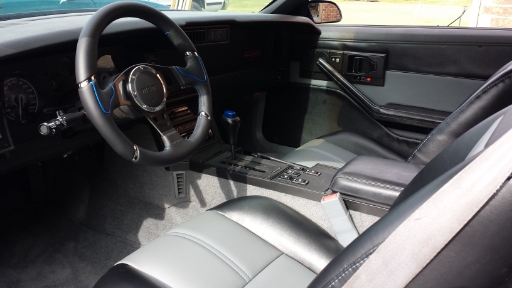

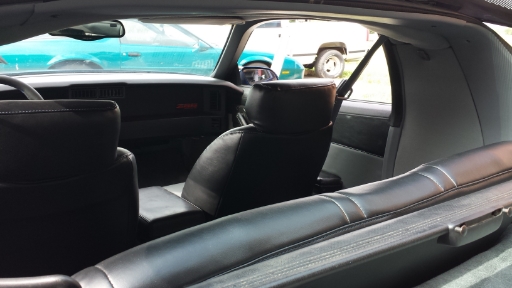
Also got the windows tinted to protect everything I just did.
After 6 months I'm finished.
minus getting the shifter **** and e-brake handle recovered.
I have the HU mount that lights up at night, however I don't like a bright cabin so using a relay I switched it. It's on during the day and when I turn my lights on it goes off.
Also in the picture below the no smoking sign you can see the microphone for my hands free calling.


While working on the gauge overlay's I found the heart of my car.


Also got the windows tinted to protect everything I just did.


 05-29-2014, 08:55 PM
#83
Junior Member
Join Date: Mar 2003
Posts: 56
Likes: 0
Received 0 Likes
on
0 Posts
Car: 1985 & 1991 Trans Ams
Engine: 350 in both
Transmission: Auto in both
Axle/Gears: 3:23 Limited Slip in both
Re: My first interior resto
Oh man is that nice! You should be very proud. Unless I missed it, I was wondering what brand of carpeting you used. I have always been worried that the aftermarket brands would fade or change color quickly unlike the OEM that seemed to never fade.
05-29-2014, 11:28 PM
#84
Supreme Member
Join Date: Apr 2010
Location: Modesto, California
Posts: 1,015
Likes: 0
Received 5 Likes
on
4 Posts
Car: 88 Firebird Formula
Engine: LO5 5.7 TBI/Ebl Flash
Transmission: 700R4
Axle/Gears: 2.73 stock rear end
Re: My first interior resto
Wow!! And i thought ripping some decent Vinyl seats from pick n pull and installing them in my crusty interior was nice...... But this is BEAUTIFUL!!!!!!!! Idk why but i think the Momo steering wheel pulls it together very nicely.
 05-31-2014, 01:52 PM
#88
Member
Thread Starter
Join Date: Apr 2010
Location: Royse City, Tx
Posts: 118
Likes: 0
Received 0 Likes
on
0 Posts
Car: 89 IROC-Z
Engine: L98 TPI
Re: My first interior resto
The carpet is ACC from 1Aauto.com
05-31-2014, 01:54 PM
#89
Member
Thread Starter
Join Date: Apr 2010
Location: Royse City, Tx
Posts: 118
Likes: 0
Received 0 Likes
on
0 Posts
Car: 89 IROC-Z
Engine: L98 TPI
Re: My first interior resto
BTW for those with nasty looking seat belts, I soaked the passenger side belt in oxyclean. It came out really clean and the water looked really nasty afterward.
 06-28-2014, 09:21 PM
#92
Member
Thread Starter
Join Date: Apr 2010
Location: Royse City, Tx
Posts: 118
Likes: 0
Received 0 Likes
on
0 Posts
Car: 89 IROC-Z
Engine: L98 TPI
03-14-2015, 03:45 PM
#94
Re: My first interior resto
I know this was almost a year ago you were doing this but could you list the color codes you used for the carpet and trim panel carpets?
Were they the ACC 8046 Silver (Part #: ZAICK24449 from A1)
http://www.1aauto.com/1985-92-chevy-...=774406&y=1987
and med. dark gray from Thirdgen Ranch?
82-92 Camaro/Firebird carpet kit for interior plastic (med. dark gray)http://www.thirdgenranch.com/catalog...a63018577e87a4
I'll be doing my 87 soon and want to be sure I'm ordering the right colors to match.
Also, how have the SEM paints been wearing on the plastic pieces? Did you do the door sill plates or leave them original? How are they doing with the door & foot traffic?
Thanks
03-19-2015, 10:54 AM
#95
Member
Thread Starter
Join Date: Apr 2010
Location: Royse City, Tx
Posts: 118
Likes: 0
Received 0 Likes
on
0 Posts
Car: 89 IROC-Z
Engine: L98 TPI
Re: My first interior resto
The carpet from 1AAuto was dove gray. Not really the right color though.
Carpet kit from Thirdgen ranch you mentioned is what I used.
Carpet kit from Thirdgen ranch you mentioned is what I used.
03-19-2015, 07:06 PM
#97
Supreme Member
iTrader: (5)
Join Date: Nov 2010
Location: Mantua NJ
Posts: 5,827
Received 64 Likes
on
57 Posts
Car: 1 Owner 1986 TA with a WS6 package
Engine: 5.0 EFI
Transmission: THM700R4
Axle/Gears: 277 Posi Speedo
Re: My first interior resto
I don't recall ever seeing any other Co. offer it but 3rd gen ranch
03-24-2015, 07:22 PM
#100
Re: My first interior resto
I got my kit in the mail today. Here is how it turned out. First impression of the material was that it looked cheap as hell. But after I put it on, it looked good. Overall. I feel that It is not worth the $65 I paid for it. More like 35-40 shipped. It was cut nice(only needed a trim here and there), and came with glue and a good brush. It looks better in person then it does in the pictures overall 7.6/10 IMO. He even gave me next day shipping. My advice, if you are gonna buy from THIRDGEN RANCH, buy it off ebay. It seems like that, due to how he can really get screwed himself from paypal/ebay, I don't think he will mess around with people.