Any better info for REAR HATCH ALIGNMENT?
 06-20-2011, 08:38 PM
#1
Member
Thread Starter
Join Date: May 2010
Location: O'hare
Posts: 377
Likes: 0
Received 0 Likes
on
0 Posts
Car: 91 Z28
Engine: Enhanced 5.0L
Transmission: 700R4
Axle/Gears: 3:42 Posi
Any better info for REAR HATCH ALIGNMENT?
Other than what has been posted?..I was looking for more of a picture version. The thread for Hatch101 in Tech,kinda stinks..Myself,and another member here need to tweak our hatches,and want to get em done at the same time..Yeah,I'd rather use his for guniea piggin'..... Thanks for help,and if you know,and are near me,come give a hand!!!
Thanks for help,and if you know,and are near me,come give a hand!!!  06-21-2011, 12:09 AM
#2
Member


Join Date: Nov 2010
Location: Sylmar, So-Cal
Posts: 325
Likes: 0
Received 0 Likes
on
0 Posts
Car: 89 firebird bone stock for now
Engine: 2.8L V6
Transmission: 700R4
Axle/Gears: B.W 9Bolt 3.27 Posi
Re: Any better info for REAR HATCH ALIGNMENT?
id give a hand if i was anywhere near there since i just recently did my hatch just last week. i kinda just freeballed it haha. i used that hatch alignment as a reference but in the end i kinda went my own way. i shuda taken pictures but its honestly really easy.
1- take plastic peice off
2 unbolt the window supports
3 unbolt the nuts inside the hatch(should be like 8)
4 use a small wedge between the window and aluminum like the edge where the window edge meets the weather stripping.
5 pry off the hatch from the window. just to let you know its a bit hard because the black gunk sticks hard. what i did was stuck a flathead screw driver and slowly shoved it in between and pried it slowly. probably the most time consuming part.
6 get a razor blade and remove the black crap from window and same on the hatch. once u have like most of the heavier gunked areas cleared but have some left on the hatch just get some gasoline on a rag and whipe away. youll be amazed haha. (my fathers idea.)
then clean the window
7 with everything cleaned just put the hatch back on and align the back peice to the spot that you want
8 mark the spots to drill the hole into
9 drill without or with the hatch.
it might be easier to glue down the hatch and screw in the outer nuts to secure it together, let it sit overnight on your prefered spot... i made mistake in screwing everything back together fast and it moved like 1/4 inch and ruined my flush look :/
when dried just drill the new holes and screw the screws in, then nuts in then plastics and your done.
just to let you know dont forget to put back the plastics in the window holes and the rubbers on the window edge, and the plastics on the window edge..... youll know what i mean when you see them
anywho hope you guys have fun and get that flush look. ill be doing this again next week haha.
06-21-2011, 08:40 AM
#3
Member
Thread Starter
Join Date: May 2010
Location: O'hare
Posts: 377
Likes: 0
Received 0 Likes
on
0 Posts
Car: 91 Z28
Engine: Enhanced 5.0L
Transmission: 700R4
Axle/Gears: 3:42 Posi
Re: Any better info for REAR HATCH ALIGNMENT?
OMG,and Holy Crap!..That makes it sound WAY scariere!..It seems as if most of the work is at the top of the glass,under the plastic cover..not by the latch,but by the hinges...but,without getting into it,everyone talks about the black goo,and the drilling of holes.....O no.....!!
06-21-2011, 09:42 AM
#4
Re: Any better info for REAR HATCH ALIGNMENT?
Mailman818: Dude...where and why are you drilling new holes??
Its really not that bad of a process. Yes some of the cars rolled out with some alignment issues, but most were pretty straight. And they can be put back straight by doing a reset. Most of the steps above are pretty accurate, but seem a little confusing.
You basically just take it all apart, clean off the old glue, align things dry, put some masking tape down to help you align the hatch on re-assembly, apply glue (urethane window sealant...like they use to install windshields), and re-assemble. There are some people that claim they have adjusted the hatch at the top where the hinges are, but I found that not to be the case with mine. I couldnt get much adjustment. Just check the gap around the glass. If its to one side or really uneven, maybe look into adjusting the hinges first, then the decklid if its still off. Also, dont forget you might have to tweak your hatch pull down a little.
I didnt have to drill holes, or wait for the glue to dry to bolt it back on. Just watch your tape marks, take your time, and dont put the hatch struts back on for a couple days.
This is one of those jobs where the exact procedures might be a tad different on each car. But the general gist is the same, and its really just time consuming. Not hard. Did mine in an afternoon back in the day and it stayed perfect for 8 years.
J.
06-21-2011, 12:20 PM
#5
Member
iTrader: (2)

Join Date: Nov 2009
Location: Hubert, NC
Posts: 436
Likes: 0
Received 0 Likes
on
0 Posts
Car: 83 Z28
Engine: F-body LT1 swap
Transmission: T-56 swap
Axle/Gears: 10 bolt w/ 28 spl posi, 4.10, disks
Re: Any better info for REAR HATCH ALIGNMENT?
Another reason I found when repairing my T-top weatherstripping is that the hinges for the glass actually bend out of shape, this causes the hatch to stick out from behind the car. I re-bent mine and it all lined up great, only issue is that the metal is cast aluminum, not very strong and if they are bent too far they will just crack in half when trying to bend them back. Someone needs to make some billet hinges or something.
Bending the hinges is a lot easier than seperating the back glass and sealing the deck lid back on. The hinge issue is still there.
Bending the hinges is a lot easier than seperating the back glass and sealing the deck lid back on. The hinge issue is still there.
06-21-2011, 02:28 PM
#6
Member
Thread Starter
Join Date: May 2010
Location: O'hare
Posts: 377
Likes: 0
Received 0 Likes
on
0 Posts
Car: 91 Z28
Engine: Enhanced 5.0L
Transmission: 700R4
Axle/Gears: 3:42 Posi
Re: Any better info for REAR HATCH ALIGNMENT?
im not near my car at the moment,but are we talking the plastic piece below the spoiler(inside the car)..or are we talking near the hinges/3rd brake light area?..I want to make sure the part i'm aligning isnt the wrong part
06-26-2011, 12:42 AM
#7

Re: Any better info for REAR HATCH ALIGNMENT?
why are you guys separating the hatch panel from the glass? pop the struts off, pull them from the bodyinside, drop the latch and loosen the inside nuts over the rear seats and slide that dude up and then re assemble everything.
takes me all of 45 mins. if you need to shift the hatch, loosen the nuts at the top of the glas, thats a 13 ir 14 mm wrench. when you go to slide it l or r you will have to work with it to prevent wedging. but once you get the R-L adj done you should be ok.
takes me all of 45 mins. if you need to shift the hatch, loosen the nuts at the top of the glas, thats a 13 ir 14 mm wrench. when you go to slide it l or r you will have to work with it to prevent wedging. but once you get the R-L adj done you should be ok.
The following users liked this post:
landon360 (02-20-2020)
Trending Topics
06-26-2011, 01:27 PM
#8
Member
Join Date: Nov 2010
Location: Sylmar, So-Cal
Posts: 325
Likes: 0
Received 0 Likes
on
0 Posts
Car: 89 firebird bone stock for now
Engine: 2.8L V6
Transmission: 700R4
Axle/Gears: B.W 9Bolt 3.27 Posi
Re: Any better info for REAR HATCH ALIGNMENT?
Mailman818: Dude...where and why are you drilling new holes??
Its really not that bad of a process. Yes some of the cars rolled out with some alignment issues, but most were pretty straight. And they can be put back straight by doing a reset. Most of the steps above are pretty accurate, but seem a little confusing.
You basically just take it all apart, clean off the old glue, align things dry, put some masking tape down to help you align the hatch on re-assembly, apply glue (urethane window sealant...like they use to install windshields), and re-assemble. There are some people that claim they have adjusted the hatch at the top where the hinges are, but I found that not to be the case with mine. I couldnt get much adjustment. Just check the gap around the glass. If its to one side or really uneven, maybe look into adjusting the hinges first, then the decklid if its still off. Also, dont forget you might have to tweak your hatch pull down a little.
I didnt have to drill holes, or wait for the glue to dry to bolt it back on. Just watch your tape marks, take your time, and dont put the hatch struts back on for a couple days.
This is one of those jobs where the exact procedures might be a tad different on each car. But the general gist is the same, and its really just time consuming. Not hard. Did mine in an afternoon back in the day and it stayed perfect for 8 years.
J.
Its really not that bad of a process. Yes some of the cars rolled out with some alignment issues, but most were pretty straight. And they can be put back straight by doing a reset. Most of the steps above are pretty accurate, but seem a little confusing.
You basically just take it all apart, clean off the old glue, align things dry, put some masking tape down to help you align the hatch on re-assembly, apply glue (urethane window sealant...like they use to install windshields), and re-assemble. There are some people that claim they have adjusted the hatch at the top where the hinges are, but I found that not to be the case with mine. I couldnt get much adjustment. Just check the gap around the glass. If its to one side or really uneven, maybe look into adjusting the hinges first, then the decklid if its still off. Also, dont forget you might have to tweak your hatch pull down a little.
I didnt have to drill holes, or wait for the glue to dry to bolt it back on. Just watch your tape marks, take your time, and dont put the hatch struts back on for a couple days.
This is one of those jobs where the exact procedures might be a tad different on each car. But the general gist is the same, and its really just time consuming. Not hard. Did mine in an afternoon back in the day and it stayed perfect for 8 years.
J.
mine was super bad till the point where the bolt would be touching the black plate hole and there was still more to move and the holes on the black plate didnt align with the old ones so i had to make mew ones.
06-27-2011, 11:58 AM
#9
Re: Any better info for REAR HATCH ALIGNMENT?
Because thats a common area for things to come out of alignment. My glass was perfectly aligned, but my hatch had shifted from its original location. Some people will say that the Aerowing cars will have more of an issue. But its fairly common in my experience.
I hardly had any movement in my actual hinges. In fact...loosening them and adjusting them was more trouble than it was worth, and I ended up re-tightening it in almost the original position.
I dont see any reason why this should be a regular job that you'd perform. It takes years for them to shift...unless it was just poorly assembled which also happened. If you adjust and reassemble things correct, it should be good for a long time. Take your time, measure, mark, assemble using the correct adhesive, let it set, and you should be good to go. If your adjustment is all in the hinges, great, even quicker/easier. Just make sure you arent making the glass crooked to make the hatch line up.
J.
07-12-2011, 01:27 PM
#10
Junior Member

Join Date: Mar 2011
Posts: 1
Likes: 0
Received 0 Likes
on
0 Posts
Re: Any better info for REAR HATCH ALIGNMENT?
Hey i know this thread is old but what QUICKCHICKEN said is correct. If you look at the end of your hinges you can see that they will slide and if you cant see any old glue crusted anywhere dont worry about taking it apart and setting new glue. p.s. if your hatch isnt sliding off your car just bulging up some what check the little rubber things that are attached to your hatch. Oh and 1 last thing look at your struts them self towards the hinge and see if you have old oil gooped on it not allowing it to close all the way
Last edited by 87formulafunk; 07-12-2011 at 01:29 PM. Reason: forgot one more fact
07-25-2011, 11:24 AM
#11
Junior Member
Join Date: Sep 2007
Location: Gainesville GA
Posts: 37
Likes: 0
Received 0 Likes
on
0 Posts
Car: 91' Z28
Engine: 383 TPI, 2-305 TBI, 305 TPI
Re: Any better info for REAR HATCH ALIGNMENT?
Old threads are here for good reason. I didn't want to make QUICKCHICKEN look bad so I made a peanut butter and jelly sandwich popped the top an cold one enjoyed them both and then tightened the bolts back up in less than 45 minutes. Deck lid was 1/8 off and 1/4 off the back. Lined up perfect and no wedging or hole drilling or black goo. One Phillips screw driver, one 50mm star drive. One 13 mm ratchet wrench. Two good shoves and a hip bump.
07-25-2011, 02:40 PM
#12
Supreme Member
iTrader: (8)
Join Date: Aug 2003
Location: LeRoy, NY
Posts: 7,240
Likes: 0
Received 5 Likes
on
4 Posts
Car: 2003 Hyundai Tiburon GT
Engine: 2.7L V6
Transmission: 6-speed
Axle/Gears: 4.41
Re: Any better info for REAR HATCH ALIGNMENT?
 Did mine in a half hour, including enlarging the holes in the body. Well, maybe 3/4 hour, but I wasn't looking at the time, I just wanted to get it done. In case you're wondering, the holes had to be enlarged because I was already at max adjustment on the factory holes (2 of which wouldn't allow adjustment). And no, the hatch panel hasn't slipped on the glass.
I have pics if anyone's interested... And I still keep wondering why people insist on removing the deck lid and potentially breaking a $1500 piece of glass
 .
07-25-2011, 04:10 PM
.
07-25-2011, 04:10 PM
#13
Supreme Member
iTrader: (5)
Join Date: Jan 2009
Location: league city
Posts: 2,928
Likes: 0
Received 3 Likes
on
3 Posts
Car: SOLD!!!!!
Re: Any better info for REAR HATCH ALIGNMENT?
Did mine in a half hour, including enlarging the holes in the body. Well, maybe 3/4 hour, but I wasn't looking at the time, I just wanted to get it done. In case you're wondering, the holes had to be enlarged because I was already at max adjustment on the factory holes (2 of which wouldn't allow adjustment). And no, the hatch panel hasn't slipped on the glass.I have pics if anyone's interested... And I still keep wondering why people insist on removing the deck lid and potentially breaking a $1500 piece of glass
.lanceandsally@yahoo.com
07-25-2011, 04:52 PM
#14
Supreme Member
iTrader: (8)
Join Date: Aug 2003
Location: LeRoy, NY
Posts: 7,240
Likes: 0
Received 5 Likes
on
4 Posts
Car: 2003 Hyundai Tiburon GT
Engine: 2.7L V6
Transmission: 6-speed
Axle/Gears: 4.41
Re: Any better info for REAR HATCH ALIGNMENT?
Stock left, modified right, same side (passenger's, I believe). Used a drill to make a secondary hole and then another bit to join the 2 holes. I removed the nuts, pushed the hatch up enough to get the hinges out of the mounts and set a 2x4 in between the hatch glass and the body lip, and set to drilling. The nut is on the hinge in the right because I took the pic after adjustment was finished and had to take the inner nut back off to show the modified hole.
Now I just get to see if the passenger's side is going to line up with the replacement quarter panel .
.
:edit: And, with the exception of enlarging the holes, this procedure is by-the-book GM, as is noted in both of my service manuals (87 and 92). Removal of the deck lid is NOT.
Now I just get to see if the passenger's side is going to line up with the replacement quarter panel
.:edit: And, with the exception of enlarging the holes, this procedure is by-the-book GM, as is noted in both of my service manuals (87 and 92). Removal of the deck lid is NOT.
Last edited by Maverick H1L; 07-25-2011 at 04:58 PM.
08-08-2011, 12:58 AM
#15
Re: Any better info for REAR HATCH ALIGNMENT?
My hatch panel sticks out about 1/2" on both sides. The hatch glass is flush up agianst the grove inside the hatch panel. So Im asuming that the hinges have bended towards the rear. I know that the hinges havnt slid backwards. So that leads me to believe that the hinges are bent. Is there any company that makes steel hinges for our 3rd gens?
08-08-2011, 09:43 AM
#16
Re: Any better info for REAR HATCH ALIGNMENT?
I had to separate the panel from the glass, my hatch stuck out about a half inch farther on the passenger side than the driver side, even though the top at the hinges was perfectly lined up with an even gap. If I hadn't done this I would have had to shove the glass all the way up to the roof in order to get the bottom to line up.
08-08-2011, 09:59 AM
#17
Re: Any better info for REAR HATCH ALIGNMENT?
It amazes me that the idea of slotting factory holes seems like a good idea? Not saying your method of fixing it is bad. Do what you gotta do. But Ive never ran across a thirdgen that required the holes to be slotted like that.
As far as the decklid removal not being in the GM manual... Thats because when they wrote the manual, they didnt have 30 years of testing under their belt to realize that the decklid can move around.
Ill agree that there is some adjustability in the hatch hinges. But its not much...look at the pictures. There is a TON more in the decklid, because the glass manufacturing tolerances were tight. So as long as the hatch area's tolerances were reasonable, there was no reason to have much adjustment up there. In my particular case, as well as others that ive seen, it did not help. There wasnt nearly enough adjustment...and even if there was, it caused issues with the fitment of the glass in relation to the body.
Ive also never seen the rear hatch glass shatter from removing the deck lid. Not sure thats ever happened...but if it did, im betting it was because there was already a crack, or the person tryed using a crowbar.
Bottom line (and Im going to stop beating the dead horse with my advice haha) if you can fix your hatch via the hinges...awesome! Seriously..thats great! But its not the only method for fixing the problem that plauges a majority of the thirdgens...most of which were never 100% lined up to begin with.
J.
Last edited by ghettocruiser; 08-08-2011 at 10:02 AM.
08-08-2011, 08:44 PM
#18
Re: Any better info for REAR HATCH ALIGNMENT?
It amazes me that the idea of slotting factory holes seems like a good idea? Not saying your method of fixing it is bad. Do what you gotta do. But Ive never ran across a thirdgen that required the holes to be slotted like that.
As far as the deck lid removal not being in the GM manual... Thats because when they wrote the manual, they didn't have 30 years of testing under their belt to realize that the deck lid can move around.
Ill agree that there is some adjust ability in the hatch hinges. But its not much...look at the pictures. There is a TON more in the deck lid, because the glass manufacturing tolerances were tight. So as long as the hatch area's tolerances were reasonable, there was no reason to have much adjustment up there. In my particular case, as well as others that Ive seen, it did not help. There wasn't nearly enough adjustment...and even if there was, it caused issues with the fitments of the glass in relation to the body.
Ive also never seen the rear hatch glass shatter from removing the deck lid. Not sure thats ever happened...but if it did, I'm betting it was because there was already a crack, or the person tryed using a crowbar.
Bottom line (and I'm going to stop beating the dead horse with my advice haha) if you can fix your hatch via the hinges...awesome! Seriously..thats great! But its not the only method for fixing the problem that plauges a majority of the thirdgens...most of which were never 100% lined up to begin with.
J.
08-08-2011, 08:54 PM
#19
Supreme Member
iTrader: (8)
Join Date: Aug 2003
Location: LeRoy, NY
Posts: 7,240
Likes: 0
Received 5 Likes
on
4 Posts
Car: 2003 Hyundai Tiburon GT
Engine: 2.7L V6
Transmission: 6-speed
Axle/Gears: 4.41
Re: Any better info for REAR HATCH ALIGNMENT?
It amazes me that the idea of slotting factory holes seems like a good idea? Not saying your method of fixing it is bad. Do what you gotta do. But Ive never ran across a thirdgen that required the holes to be slotted like that.
As far as the decklid removal not being in the GM manual... Thats because when they wrote the manual, they didnt have 30 years of testing under their belt to realize that the decklid can move around.
Ill agree that there is some adjustability in the hatch hinges. But its not much...look at the pictures. There is a TON more in the decklid, because the glass manufacturing tolerances were tight. So as long as the hatch area's tolerances were reasonable, there was no reason to have much adjustment up there. In my particular case, as well as others that ive seen, it did not help. There wasnt nearly enough adjustment...and even if there was, it caused issues with the fitment of the glass in relation to the body.
Ive also never seen the rear hatch glass shatter from removing the deck lid. Not sure thats ever happened...but if it did, im betting it was because there was already a crack, or the person tryed using a crowbar.
Bottom line (and Im going to stop beating the dead horse with my advice haha) if you can fix your hatch via the hinges...awesome! Seriously..thats great! But its not the only method for fixing the problem that plauges a majority of the thirdgens...most of which were never 100% lined up to begin with.
J.
As for breaking the glass, you overtighten the nuts on the decklid ever so slightly, and you end up paying a yard however much or a resto place a TON of money for the $2000 piece of glass you just shattered. It's happened to guys on here while adjusting their hatches the wrong, NON-GM, way.
Seriously, you can mess with the decklid, doing something GM doesn't want to be done, and wait 24+ hours to drive the car again or you'll have to redo your adjustments and reapply the sealants, or you can do like I did, undo the body nuts, lift the front of the hatch, enlarge the holes, and put everything back together again and be driving again in an hour or less and not have to worry about anything. Which would you choose?
08-08-2011, 09:25 PM
#20
Re: Any better info for REAR HATCH ALIGNMENT?
Your windshield move around after however many years since it was built? I didn't think so. That throws the moving decklid theory out the window right there. Don't blame the hatch struts, either. The hatch isn't firmly attached to the body like the windshield is, and, as we all know, the body does a LOT of flexing.
As for breaking the glass, you overtighten the nuts on the decklid ever so slightly, and you end up paying a yard however much or a resto place a TON of money for the $2000 piece of glass you just shattered. It's happened to guys on here while adjusting their hatches the wrong, NON-GM, way.
Seriously, you can mess with the decklid, doing something GM doesn't want to be done, and wait 24+ hours to drive the car again or you'll have to redo your adjustments and reapply the sealants, or you can do like I did, undo the body nuts, lift the front of the hatch, enlarge the holes, and put everything back together again and be driving again in an hour or less and not have to worry about anything. Which would you choose?
 08-08-2011, 09:32 PM
#21
Supreme Member
iTrader: (8)
Join Date: Oct 2001
Location: Il
Posts: 11,734
Received 795 Likes
on
528 Posts
Car: 1989-92 FORMULA350 305 92 Hawkclone
Engine: 4++,350 & 305 CIs
Transmission: 700R4 4800 vig 18th700R4 t56 ZF6 T5
Axle/Gears: 3.70 9"ford alum chunk,dana44,9bolt
Re: Any better info for REAR HATCH ALIGNMENT?
Everything you need to know about this is in the body section of the Helm factory service manual.
08-08-2011, 10:23 PM
#22
Re: Any better info for REAR HATCH ALIGNMENT?
Its also noted in my "1986 Camaro Shop Manual" detailed instructions on hatch glass alignment. Im gonna copy it and post it for my fellow thirdgen brothers. Here it is straight out of my shop manual......
molding.
reinstalled
reinforcement. Torque bolts 5 to 7 N'm (40
More to continue....
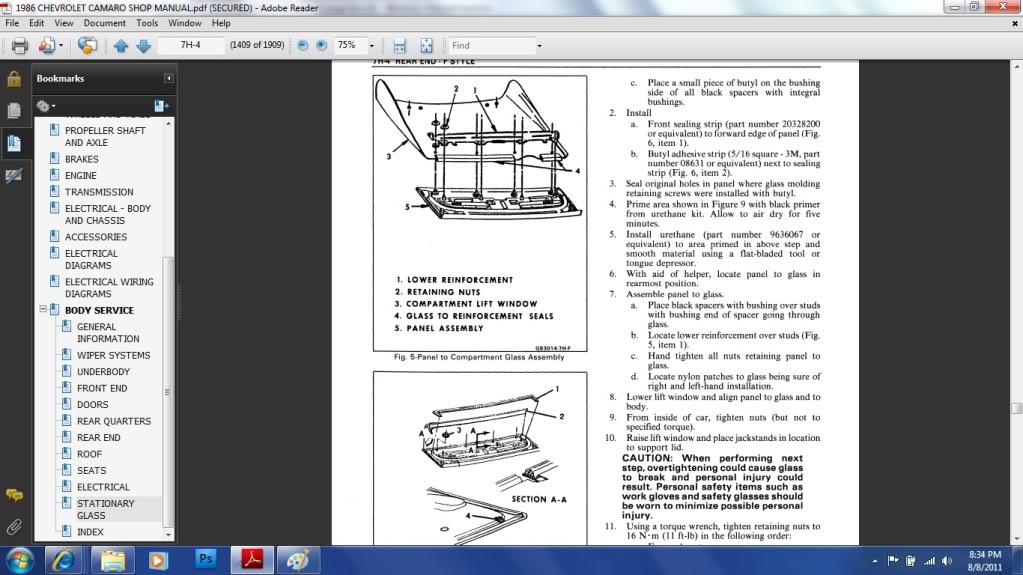
COMPARTMENT LIFT WINDOW
The compartment lift window glass assembly
consists of a solid formed tempered safety glass with
two piece urethane attached black painted moldings. A
finishing panel is bolted to the bottom of the glass.
Mounted on each side of the lift glass assembly and
attached to the body are tubular gas supports which
assist in opening. Gas supports vary in output levels
depending on options such as a rear window wiper,
spoiler or both.
Adjustments
CAUTION: Glass side of hinge
assembly has slots. These slots are for
production build use and not intended
for service adjustment of glass.
Follow recommended adjustment
procedure or glass breakage and
personal injury could occur.
CAUTION: Glass side of hinge
assembly has slots. These slots are for
production build use and not intended
for service adjustment of glass.
Follow recommended adjustment
procedure or glass breakage and
personal injury could occur.
The compartment lift window assembly height,
fore and aft and side adjustments are controlled at the
hinge-to-body location. This area of the body has
oversize hinge attaching holes (Fig. 3) in addition to
the hinge-to-body spacers. Adjustments at the hinge
location must be made with gas supports disengaged.
Additional height adjustment can also be made at the
lower panel by adjusting the rubber bumpers. Bolts
holding hinge to body should be tightened 20 to 28
Nom (15 to 20 ft-Ib).fore and aft and side adjustments are controlled at the
hinge-to-body location. This area of the body has
oversize hinge attaching holes (Fig. 3) in addition to
the hinge-to-body spacers. Adjustments at the hinge
location must be made with gas supports disengaged.
Additional height adjustment can also be made at the
lower panel by adjusting the rubber bumpers. Bolts
holding hinge to body should be tightened 20 to 28
1.
Prop lid open and place protective covering along
edges of rear compartment opening to prevent
damage to painted surfaces.
2. Use a 13 mm socket to remove nuts holding glass
to hinge (Fig. 3).
edges of rear compartment opening to prevent
damage to painted surfaces.
2. Use a 13 mm socket to remove nuts holding glass
to hinge (Fig. 3).
CAUTION: Do not attempt to remove
or loosen gas support assembly
attachments with lid in any position
other than fully open as personal
injury may result.or loosen gas support assembly
attachments with lid in any position
other than fully open as personal
3. While helper supports glass, disengage gas
supports from lift window assembly (view A, Fig.
4) and disconnect harness connector for electric
grid defogger (if present).
4. With aid of helper, remove lift window assembly
fron1 body and place on a protected surface.
supports from lift window assembly (view A, Fig.
4) and disconnect harness connector for electric
grid defogger (if present).
4. With aid of helper, remove lift window assembly
fron1 body and place on a protected surface.
CAlJTION: When installing bolts
(glass to hinge), be sure to torque only
to 16 N�m (11 ft-Ib). Overtightening
could cause glass to break and
possible personal injury. Always wear
safety glasses during this operation.
(glass to hinge), be sure to torque only
to 16 N�m (11 ft-Ib). Overtightening
could cause glass to break and
possible personal injury. Always wear
safety glasses during this operation.
5. To install, reverse the removal procedure. Torque
bolt holding gas support to body 5 to 7 N� m (48
to 60 in-Ib).
bolt holding gas support to body 5 to 7 N� m (48
to 60 in-Ib).
Removal of Compartment Lift Window Panel from Glass
CAlJTION: When performing the
following operations, personal
protection items such as safety
glasses and work gloves should be
WOf'n to minimize possible personal
injury.
CAlJTION: When performing the
following operations, personal
protection items such as safety
glasses and work gloves should be
WOf'n to minimize possible personal
injury.
1.
Place protective coverings around body opening.
2. Place two jackstands in body to support glass.
Place protective covering over jackstands.
3. Disconnect electrical connectors from gas
support (if present) and remove bolts retaining
gas support to lower reinforcement.
4. LO'Ner glass.
5. Relmove
a. Wiper motor and blade assembly (if
present)
b. Gas supports
c. Lock striker
d. Nuts holding lower reinforcement to panel,
starting with outboard nuts (Fig. 5, item 2)
e. Scre'ws retaining lift window molding to
panel
6. Remove panel from glass.
a. Mask off top forward edge of panel next to
glass.
b. Using a flat-bladed sharp tool, cut out foam
and butyl sealing strips between panel and
glass (Fig. 6, items 1 and 2). Clean tool
frequently to ease cutting operation.
c. Using a sharp-bladed utility knife, cut
urethane between nylon patches and glass.
New patches will be required when
installing panel to glass.
d. Lift upward on panel and pull from glass,
being careful not to distort ends of glass
molding.
Installation and Adjustment
1.
Cleaning
a. Using a razor blade and cloth dampened
with alcohol, clean all adhesive from glass.
b. Clean all adhesive from panel as a bench
operation if original panel is to be
a. Using a razor blade and cloth dampened
with alcohol, clean all adhesive from glass.
b. Clean all adhesive from panel as a bench
operation if original panel is to be
reinstalled
c. Place a small piece of butyl on the bushing
side of all black spacers with integral
bushings.
2. Install
a. Front sealing strip (part number
side of all black spacers with integral
bushings.
2. Install
a. Front sealing strip (part number
20328200
or equivalent) to forward edge of panel (Fig.
6, item 1).
b. Butyl adhesive strip (5/16 square - 3M, part
number
6, item 1).
b. Butyl adhesive strip (5/16 square - 3M, part
number
08631 or equivalent) next to sealing
strip (Fig. 6, item 2).
3. Seal original holes in panel where glass molding
retaining screws were installed with butyl.
4. Prime area shown in Figure 9 with black primer
from urethane kit. Allow to air dry for five
minutes.
5. Install urethane (part number 9636067 or
equivalent) to area primed in above step and
smooth material using a flat-bladed tool or
tongue depressor.
6. With aid of helper, locate panel to glass in
rearmost position.
7. Assemble panel to glass.
a. Place black spacers with bushing over studs
with bushing end of spacer going through
glass.
b. Locate lower reinforcement over studs (Fig.
5, item 1).
c. Hand tighten all nuts retaining panel to
glass.
d. Locate nylon patches to glass being sure of
right and left-hand installation.
8. Lower lift window and align panel to glass and to
body.
9. From inside of car, tighten nuts (but not to
specified torque).
10.
Raise lift window and place jackstands in location
to support lid.
to support lid.
CAUTION: When performing next
step, overtightening could cause glass
to break and personal injury could
result. Personal safety items such as
work gloves and safety glasses should
be worn to minimize possible personal
injury.
step, overtightening could cause glass
to break and personal injury could
result. Personal safety items such as
work gloves and safety glasses should
be worn to minimize possible personal
injury.
11. Using a torque wrench, tighten retaining nuts to
16
Nom (11 ft-Ib) in the following order:
a. Forward center
b. Rearward center
c. All remaining nuts
12. Install molding to panel. It may be necessary to
drill new holes for retaining screws.
a. Forward center
b. Rearward center
c. All remaining nuts
12. Install molding to panel. It may be necessary to
drill new holes for retaining screws.
13.
Installing gas supports.
a. Install bolts - gas support to body at right
and left-hand gas supports. Make sure
electrical connector is facing inboard.
Torque bolts 20 to 28 Nom (15 to 20 ft-Ib),
Figure 4, view B).
b. Connect electrical connector to gas support
(if present).
c. Install bolts at rear of gas supports to lower
a. Install bolts - gas support to body at right
and left-hand gas supports. Make sure
electrical connector is facing inboard.
Torque bolts 20 to 28 Nom (15 to 20 ft-Ib),
Figure 4, view B).
b. Connect electrical connector to gas support
(if present).
c. Install bolts at rear of gas supports to lower
reinforcement. Torque bolts 5 to 7 N'm (40
to 60 in-Ib) and connect electrical connector
(if present), Figure 4, view A.
14. Lift lid and remove jackstands from body.
15. Install
a. Striker to panel
b. Wiper motor and blade assembly. Torque
nut retaining wiper motor to glass 5 to 7
N'm (40 to 60 in-Ib).
16. Align lock
a. Carefully close lid and check striker-to-Iock
engagement.
b. If striker does not engage lock correctly,
loosen rear end trim panel and loosen bolts
holding lock assembly to rear end panel. If
equipped with electric lock release solenoid,
loosen bolt holding solenoid to rear end
panel.
c. Adjust lock for proper engagement to
striker.
d. Tighten lock and solenoid retaining bolts 9
to 12 N'm (7 to 9 ft-Ib).
e. Replace rear end trim pane1.
17~ Replace lift window trim panel.(if present), Figure 4, view A.
14. Lift lid and remove jackstands from body.
15. Install
a. Striker to panel
b. Wiper motor and blade assembly. Torque
nut retaining wiper motor to glass 5 to 7
N'm (40 to 60 in-Ib).
16. Align lock
a. Carefully close lid and check striker-to-Iock
engagement.
b. If striker does not engage lock correctly,
loosen rear end trim panel and loosen bolts
holding lock assembly to rear end panel. If
equipped with electric lock release solenoid,
loosen bolt holding solenoid to rear end
panel.
c. Adjust lock for proper engagement to
striker.
d. Tighten lock and solenoid retaining bolts 9
to 12 N'm (7 to 9 ft-Ib).
e. Replace rear end trim pane1.
More to continue....
08-08-2011, 10:27 PM
#23
Re: Any better info for REAR HATCH ALIGNMENT?
Glass Replacement and Adjustment
CAUTION: When removing glass
assemblies from car, the use of
personal protection items such as
work gloves and safety glasses is
recommended to minimize possible
personal injury.
assemblies from car, the use of
personal protection items such as
work gloves and safety glasses is
recommended to minimize possible
personal injury.
Removal
1. Place protective covering along edges of rear
compartment to prevent damage to painted
surfaces.
2. If glass is broken, remove all broken glass from
interior of car.
3. From inside of car, remove plastic covers from
bolts holding gas supports to body.
4. If equipped with heated back glass, remove wire
connectors from gas supports.
a. Unlock compartment lift window.
b. Have helper support lid in partially open
position.
5. Remove
a. Bolts holding gas supports to body
b. Back body opening upper garnish molding
c. Nuts retaining lift window hinge to body
(Fig. 3)
6. With aid of helper remove lift window from car
and place upside down on a protected surface.
Note position of hinge shims (if present).
7. Remove
a. Gas supports from lower reinforcement
(Fig. 4, view A)
b. Hinge assemblies from glass
c. Trim panel
d. Wiper and blade assembly (if present)
e. Lock striker
f.
Electrical contact and wiring harness (if
present)
g. Lower reinforcement (Fig. 5, item 1)
h. Screws holding glass finishing molding to
panel
h. Screws holding glass finishing molding to
panel
i.
Nylon patches at radius joint of panel (Cut
through adhesive using a curved blade
utility knife.)
8. With aid of helper, turn lift window over and
place masking tape along top edge of panel.
a. If glass is being replaced for any reason
other than breakage, use a flat-bladed sharp
tool to cut out foam and butyl sealing strips
between panel and glass. Clean tool
frequently to ease cutting operation.
b. Lift upward on panel and pull from glass,
being careful not to distort ends of glass
molding.
9. (]ean panel of foam sealing strip and all
adhesives. This can be done by using a cloth
dampened in alcohol.
10. H..emove lower glass sealing strips (Fig. 5, item 4).
11. H..emove and discard plastic spacers.
Install;ation
1. \Vhen a new glass is installed, new glass finishing
lTIoldings will be required. Use the following steps
to install moldings to glass.
a. Use clear primer in urethane kit (9636067
or equivalent). Apply primer to glass as
shown in Figure 7.
b. Apply a 4.5 mm (3/16") bead of urethane
from kit into molding channel as shown in
Figure 8. Do not apply urethane for a
distance of 25 mm (1") from center end of
each molding.
c. Place molding escutcheon inside right and
left-hand moldings.
d. Use a rubber mallet and install moldings
onto glass making sure to align holes in tabs
of molding with holes in glass. Be sure
corner area is fully seated.
C::AUTION: When performing next
step, overtightening could cause glass
to break and possible personal injury.
-rhe use of personal protection items
such as safety glasses and work
gloves is recommended to minimize
possible personal injury.
step, overtightening could cause glass
to break and possible personal injury.
-rhe use of personal protection items
such as safety glasses and work
gloves is recommended to minimize
possible personal injury.
2. Install hinge to glass and torque bolts 16 N �m (11
ft-Ib).
3. Install the following items:
a. Glass to reinforcement seals to rear edge of
glass (Fig. 5, item 4).
b. Front sealing strip (part number 20328200
or equivalent, Fig. 6, item 1).
c. Butyl adhesive strip (5/16" square, 3M part
number 08631 or equivalent) next to
sealing strip (Fig. 6, item 2). Seal holes in
panel where glass molding screws were
installed using above butyl.
d. Apply black primer (from kit) to panel (Fig.
9). Allow to air dry for five minutes.
e. Apply urethane (part number 9636067 or
equivalent) to area of panel primed in aboveft-Ib).
3. Install the following items:
a. Glass to reinforcement seals to rear edge of
glass (Fig. 5, item 4).
b. Front sealing strip (part number 20328200
or equivalent, Fig. 6, item 1).
c. Butyl adhesive strip (5/16" square, 3M part
number 08631 or equivalent) next to
sealing strip (Fig. 6, item 2). Seal holes in
panel where glass molding screws were
installed using above butyl.
d. Apply black primer (from kit) to panel (Fig.
9). Allow to air dry for five minutes.
e. Apply urethane (part number 9636067 or
step. Smooth urethane with a flat-bladed
tool. If new panel is to be installed, also
apply to forward outer drain holes (Fig. 6,
item 4).tool. If new panel is to be installed, also
apply to forward outer drain holes (Fig. 6,
4. Install panel to glass.
a. Place new glass spacers .over forward studs
on panel (if original glass was broken),
Figure 6, item 3.
b. Place glass on panel by placing holes in glass
over studs on panel. Aligq panel to glass in
rearmost position.
c. Place spacers between glass and lower
reinforcement.
d. Place lower reinforcement over studs on
panel (Fig. 5, item 1).
e. Apply nylon patches to glass (being sure of
right and left-hand part installation).
f.
Hand tighten all nuts retaining the
reinforcement to panel.
g. With the aid of a helper, install
compartment lift window assembly to the
body. The holes for the hinge body bolts are
oversized which allows for some
adjustment. Install original hinge shims to
body (Fig. 10). Once the glass is aligned,
torque hinge-to-body nuts 20 to 28 N em (15
to 20 ft-Ib).
h. From inside the car, loosen the lower
reinforcement-to-panel nuts.
1.
From outside the car, position rear panel
center and forward 3 mm (1/8") of final
center and forward 3 mm (1/8") of final
desired position.
j.
From inside the car, hand tighten the lower
reinforcement-to-panel nuts.
k. Raise and prop open compartment lift
reinforcement-to-panel nuts.
k. Raise and prop open compartment lift
window.
CAUTION: Torque of 16 N� m (11 ft-Ib)
must be maintained when tightening
retaining nuts, panel to glass (Fig. 5,
item 2) or glass breakage and personal
injury could result. Personal
protection items such as safety
glasses and work gloves should be
worn to minimize possible personal
injury.
1.
must be maintained when tightening
retaining nuts, panel to glass (Fig. 5,
item 2) or glass breakage and personal
injury could result. Personal
protection items such as safety
glasses and work gloves should be
worn to minimize possible personal
injury.
1.
Tighten retaining nuts in the following
order:
� Forward center
� Rear center
� All remaining nuts
m. Install screws securing glass finishing
molding to panel. It may be necessary to
drill two small holes in panel for molding
retaining screws.
5. While helper supports lift window, install gas
supports to body. Be sure that electrical contact
at forward edge of gas support (if present) is
inboard, then
a. Torque gas support-to-body bolts 20 to 28
N"m (15 to 20 ft-Ib).
b. Torque gas support-to-lift window bolts 5 to
7 N"m (40 to 60 in-Ib).
REAR END� FSTYLE 7H�7
c. Reinstall WIrIng harness and upper
electrical contact to lift window panel (if
present).
d. Install wiper motor to lift window (if
present); torque all bolts 5 to 7 N"m (3.5 to
5 ft-Ib).
e. Install lock striker to lift window panel and
carefully check lock striker-to-Iock
engagement.
electrical contact to lift window panel (if
present).
d. Install wiper motor to lift window (if
present); torque all bolts 5 to 7 N"m (3.5 to
5 ft-Ib).
e. Install lock striker to lift window panel and
carefully check lock striker-to-Iock
engagement.
f.
If it is necessary to adjust lock for proper
engagement of striker, remove rear end trim
panel.
g. Loosen bolts holding lock to rear end panel
(and solenoid if present).
h. Adjust lock for proper engagement of
striker.
i. Tighten all bolts to torque of 9 to 12 N" m
(7 to 9 ft-Ib).
engagement of striker, remove rear end trim
panel.
g. Loosen bolts holding lock to rear end panel
(and solenoid if present).
h. Adjust lock for proper engagement of
striker.
i. Tighten all bolts to torque of 9 to 12 N" m
(7 to 9 ft-Ib).
j.
Install trim previously removed.
 08-08-2011, 10:53 PM
#26
Re: Any better info for REAR HATCH ALIGNMENT?
i have an extra hatch glass from a friends FORMULA where the aerowing mount holes rusted pretty bad, i'll separate the hatch panel fron the glass and do an observation.
i helped a friend do this a few years back but didnt pay as much attn because i didnt have any hatch issues.
i helped a friend do this a few years back but didnt pay as much attn because i didnt have any hatch issues.
08-09-2011, 06:36 AM
#27
Re: Any better info for REAR HATCH ALIGNMENT?
Your windshield move around after however many years since it was built? I didn't think so. That throws the moving decklid theory out the window right there. Don't blame the hatch struts, either.
Seriously, you can mess with the decklid, doing something GM doesn't want to be done, and wait 24+ hours to drive the car again or you'll have to redo your adjustments and reapply the sealants, or you can do like I did, undo the body nuts, lift the front of the hatch, enlarge the holes, and put everything back together again and be driving again in an hour or less and not have to worry about anything. Which would you choose?
Seriously, you can mess with the decklid, doing something GM doesn't want to be done, and wait 24+ hours to drive the car again or you'll have to redo your adjustments and reapply the sealants, or you can do like I did, undo the body nuts, lift the front of the hatch, enlarge the holes, and put everything back together again and be driving again in an hour or less and not have to worry about anything. Which would you choose?
And once again...Ill say that the reason that GM doesnt think you should adjust the decklid..is because they didnt know the decklid would ever be a problem. There are no new holes to drill under the decklid. There is plenty of adjustment back there.
We do things that GM doesnt want us to do all the time...LOTS of stuff that isnt even close to being in the manual. So that argument is just lame.
Which would I choose? Ill choose the method that might take a little longer, but doesnt require me to drill holes or make holes bigger. The amount of time it takes to do this job makes ABSOLUTELY no difference to me. I performed a total hatch alignment on my 87, probably 8 years ago. And havent had to mess with it since. Its not something you should be doing on a regular or even semi-regular basis IMO. Took me an afternoon, let it sit over night, and left the hatch struts disconnected for a day or two. No problems. And my hatch glass didnt explode...because hey...I used common sense. When my hatch glass measures perfectly even all the way around between the frame and the glass, but the decklid is off by 1/2" on one side, and a little less on the other...makes sense to me where the problem is.
But like I said... do what you gotta do! If the hinge method is what you wanna do...cool!
J.
 08-16-2011, 06:16 AM
#30
Junior Member

Join Date: Apr 2010
Location: Clarendon, NC
Posts: 54
Likes: 0
Received 1 Like
on
1 Post
Car: 1991 RS camaro
Engine: 5.7
Transmission: 700r4
Axle/Gears: peg leg for now
Re: Any better info for REAR HATCH ALIGNMENT?
I have tried the method of moving the hinges with no luck. The lid still sticks out 1/2". I attempted to remove the lid from the glass, but I chickened out. I was afraid I would destroy the glass.
04-22-2014, 08:32 AM
#31

Re: Any better info for REAR HATCH ALIGNMENT?
So I am in the process of putting my deck lid back on the glass and have been searching for part number 20328200 everywhere and all places say "...discontinued part...". I noticed in the manual it states "...or equivalent...". Without nothing to compare it too I don't know what an 'equivalent' part would be? If there is anyone out there that could send a photo or part number to order it would be greatly appreciated! Thanks in advance.
-CB
-CB
 07-11-2014, 05:38 PM
#35
Supreme Member
iTrader: (8)
Join Date: Aug 2003
Location: LeRoy, NY
Posts: 7,240
Likes: 0
Received 5 Likes
on
4 Posts
Car: 2003 Hyundai Tiburon GT
Engine: 2.7L V6
Transmission: 6-speed
Axle/Gears: 4.41
Re: Any better info for REAR HATCH ALIGNMENT?
I have no idea about that as I did that to my other car body and haven't done it yet to this one. I keep thinking I'm going to and something else keeps coming up. Maybe this weekend... But I can't imagine there being much more trouble than doing so with the door bolt holes (which ARE structural unlike the hatch).
07-15-2014, 08:11 PM
#36
Junior Member
Re: Any better info for REAR HATCH ALIGNMENT?
Another reason I found when repairing my T-top weatherstripping is that the hinges for the glass actually bend out of shape, this causes the hatch to stick out from behind the car. I re-bent mine and it all lined up great, only issue is that the metal is cast aluminum, not very strong and if they are bent too far they will just crack in half when trying to bend them back. Someone needs to make some billet hinges or something.
Bending the hinges is a lot easier than seperating the back glass and sealing the deck lid back on. The hinge issue is still there.
Bending the hinges is a lot easier than seperating the back glass and sealing the deck lid back on. The hinge issue is still there.
07-16-2014, 10:47 AM
#37
Re: Any better info for REAR HATCH ALIGNMENT?
I've compared several sets of hinges next to each other and have come to the conclusion that hatch hinges are made with a slight 'bend' in them. seems reasonable to believe they are slightly 'bent' so that the properly fit the contour of the glass. ( there is a L and a R side hinge too ).
After removing/swapping more hatches than I care to remember,.... the factory appears to have adjusted the hatch alignment ( across the back of the decklid ) by adding shims between the body and the hinge under the hinges. The thicker the shim, the more the hatch will move to the front of the car. My belief is that this is why many hatches tend to stick "over" a bit too far. Adjustment shims can be added to correct that, but there's nothing to remove in order to make the hatch stick out "more:. ( 1 way adjustment ) I've found different thickness shims used on different cars.
I could be wrong,..... but I would HIGHLY suggest shimming the hinges before cutting and drilling any body panels !
07-16-2014, 07:02 PM
#38
Junior Member
Re: Any better info for REAR HATCH ALIGNMENT?
I've compared several sets of hinges next to each other and have come to the conclusion that hatch hinges are made with a slight 'bend' in them. seems reasonable to believe they are slightly 'bent' so that the properly fit the contour of the glass. ( there is a L and a R side hinge too ).
After removing/swapping more hatches than I care to remember,.... the factory appears to have adjusted the hatch alignment ( across the back of the decklid ) by adding shims between the body and the hinge under the hinges. The thicker the shim, the more the hatch will move to the front of the car. My belief is that this is why many hatches tend to stick "over" a bit too far. Adjustment shims can be added to correct that, but there's nothing to remove in order to make the hatch stick out "more:. ( 1 way adjustment ) I've found different thickness shims used on different cars.
I could be wrong,..... but I would HIGHLY suggest shimming the hinges before cutting and drilling any body panels !
Randy
07-16-2014, 07:36 PM
#39
Re: Any better info for REAR HATCH ALIGNMENT?
No Problem,
The shims are sized teh same as the hinge that sits on top of it..... pretty much any type of shim will work - but I'd only use something that's the AT LEAST the same size as the hinge itself. ( no smaller ).
Post your results so we know what adjustment you used and how well it worked out for you !
The shims are sized teh same as the hinge that sits on top of it..... pretty much any type of shim will work - but I'd only use something that's the AT LEAST the same size as the hinge itself. ( no smaller ).
Post your results so we know what adjustment you used and how well it worked out for you !

Thread
Thread Starter
Forum
Replies
Last Post