Cupholder Install
 09-13-2010, 11:25 AM
#1
Supreme Member

Thread Starter
iTrader: (3)
Join Date: Jun 2007
Location: Pennsylvania
Posts: 2,359
Likes: 0
Received 5 Likes
on
5 Posts
Car: 1992 Camaro RS
Engine: Rebuilt 350 going in after paint
Transmission: WCT5, 7k & counting behind the 350
Axle/Gears: 4thgen disc rear w/ 3.73 Posi
Cupholder Install
Like most thirdgen owners, I don't like that they have no cupholders. If I had an automatic trans it wouldn't be such a big deal, but I don't and its tricky shifting gears with a thin styrofoam cup full of hot coffee in your hand.
I used a cupholder I pulled from a 94 Cavalier at the junkyard earlier this summer after reading a thread by 58mark detailing his cupholder install. I went a slightly different direction with it than he did and put it in the center dash vents since I never use them.
Here are some finished pics. Progress pics and install notes to follow.
Unfortunately for you Firebird owners, this wont work for you.
Last edited by 92RS_Ttop; 09-13-2010 at 11:53 AM.
 09-13-2010, 11:28 AM
#2
Supreme Member
Thread Starter
iTrader: (3)
Join Date: Jun 2007
Location: Pennsylvania
Posts: 2,359
Likes: 0
Received 5 Likes
on
5 Posts
Car: 1992 Camaro RS
Engine: Rebuilt 350 going in after paint
Transmission: WCT5, 7k & counting behind the 350
Axle/Gears: 4thgen disc rear w/ 3.73 Posi
Re: Cupholder Install
Before you can fit the cupholder in the vent area, it has to have the plastic tabs cut off the bottom, as well as the center vertical rib on the top side of it. I also cut the top plastic tabs off since 1 was broken when I pulled it from the Cavalier, but you can probably leave them in place to help the cupholder support the weight of the cups.
09-13-2010, 11:47 AM
#3
Supreme Member
Thread Starter
iTrader: (3)
Join Date: Jun 2007
Location: Pennsylvania
Posts: 2,359
Likes: 0
Received 5 Likes
on
5 Posts
Car: 1992 Camaro RS
Engine: Rebuilt 350 going in after paint
Transmission: WCT5, 7k & counting behind the 350
Axle/Gears: 4thgen disc rear w/ 3.73 Posi
Re: Cupholder Install
Once the cupholder is ready to go, you can remove the front directional louvers from the dash vent. I just used a screwdriver to push in the little tabs on the sides and they popped right out.
Next you have to remove the dash pad so you can take out the ductwork. I didn't grab pics of that, but its just a few small hex bolts under the front edge of the dash pad, and a couple phillips screws in the defroster vents on top. Very straightforward stuff.
To remove the duct, you have to take out 4 screws. The top left is pretty easy to get to, the top right is a bit harder. I used a 1/4" drive socket(9/32) with a swivel joint and a 6" extension to reach them. The bottom 2 screws are impossible to get to from the top. Since I plan on taking out the whole dash eventually when I redo the interior I was able to just cut the bottom half of the duct out. I know its not the "right" way to do it") . You can see the top left bolt in the pic below. The top right one I was not able to get a pic of because its located under some other ductwork and it was too dark in there to get a good pic of it.
. You can see the top left bolt in the pic below. The top right one I was not able to get a pic of because its located under some other ductwork and it was too dark in there to get a good pic of it.
Next you have to remove the dash pad so you can take out the ductwork. I didn't grab pics of that, but its just a few small hex bolts under the front edge of the dash pad, and a couple phillips screws in the defroster vents on top. Very straightforward stuff.
To remove the duct, you have to take out 4 screws. The top left is pretty easy to get to, the top right is a bit harder. I used a 1/4" drive socket(9/32) with a swivel joint and a 6" extension to reach them. The bottom 2 screws are impossible to get to from the top. Since I plan on taking out the whole dash eventually when I redo the interior I was able to just cut the bottom half of the duct out. I know its not the "right" way to do it
. You can see the top left bolt in the pic below. The top right one I was not able to get a pic of because its located under some other ductwork and it was too dark in there to get a good pic of it.
09-13-2010, 11:52 AM
#4
Supreme Member
Thread Starter
iTrader: (3)
Join Date: Jun 2007
Location: Pennsylvania
Posts: 2,359
Likes: 0
Received 5 Likes
on
5 Posts
Car: 1992 Camaro RS
Engine: Rebuilt 350 going in after paint
Transmission: WCT5, 7k & counting behind the 350
Axle/Gears: 4thgen disc rear w/ 3.73 Posi
Re: Cupholder Install
After the duct is out, you need to remove the vertical divider in the front that goes between the 2 directional louvers. A plain hacksaw blade works just fine to cut this out.
After you cut out the vertical piece, the cupholder slides right into place. There is a little play side-to-side, but overall its a good fit.
After you cut out the vertical piece, the cupholder slides right into place. There is a little play side-to-side, but overall its a good fit.
09-13-2010, 12:13 PM
#5
Supreme Member
Thread Starter
iTrader: (3)
Join Date: Jun 2007
Location: Pennsylvania
Posts: 2,359
Likes: 0
Received 5 Likes
on
5 Posts
Car: 1992 Camaro RS
Engine: Rebuilt 350 going in after paint
Transmission: WCT5, 7k & counting behind the 350
Axle/Gears: 4thgen disc rear w/ 3.73 Posi
Re: Cupholder Install
To hold the cupholder in place, I drilled a couple pilot holes in the bottom of the dash and through the bottom of the cupholder frame and used some small sheet metal hex bolts to hold it in place.
With just the bottom bolts holding it in, the cupholder wants to tip forward when there is a cup in it so I added another pair of bolts from the top to keep it from tipping forward and either breaking or spilling my drink all over the shifter. These bolts don't screw into the top of the cupholder, they just press against it to keep it from tipping forward.
If you left the top tabs on the cupholder, they should keep it from tipping forward without the need for the top pair of bolts.
09-13-2010, 12:22 PM
#6
Supreme Member
Thread Starter
iTrader: (3)
Join Date: Jun 2007
Location: Pennsylvania
Posts: 2,359
Likes: 0
Received 5 Likes
on
5 Posts
Car: 1992 Camaro RS
Engine: Rebuilt 350 going in after paint
Transmission: WCT5, 7k & counting behind the 350
Axle/Gears: 4thgen disc rear w/ 3.73 Posi
Re: Cupholder Install
There will be a small gap on either side of the cupholder since the vent opening is slightly wider than the cupholder. The gap is really only visible from the sides and the dash pad helps to hide it. I still need to do something to cover the gaps up with. I think it will have to wait till I do the interior of the car though. I want to create a custom gauge area from fiberglass, and when I do that it will be simple to smooth the cupholder into the dash. I could also cut out some filler pieces and epoxy them into place if it starts to bother me before that, but I can't see the gap while I'm driving right now.
02-16-2011, 01:43 PM
#7
Banned
iTrader: (12)
Join Date: Jul 1999
Location: Bertram (outside Austin), TX
Posts: 12,212
Likes: 0
Received 10 Likes
on
10 Posts
Car: 87 GTA
Engine: L98
Transmission: 700R4
Axle/Gears: Dana M78 3.27 posi
Re: Cupholder Install
58mark mounted his slide-out cupholder & kept the AC vents intact.
https://www.thirdgen.org/forums/fabr...cupholder.html
https://www.thirdgen.org/forums/fabr...cupholder.html
Trending Topics
02-16-2011, 02:00 PM
#8
Supreme Member
iTrader: (3)
Join Date: Jan 2009
Location: Mesquite, Texas
Posts: 4,009
Likes: 0
Received 5 Likes
on
5 Posts
Car: 89 rs, 86 Trans Am
Engine: RS-V6... Trans Am-LG4
Transmission: RS-T5... Trans Am 700r4
Re: Cupholder Install
that looks nice, but here in Texas we need our A/C vents!
good job with it though. I hope my thread helped in you in some way
good job with it though. I hope my thread helped in you in some way
02-16-2011, 06:36 PM
#9
Supreme Member
Thread Starter
iTrader: (3)
Join Date: Jun 2007
Location: Pennsylvania
Posts: 2,359
Likes: 0
Received 5 Likes
on
5 Posts
Car: 1992 Camaro RS
Engine: Rebuilt 350 going in after paint
Transmission: WCT5, 7k & counting behind the 350
Axle/Gears: 4thgen disc rear w/ 3.73 Posi
Re: Cupholder Install
58mark mounted his slide-out cupholder & kept the AC vents intact.
https://www.thirdgen.org/forums/fabr...cupholder.html
https://www.thirdgen.org/forums/fabr...cupholder.html
I thought about mounting it under the dash like he did, but I will eventually remove all the vent ducting except for the windshield defogger. That is the only one I use, and rarely at that. The car gets garaged over the winter so no need for heat, and on the few days its gets really hot here in PA I prefer to take the tops off vs using A/C anyhow.
02-16-2011, 06:40 PM
#10
Supreme Member
Thread Starter
iTrader: (3)
Join Date: Jun 2007
Location: Pennsylvania
Posts: 2,359
Likes: 0
Received 5 Likes
on
5 Posts
Car: 1992 Camaro RS
Engine: Rebuilt 350 going in after paint
Transmission: WCT5, 7k & counting behind the 350
Axle/Gears: 4thgen disc rear w/ 3.73 Posi
Re: Cupholder Install
As I mentioned in the last post, I never use the A/C since I prefer the T-tops. But in Texas, and other southern states, I can certainly understand preferring to have working A/C over cupholders.
I will eventually remove the curved front and fab one that "fits" a lot nicer into the opening to give it more of a finished look. I did that while I was still DD'ing the Camaro so I didn't want it all torn apart any longer than absolutely necessary.
02-16-2011, 06:43 PM
#11
Banned
iTrader: (12)
Join Date: Jul 1999
Location: Bertram (outside Austin), TX
Posts: 12,212
Likes: 0
Received 10 Likes
on
10 Posts
Car: 87 GTA
Engine: L98
Transmission: 700R4
Axle/Gears: Dana M78 3.27 posi
Re: Cupholder Install
Yeah, his thread is what gave me the idea. I think I credited him in my initial post? If not, it was an unintentional oversight on my part.
I thought about mounting it under the dash like he did, but I will eventually remove all the vent ducting except for the windshield defogger. That is the only one I use, and rarely at that. The car gets garaged over the winter so no need for heat, and on the few days its gets really hot here in PA I prefer to take the tops off vs using A/C anyhow.
I thought about mounting it under the dash like he did, but I will eventually remove all the vent ducting except for the windshield defogger. That is the only one I use, and rarely at that. The car gets garaged over the winter so no need for heat, and on the few days its gets really hot here in PA I prefer to take the tops off vs using A/C anyhow.
My only issue with Marks is where it is. Kinda far for most drivers, but I'm sure well within Marks arm reach.
 I would put his under the AC vents, closer to the driver.
Winter? Whats that? Already mid 70 every day here.
 Gotta love Central Texas!
02-16-2011, 06:46 PM
Gotta love Central Texas!
02-16-2011, 06:46 PM
#12
Junior Member

Join Date: Jan 2011
Location: philadelphia pa
Posts: 93
Likes: 0
Received 0 Likes
on
0 Posts
Car: 88 camaro rs
Engine: stock 2.8L V6
Transmission: stock
Axle/Gears: stock
Re: Cupholder Install
would it be possible to put a cup holder between the shifter and the glove box?
02-16-2011, 07:41 PM
#13
Banned
iTrader: (12)
Join Date: Jul 1999
Location: Bertram (outside Austin), TX
Posts: 12,212
Likes: 0
Received 10 Likes
on
10 Posts
Car: 87 GTA
Engine: L98
Transmission: 700R4
Axle/Gears: Dana M78 3.27 posi
Re: Cupholder Install
In Camaros, I've seen the cup holder between the shifter & the radio & between the shifter & the glove box.
02-16-2011, 07:51 PM
#14
Junior Member
Join Date: Jan 2011
Location: philadelphia pa
Posts: 93
Likes: 0
Received 0 Likes
on
0 Posts
Car: 88 camaro rs
Engine: stock 2.8L V6
Transmission: stock
Axle/Gears: stock
Re: Cupholder Install
In a Camaro or 82-84 'bird or later model 'bird with manual windows & mirrors. With power windows or power mirrors, the controls are where the cup holder could fit.
In Camaros, I've seen the cup holder between the shifter & the radio & between the shifter & the glove box.
In Camaros, I've seen the cup holder between the shifter & the radio & between the shifter & the glove box.
02-16-2011, 07:58 PM
#15
Banned
iTrader: (12)
Join Date: Jul 1999
Location: Bertram (outside Austin), TX
Posts: 12,212
Likes: 0
Received 10 Likes
on
10 Posts
Car: 87 GTA
Engine: L98
Transmission: 700R4
Axle/Gears: Dana M78 3.27 posi
Re: Cupholder Install
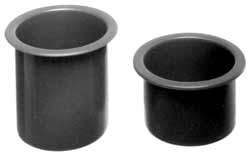
Sure. Virtually nothing down there. Just pull the top plate off to double check inside & verify clearance for everything, measure twice & cut your hole after finding what your going to drop in there as the cup holder.
Find you something like this and cut the hole to slide this down into.
Find you something like this and cut the hole to slide this down into.
02-18-2011, 02:00 PM
#16
Supreme Member
Thread Starter
iTrader: (3)
Join Date: Jun 2007
Location: Pennsylvania
Posts: 2,359
Likes: 0
Received 5 Likes
on
5 Posts
Car: 1992 Camaro RS
Engine: Rebuilt 350 going in after paint
Transmission: WCT5, 7k & counting behind the 350
Axle/Gears: 4thgen disc rear w/ 3.73 Posi
Re: Cupholder Install
Yeah, that will work fine. If you've got a manual transmission though, you have to be real careful you don't knock your drink over shifting gears. I know I would to that about 2 miles after I put a cup in there.
02-18-2011, 03:50 PM
#17
Junior Member
Join Date: Jan 2011
Location: philadelphia pa
Posts: 93
Likes: 0
Received 0 Likes
on
0 Posts
Car: 88 camaro rs
Engine: stock 2.8L V6
Transmission: stock
Axle/Gears: stock
Re: Cupholder Install
Sure. Virtually nothing down there. Just pull the top plate off to double check inside & verify clearance for everything, measure twice & cut your hole after finding what your going to drop in there as the cup holder.
Find you something like this and cut the hole to slide this down into.
Find you something like this and cut the hole to slide this down into.
02-18-2011, 03:56 PM
#19
Banned
iTrader: (12)
Join Date: Jul 1999
Location: Bertram (outside Austin), TX
Posts: 12,212
Likes: 0
Received 10 Likes
on
10 Posts
Car: 87 GTA
Engine: L98
Transmission: 700R4
Axle/Gears: Dana M78 3.27 posi
Re: Cupholder Install
.....that I got from a simple google search for "cup holder". 3" round should hold most big cups.
http://tweetys.com/cupholder1-12deep.aspx
http://tweetys.com/cupholder1-12deep.aspx
02-18-2011, 03:57 PM
#20
Junior Member
Join Date: Jan 2011
Location: philadelphia pa
Posts: 93
Likes: 0
Received 0 Likes
on
0 Posts
Car: 88 camaro rs
Engine: stock 2.8L V6
Transmission: stock
Axle/Gears: stock
02-27-2011, 04:55 AM
#21
Member
iTrader: (1)
Join Date: May 2009
Posts: 403
Likes: 0
Received 0 Likes
on
0 Posts
Car: 85 Z28 T-Top 36mm sway & wonderbar
Engine: TPI L98 350 W/85 Vette Stage II ECM
Transmission: W/C T-5, alum drive shaft
Axle/Gears: 9 bolt posi, 3:27, PBR's, BB LS1's
Re: Cupholder Install
I like mine. This one will hold a large cup.

Thread
Thread Starter
Forum
Replies
Last Post
gixxer92
Engine/Drivetrain/Suspension Parts for Sale
5
09-01-2015 04:32 PM