When you click on links to various merchants on this site and make a purchase, this can result in this site earning a commission. Affiliate programs and affiliations include, but are not limited to, the eBay Partner Network.
Re: Headers and exhaust options for 700 hp street car
GTA Matt: good to know. I will plan on adding some fuel and watching the Learn table in the holley software. I can datalog, so I will do some street rips in the spring and get it dialed in. Still got a while before that, but it is good to know what to expect. Also, see my paragraph below about using the "flex sections" you mentioned last week.
Orr, thanks. That is good real-world info to know. And, as you are aware, this is truly a street car first so I have to keep that in mind as compared to chasing my tail trying to grabe every bit of horsepower/torque from the car.
I think I am settling on NOT doign the dual cutouts at this point in time. With the power this engine makes NA 531, and the fact that I will always run a 200 shot or smaller of nitrous, I don't see the new headers , y pipes, and 4" exhaust being too restrictive. I think we have all established that based on math, real world experience, and mechanical knowledge. So, it makes more sense for me to not go crazy cutting all sorts of metal out of the oem trans tunnel and frame rails just to experiment with dual cutouts. It will save me $200 in not buying a cutout too. One of my biggest concerns has been ONYL because you guys have talked about the importance of keeping the HOT exhaust gas flow/pulses/scavenging flowing as fast as possible while being uninterrupted by hard bends, necked-down pipes, and so forth. So Looking at my hand drawn diagram (above), I think that with having the two cutouts just a few inches before the main 3"-4" Y pipe, this would create a turbulent area of gas. I am specifically talking about when the cutouts are closed (which will be pretty often on the street, autocross, and whatnot). That "leg" of the cutout's pipe being corked closed could create turbulent airflow on both sides, just prior to gasses entering the real y-pipe and it might just be a mess? Am I over thinking this?
Anyways, I think I will skip the cutouts for now. I can always mayyybe go back and add them later in life if I want to, but for now, I will just make "long" sections of 3" pipe from the header exit to the flowmaster Ypipe. The pipemax data above gives an optimal length for this pipe, but I am obviously constrained to the real-world underside positioning of everything underneath the car. I will finding a place in each 3" diameter section of pipe to best put an oxygen sensor bung. One o2 sensor will be for the holley sniper efi, and the other o2 sensor will be for a new o2 display gauge that I want to put in my A-pillar. Having only 1 o2 sensor on one side of the engine always made me curious as to what was going on with afr over on the passenger side. So , depending on tightness, I will be installing bungs accordingly.
I will be using the rubber isolators on hangers to hang the exhaust, mostly the mufflex portions, and maybe 1 hanger on each section f that 3" diameter "collector" pipe as well. However, it was mentioned above, and makes sense to me, to maybe use a section of "flexible exhuast pipe" because of the movement/torquing of the engine and the rigidity that comes from using Locking v-band clamps. I do not want to have joints bust open or pipes under stress as the car drives or races, so would it be a smart idea to maybe use one of these flexible braided pipes? I know it is rather unsightly, but I would be using the smallest length possible, just to allow some "give" to the pipes/joints. Is this even ok? will it hold up at all or am I going to expect a lot of problems from using it? Thoughts?
lastly, here are some photos I took today of the underside. Some show the "outrigger" bars that I mentioned yesterday in my post, regarding the structure of the S&W chassis subframe kit and its bars that go out to the rockers. I am considering making my own transmission mount/crossmember, which could be a fun little project. I know hawks sells one, but maybe I could try to make one and get creative successfully? I will also have to modify my driveshaft safety loop in order to fit that 4" diameter pipe past it. It currently is an actual big loop, but I am considering making it into the shape of a letter P and the exhaust would sneak just under the bottom bulge of that letter P .
Re: Headers and exhaust options for 700 hp street car
Lots of info in here
I'm sure you saw my threads with making a big exhaust.
Modifications, cutting, oval piping, a merge and a big single 4" muffler.
The oval piping really helped with ground clearance.
Re: Headers and exhaust options for 700 hp street car
Originally Posted by IROCZman15
I think I am settling on NOT doing the dual cutouts at this point in time. I don't see the new headers , y pipes, and 4" exhaust being too restrictive.
Just to clarify, this is NOT about dealing with a restrictive exhaust. I'm quite sure that you'll be able to provide the requisite 2.2 CFM per crankshaft HP that is needed before the exhaust starts to limit output. Hell, even the last little bit of additional flow capacity starts to see diminishing returns. So there's no need to knock yourself out there. Big pipes. One big *** muffler that'll move 1000 CFM and you're good to go. You might need a little more when the nitrous is in the picture but I can't say I'm any authority on how juiced cars behave in general. Other than the exhaust needs attention.
What the cutouts ARE about is pressure wave tuning. You're trying to time the reflected pulse from the collector/cutout seeing open air (or a termination box/chamber) so that it imparts a negative pressure on the exhaust valve during the overlap cycle. This will draw in the intake charge before the piston starts down the bore. And this is considerably more suction that most can imagine. This is where the increased output comes from and the associated increase in VE.
But...I get it. Real estate is limited. There are costs associated with it as well and lord knows you'll be spending enough to put a decent exhaust on the car.
Looking good so far. Keep calm and wrench on....
Re: Headers and exhaust options for 700 hp street car
The summit flex couplers i think are the style i always used. They have a liner inside. The cxracing style you can see its just braided mesh inside and thats the style you do not want. The braided stuff will fail someday and close up. The liner style is the best. Always a good idea to have a flex in the exhaust. I always used the treadstone ones in my turbo stuff and they survive
Re: Headers and exhaust options for 700 hp street car
LB9GTA: yup, I read over a lot of your threads in recent years and your build was one I kept a close eye on for several of my upgrades, including this exhaust. I am thinking about those oval sections of pipe that BadSS posted the link to, and I am going to keep those in my back-pocket as plan B. I took some measurements and I am thinking I can posssssibly get away with the regular 3" diameter circle tube, but if I run into too many obstacles (or ground clearance issues) I will buy some of the oval stuff.
skinny: you said it perfectly. I didn't phrase myself correctly regarding the term restrictive, but I do mostly understand all that you have been describing related to the science behind the pressure waves and scavenging pulses. I feel ok about holding off on incorporating the dual 3" cutouts at this stage of the game.
Orr: So, I am glad you mentioned that because when i looked at the photo in the second link I included, I said to myself, ummm , is that just braided steel with no inner? Then I wondered how anyone could even sell that as a proper exhaust component, because that will undoubtedly leak all the time. I chalked it up to maybe just a badly taken photo, but turns out, it's just a garbage product! Thanks for reassuring my initial thoughts about that one. I'l buy the ones I posted from summit, the ones with the inner lining; like you have suggested.
- ordering flex pipes, heat wrap, and some heat sleeve stuff tonight
- already ordered two 3" locking band clamps, exhaust hangers, metal zip ties, and the flowmaster Y pipe a few days ago. IT should arrive Friday/Saturday
- for this short length of 3" pipe on each side of the transmission, I am considering using segments of the 3" hooker cat-back exhaust that I jsut pulled off the car. Nobody is going to buy this stuff from me, and I already hae it here. I can cut it, weld it, work it without feeling bad about hacking up any new pipes. if it turns out good, I can heat wrap it and call it down. If I do need to end up buying some clean new 3" exhaust pipe, I'll just get a few assorted bends/straights and re-design what i need to, OR I will go with the oval tube sections that BadSS mentioned.
Re: Headers and exhaust options for 700 hp street car
Not too much of a progress update recently, got busy with some other things.
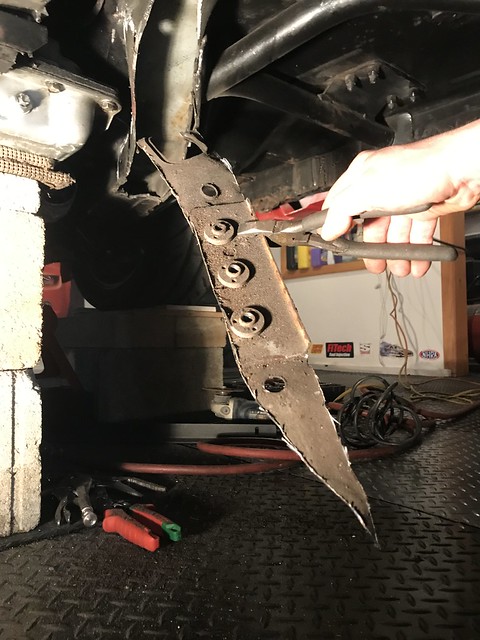
I did get some time to cut out some sections of the oem frame-rails on the passenger side of the transmission tunnel. There is no other way to truly tuck a 3" collector along the area of the 700r4 transmission and the design of the oem inner "frame-rail". stick shift guys have more space and those with smaller automatic transmissions, but not me with the 700r. But, No need to be alarmed, as I immediately used very beefy angle iron to reinforce the remaining frame rail and welded this angle iron to the floor-pan sheet-metal. I also welded a reinforcing flat plate in place on top of hte angle iron too, so it is strong and all stitched together. Once the final placement/fitment of the 3" collector pipe is in place, I am probably going to add a type of triangle brace into the framerail also. I still have to wait to do all that until I build a full transmission cross-member from scratch, so I have some work cut out for myself. No photo updates for now, and taking that much metal out of the frame was a bit scary, but I assure you guys that I welded a lot of reinforcement to make up for the removed frame. keep in mind that I have the subframe connectors coupled to extra bars that go to the rocker area and another section where a sandwich-plate bolts through the floor...along with a full 6-point roll bar. The reason I did all this, is simply to retain ground clearance with the entire exhaust. There was no other way to do this without notching/removing the section frame. I am certainly not the first person to do this, but it is a path less traveled. I did do quite a bit of measurements and mocked up a cardboard template of that oval-tube that BadSS suggested, but even that would hang dangerously low to the ground, and this car is already low and gets driven a LOT on treacherous NJ roads....there are even speed bumps a few blocks from my house that I scrape the torque arm crossmember on, and the oval tubes were a good 1.5" lower during a mock up.
Regarding the oxygen sensors, I was never a fan of where the sensor bung was in those Dyno Dons headers. I wish the bung was a little further back in the collector so it got a "blend" of the 4 cylinders, instead of just the two cylinders nearby it. (Its not visible in my above photos due to the angle I took the picture at, but its just real close to the edge of the primary pipes in the small merge) Anyways, this always seemed to cause a bouncy/erratic AFR reading... that probably was just due to the firing order and exhaust pulses. Along with the holley sniper's wideband oxygen sensor, I use the highly recommended HBX-1 oxygen sensor extender, which is a MUST do for nitrous.
-- my question for you guys is about oxygen sensor placement. I've read a bunch about it, and know that it has to be upright or at the very least, angled so that it can't retain moisture. We don't need to discuss that.... My question is more about how far back from the collector it can be? Since I will not have exhaust cutouts, there will be no chance for ambient air to give a false-reading through the backside of the exhaust system. It is very crowded under these cars, and I want the sensor in a safe spot, where it can get accurate oxygen count readings, and the closest I can get to weld a bung onto a collector pipe is 17-18" from the very end of the ending edge of the primary pipes. * This is exactly where the oem transmission mount/crossmeber is... and is the best chance I have with enough real-estate to install the bung/sensor. Is this too far back? One oxygen sensor will run the holley sniper efi, and I plan on adding in a second o2 sensor so I can finally have some type of reading of what the passenger side of then engine is actually doing. This will go to a gauge in the A-pillar, because the sniper can ONLY use one o2 sensor for its calculations... but I can compare the left bank with right bank in my brain and probably have enough length in the o2 wires to switch them side to side for comparison.
My next task to tackle is to build the transmission cross-member. I have a few ideas rolling around in my head, and with that section of frame-rail removed, the oem style threaded nuts that the oem cross-member mounted to are now gone forever. For many years, since the first time I removed a transmission in this car.. I have always wondered if it would be smarter for me to not have to thread bolts up-into the car to mount the trans cross-member. I have long debated simply having bolts welded to the car (from inside the cabin on a piece of sheet metal plate) and then I could just simply spin on the nuts while installing the cross-member. essentially the bolt threads would hang down and locate the cross-member, and the nuts would just snug it tight from the underside. (kinda like the way cylinder head studs act compared to cylinder head bolts?) Is there something I am overlooking that should steer me away from doing this? buts underneath the car and bolts protruding downwards but welded to the inner sheet-metal structure of the cabin?
- i hope to get started on the cross-member fabrication within a week, and correct me if I am wrong, but with the torque arm now on its own separate cross-member, the trans cross-member I have to fabricate simply just has to be there to hold up the tail-shaft area and keep drive-line angle consistent right...meaning it doesn't have to be ultra beefy? I mean, the stock stamped steel one wasn't really that stout to begin with, but I use the car for more heavy-duty reasons compared to the stock stuff. Thoughts?
Re: Headers and exhaust options for 700 hp street car
With the heated widebands you can run them whereever. I used to run them in both banks in bungs on the ypipe as long as your collector flange seal was good. Def want a mix of all 4 primaries in a collector to get an average reading. Then check plugs to see if you have a rich or lean cylinder.
i also had it in the y section to read all 8 cylinders. Move it around as necessary to check and then pick a spot and leave it. My holley i have the holley closed loop sensor in passenger bank. I have a separate wideband AEM unit in driver side, sent to holley to log it. Compared the two, then checked plugs. I have a richer condition at the rear cyl compared to fronts. Single plane intake and bbc runner architecture lol
Re: Headers and exhaust options for 700 hp street car
Orr: That is the best answer, and the answer I was hoping for! Much appreciated. I definitely want a true reading of all 4 pipes and I am hoping to move the sensors from side-to-side to see how different/similar they are with readings. I see you have a second o2 sensor that connects to your holley, but my sniper will not allow that. Therefore, I will be totally fine with just a wideband o2 sensor hooked to a gauge in the a-pillar. You have an AEM unit, do you like it and if so which one is it? Any other brands/suggestions? I did more digging and also posted about the topic on the Holley efi forums after searching through threads on there. link: https://forums.holley.com/showthread...-oxygen-sensor
One thing I am glad that was mentioned on the holley efi discussion was that the further rearward that the sensor is, there will be a "delay" as to how soon the ecu and make fueling corrections. I am not using the proper terminology, but I do understand what it involves. I am glad someone mentioned that the way to combat this is to adjust the sensor's advanced control. I will have to read up on this just in case I do need to adjust it.
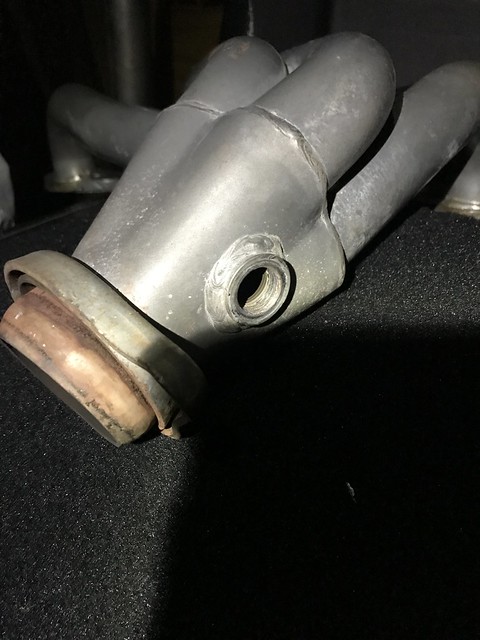
as I mentioned above (and you backed up my thinking) I would much prefer to have a afr reading of all 4 cylinders on the bank, instead of just the cylinders/primaries directly next to the o2 sensor bung. See below for the photos of my new ebay headers and the dyno dons headers and you can get a sense of why I think that the sensor location isn't getting a true reading of all 4 cylinders... its just too close to the primaries.
New ebay headers with o2 bung location:
My previous headers Dyno Dons with its o2 bung location.
anyone have any pros/cons to my idea from yesterday, regarding me mounting the trans cross-member mount bolts facing downward with nuts holding the cross-member up into place? I am favoring doing it this way unless there is some unforeseen/problematic reason I have yet to realize.
Last edited by IROCZman15; 01-18-2022 at 07:39 PM.
Re: Headers and exhaust options for 700 hp street car
Yeah you can play with the advance control, make it change the table ahead of the current cells somewhat quicker and more aggressive. I have seen it mentioned that closer the tune is to perfect the less aggressive you want the control anyway. You will want to try it more on the aggressive side to begin with and back it off as needed.
i run a aem uego on the pillar. Had good luck with them and they are priced nicely
The wideband has an 0-5v analog output which should be used for tuning. I've used it to tune countless different types of ECU, find a way to bring it in to your datalogs so you can drive for a couple hours then come home sit down at a table with the laptop and tune the engine properly by reviewing the logs over a long period of time
You want the sensor far 2 to 3 feet from the head or turbo to keep it from overheating. Widebands passing say 1300*F Or so will begin to read erroneously rich. It can say 11 when the real A/F is 16:1, not good. Usually at the end of a full length header is fine. Shorter header collector is too close IMO. Depends how much power (heat throughput) the engine is making.
Re: Headers and exhaust options for 700 hp street car
A good bit of progress, but nothing specifically exhaust related.
I think I mentioned above that I was going to have to get creative with routing the exhaust because I am UNWILLING to let my exhaust be the lowest component of the vehicle. I did not want the hassle of banging exhaust pipes closed-flat on a speed bump or pothole, or having welds crack, and throwing off oxygen sensor readings or the whole tune. I did not want to have to regularly repair exhaust damage or deal with the leaks, so I did what I had to do and made sacrifices to the oem sheetmetal/frame-rail under the car...specifically the passenger side. The stick-shift guys have it made when it comes to clearance between the transmission housing and the trans tunnel, but not for me with the bif 700r4 trans. Almost everyone who has a 700r and wants a 3" collectors settles on having them hang really low and passing almost "under the framerails" completely. Not something I was going to allow, I was determined to find a better way. So I took a different approach and cut out half of the "box' that made up the passenger side inner frame-rail along the trans tunnel. It is surprisingly thin metal just stamped, folded and spot welded... but it worked just fine for the stock chassis indeed. I kept the outside "rail" and then welded a series of 2"x2" pieces of angle iron to this edge and to the underside of the floor to retain rigidity in this area of the car. I then cut some flat plates of metal and lapped them over the angle iron and welded them to the angle iron and the floor sheetmetal where the oem frame had met the trans tunnel. My subframe connectors also connect to this part of the oem frame, and I boxed in the open area at the front which is near the firewall. My welds were decent, but the damn rubber based undercoating kept giving me problems despite me doing my best to scrape it all off. I used a heat-rated seam sealer on the welds, gaps, and any open areas, and while the seam sealer will serve a nice "sealing" purpose, it made the underside look messy and unsmooth. Once the seam sealer was cured, I painted over everything with VHT high heat engine enamel satin black paint. Not everyone might like my approach to this, but its my car and what I thought was the solution that would give me the most options of collector clearance. It is structurally sound, for sure.
-please remember, this cut out section of frame was reinforced heavily, but I didn't get to take a picture of it before seam-sealer and paint.sorry
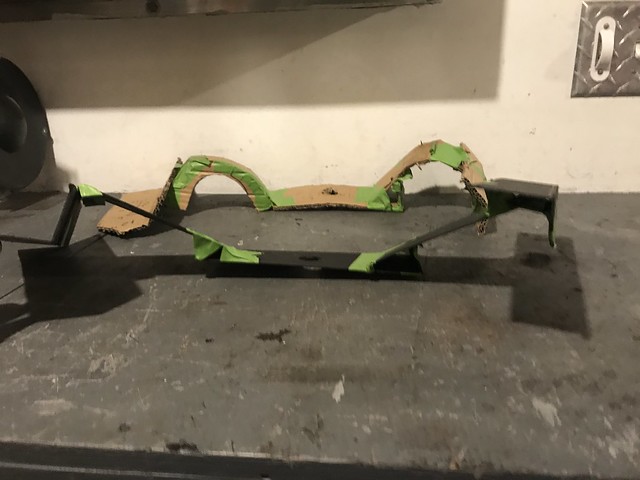
I did a whole lot of research on crossmembers, both on fbody sites, drag websites, unibody car stuff, etc. I saw some interesting stuff, and I knew that to get the fitment I was looking for, I would have to build one. The hooker trans crossmember and some others are ok, but each left a lot to be desired, and I knew I would regret buying something that didn't check all the boxes I required.....plus NONE would fit with the way I cut out half the passenger side's framerail.
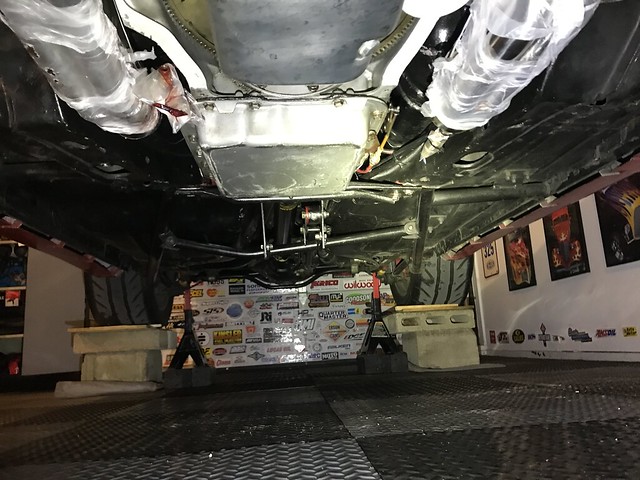
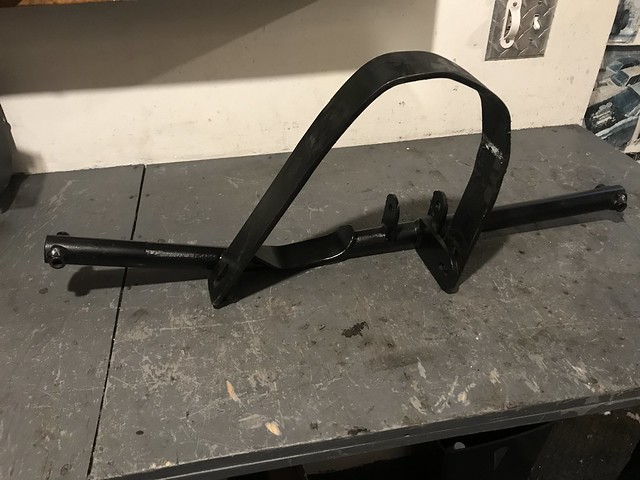
So I was on my own. I came up with a cardboard design using arches, but it didn't seem feasible. I then designed one out of heavy card-stock and used the strength properties that come with triangles and angles to create a mock up. I got some scrap steel from work, some from home depot (which I didn't use and returned) and some from a local welding place for $20. In the end I used the 1.5" angle iron for the outer mounts, the 3" x 3/16" flat stock for the "arms" and some "gusset supports" and then the 3"x1" rectangle tube for the base. The trans tunnel of these cars is filled with weird angles and interesting geometry, which left my home-built trans mount not aesthetically symmetrical, but it is super strong. As I mentioned a week ago, I have always wanted to do away with the threaded-inserts that the factory used for mounting the trans crossmember. Three out of the four were previously stripped out and I had re-tapped them with a bigger thread size, but I was always unhappy about it. So, I bought some huge 1/2" diameter grade-8 zinc coated bolts and welded them to a 1/8" plate that lives on each side of the sheetmetal floor in the driver's compartment. Drilled holes through the floor, the oem subframe rails (and my passenger side home made angle-iron rail) and used three bolts per side to locate and hold my transmission crossmember up. Also, not pictured (but already drilled and mocked up) will be several long 3/8" bolts that go horizontally through the crossmember's outer mounts, through the car's frame rails, and through the mounting pad of the S&W subframe connector too. These will secure the trans mount laterally. This thing is not going anywhere, and it is robust. I will have to weigh it compared to the oem unit, but it had to be done with heavy duty strength in mind.
this is a view looking backwards to teh rear of the car along the driver's side, obviously fuel lines and all that are just loosely pulled aside still
looking backwards on the car along passenger side trans tunnel. don't mind the sloppy seam sealer.
looking up from the passenger side :
If my measurements are correct, the way I built the "arches" in the trans crossmember, it will allow me to bring up my 3" collector pipes about 1 5/8" higher than where the would have lived if I let them hang under the frame and oem trans crossmember. They will not be the lowest item on the car. So that's exactly what I was gong for, primarily to save ground clearance.
- this all took a ton of work, and I hope it all works out. Seems ultra strong here sitting in the car, but the true test will be when the car is driving/racing around. I still need to cut/modify the crossmember that holds the torque arm and rebuild some type of driveshaft safety loop, so that will be soon. However, I am now getting to the point where I can actually start to work on the exhaust components. First will be putting V-bands on the header's and then working out pie cuts, pipe, and flex-pipe to get to the flowmaster 3"to4" merge collector.
On another note, I did get the pulleys and diff cover back form the powdercoating guy, with tip, just a tad over $100. Installed the diff cover but have yet to install the pulleys. the diff cover comes from moser with a slightly textured aluminum finish, so the powsercoating is not glass smooth, but it turned out great. I had him mask off and keep the Moser logo on there too.
Last edited by IROCZman15; 01-25-2022 at 08:23 PM.
Re: Headers and exhaust options for 700 hp street car
Thanks man, I like how it turned out also. I was only planning on having the two pulleys powder coated but the powder coat shop said that there�s a minimum $ amount for a small batch and suggested I could throw in a few more items to get powder coated in order to make the best use of my shop minimum fee, so that�s when I decided to put the diff cover in with the pulleys to pay for a full batch.
Seeious question for the group, keeping it tech related and not � oem GM purist� based, but is there anything I did or shouldn�t have done regarding the crossmember fabrication? I was hoping to hear that my design is structurally sound so that I could ease my worries about doing something in uncharted territory. I know that I have tried my best to test it and used my full body weight and tried to wrangle this thing in all directions and it is strong and it�s mounting points at the body are strong. But I know you that many of you fellas are smarter and more experienced than I am with chassis stuff, so any constructive feedback is appreciated. But, if it�s good to go, then I can start to move on the the exhaust pipes
Re: Headers and exhaust options for 700 hp street car
oh wow! I had never seen your trans mount! I like that. I guess I over-thought it, and assumed that I really would have some weight/torque on the back end of the transmisssion. Its good to see your design, and that is much simpler than mine. Cool, thanks.
Having the transmission cross-member and mount done was a big cross-off and it allowed me to move on to modifying the cross-member that spans the gap between the right/left sub-frame connector, and it also doubles as part of the driveshaft safety loop, but most importantly, it is the front mount for my adjustable torque arm. The bottom part of it has been the lowest point of my undercarriage for 10+ years, and I knew I could not run the exhaust any lower than this point all along the underside of the whole car. The 4" pipe barely fit above it, but I knew the exhaust would need some movement/flex as the car drives along, so I made the choice to cut out a section of the cross-bar and put in a notch. I also needed to re-bend the 3/16" steel that is the driveshaft safety loop, and I cut of the one mounting tab for it and moved it a few inches outboard on the cross-bar. The notch in the bar will be right where the 3"to4" flowmaster merge will be and it should have good clearance when the exhaust is finally mounted on metal hangers add anchored good. However, just in case, I might want to put some type of "heat safe" padding or isolator between the merge collector and that flat piece on the cross-bar. What kind of material would work for that?
here you can see the six 1/2" bolts coming from above , and also the 3/8" bolts that go horizontally from the frame/subframe through the trans crossmember side mounts
I temporarily positioned the mufflex system, but my next task will be welding the v-band flanges onto the ends of the longtube headers. I pulled out the headers today, so maybe after work tomorrow I can get the flanges on them. Once that is done, I can install the headers for good, as well as install the starter, run new copper-nickle trans fluid lines, and install the oil pressure sending unit as well.
Then it will be onto a new challenge for me, making the pie-cuts and lengths of pipe that will run from each header to the flowmaster 3"to4" collector. This is where I will have a section of straight 3" diameter pipe that I plan on welding in some oxygen sensor bungs. I will also be using those flex-pipes, but I am going to put them downstream of the o2 sensor, (in front of the merge pipe), just in case they have any small leaks.. it hopefully wont get screwey with the o2 sensors.
Re: Headers and exhaust options for 700 hp street car
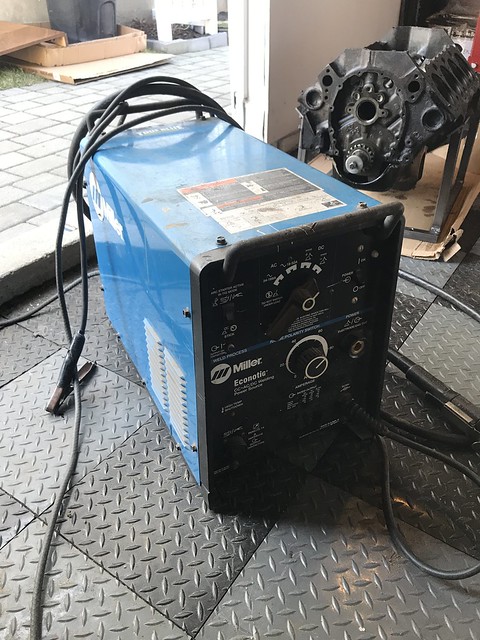
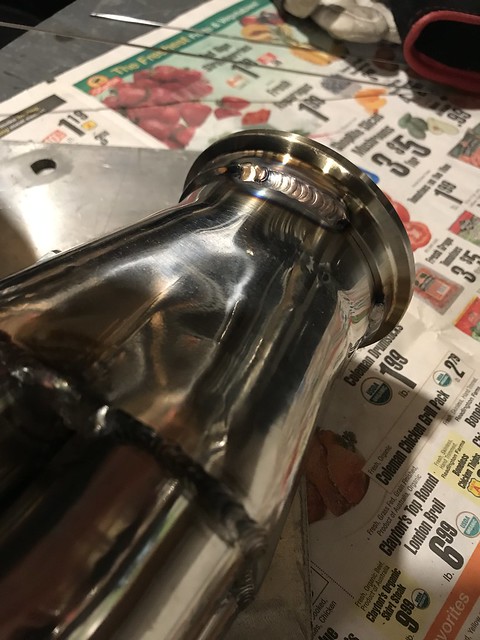
Today after work, I tig welded one flange of the v-bands to each header's exit. I used my old Miller EconoTig, which is from 1994, so it does not have all sorts of settings like new welders do. Its pretty basic, just a few ***** and a foot pedal, but it was up to the task.
Today was the first day i welded on an actual stainless steel part, as opposed to scrap stainless pieces that I collected from work. Anyways, I used 1/16" 880 filler rod and followed the advice of the internet welders.. but working in small sections in order to avoid warping the flange. I wish I had a nice big welding bench, as I had to stand up and work in contorted angles to get proper torch angle on the round pipes, but all in all, I think it turned out pretty decent.
Re: Headers and exhaust options for 700 hp street car
Miller Econotig. I have one too. An earlier model than yours.
I can't use the dial to set the max output. Foot pedal is zero to 100%.
And the minimum will blow right through thin sheet metal unless you are quick.
If you are blowing holes, the welding forums say to try DCEP or even AC.
Nice welds.
Re: Headers and exhaust options for 700 hp street car
I think during my research of the EconoTig model I saw the version you must have. cool. I could imagine your difficulty without having a dial, and only using the foot pedal! Yikes!
Its a cool machine, and the price was perfect (free!) but I had to buy the torch, hoses, foot pedal, my argon tank, and eventually I built a rolling cart for it. These EconoTig welders are much larger (and heavier) than many of the common Tig welders that are out there now, so even after a long long search, I could not find an affordable cart that would hold it and suit my needs. I wanted something low to the ground and sturdy. So, I bought an $85 cart and basically just used the bottom frame and wheels. I had to cut the top tray and widen and lengthen it. I also modified the back where the gas cylinder goes, and I built some uprights with hooks to hold the torch hoses and ground cable. I Think I want to add a top tray with dividers to hold various small items like gloves, electrodes, and wire brushes. One day.
Re: Headers and exhaust options for 700 hp street car
The garage and my tools have been taking a beating recently and currently R.I.P to my trusty angle grinder, a electric drill, my bench-mounted vise, and something is jamming up the wire in my MIG welder. Everything is dirty and metal shrapnel/dust over everything. getting impatient to wrap this project up and do a garage re-set and cleanup.
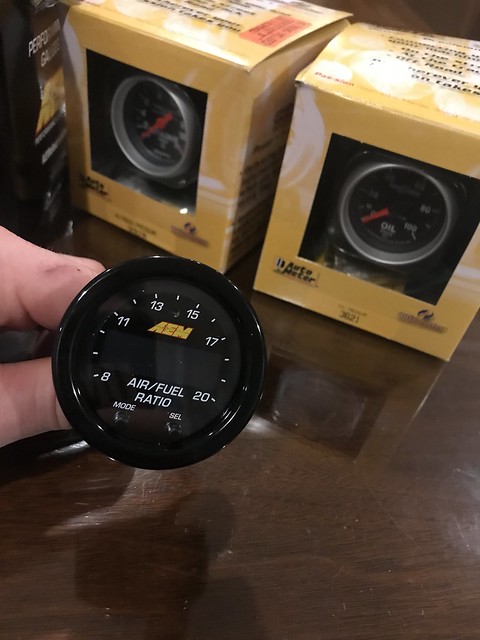
Anyways, I spent some time bending up all new transmission fluid lines to replace the oem steel ones that had been well abused, bent, cut up, and simply always in the way for many years. I made nice clean new ones out of 5/16" copper-nickle tube and flared the ends. I also re-routed my fuel lines, rear-brake line, fuel pump wiring harness, and oxygen sensor wiring harnesses, higher up inside the trans tunnel to keep them away from exhaust heat. They should all be safe from moving objects and heat now, and I will probably wrap them in that heat-shield sleeve stuff later on. I got the two powdercoated pulleys on the engine too (no belts yet). Added in a secondary oil pressure line which will go to a new autometer oil pressure gauge on the A-pillar. Also bought a nitrous pressure gauge and the AEM UEGO X-series wideband oxygen sensor. Only the oil pressure gauge was hooked up so far, but not yet installed in the A-pillar.
(probably going to roder that silver bezel for the AEM gauge so it matches the silver bezels on the nitrous and oil gauges.
After all that was installed, (and the headers with new gaskets), I wanted to check for leaks before proceeding with the fabrication of the collectors and merge pipes. So I got all the car's electronics hooked up and fired it up. I put the sniper in open loop, because I did not have the oxygen sensor installed.
--- Damn, this thing I was way louder than it ever was with the dyno-dons shorty headers. I decided to take a video of it, and the phone camera/microphone really does it no justice. Its loud in a good way, but too damn loud and if left like this it will be causing a ruckus everywhere. I am curious to see how the volume changes once the collectors, merge pipe, 4" pipes and magnaflow muffler are in place.
I had a few hours real quick today to try to fab up some collector pipes. I originally intended to get all creative with stainless 3" pipes and lots of pie cuts, but this project is wearing me down and I decided to just use some of those 18" long 3" diameter sections of pipe from autozone for $12 piece or something. I did a few pie cuts, but I don't have a metal chop-saw with a base-clamp, so I essentially just used the angle grinder to guess my best guess at some angles and chopping things up. If I gotta re-do this one day, I'll make it more professional, but now its more about getting the project done and moving onto the next stuff...because Island Dragway opens March 6th this year.
-I used the TIG to tack the pie-cut pieces in place, which was NOT my initial plan. I was going to tack them quick and easy with the MIG welder while everything was under the car, but the MIG is acting dumb. So I had to lie on my back, holding the TIG torch in one hand, filler rod in another hand and using either my shoulder and sometimes my knee to work the welders foot-pedal amp control. Not how I intended to do it, but its tacked in place and now I can put the pieces on a bench and weld them up properly... after I go get more Argon, because the bottle ran out today as I was tacking stuff in place. Just can't win recently !
not thrilled about any of these quick-n-dirty tack welds, but they are holding and I will get it all zipped up nice on the bench once I get TIG gas refill.
The headers themselves do fit good. I did run into a clearance issue when I went to index the starter, so I had to cut a slice off of the mounting area on the starter body so that the starter gear could index the flexplate properly. I built a bracket/hanger off the starter to hold the trans lines too. I've noticed that the drivers side header does come down a bit lower than the passenger header, and there is nothing I can do about that, so I just worked the 3" collector pipes on each side accordingly. I do like these v-band clamps at the header/collector flanges, so i am glad I did that. Not sure if I will cut in a v-band at the 4" pipe too, but for now, I am going to leave the area where the flowmaster merge pipe connects tot he 4" main pipe as a slip fit with a band-clamp. Can always change it later on.
As for the oxygen sensors.... My gameplan has changed from a few weeks ago when we discussed where to put them. I initially planned on them landing somewhere near where the tailshaft of the trans is, but thats where my flex-pipes are. So I am going to squeeze them in alongside the trans body right about where those red pieces of tape are. They will be angled just slightly off from vertical, so basically at the 11:00 position and the 1:00 position. Anyone foresee any problems with that? Its about 8ish inches away from the header exit, so the airflow will have a blend of all 4 primary pipes. Thoughts?
Last edited by IROCZman15; 02-13-2022 at 08:52 PM.
Re: Headers and exhaust options for 700 hp street car
Does your Econotig flow gas for a non-adjustable 15 seconds?
Wastes a ton of gas, especially when making tack welds. Wanna change that? Here is how I did it: https://weldingweb.com/vbb/threads/7...r-welders-also
It's really hard to say if the foot pedal works as planned, but the gas timer works perfect.
Last edited by NoEmissions84TA; 02-13-2022 at 09:15 PM.
Re: Headers and exhaust options for 700 hp street car
Dude, thats awesome! I certainly have got to look into that. I can't believe how much post-flow gas this things uses, so exactly like you said.. when I do a simple tack weld it just keeps pumping out argon. Sometimes I would reach over and shut off the main power switch on the machine to kill off the gas flow. Probably dumb, but now I am Glad you brought that up, I will certainly look into that upgrade. I am actually a member on that same welding-web forum. When I first got these two welders, I had a bunch of questions, and created a thread on the new-members section. The guys there helped me get everything sorted out pretty well!
--sidenote, while welding up those pie-cuts yesterday using the tig torch, I adjusted the flexible head like I usually do in tight spots, and heard/felt a crack from the torch gun. So, the torch is no longer an adjustable head, but now it also isn't fixed...it just kind of bobbles around...which is super difficult to get a crisp weld line. DAMN! another tool busted up.
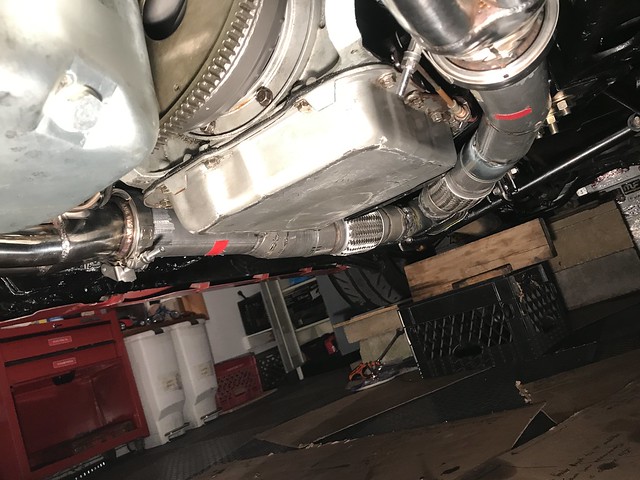
I welded in the o2 bungs today real quick and they are 6 5/8" from the v-band flange. I put a cheapo o2 bung externder and a bolt into the bung while welding to give the heat a place to travel to and avoid warping the bung. I had to put them on an angle because of the curvature of the trans tunnel. I won't be able to unscrew them when this y-pipe is mounted to the headers, but all I have to do is let it hang by the flex pipes, screw the o2 sensors in tight, and then lift the whole assembly up to the headers and tighten the v-bands.
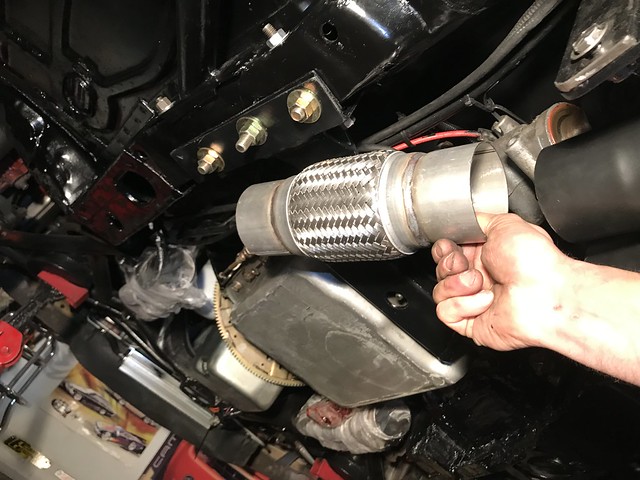
so, yea, now that the pipes are welded in and the bungs, the last thing I have to do is weld up the joint between the flowmaster 4"to3" merge and the silver mufflex slip-collar.
-After thats done, I am going to scuff the whole thing, prime the whole piece (not the flex pipes) with VHT primer and then some VHT paint. Then it will be time to put on the header pipe-wrap. I know that the wrapping will hold oils and debris, and its a pain to work with the fiberglass , but I am fully interested in keeping the heat in the pipes and less radiating to the nearby trans, fluid lines, fuel lines, floorboards, and whatnot. My biggest question is, should I wrap those flex pipes too? Did some research and some people in-fact do wrap flex pipes. They suggest wrapping the flex pipe as a separate section, in case I gotta take that part off... I wouldn't have to unspool the whole y-pipe assembly. I am not going to wrap the mufflex main pipe or anything past the drivers seat area, so basically JUST this y-pipe section that is in the below photo. Thoughts?
Last edited by IROCZman15; 02-15-2022 at 08:30 PM.
Re: Headers and exhaust options for 700 hp street car
You got it done. Good for you!
Here is my . Run the engine to heat the pipes and burn off any contaminants. Then scuff and VHT primer the pipes for corrosion resistance only. Or use hi-temp aluminum paint. Apply as thin as you possibly can. Forget the paint coat. That much thickness of paint will peel when heated. Find a way to heat the pipes to bake the paint (heat gun). Forget about pretty. Then use the heat wrap on the pipes only. Do not wrap the flex couplings. Again, just what I would do if I were in your shoes.
Re: Headers and exhaust options for 700 hp street car
Have you got a picture looking straight up at the transmission pan? I'm interested to see how your pipes run in the area immediately adjacent to the transmission.
Sort of like the images below.
Or from an angle but in line with the vehicle centreline like this.
I'm looking for possible solutions to what I'll be encountering once I mothball this particular exhaust.
Re: Headers and exhaust options for 700 hp street car
NoEmissions84TA: yup, thats almost exactly what I did, except I had already scuffed the pipes and primed/painted them before the time I read you post about heat-cycling everything. I did do light coats of paint, mostly because everything was cold and I was afraid of runs. But like you said, thicker paint will be more likely to flake off. after everything was painted I let my small propane-master heater heat everything up and help cure the paint. Much thanks for the advice!
SkinnyZ: sure thing. I took a bunch of photos, and some of those are below. There are more int he photo-album on flickr that the below photos are stored in. I think if you click on the photo and find the link, you will be able to open the photo album. if you need anything more specific or a different angle, just let me know and I will snap a photo for ya. Since the car is not on a lift, and it is only 12" inches int he air on concrete blocks, I cant get a zoomed-out overall view of everything at one time.
--sidenote.. I looked back at the pipe-max data about the collector pipes. I measured the length of each "collector pipe" and I'm not sure what exactly technically is considered a collector, but Ont he drivers side I have 27" of pipe between the header's exit flange and the 3"-to-4" merge and On the passenger side I have 26". What's the group consensus on this length for power/flow/performance? I'm not 100 fluent in the math and pipemax data (yet).
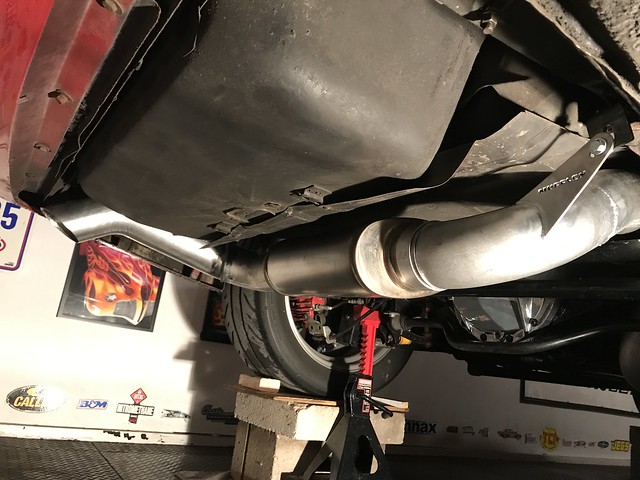
Got the y-pipe cleaned up, sanded down, and shot it with VHT primer followed by a coat of VHT paint. Across all my avenues of car buddies that I asked, most said to avoid the heat wrap, but some said to do it thats the route I went (for now). if it turns out to be a problem, I'll just take it off. I used plenty of metal zip ties and faced all of the tails upwards. Out of the 50 foot rol of heat wrap, I was only left with about 1 foot of leftover. whew!
I installed both HBX-1 oxygen sensor extenders (important for nitrous) and then I installed the holley o2 sensor in the drivers side bung and the new AEM o2 sensor in the passenger side bung. When it was all said and done, they are 6.5 inches from the v-band at the header . I am happy with the placement and the angle of them. Bolted up the y-pipe and those v-bands work great; they just sucked everything together nice and tight. Took some time to locate the best position for the main 4"pipe and welded on a hanger for it. Got the up-and-over axle pipe in, as well as the magnaflow muffler. Welded up a hanger for the tailpipe and tightened everything up. I will re-tighten all fasteners after a few heat cycles. Did a test fire up in open-loop and was happy that the violent sound of the open headers was noticeably muffled. For a street-car, this is perfect. In the video (iphone 7 camera) it sounds quieter, but it has some deep ground-pounding thump to it. My experience with magnaflow mufflers has been that they are a little quieter at first and after a bit of use, it will get a little louder. Not sure if its for other styles of magnaflow mufflers, but we will see. As it is right this moment, its really good sounding. However, no matter what, this whole exhaust system will flow tons better than my old system, and that was the primary goal.
Next, after tightening fasteners, I want to check/adjust the driveline angles since things probably shifted a bit when I built the whole trans-crossmember. Some other quick undercarriage projects and then its time to get this thing on the ground, so I can road test it and take some measurements of the underside clearance on everything exhaust/frame related. After that, I have to install the 3 new gauges into the a-pillar gauge pod and install carpet, seats, and whatnot. Then it is on to probably a few measurements and ordering the new rear drag wheels and tires.
still mostly thinking of the 15" Jegs ssr star wheels (to match the front skinnies) and then a MT ET Street SS tire in the 275/65/15 range.
Last edited by IROCZman15; 02-20-2022 at 08:26 PM.
Re: Headers and exhaust options for 700 hp street car
Where is the BEER smiley? You earned a 6-pack, at least.
You managed to get the entire system tucked up as high as possible!
I love that you ran the plug wires below the headers. Heat rises. They will cook less.
Use copper line when you connect that oil pressure gauge in the pillar.
Re: Headers and exhaust options for 700 hp street car
thanks fellas. If anyone notices anything concerning or has advice, as always.. feel free to shout it out. I would rather make changes to the car now instead of later. That's the reason I post all this typing/photos, so that if I am doing anything way-off, someone can steer me in the right direction.
- It does sound good, but I'm eager for the magnaflow muffler to get worked-in because I'm 99% sure it will get a little louder and then it will be perfect. I'm like 95% happy with the sound. Also, with the car on the ground and the exhaust pulsing off the pavement, that might change the sound a little bit.
I'm glad you guys steered me away from the exhaust cutouts, that would have been such a headache, and not worth it for flow or sound. Much thanks.
Yes, I like the cleaner look of the spark plug wires tucked under the headers too, but the heat factor is also a huge important. As for the oil pressure line to the new gauge, I kinda wish I did get a copper line. However, I had some extra pieces of -4 braided AN hose, so I took the supplied plastic lien that came wit the gauge, and snaked it through the braided/ptfe -4 line so it acts like a sheething and also helps keep the line straight. It's doing good, but I might venture to switch it to copper next time I'm in there.
I gave the whole underside a wipe down and checked some bolts today after work. I played around with the adjustable torque arm and driveline angles a bit, but I want to revisit my measurements after I give the car a drive to shake out the suspension a bit. Then I brought the car back down to the ground. Was very very pleased with the overall ground clearance. For reference, I put a soda can and a 4"x4" wood block that I took a true measurement of it and it was 3.5" tall. So, using that as a gauge, I spot-checked a few key areas. I have at minimum 4" of ground clearance, so that is a big win. Will see if anything changes after a few shakedown drives of the car, and I'll then also tighten up all exhaust bolts.
Re: Headers and exhaust options for 700 hp street car
I will probably update this post a few more times maybe with a soundclip or video clip once I get the tune settled in. its been too cold for me to get the laptop out and start making any adjustments, but I will get to it in the coming weeks. I did take the car out a bit yesterday evening for about 15 minutes of driving. Sounds great, feels great, and no issues with anything in the exhaust, driveline etc. When I came back I cranked the header bolts a little bit tighter since everything was warm but it skipped my mind to get out a thermal gun and check the header temps. Next time.
I wanted to add up the cost of this project (minus all the man hours of labor) to see how close I was to my approx $1,200 budget that I had envisioned in the very beginning of the project. Additionally, I always counted on selling my old headers and exhaust stuff so I always did factor that into the mix. Here is a full breakdown of the stuff I purchased, and I think I included everything....except the electricity bill!
2022 exhaust project spending:
$ 212 ~ Ebay stainless steel 1.75" long tube headers
$ 702 ~ Mufflex 4" cat back system with magnaflow muffler (bought in person at mufflex)
$ 67 ~ Flowmaster 3"-to-4" merge pipe
$ 79 ~ two 3" diameter flex pipes
$ 27 ~ Header wrap 50feet
$ 80 ~ Innovate Motorsports HBX-1 Oxygen sensor extender
$ 36 ~ Three of thoise 3" diameter 18" long tailpipe sections from Advanced Auto Parts
$ 24 ~ VHT primer and VHT Paint
$ 10 ~ Permatex Copper Gasket maker, not used yet
$ 28 ~ one pound of 1/16" diamter 880 tig welding filler rod
$ 64 ~ two EvilEnergy 3" diameter stainless V-band clamps
$ 8 ~ Pack of stainless steel oxygen sensor bungs
$ 28 ~ two diameters of the fabric heat wrap/heat sleeve for fluid lines
$ 13 ~ pack of 100 metal zip ties
$ 40 ~ refill of argon welding gas
$ 1,418 = Grand Total
BUT, I had half-planned on listing my dyno dons headers and y-pipe as well as the electric exhaust cut out and the hooker muffler, chrome tips, etc online for sale to recoop some of the money into the exhaust budget. For years my cousin has been asking me to buy them so he(we) can put them into his 1986 IROC with a TPI. So I am selling everything exhaust related that I took off the car to him for a $400 cash price. Chances are I could have made more money selling the stuff to a stranger, but i'm happier that he will make good use of it, and I can help him put it all on.
So, minus that $400 profit from the $1,418 brings me right to $1,018. In lay-mans terms, I'll remember it in my brain as an overall cost of $1,000. Not too bad.
Last edited by IROCZman15; 03-01-2022 at 08:06 PM.
Re: Headers and exhaust options for 700 hp street car
This thread is showing quite a bit of awesome progression! many new ideas that i hadn't seen in the last 2 decades of being on the forums. i too have progressed a bit from the old hedman longtubes and a 2.5" exhaust.
here are some pictures of what i've come up with. the headers are 2" to 2-1/8" stepped primary, and a 3.5" merge collector with a 3" choke. I'm running dual 3.5" aluminum exhaust with tailpipes to the bumper. back in 2020 i built the headers and redid the subframe to comply with SFI 25.x spec. i don't need it for my ET range, but was finding a lot of cracks in the floor and figured it was time. I also made small tunnels on either side of the DS tunnel to make way for the exhaust, and deleted the rear seats for the mufflers to have a spot to live. the tailpipes were built over Christmas 2021 and are a TOTL configuration. Best pass to date through the tailpipes is a 9.19 @ 150 mph, all naturally aspirated.
Re: Headers and exhaust options for 700 hp street car
Originally Posted by mw66nova
...and deleted the rear seats for the mufflers to have a spot to live...
This was the route that we were contemplating many years ago when trying to figure out an efficient system with true duals. But the prospect of cutting out the rear seat didn't seem a reasonable choice given the direction the build was going at that time.
Looks good as always Matt.
Re: Headers and exhaust options for 700 hp street car
Matt, I am super glad you wrote in!
you are Definitely a great source of knowledge and real world experience. I follow you on youtube and watched the video of the exhaust project taking shape one day on my lunch break while at work. good stuff, awesome stuff. Glad you posted some photos too. You sure did a ton of work.
Everyone, feel free to keep this thread going for years to come, especially if there is more technical knowledge, or different ideas, lets keep the info out there for the future projects that people may embark on.
So, I finally was able to get to the track (just last night!) but I wish i went back in March. Every time i was going to go, it was a rain out or some other weather related track closure. I wil be typing up a full post on this thread, as well as my nitrous system install thread, and my main car build-up thread. There will be links to videos of the passes, datalog screenshots, and timeslips included. I probably wont get to typing everything up for a few more days (tomorrow is Easter, Monday is my birthday and I have work), but I'll get it typed up soon enough.
-Even through the track session last night was a shakedown after a full wintertime of work on the car, it still did good and got me some new personal best timeslips on all motor and on nitrous.
Stay tuned, but feel free to keep on discussing any/all info for high horseper exhaust options for 3rd gens!
Re: Headers and exhaust options for 700 hp street car
typed up a bit about my first dragstrip session with the new exhaust. learned a bit, but wish I had more passes to get better data and timeslips. possibly I can get back to the track in about 2 weeks from now.
BUT i noticed in the html code that this hyperlink says the word flowmaster...however the site's page is selling the magnaflow muffler. I got the magnaflow straight through muffler.
Since I live about 90 minutes away from mufflex, I called them a few days ahead of time and picked their brain about single cat/dual cat and muffler choices. We concluded that since I would be building the y-pipe myself, the single cat would be just fine with the 3"-to-4" flowmaster merge pipe and they highly recommended the magnaflow muffler. I do not run any type of catalytic converter, just headers, y pipe, and mufflex system.
In short, I am very pleased at the overall cost, sound, clearance, and fitment of the mufflex system and the headers. For a soundclip of it running down the dragstrip (fully muffled!) here is a short youtube video:
(cell phone speaker and laptop speakers are not that great for portraying the actual sound, a desktop computer with real speakers is best)
When i first put together the exhaust I made a few youtube videos back in february, some of just the open headers, and some with the full exhaust on. Those can be found on my youtube channel, but one is here.
Re: Headers and exhaust options for 700 hp street car
Thanks. Yes, I called them today. Been thinking about going to 4" to see if I can get some more top end out of my engine. Been debating between 3" dual which is difficult to fit and loud as heck, versus single 4" which is easy to fit and still loud but not as loud. Saw a guy on ls1tech with an 800 Hp n/a engine with 4" single and it didn't hurt him so that convinced me that single 4" is the way to go in our cars considering the packaging issues.
Re: Headers and exhaust options for 700 hp street car
How in the world did this board not convince the OP he could run true duals?!
There are too many 3rd gens running true duals to not be able to do it. Dual 2.5s into spintech 9000s or bullet mufflers.
Any exhaust shop thats great at what they do can pull it off
Last edited by blackgloves; 06-04-2022 at 05:59 PM.
Re: Headers and exhaust options for 700 hp street car
Originally Posted by blackgloves
How in the world did this board not convince the OP he could run true duals?!
There are too many 3rd gens running true duals to not be able to do it. Dual 2.5s into spintech 9000s or bullet mufflers.
Any exhaust shop thats great at what they do can pull it off
I said it in the first post that I didn't want anything to do with true duals. Was never anything I wanted to do. Too busy underneath the car. I will never be interested in duals under this car. Exhaust turned out awesome and I am very glad I did not make compromises and did what I set out to do.
Re: Headers and exhaust options for 700 hp street car
Originally Posted by blackgloves
you think so? That equals 5 inches exhaust and no y-pipe.
No no no, don't sum up tube diameter. Flow is related to the cross-sectional area. So,
* two 2.5" diameter tubes have about 9.8 square inches of area.
* and one 4" diameter tube has about 12.5 square inches of area.
Also, two smaller pipes aren't necessarily as good as the area might imply because the velocity profile isn't constant across the pipe, it's kind of parabolic in shape. So the single pipe might have more average velocity too. But what exhaust really wants is a bit hard to predict so a lot of times you just gotta try stuff and see what happens.
Re: Headers and exhaust options for 700 hp street car
When the engine is N/A Its best to keep cylinder pulses separated until the temperature and velocity has gone down near the boiling point of water.
For example headers, each pulse gets its own tube. Then it cools, and they combine with less penalty later in the system.
Parabolic flow is only found in laminar flow type, which is unlikely in general- Once the exhaust cools and disorganizes, velocity drops and the exhaust volume condenses causing turbulence and swirl, then the profile of flow has difficulty maintaining laminar, it becomes turbulent which is fairly flat across the tube. And right at the head where exhaust moves into the header tube its probably got so much energy that it is initially turbulent as well. I suspect there is some organization just after the exhaust valve closes due to the spreading out of exhaust gas thanks to the space left behind it (think of a bubble moving along with fluid in a tube) where the fluid may briefly become laminar.
I would favor dual 2.5" (Or 8x individual tubes like headers all the way to the 200*F cutout) with an X-pipe balance after 300*F~ over a single 4" as it will foster higher gas velocity per each side in theory. The point at which exhaust loses all of it's internal energy is where it needs to be let go, otherwise the fluid has to be forced out which is what causes more 'back pressure'.
If you combined both 2.5" into a 4" after the X-pipe it wouldn't matter much at that point the velocity and gas volume is mostly gone. Although the pressure will likely go up. As a section diameter is increases pressure rises. If the section decreases in diameter the velocity speeds up and pressure decreases. But higher velocity means more friction so energy is lost faster.
Transitions and bends absorb kinetic energy and create disorganization in a laminar flow but you can't disorganize what is already disorganized. It will still take kinetic energy however.
The short answer is exactly what Qwktrip said "Its hard to predict" so none of this crap matters, you have to try it, record results, and then compare with something else.
Re: Headers and exhaust options for 700 hp street car
Originally Posted by blackgloves
you think so? That equals 5 inches exhaust and no y-pipe.
well, it doesn't though. The other guys already beat me to it with their response, but when it comes to area of pipes, you have to do the math differently than you are thinking it should be done. The 4" diameter pipe provides significantly more room than two 2.5" pipes.
Re: Headers and exhaust options for 700 hp street car
My swap is mid way finished. I'm going 3 inch dual pipes.
Why he can't do the same is a little confusing. If room is an issue.. a 4inch pipe fits fine?
Re: Headers and exhaust options for 700 hp street car
Originally Posted by blackgloves
If room is an issue.. a 4inch pipe fits fine?
Yes, off the shelf kits from Mufflex.
Dual 3" is more difficult to package but can be done with enough fiddling. When you run dual 3" exhaust over the axle the second pipe has no place to tuck and ground clearance suffers. Mufflers are small and hellacious loud. The dual 2.5" helps with ground clearance and noise because pipe is small.
 01-10-2022, 09:06 PM


 . Run the engine to heat the pipes and burn off any contaminants. Then scuff and VHT primer the pipes for corrosion resistance only. Or use hi-temp aluminum paint. Apply as thin as you possibly can. Forget the paint coat. That much thickness of paint will peel when heated. Find a way to heat the pipes to bake the paint (heat gun). Forget about pretty. Then use the heat wrap on the pipes only. Do not wrap the flex couplings. Again, just what I would do if I were in your shoes.


 Where is the BEER smiley? You earned a 6-pack, at least.