Well I finally built it...
 09-13-2007, 02:34 PM
#1
Supreme Member

Thread Starter
iTrader: (25)
Join Date: Jul 2004
Location: Beautiful BC
Posts: 2,623
Likes: 0
Received 0 Likes
on
0 Posts
Car: '88 IROC-Z / '91 Z28 / '91 GTA
Engine: LT4 Hot Cam 305 / L98 355 / MR 383
Transmission: 5-spd / 700R4 / 700R4
Axle/Gears: 3:45 / 3:23 / 3:23
Well I finally built it...
...after procrastinating for so long, I finally built a proper box. I thought I'd write up this little thread to help motivate others and show them its not that hard if you want to go through with it. So here we go..
First thing I did was relocated my battery and amp into the spare tire well. The amp is a Kicker 700.5. Here is what it looked like;

Now I know it looks kinda messy and a ton of wires hanging around but thats what happens when you have a 5 channel amp. Its ok though since everything is hidden behind the spare tire panel;

Next I started on the box build to replace the small single 10" box I had sitting in the bottom of the well. I mostly followed the dimentions from the .pdf posted on page 2 of the sticky but I found it wasn't exact nor were the directions 100% correct;

I built this thing to last placing screws approximatly every two inches, glued every seam, and siliconed it for an air tight fit;

I then used a piece of cardboard to make a template before cutting a piece from MDF for a perfect fit;

Once fitted I predrilled and countersunk holes in preparation for mounting, and I measured and cut appropriate holes for the pair 10" drivers;

I then found out the mounting depth of my subs were just a hair to shallow, I like to stick to the rule of thumb and allow at least one inch of air space between the bottom of the magnet and the box for adequate air flow. So I made up some MDF rings;

Here is what it looks like when its put together. I was pleased to learn that I can still remove the box as one piece without having to take off the top panel. While construction may be complete, finishing is not. Here is how it looks once the construction was complete;


I had intended to router around the subs and flush mount them into the box, and then use a 1/4" sheet of MDF to make a flush cover which is carpeted with hidden grills to give it a stealth appearance. Since I had to raise the drivers to fit properly, I will have to devise a new plan. For the mean time I intend to simply carpet with stock appearing material.
Questions or comments are welcome.
First thing I did was relocated my battery and amp into the spare tire well. The amp is a Kicker 700.5. Here is what it looked like;
Now I know it looks kinda messy and a ton of wires hanging around but thats what happens when you have a 5 channel amp. Its ok though since everything is hidden behind the spare tire panel;
Next I started on the box build to replace the small single 10" box I had sitting in the bottom of the well. I mostly followed the dimentions from the .pdf posted on page 2 of the sticky but I found it wasn't exact nor were the directions 100% correct;
I built this thing to last placing screws approximatly every two inches, glued every seam, and siliconed it for an air tight fit;
I then used a piece of cardboard to make a template before cutting a piece from MDF for a perfect fit;
Once fitted I predrilled and countersunk holes in preparation for mounting, and I measured and cut appropriate holes for the pair 10" drivers;
I then found out the mounting depth of my subs were just a hair to shallow, I like to stick to the rule of thumb and allow at least one inch of air space between the bottom of the magnet and the box for adequate air flow. So I made up some MDF rings;
Here is what it looks like when its put together. I was pleased to learn that I can still remove the box as one piece without having to take off the top panel. While construction may be complete, finishing is not. Here is how it looks once the construction was complete;
I had intended to router around the subs and flush mount them into the box, and then use a 1/4" sheet of MDF to make a flush cover which is carpeted with hidden grills to give it a stealth appearance. Since I had to raise the drivers to fit properly, I will have to devise a new plan. For the mean time I intend to simply carpet with stock appearing material.
Questions or comments are welcome.
 09-13-2007, 02:45 PM
#2
Member
Join Date: Jul 2007
Location: Michigan
Posts: 248
Likes: 0
Received 0 Likes
on
0 Posts
Car: 2007 Cobalt LT
Engine: M62'd 2.2L L61
Transmission: 4T45E 4-speed Automatic
Axle/Gears: Stock
Re: Well I finally built it...
You could gradually build up to the sub (around the sub in a circular fashion) and then carpet over it, still preserving the so-called "stealthy-appearance", and looking good.
09-15-2007, 01:21 PM
#5
Member

Join Date: Jun 2006
Location: St. Charles, IL
Posts: 118
Likes: 0
Received 3 Likes
on
3 Posts
Car: 1987 Trans Am
Engine: 305 TPI
Transmission: 700 R4
Axle/Gears: 2.73
Re: Well I finally built it...
BEAUTIFUL!!!!! Slightly off the subject...is your interior plastic new? That looks like a new car. WOW!
 09-16-2007, 10:24 AM
#7
Banned
iTrader: (12)
Join Date: Jul 1999
Location: Bertram (outside Austin), TX
Posts: 12,212
Likes: 0
Received 10 Likes
on
10 Posts
Car: 87 GTA
Engine: L98
Transmission: 700R4
Axle/Gears: Dana M78 3.27 posi
Re: Well I finally built it...
Are the subs sharing the same air space, or did you drop in a divider wall?
Instead of trim rings, you could always add another piece of MDF (although that would increase box weight, making it heavier to remove, to get the flush fit.
Instead of trim rings, you could always add another piece of MDF (although that would increase box weight, making it heavier to remove, to get the flush fit.
Trending Topics
 09-16-2007, 10:36 PM
#9
Supreme Member
Thread Starter
iTrader: (25)
Join Date: Jul 2004
Location: Beautiful BC
Posts: 2,623
Likes: 0
Received 0 Likes
on
0 Posts
Car: '88 IROC-Z / '91 Z28 / '91 GTA
Engine: LT4 Hot Cam 305 / L98 355 / MR 383
Transmission: 5-spd / 700R4 / 700R4
Axle/Gears: 3:45 / 3:23 / 3:23
Re: Well I finally built it...
thanks guys...
the box does not have a divider in it, its internal volume is approximatly 2.1'. The interior plastic is stock and never been replaced.. just over 50,000 original miles on the car.
I think what I may do is make a 2x4 or 2x2 frame on the top surface, and then resheet it with a 1/4" sheet to recess or flush mount the subs.. I'm not sure what I'm going to do yet...
09-17-2007, 03:33 PM
#11
Supreme Member
Thread Starter
iTrader: (25)
Join Date: Jul 2004
Location: Beautiful BC
Posts: 2,623
Likes: 0
Received 0 Likes
on
0 Posts
Car: '88 IROC-Z / '91 Z28 / '91 GTA
Engine: LT4 Hot Cam 305 / L98 355 / MR 383
Transmission: 5-spd / 700R4 / 700R4
Axle/Gears: 3:45 / 3:23 / 3:23
Re: Well I finally built it...
they're 10's, but I positioned them in such as way that I could easily enlarge the holes to suit 12's if need be in the future.
09-22-2007, 09:36 PM
#12
Senior Member
Join Date: Jul 2007
Location: Corner Brook, NL
Posts: 1,305
Likes: 0
Received 1 Like
on
1 Post
Car: 1984 Z28 HT,2006 2500HD
Engine: 5.7L, 6.6Llbz dmax
Transmission: 700R4, 6 speed allison
Axle/Gears: worn out 3.73 posi
Re: Well I finally built it...
looks good, very clean butt i read somewhere that you shouldnt seal your box with silicone as it emits a gas or something that deteriorates the sub suspension butt that may be just a myth i dunno just thought youd like to know butt i noticed you have that privacy cover or whatever its called the canvas thing over the trunk does that make any noise because of the subs?
09-23-2007, 12:39 AM
#13
Junior Member

Join Date: Jun 2007
Location: winnipeg mb
Posts: 59
Likes: 0
Received 0 Likes
on
0 Posts
Car: 1989 camaro
Engine: 2.8
Re: Well I finally built it...
i know what you mean the directions are n that good and some of the measurements are off. (from the plans)
09-23-2007, 07:37 AM
#14
Supreme Member
iTrader: (2)

Join Date: Dec 2000
Location: Buffalo, NY
Posts: 2,361
Likes: 0
Received 2 Likes
on
1 Post
Car: 1984 Trans Am
Engine: LT1
Transmission: T56
Axle/Gears: 10 bolt w/ 4.10 gears
Re: Well I finally built it...
it looks very nice! I wouldn't build up the entire top of the box because I like how it matches the height of the "hump" over the gas tank. If security is the reason for wanting them hidden, you really can't see inside the well when the hatch is closed. Oh and Brennan, there aren't two t's in the "but" that you're trying to use.... one letter makes a big difference 
09-25-2007, 10:48 AM
#15
Member

Join Date: Nov 2001
Location: Sayreville nj usa
Posts: 176
Likes: 0
Received 0 Likes
on
0 Posts
Car: 02 redfire gtp coupe
Engine: 3.8 modded and supercharged
Transmission: 4t65-ehd
Re: Well I finally built it...
id like to see some more of the battery. if i get the t/a im looking at i have a single 12 i want to use but 2 amps. 1 for interior and 1 for the sub. i was toying with where to put the batt but i havent been in a thirdgen in a long time.
 10-13-2007, 04:10 PM
#17
Senior Member
iTrader: (1)
Join Date: Apr 2007
Location: Edgewater, Florida
Posts: 272
Likes: 0
Received 0 Likes
on
0 Posts
Car: 92 Lo3 RS
Engine: 305 roller tbi
Transmission: t-5
Axle/Gears: 3.08 open
Re: Well I finally built it...
Is this car ever done......looks great so far(jealous) florida sun destroys everything, even with low abuse my car has suffered, never been garaged. has anyone done stealth like speakers in the plastics, not hidden but looking like they belong?
10-31-2007, 12:28 AM
#18
Supreme Member
Join Date: Oct 2001
Location: Louisville, Ky
Posts: 3,155
Likes: 0
Received 2 Likes
on
2 Posts
Car: 1991 Z28
Engine: 383
Transmission: T-5
Axle/Gears: 3.08 10 Bolt
Re: Well I finally built it...
A+ Looks excellent!!
Makes me want to re-relocate the battery from the well to the spare tire area along with the amp, put my speaker amp in the lock box area and enjoy two 12's over my planned one. But then I would have nothing to mount on my seat deletes
Makes me want to re-relocate the battery from the well to the spare tire area along with the amp, put my speaker amp in the lock box area and enjoy two 12's over my planned one. But then I would have nothing to mount on my seat deletes

 10-31-2007, 07:51 AM
#20
Banned
iTrader: (12)
Join Date: Jul 1999
Location: Bertram (outside Austin), TX
Posts: 12,212
Likes: 0
Received 10 Likes
on
10 Posts
Car: 87 GTA
Engine: L98
Transmission: 700R4
Axle/Gears: Dana M78 3.27 posi
Re: Well I finally built it...
How does it come out? I don't even see room for fingers to fit beside the box, much less enough room for a hand, to reach the bottom edge to lift the box.
How does it lift out?
How does it lift out?
10-31-2007, 10:40 AM
#21
Member

Join Date: Sep 2007
Location: Saraland AL
Posts: 149
Likes: 0
Received 0 Likes
on
0 Posts
Car: 1997 Grand Prix GTP (for now)
Engine: 3.8 sc
10-31-2007, 04:11 PM
#22
Member
iTrader: (1)
Join Date: Feb 2006
Location: canada, eh
Posts: 364
Likes: 0
Received 0 Likes
on
0 Posts
Car: 1987 Z28 camaro
Engine: 305 V8
Transmission: auto
Axle/Gears: 10 bolt pozi
Re: Well I finally built it...
I tryed to build a box with the demintions given in the sticky. and it didnt turn out too good, any chance you can share the demintions of your box?
11-01-2007, 09:12 PM
#23
Supreme Member
Thread Starter
iTrader: (25)
Join Date: Jul 2004
Location: Beautiful BC
Posts: 2,623
Likes: 0
Received 0 Likes
on
0 Posts
Car: '88 IROC-Z / '91 Z28 / '91 GTA
Engine: LT4 Hot Cam 305 / L98 355 / MR 383
Transmission: 5-spd / 700R4 / 700R4
Axle/Gears: 3:45 / 3:23 / 3:23
Re: Well I finally built it...
if you think its a tight fit now, wait until it is carpeted, it will look seamless! Its true that the fit is tight, however there is some give in the plastic surround peices so you can fit your hand in there to tilt the box forward, then grab and edge to lift it out. As mentioned, you can also remove the subs and use the holes to lift the box out.
I too used the .pdf file from the sticky and found its not exact. I did however use those dimentions and cut out all the pieces and start to test fit and dry assemble the box. Once I realized that it was not correct, I simply modified the pieces to make it work.
I too used the .pdf file from the sticky and found its not exact. I did however use those dimentions and cut out all the pieces and start to test fit and dry assemble the box. Once I realized that it was not correct, I simply modified the pieces to make it work.
11-24-2007, 09:53 AM
#24
Member
iTrader: (1)
Join Date: Apr 2007
Location: Dayton, OH
Posts: 129
Likes: 0
Received 0 Likes
on
0 Posts
Car: 1985 Pontiac Trans Am - PROJECT
Engine: 412 c.i. SBC / 6.75 L
Transmission: 700R4
Axle/Gears: Borg Warner 3.27
Re: Well I finally built it...
PM sent.
Setup looks great so far. My only concern would be lack of access to and lack of air flow to the amp. Other than that, stealth mode FTMFW!
Setup looks great so far. My only concern would be lack of access to and lack of air flow to the amp. Other than that, stealth mode FTMFW!
11-24-2007, 11:17 PM
#25
Supreme Member
iTrader: (6)

Join Date: Oct 2006
Location: West of Toronto
Posts: 3,041
Likes: 0
Received 7 Likes
on
7 Posts
Car: 89 IROC
Engine: 305 TPI / ZZ4 cam
Transmission: Stage 2 700R4, LS1 driveshaft
Axle/Gears: Strange 3.42 w/ Auburn
Re: Well I finally built it...
Looks very nice so far.........good choice in beer brands 
11-25-2007, 06:34 PM
#27
Supreme Member
iTrader: (1)

Join Date: Apr 2007
Location: BUFFALO, NY
Posts: 1,196
Likes: 0
Received 0 Likes
on
0 Posts
Car: '89 IROC-Z
Engine: 355
Transmission: 700r4 edge 3000 stall
Axle/Gears: 9-bolt 3.73
Re: Well I finally built it...
love the molson canadian bottle, number 1 beer here in buffalo.. anyway the box looks pretty good, are you gonna put carpet over it? I like the stealth look, make sure you get a cover to go over it too. Got my car broken into and my stereo robbed, the crime here in buffalo sucks, and I had my subs covered up too and an alarm.
11-25-2007, 08:34 PM
#28
Member
iTrader: (1)
Join Date: Apr 2007
Location: Dayton, OH
Posts: 129
Likes: 0
Received 0 Likes
on
0 Posts
Car: 1985 Pontiac Trans Am - PROJECT
Engine: 412 c.i. SBC / 6.75 L
Transmission: 700R4
Axle/Gears: Borg Warner 3.27
Re: Well I finally built it...
I started building my version today. I've been keeping track of the measurements I'm using and I'll post them up in the sticky thread. My version will have a false floor with 'sunken' subs behind the rear seats.
11-25-2007, 08:41 PM
#29
Junior Member

Join Date: Nov 2007
Posts: 16
Likes: 0
Received 0 Likes
on
0 Posts
Re: Well I finally built it...
Looks very very nice! i had no idea there was that much room back there, esspecially for the battery and amp.. I'm inspired!
Did you account at all for internal box volume verses what the final box volume for those drivers would ideally be? (Using some calculations with a program such as freespace?)
A word about silicone.. Silicone is great stuff! However, MDF is crazy **** silicone will not really bond to MDF, well it will bond to the mdf dust thats likely on top of the mdf, its the nature of mdf.. The vibration is likely to make the silicone disconnect from your mdf..
Floor glue, such as PL Construction Floor Joist glue.. i believe its called PL 8000 when made by DAP works very well. An alternative to silicone is latex caulking, which will flex, but may also have bonding issues..
Regarding the gassing off of silicone.. I've never heard of it to affect woofer material, although its possible. However silicone is pretty well fully cured in 48 hours, after that time the gassing off factor would be pretty well zero.
11-25-2007, 09:07 PM
#30
Member
iTrader: (2)
Join Date: Aug 2006
Location: Ocala, Florida
Posts: 266
Likes: 0
Received 0 Likes
on
0 Posts
Car: 1989 IROC-Z
Engine: 5.7
Transmission: 700R-4
Axle/Gears: 9-Bolt Borg-Warner 2.77
Re: Well I finally built it...
if you think its a tight fit now, wait until it is carpeted, it will look seamless! Its true that the fit is tight, however there is some give in the plastic surround peices so you can fit your hand in there to tilt the box forward, then grab and edge to lift it out. As mentioned, you can also remove the subs and use the holes to lift the box out.
I too used the .pdf file from the sticky and found its not exact. I did however use those dimentions and cut out all the pieces and start to test fit and dry assemble the box. Once I realized that it was not correct, I simply modified the pieces to make it work.
I too used the .pdf file from the sticky and found its not exact. I did however use those dimentions and cut out all the pieces and start to test fit and dry assemble the box. Once I realized that it was not correct, I simply modified the pieces to make it work.
11-27-2007, 01:20 PM
#31
Supreme Member

Join Date: Jul 2003
Location: Markham
Posts: 2,494
Likes: 0
Received 0 Likes
on
0 Posts
Car: 1990 Camaro
Engine: 355ci
Transmission: TKO-600 5 speed
Axle/Gears: 3.73 10 bolt
Re: Well I finally built it...
i was actually going to build a box for mids and tweeters in my seat delete, but apparently even those are better just left in the B pillars because again the closer you put them to you the worse theyre going to sound
sorry back to topic
11-27-2007, 05:07 PM
#32
Junior Member
Join Date: Aug 2006
Location: tennessee
Posts: 88
Likes: 0
Received 0 Likes
on
0 Posts
Car: 89 iroc z
Engine: tpi
Transmission: 700r4
Axle/Gears: 3.23
Re: Well I finally built it...
thats cool looking and all but i bet you could get a better sound out of it if you ported it has anyone made a ported box for the trunk space
11-29-2007, 10:56 AM
#33
Re: Well I finally built it...
Some silicones outgas stuff that will degrade some of the softer woofer surrounds, not really a good thing to use to seal up a box. Really, your best bet is to be **** retentive about fitment and have all the joints tight enough that the glue seals them without having to goo up the inside of the box� _any_ gap in the joints hurts structural rigidity and will hurt the final sound of the box anyway.
02-05-2008, 10:00 PM
#34
Supreme Member
Thread Starter
iTrader: (25)
Join Date: Jul 2004
Location: Beautiful BC
Posts: 2,623
Likes: 0
Received 0 Likes
on
0 Posts
Car: '88 IROC-Z / '91 Z28 / '91 GTA
Engine: LT4 Hot Cam 305 / L98 355 / MR 383
Transmission: 5-spd / 700R4 / 700R4
Axle/Gears: 3:45 / 3:23 / 3:23
Re: Well I finally built it...
thanks for all the comments guys. I'm really not worried about the silicon destroying my subs or not bonding well to the mdf, it was used as overkill. All the seams were glued and screwed so I'm positive they were air tight, I then siliconed the seams for extra measure. I also left the box open and exposed for a couple days to ensure the silicon was dry. The silicon I used applies clear and turns white when dried and specifics a 24 hour drying time, so I'm sure I was safe.
On another note, I'm having trouble finding automotive grade carpet that matches my interior to cover this box with.. thats the trouble with small towns. Any suggestions on where I can look online? I really don't need all that much.. shipping would probably cost me as much as the material.
On another note, I'm having trouble finding automotive grade carpet that matches my interior to cover this box with.. thats the trouble with small towns. Any suggestions on where I can look online? I really don't need all that much.. shipping would probably cost me as much as the material.
 02-05-2008, 11:43 PM
#36
Member
iTrader: (1)
Join Date: Dec 2007
Location: Big Rock,IL
Posts: 493
Likes: 0
Received 0 Likes
on
0 Posts
Car: 91 RS
Engine: 350 TBI
Transmission: World Class T-5
Axle/Gears: 3.27 9-Bolt LSD
Re: Well I finally built it...
how do you have that amp running? i have worked with those amps alot when i worked in a shop and it is a good amp? they are set up with three amps-do you have the front channels bridged to one and the rears bridged to the other and the third not hooked up?
02-06-2008, 12:24 AM
#37
Supreme Member
Thread Starter
iTrader: (25)
Join Date: Jul 2004
Location: Beautiful BC
Posts: 2,623
Likes: 0
Received 0 Likes
on
0 Posts
Car: '88 IROC-Z / '91 Z28 / '91 GTA
Engine: LT4 Hot Cam 305 / L98 355 / MR 383
Transmission: 5-spd / 700R4 / 700R4
Axle/Gears: 3:45 / 3:23 / 3:23
Re: Well I finally built it...
I really like this amp, I shopped around for a while because I wanted to find a good quality amp with decent power that would run my whole system and have built in crossovers, etc.
02-06-2008, 10:46 AM
#38
Re: Well I finally built it...
Nice job man. I really want to put somethign together for my 86. But probably only use a single sub. I need to retain my t-top storage area too. Im not into laying them on the back seats like some.
My problem is, Im so dumb when it comes to car stereo components, what works with what, etc etc. How to wire the speakers and amps and ohm ratings and wattage handling... haha. Burns me out.
I like the looks of that kicker amp though. Because Ide like to upgrade all 4 speakers and add a sub, that seems perfect. Not sure if I can go with kick panel speakers, because I converted to 6speed, and my feet/shoes are big. Ide hate to loose foot room. And i might need a cage soon, so I dont want to interfere with the door bar. But...
either way...good work and that definetly gives me some ideas!
J.
02-06-2008, 05:33 PM
#39
Supreme Member

Join Date: Apr 2002
Location: New Jersey
Posts: 3,552
Likes: 0
Received 5 Likes
on
5 Posts
Car: 86 Corvette, 89 IROC, 1999 TA
Engine: 350, 350, LS1
Transmission: 700r4, 700r4, T-56
Axle/Gears: 3.07, 373, 4.10
Re: Well I finally built it...
how many beers did the job take? looks great!
Last edited by 89RsPower!; 02-06-2008 at 05:36 PM.
02-06-2008, 06:36 PM
#40
Member
Join Date: May 2006
Location: Melbourne Australia
Posts: 330
Likes: 0
Received 1 Like
on
1 Post
Car: 88 GTA
Engine: Ls1
Transmission: 4L60E
Axle/Gears: 9 bolt 3.27
Re: Well I finally built it...
I used the same plans too. I also had to space my subs up a bit, mine are MTX 12in. After I made the box with the spacers etc, I fibreglassed it and sanded and bondoed to make it VERY smooth, then I covered it with vinyl. Here's a couple of pics
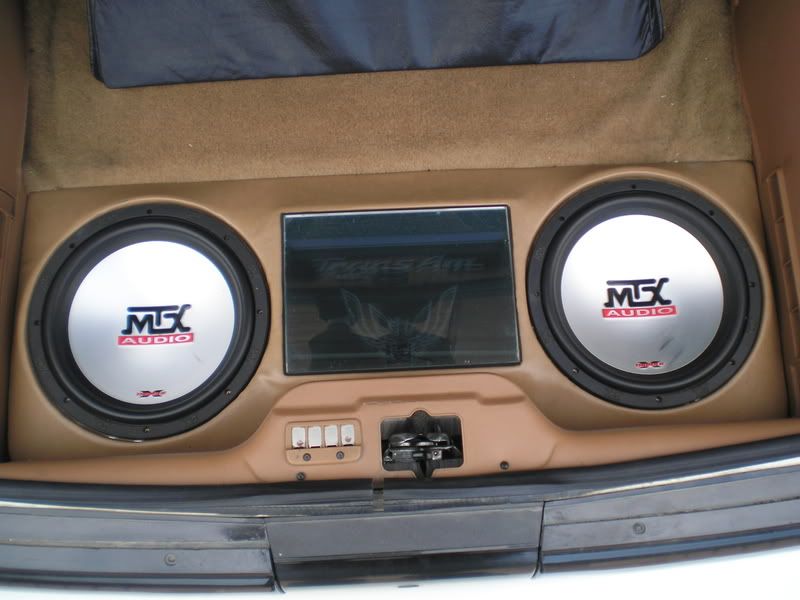

And here's a pic of the light in the center
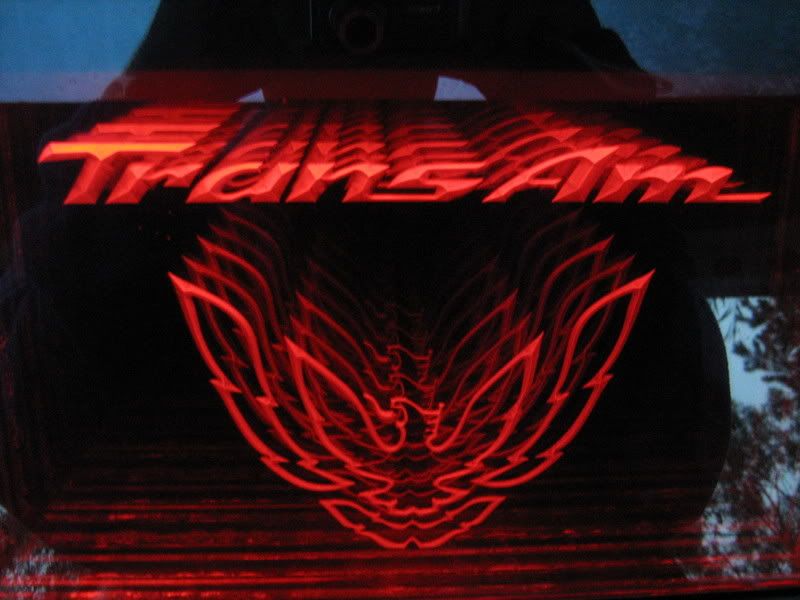
And here's a pic of the light in the center
02-06-2008, 08:59 PM
#41
Supreme Member
iTrader: (1)
Join Date: Apr 2007
Location: BUFFALO, NY
Posts: 1,196
Likes: 0
Received 0 Likes
on
0 Posts
Car: '89 IROC-Z
Engine: 355
Transmission: 700r4 edge 3000 stall
Axle/Gears: 9-bolt 3.73
Re: Well I finally built it...
damn thats a nice set up man, i had one similar to that it just had regular neon lights though around the amps. i cant have a system anymore it will just get jacked
02-06-2008, 10:34 PM
#42
Member
Join Date: May 2006
Location: Melbourne Australia
Posts: 330
Likes: 0
Received 1 Like
on
1 Post
Car: 88 GTA
Engine: Ls1
Transmission: 4L60E
Axle/Gears: 9 bolt 3.27
Re: Well I finally built it...
Thanks mate, I have 5% limo tint on the back window so you can't see it with the hatch closed.
02-07-2008, 09:10 AM
#43
Supreme Member
iTrader: (1)
Join Date: Apr 2007
Location: BUFFALO, NY
Posts: 1,196
Likes: 0
Received 0 Likes
on
0 Posts
Car: '89 IROC-Z
Engine: 355
Transmission: 700r4 edge 3000 stall
Axle/Gears: 9-bolt 3.73
Re: Well I finally built it...
i had my stuff tinted too and covered with a blanket that matched the interior, i didnt have a head unit so there was no way you could tell, never bumped it either, still got jacked have no idea how they knew it was in there. oh well it turned out good cos i hustled to insurancance company for like 4g's and bought a new iroc lol
02-07-2008, 10:46 AM
#44
Senior Member
Join Date: Oct 2007
Location: Stone Mtn., GA
Posts: 585
Likes: 0
Received 0 Likes
on
0 Posts
Car: 90 Camaro RS
Engine: V6 3.1 MFI
Transmission: 4 Speed Auto 700R4
Axle/Gears: 3.23
Re: Well I finally built it...
Nice job, brisk
 o just one more thing
Oooooooo Canada!
Our home and native land!.........
and
VAN454 could you send me a pic of your back window iv been try to pick how tinted i want mine to be.
o just one more thingOooooooo Canada!
Our home and native land!.........
and
VAN454 could you send me a pic of your back window iv been try to pick how tinted i want mine to be.
Last edited by RS Reaper; 02-16-2009 at 09:03 PM.
02-16-2009, 08:47 PM
#45
Junior Member

Join Date: Feb 2009
Location: Baltimore Md
Posts: 9
Likes: 0
Received 0 Likes
on
0 Posts
Car: 91 RS (In project) 350 TBI
Engine: 350 TBI Pulled From 87 Chev Truck
Transmission: stock Manual 5 speed
Axle/Gears: stock
Re: Well I finally built it...
Nice setup. Theres a few boxmakers out there that focus there attention on boxes for therd gen camaros but ive never seen one like this. If you could get that stealthy like you said you could sell them and in my opinion people would rather have your box than the compotition. Thats just me thoe. Get it right and see if it works.

Thread
Thread Starter
Forum
Replies
Last Post
Zeek1041
Theoretical and Street Racing
12
09-30-2015 11:00 AM
Buggy Disaster
Auto Detailing and Appearance
12
09-22-2015 01:15 PM