My spin on a Line Lock install. Pictures and Part Numbers.
 03-01-2015, 02:00 PM
#1
Member

Thread Starter
iTrader: (2)
Join Date: Feb 2010
Posts: 460
Likes: 0
Received 3 Likes
on
3 Posts
Car: '89 Camaro
Engine: LS1
Transmission: 4L65/70E
Axle/Gears: 9 Inch, 3.70 gears
My spin on a Line Lock install. Pictures and Part Numbers.
I know this has been covered before, but while I was researching this install I'd have to piece together information from a bunch of different threads. I'm not a complete bonehead, but I'm not a rocket scientist either, but I had a few questions after reading the threads that I found on here doing a search for "line lock" or "roll control". My idea was to compile a bunch of the stuff I read about on here, plus my experience this weekend with the install, and put it on here. Hopefully this helps someone out.
First, I mounted the line lock solenoid and wired it up. Sticking with the sleeper theme, I didn't want a switch and indicator light that stuck out, I wanted something that blended right in with the interior. Since my car only gets driven in nice weather now, I pulled out the defroster switch, cut the wire for that and used that to power the solenoid. It's an ignition hot circuit, so that switch is dead when the car isn't running and the line lock only pulls 3 amps. In addition, it has a timer, so the line lock won't be forgotten about in the on position (originally this was designed so that you wouldn't forget to turn off the defroster, since it pulls a lot of power and creates not an insignificant amount of heat on the glass) I also ran the wire through the C100 bulkhead connector and through the headlight harness, so that it would be as hidden as possible for a nice clean install.
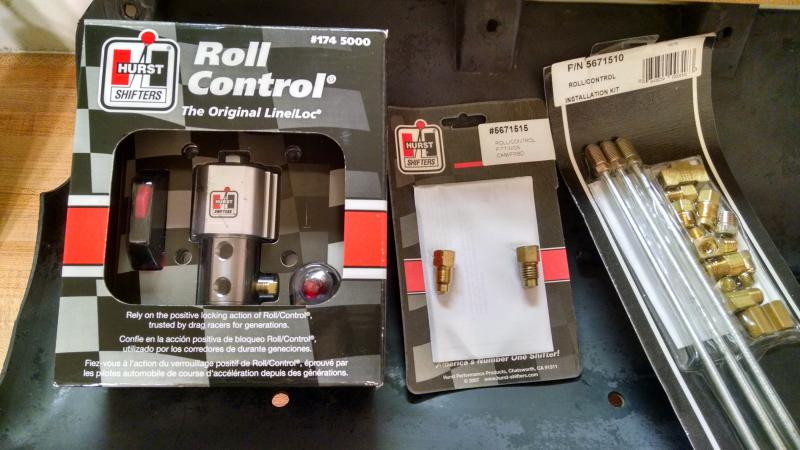
Here's the line lock kit that I used, I bought it on here for $100. However, after doing the install there are some things that I'd do differently, or recommend that people do if they want to follow a similar route.
The Hurst roll control, aka Line lock, http://www.summitracing.com/parts/huu-1745000
The Hurst install kit, http://www.summitracing.com/parts/huu-5671510
The Hurst adapter fittings that are supposed to fit in our cars, http://www.summitracing.com/parts/huu-5671515
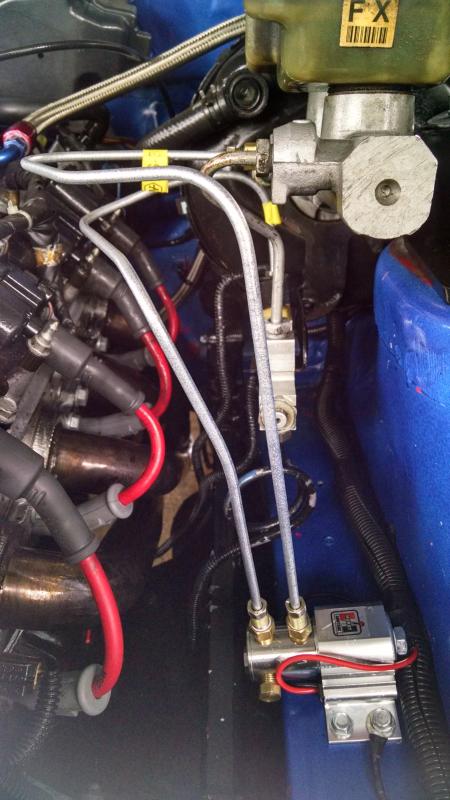
I ended up plumbing mine between the master cylinder and the proportioning valve, and used the supplied 24" lines and bent the whole shebang with a cheap tubing bender from Autozone. Don't forget about the 1/8" npt to 3/16" flare adapters in the body of the solenoid. Also, there is one hole on the side of the body of the solenoid that isn't plugged, and the plug that comes already installed in the solenoid isn't tight. Some dumbass (KHulsebus) didn't notice this until it puked brake fluid all over the place while bleeding the system. However, even with all the fittings that come in the kit, I was one short. This is where if you're following what I did would differ from the directions and the parts I listed. I needed one more fitting, a M11x1.5 to 3/8in-24. A quick search online gave me this, http://www.autozone.com/brakes-and-t...5283_156883_0/
SO, my recommendation would be to skip buying the pair of adapter fittings (HUU-5671515) and just pick up two of those from a local parts store. The part number (#BLF32C) interchanges between Pepboys, Autozone, O'Rileys, Checker, whatever you have near you.
Here's the finished product.
First, I mounted the line lock solenoid and wired it up. Sticking with the sleeper theme, I didn't want a switch and indicator light that stuck out, I wanted something that blended right in with the interior. Since my car only gets driven in nice weather now, I pulled out the defroster switch, cut the wire for that and used that to power the solenoid. It's an ignition hot circuit, so that switch is dead when the car isn't running and the line lock only pulls 3 amps. In addition, it has a timer, so the line lock won't be forgotten about in the on position (originally this was designed so that you wouldn't forget to turn off the defroster, since it pulls a lot of power and creates not an insignificant amount of heat on the glass) I also ran the wire through the C100 bulkhead connector and through the headlight harness, so that it would be as hidden as possible for a nice clean install.

Here's the line lock kit that I used, I bought it on here for $100. However, after doing the install there are some things that I'd do differently, or recommend that people do if they want to follow a similar route.
The Hurst roll control, aka Line lock, http://www.summitracing.com/parts/huu-1745000
The Hurst install kit, http://www.summitracing.com/parts/huu-5671510
The Hurst adapter fittings that are supposed to fit in our cars, http://www.summitracing.com/parts/huu-5671515
I ended up plumbing mine between the master cylinder and the proportioning valve, and used the supplied 24" lines and bent the whole shebang with a cheap tubing bender from Autozone. Don't forget about the 1/8" npt to 3/16" flare adapters in the body of the solenoid. Also, there is one hole on the side of the body of the solenoid that isn't plugged, and the plug that comes already installed in the solenoid isn't tight. Some dumbass (KHulsebus) didn't notice this until it puked brake fluid all over the place while bleeding the system. However, even with all the fittings that come in the kit, I was one short. This is where if you're following what I did would differ from the directions and the parts I listed. I needed one more fitting, a M11x1.5 to 3/8in-24. A quick search online gave me this, http://www.autozone.com/brakes-and-t...5283_156883_0/
SO, my recommendation would be to skip buying the pair of adapter fittings (HUU-5671515) and just pick up two of those from a local parts store. The part number (#BLF32C) interchanges between Pepboys, Autozone, O'Rileys, Checker, whatever you have near you.
Here's the finished product.

Last edited by khulsebus; 03-20-2015 at 10:57 PM.
 03-01-2015, 03:33 PM
#2
Member
Thread Starter
iTrader: (2)
Join Date: Feb 2010
Posts: 460
Likes: 0
Received 3 Likes
on
3 Posts
Car: '89 Camaro
Engine: LS1
Transmission: 4L65/70E
Axle/Gears: 9 Inch, 3.70 gears
Re: My spin on a Line Lock install. Pictures and Part Numbers.
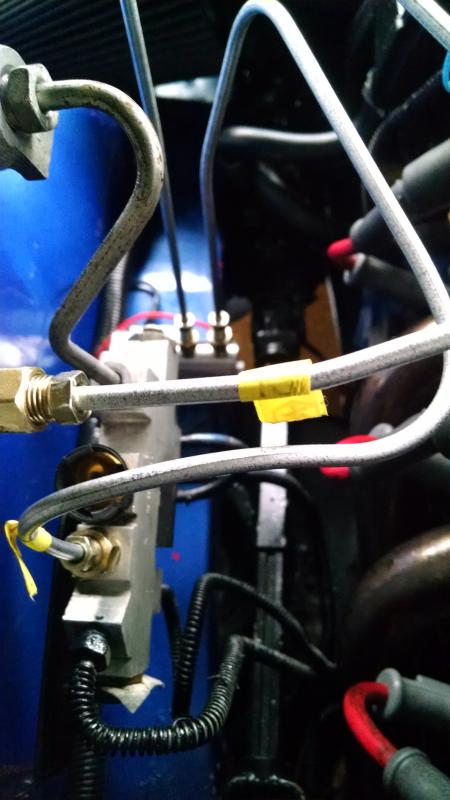
I received a PM asking for more pictures that better showed the install. I replied to them, but I thought I should post them on here as well. This one you can see the routing of the line going from the line lock to the proportioning valve a little better.
This one you can see the routing of the line that goes from the master to the proportioning valve.
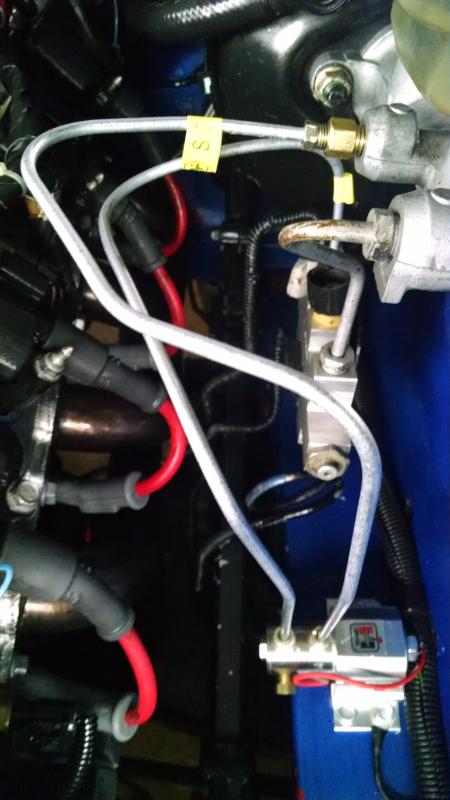
The inlet side of the solenoid has an M on it, which should be the line closest to the master. There are two other holes, or ports, in the body. You could install this after the proportioning valve, and then run the two lines off of the valve and install a pressure warning switch or some kind of a deal to keep the tail lights lit while the system is engaged. I chose not to do that after talking with Matt (mw66nova) and looking at his pictures.
Also, to clarify things a little better, I mounted the solenoid with the included screws with two holes I drilled into the front sub-frame rail and used another hole that was already there. I chose to mount it there because that's the best place I could mount it to and get my drill in place to drill the holes. Also, I was trying to find a place where the screws wouldn't be going into the wheel well. Could have very well used bolts instead of the screws, but at the time I didn't have any lying around that were matching. This car may be built on a budget, but I do like to pay attention to details like that. If the engine were out while I did this, I would have a more sanitary mounting where I could get the drill at a better angle.
If anyone would like, I can take a picture of the instructions, but honestly they aren't very good.

Thread
Thread Starter
Forum
Replies
Last Post
1992 Trans Am
History / Originality
27
05-10-2023 07:19 PM
I'llrocya
Interior Parts for Sale
3
02-02-2016 11:43 PM