How To: Brake caliper rebuild
 03-18-2013, 08:34 PM
#1
Supreme Member

Thread Starter
iTrader: (30)
Join Date: Sep 2005
Location: O'Fallon, MO
Posts: 6,258
Likes: 0
Received 4 Likes
on
4 Posts
Car: 1991 Z28 convertible built 3/1/1990
Engine: Cammed 6.0L LSX
Transmission: T56
Axle/Gears: custom Ford 8.8", 4.10 gears
How To: Brake caliper rebuild
A few people have asked me to make a how-to thread for rebuilding brake calipers since I'm rebuilding my '98-'02 fbody (LS1) front and rear calipers for my car. They were recently powdercoated and in order to coat them, they had to be dismantled completely. So now I get to start fresh with all new seals, abutment clips, etc.
As of today all I have done is the new seals, but I will update this post when the rest of my hardware comes in the mail. The rest of the parts should be here in about a week.
Replacing seals:
This is an important thing to remember when your calipers stop working correctly: new seals are in most cases MUCH cheaper than buying a new or re-manufactured calipers. A re-manufactured caliper is just a used caliper that someone else replaced the seals in and is being sold again, so in essence you're paying someone else labor to do what I am showing you how to do below.
For my LS1 calipers, all the seals were about $12 for front and rear. Keep in mind most retailers sell the seals in a package per CALIPER, not per AXLE. So buy your quantities in accordance.
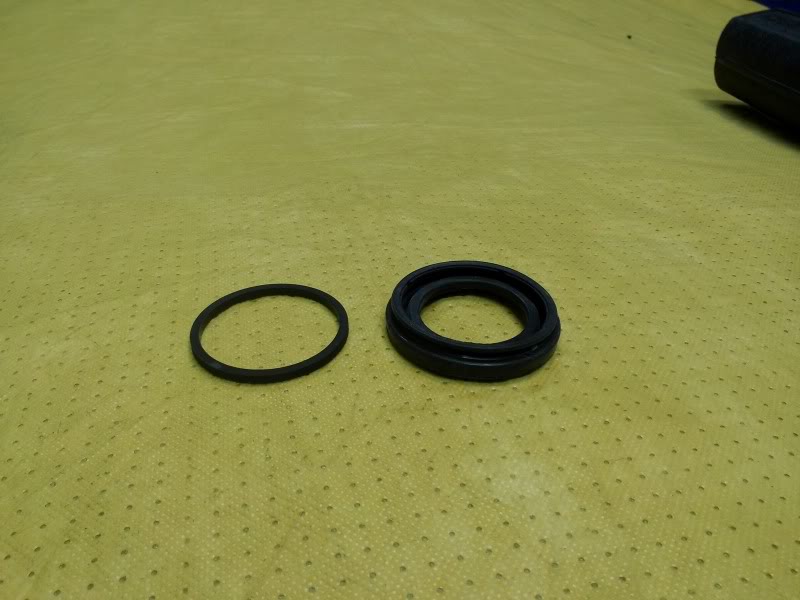
Here are the seals I bought from RockAuto.com, sorry for the dark photo, it was taken inside my dining room. This how-to is for one of my rear calipers which are single piston just like stock 3rd gen front and rear calipers. For dual caliper pistons, all the steps below are exactly the steps you will do except you will do it twice.

Out of the packaging, here's what you're looking at.
The one on the left is the pressure seal that the piston will slide in and out of, keeping the brake fluid behind it. When you lose hydraulic pressure with a caliper, this seal is the culprit.
The part on the right is a dust boot, and keeps brake dust and other debris from getting between the piston and the cylinder of the caliper.
To remove the piston from the caliper, simply take an air compressor with an air chuck and turn the pressure up to 50-60psi and insert the air chuck into the bleeder screw hole on the caliper. The piston will be pushed out by the air pressure. Be careful doing this, as sometimes the piston will fly out with great force. Aim it away from anything you don't want getting dinged up. Once you get the piston out, remove the old pressure seal.
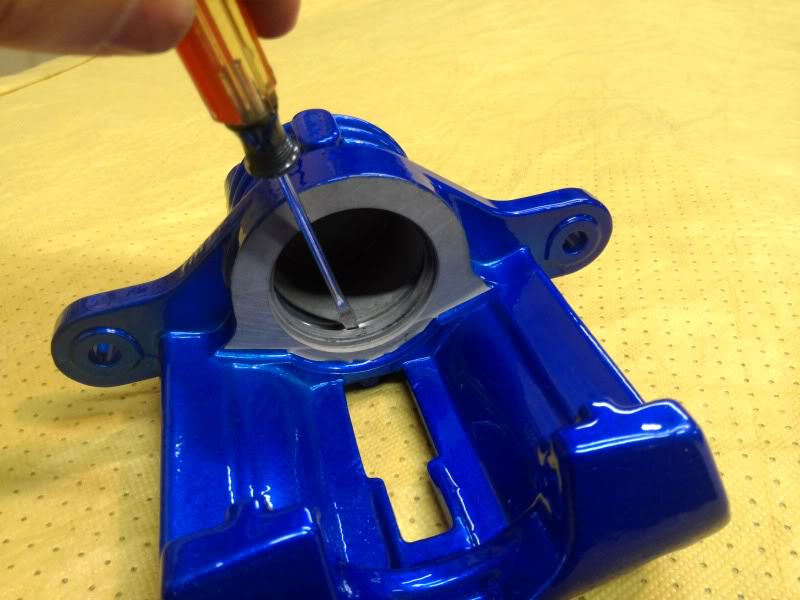
You will see two ridges on the inner wall of the caliper cylinder. The one that the screwdriver is pointing to is where the pressure seal will be inserted. The ridge that is forward of the screwdriver in the photo is where the dust boot will attach to.
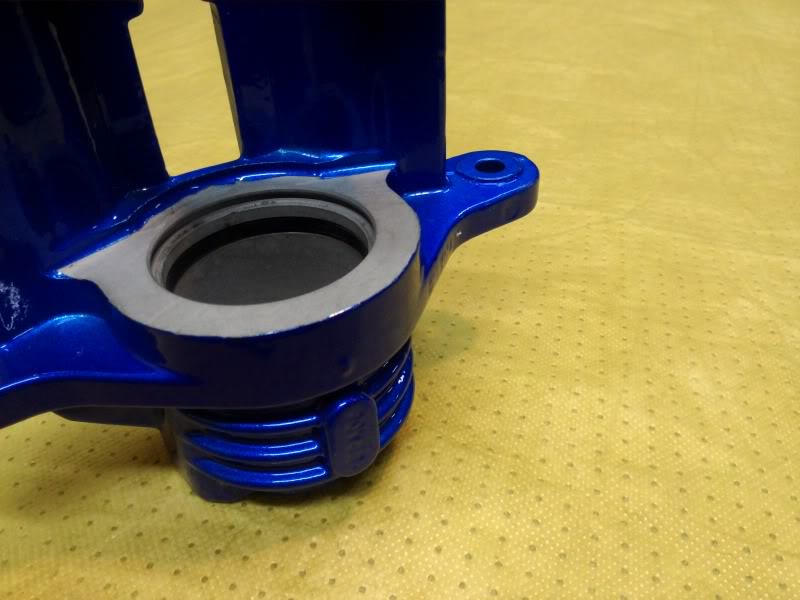
The next step after you have the piston out of the caliper is really simple. Just insert the pressure seal into the ridge designated for it.
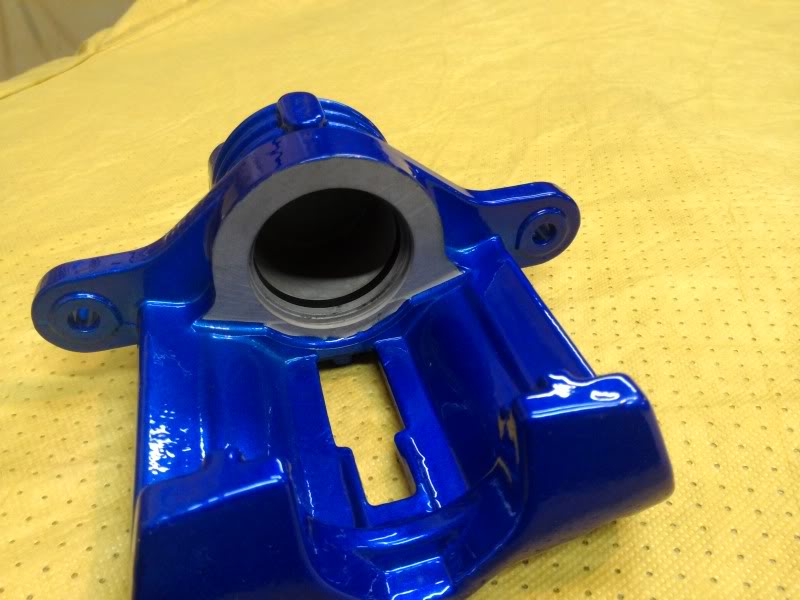
Here's another look at the pressure seal properly seated in the cylinder. Make sure that the seal is seated perfectly smooth and is not twisted or lop sided in any way. You can also get a good look at the ridge designated for the dust boot.
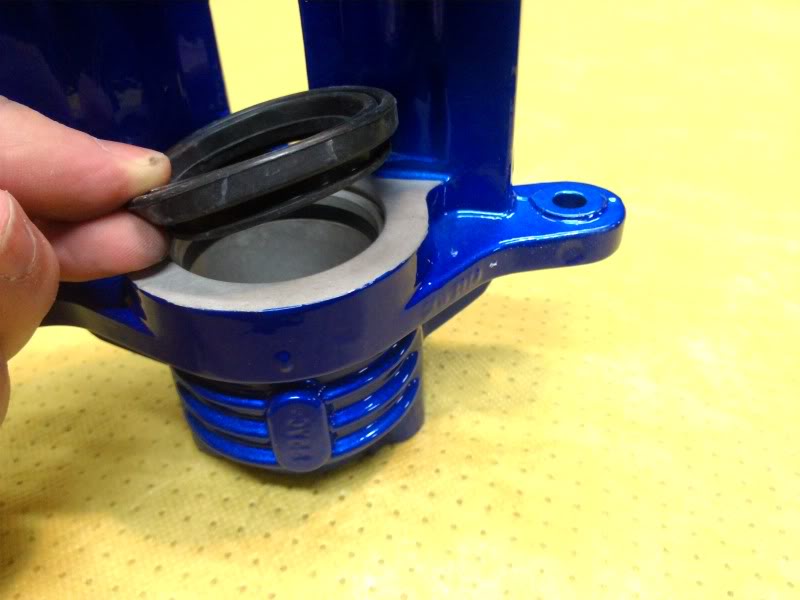
The dust boot only goes on one way, and as you can see there is a lip on the boot that will fit in the ridge of the cylinder. The way I am holding it is the correct direction it should be installed.
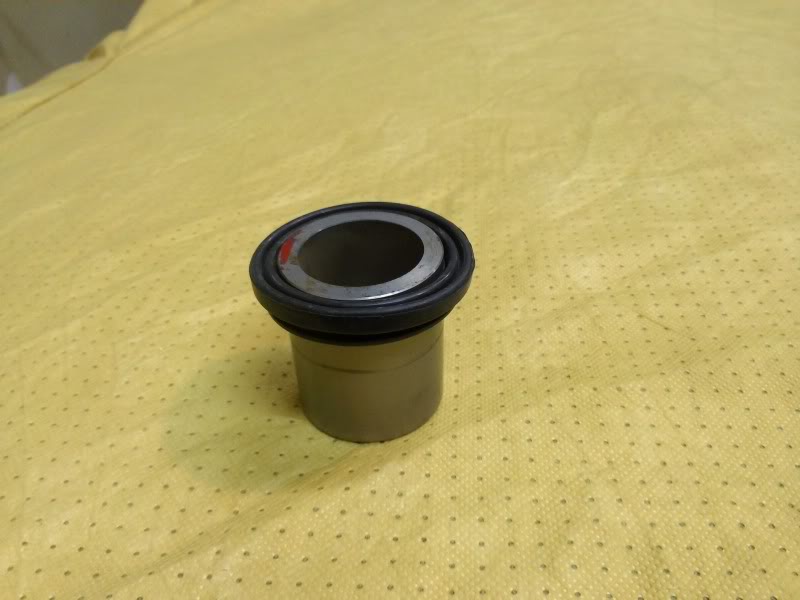
Here's a look at what the piston looks like. See how it also has a ridge in it, the inner lip of the dust boot will seat in that ridge.

Here is the dust boot properly installed on the piston.
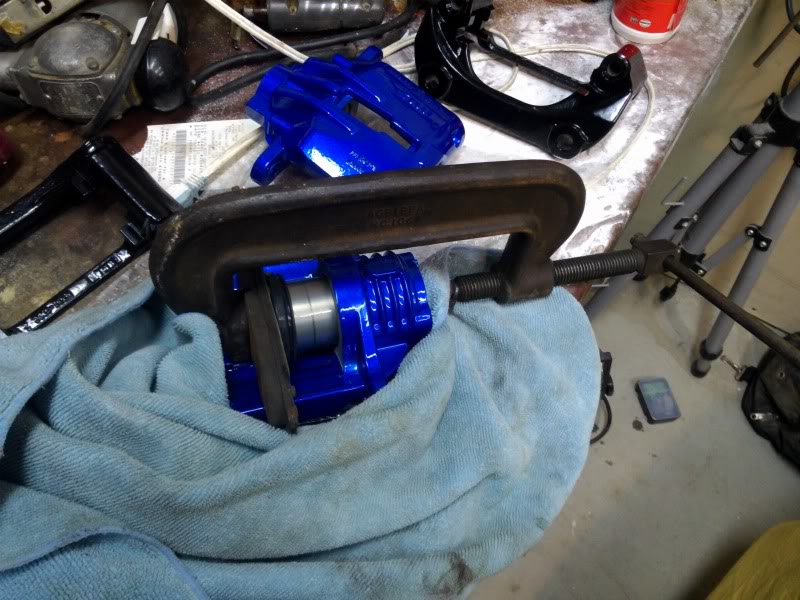
The next step is crucial in the sense that when you put the piston in the cylinder, you have to ensure that it is going in perfectly straight. You don't want it go start going in crooked. Set it up by hand and then grab a C-clamp big enough to go around the backside of the caliper and to put an old used brake pad on the face of the cylinder to make sure that you're using a straight, even surface to push it into the caliper.
If you run into any problems with the piston going in crooked OR when you're using the C-clamp, it gives you any struggle, STOP and try to grab the piston by hand and straighten it out. The piston should go in really smooth with very little effort using the C-clamp.
And here's what you have when you have the piston in the cylinder. All you need to do now is wiggle the dust boot into its place of the cylinder.
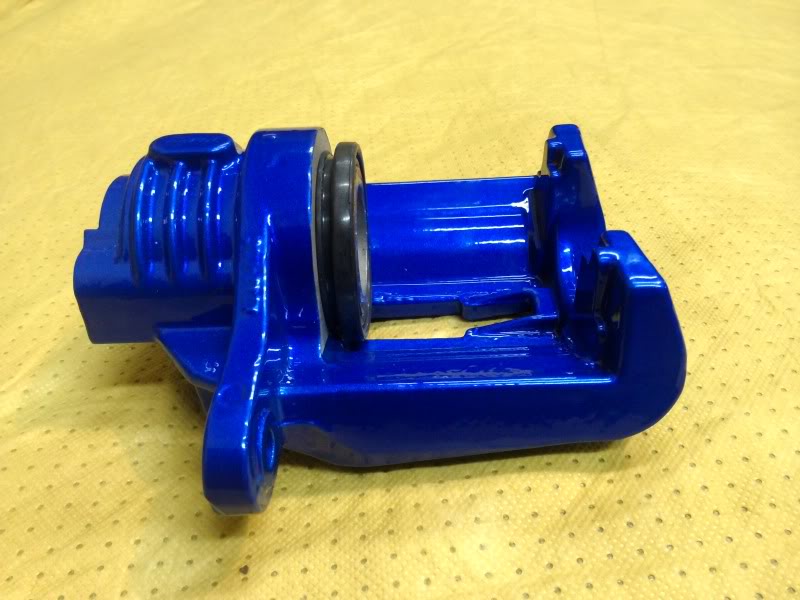
I will update when I have the rest of the hardware to show how everything else goes together.
As of today all I have done is the new seals, but I will update this post when the rest of my hardware comes in the mail. The rest of the parts should be here in about a week.
Replacing seals:
This is an important thing to remember when your calipers stop working correctly: new seals are in most cases MUCH cheaper than buying a new or re-manufactured calipers. A re-manufactured caliper is just a used caliper that someone else replaced the seals in and is being sold again, so in essence you're paying someone else labor to do what I am showing you how to do below.
For my LS1 calipers, all the seals were about $12 for front and rear. Keep in mind most retailers sell the seals in a package per CALIPER, not per AXLE. So buy your quantities in accordance.
Here are the seals I bought from RockAuto.com, sorry for the dark photo, it was taken inside my dining room. This how-to is for one of my rear calipers which are single piston just like stock 3rd gen front and rear calipers. For dual caliper pistons, all the steps below are exactly the steps you will do except you will do it twice.
Out of the packaging, here's what you're looking at.
The one on the left is the pressure seal that the piston will slide in and out of, keeping the brake fluid behind it. When you lose hydraulic pressure with a caliper, this seal is the culprit.
The part on the right is a dust boot, and keeps brake dust and other debris from getting between the piston and the cylinder of the caliper.
To remove the piston from the caliper, simply take an air compressor with an air chuck and turn the pressure up to 50-60psi and insert the air chuck into the bleeder screw hole on the caliper. The piston will be pushed out by the air pressure. Be careful doing this, as sometimes the piston will fly out with great force. Aim it away from anything you don't want getting dinged up. Once you get the piston out, remove the old pressure seal.
You will see two ridges on the inner wall of the caliper cylinder. The one that the screwdriver is pointing to is where the pressure seal will be inserted. The ridge that is forward of the screwdriver in the photo is where the dust boot will attach to.
The next step after you have the piston out of the caliper is really simple. Just insert the pressure seal into the ridge designated for it.
Here's another look at the pressure seal properly seated in the cylinder. Make sure that the seal is seated perfectly smooth and is not twisted or lop sided in any way. You can also get a good look at the ridge designated for the dust boot.
The dust boot only goes on one way, and as you can see there is a lip on the boot that will fit in the ridge of the cylinder. The way I am holding it is the correct direction it should be installed.
Here's a look at what the piston looks like. See how it also has a ridge in it, the inner lip of the dust boot will seat in that ridge.
Here is the dust boot properly installed on the piston.
The next step is crucial in the sense that when you put the piston in the cylinder, you have to ensure that it is going in perfectly straight. You don't want it go start going in crooked. Set it up by hand and then grab a C-clamp big enough to go around the backside of the caliper and to put an old used brake pad on the face of the cylinder to make sure that you're using a straight, even surface to push it into the caliper.
If you run into any problems with the piston going in crooked OR when you're using the C-clamp, it gives you any struggle, STOP and try to grab the piston by hand and straighten it out. The piston should go in really smooth with very little effort using the C-clamp.
And here's what you have when you have the piston in the cylinder. All you need to do now is wiggle the dust boot into its place of the cylinder.
I will update when I have the rest of the hardware to show how everything else goes together.
 03-18-2013, 10:21 PM
#2

Re: How To: Brake caliper rebuild
I wish more people would do this. I scored some LS1 calipers off ebay CHEAP because they had torn up seals and generally looked terrible. So much cheaper than buying remanufactured calipers. I think I paid around $6 per front caliper, that and a wire brush and they are good to go. Huge savings there.
The only tricky part is coming up with a method to get the dust boots in. I finally came up with something that worked pretty well, but it takes a little playing with it to figure out something htat works. I dont think there's any tool out there for it, and it's not hard, just may take you a few minutes of messing with it to get it right.
The only tricky part is coming up with a method to get the dust boots in. I finally came up with something that worked pretty well, but it takes a little playing with it to figure out something htat works. I dont think there's any tool out there for it, and it's not hard, just may take you a few minutes of messing with it to get it right.
03-18-2013, 10:46 PM
#3
Supreme Member
Thread Starter
iTrader: (30)
Join Date: Sep 2005
Location: O'Fallon, MO
Posts: 6,258
Likes: 0
Received 4 Likes
on
4 Posts
Car: 1991 Z28 convertible built 3/1/1990
Engine: Cammed 6.0L LSX
Transmission: T56
Axle/Gears: custom Ford 8.8", 4.10 gears
What I think I will end up trying is pushing the piston further into the cylinder where the dust boot goes past its seat, then use the air chuck to push it back out and hopefully the lip of the boot pops into the seat on the way back out.
think that will work?
Posted from Thirdgen.org App for Android
think that will work?
Posted from Thirdgen.org App for Android
03-18-2013, 11:09 PM
#4
Re: How To: Brake caliper rebuild
How about if you put the outer seal on the caliper first and then slid the piston into that? might be easier getting the outer seal onto the piston that way. You could probably pull the seal up into the groove of the piston.
 04-12-2013, 08:29 PM
#6

Re: How To: Brake caliper rebuild
I have the solution to the piston boot!!!!!!!!!!!!!!!
lube the inner seal with brake fluid and the piston body, lay the piston face down on the table and put the seal on the butt end of the piston just enough for it to sit comfortably on the piston without popping back off.
the edge of the boot that goes into the caliper should almost be at the end of the butt of the piston. you will need to sorta pull the outer edge of the boot back enough for the it to be past the edge of piston. hang the lower part of the boot into the lower part of the groove of the caliper and slowly walk it around, take a flat blade screw driver and tuck the last part (pic 2) into the groove. no need to worry about damaging the seal with the screw driver, not anywhere near the pressure to puncture it as you tuck the boot. it slips right in pretty much.
NOW work the piston into the caliper by hand and once the piston gets to the end the stacking of the boot pops the boot into the groove of the piston. this procedure took me all of 2 mins.
pics are in order.
Trending Topics
07-01-2014, 01:04 AM
#8
Junior Member

Join Date: Sep 2013
Location: Mesa ,AZ
Posts: 24
Likes: 0
Received 0 Likes
on
0 Posts
Car: 1989 RS Black Vert
Engine: 305 TBI
Transmission: Auto
Axle/Gears: 2:7some thing
Re: How To: Brake caliper rebuild
Do know any place to get the dust boots for the E Brake

Thread
Thread Starter
Forum
Replies
Last Post
Eric-86sc
Engine/Drivetrain/Suspension Parts for Sale
3
04-03-2016 03:52 PM
sailtexas186548
Engine/Drivetrain/Suspension Parts for Sale
8
01-19-2016 12:21 PM