Dimensions for well sub box
 09-05-2011, 10:55 AM
#151
Junior Member

Join Date: Sep 2011
Posts: 5
Likes: 0
Received 0 Likes
on
0 Posts
Car: A 84 Chevrolet Camaro Z28 soon
Engine: 305


 09-24-2011, 06:00 PM
#154
Member
Join Date: Feb 2011
Location: West Michigan
Posts: 175
Likes: 0
Received 0 Likes
on
0 Posts
Car: 1989 Formula Firebird
Engine: Swapped 350 TPI speed density
Transmission: 700R4
Axle/Gears: 2.73 (soon to be 3.42)
Re: Dimensions for well sub box
can you pm me the drawings or wherever you got the dimensions
12-02-2011, 10:35 AM
#155
Member
iTrader: (1)

Join Date: Nov 2011
Location: Holland, MI
Posts: 402
Likes: 0
Received 0 Likes
on
0 Posts
Car: 1982 Firebird
Engine: 2.8 N/A
Transmission: Manual 4 Speed
Re: Dimensions for well sub box
Does anyone have actual dimensions that work? So far i just see a lot of talk about how dimensions given by a few people in this thread dont work. Also, does anyone build these for people on here? Thanks
12-03-2011, 01:55 PM
#156
Re: Dimensions for well sub box
Its a shot in the dark really. Just go over all the posts and choose the one that includes the 3/4 thickness of the MDF. the added 3/4 thickness will be a good shot because the thickness is added to the measurements.
12-03-2011, 09:16 PM
#157
Senior Member

iTrader: (2)
Join Date: Jun 2007
Location: www.nythirdgen.com
Posts: 759
Likes: 0
Received 0 Likes
on
0 Posts
Car: 1987 IROC-Z
Engine: 350 TPI
Transmission: 700R Auto
Re: Dimensions for well sub box
One of the members Darren emailed me the attached pdf plans for a sub box a few years ago. These work perfect
01-13-2012, 08:28 AM
#160
 02-22-2012, 12:09 PM
#161
Junior Member

Join Date: Feb 2012
Posts: 15
Likes: 0
Received 0 Likes
on
0 Posts
Re: Dimensions for well sub box
hey guys for the longest time when i first came to this site i wondered the measurements of the boxes that people put in the well area. well i got one and now im posting up what i got. its mad out of 3/4 inch MDF so each side view measurement includes the thickness of 1 1/2 inch of mdf (front and rear panels 3/4 + 3/4 = 1 1/2)


02-22-2012, 09:00 PM
#162
Junior Member
Join Date: Feb 2012
Posts: 15
Likes: 0
Received 0 Likes
on
0 Posts
Re: Dimensions for well sub box
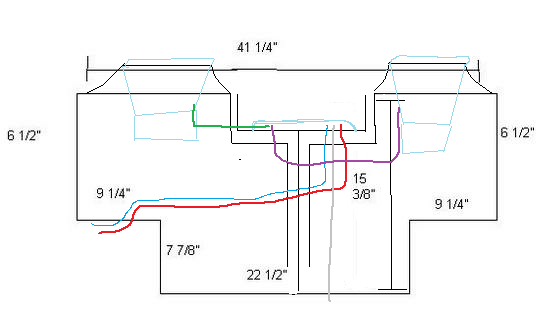
I know this is an old thread but i thought i should bring it to attention that the bottom dimension is incorrect. it says 28 1/8" but should actually be 26 1/8".
02-22-2012, 09:52 PM
#163
Junior Member
Join Date: Feb 2012
Posts: 15
Likes: 0
Received 0 Likes
on
0 Posts
Re: Dimensions for well sub box
another thing i noticed is that these directions say the very bottom piece should be 10". is this right or should it be 8 3/4?
02-23-2012, 11:38 AM
#164
Junior Member
Join Date: Feb 2012
Posts: 15
Likes: 0
Received 0 Likes
on
0 Posts
Re: Dimensions for well sub box
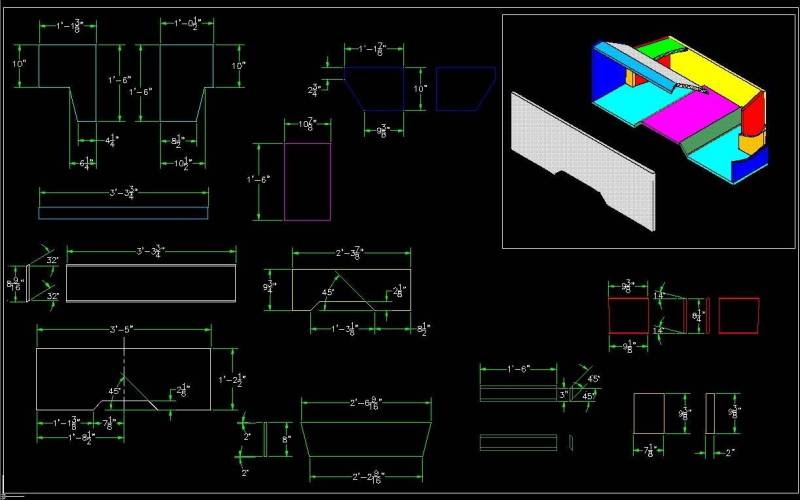
Ok... a little longer than 24 hours, but here goes...
A - Top measure 39 1/2"
Bottom 26 1/8"
Outside indented cuts 9" x 5 3/8" on driver side and 9" x 7 7/8" on pass
B - 26 1/8" x 8 3/4"
C - Top measure 39 1/2"
Bottom 26 1/8"
Outside indented cuts 7 1/2" x 5 3/8" on driver side and 7 1/2" x 7 7/8" on pass
Center indented cut 7 1/2" x 15 1/4" (almost 100% positive this is centered at the top)
D, G - Outside 10 1/4"
Inside 8 3/4"
Bottom 8 3/4"
Top: Connect the outside and inside edges
E - 6 1/4" x 10 1/4"
H - 10 1/4" x 8 5/8"
F, I - Outside (I forgot this measurement) Measure to fit your box
Inside 10 1/4"
Bottom 8 1/2"
Top: Connect the outside and inside edges
J - 16 3/4" x 7 1/2"
K - 15 1/4" x 3"
L, M - 7 1/2" x 3"
False floor - Seat side 44"
Tails Side 42 1/2"
Width 34"
A couple of things to be aware of...
FIRST, ALL measurements may need adjusted for your car. But these are pretty exact to the pieces in my setup here: https://www.thirdgen.org/forums/car-...etup-look.html
SECOND, the 16* angle shown in the PDF is dead on.
THIRD, you will have to add some kind of support braces for the false floor close to the seats.
FOURTH, I used 3/4" mdf for everything BUT the B and J panels. They are 1/2" in my setup. This affects the setup's measurements.
Any questions, feel free to ask. Happy building!
for piece "A", what is the total height of the piece? from the bottom to the top? and does piece "B" (the very bottom) go inbetween "A" and "C" or under "A" and "C"?
06-20-2012, 11:19 PM
#165
Junior Member

Join Date: May 2012
Location: Canada, Alberta
Posts: 32
Likes: 0
Received 0 Likes
on
0 Posts
Car: 91' Camaro RS T-top
Engine: 3.1 V6
Transmission: Auto
Re: Dimensions for well sub box
Well. My old subbox sucks.. The person owning the car before did not do a very good job. So im building a new one. being a autobody worker. I'm deciding to do a MDF bottom but have a fibre glass top, and mount my amp in the middle in a enclosed area with plexiglass. bass syncing lights. and a small 12v fan pulling air to help with the cooling. Sorry for my horrible paint skills. I'm a lot better at photoshopping real pixels. 
I want the tops to have a real awesome, car color match like this fibreglass build

I want the tops to have a real awesome, car color match like this fibreglass build
 Nevermind. My probation status doesnt let me post up a pdf file.
07-06-2012, 10:50 AM
Nevermind. My probation status doesnt let me post up a pdf file.
07-06-2012, 10:50 AM
#168
Member
Join Date: Jul 2009
Location: Northeast Ohio
Posts: 138
Likes: 0
Received 0 Likes
on
0 Posts
Car: 87 IROC Z-28
Engine: 5.0L 305 TPI V8
Transmission: 700R4
Axle/Gears: 3.23
Re: Dimensions for well sub box
Set my first box up a little bit differently, but same basics apply.
Attaching the CAD pdf in case someone wants it.
BOX ASSEMBLY.pdf
Attaching the CAD pdf in case someone wants it.
BOX ASSEMBLY.pdf
07-06-2012, 11:27 AM
#169
Re: Dimensions for well sub box
Set my first box up a little bit differently, but same basics apply.
Attaching the CAD pdf in case someone wants it.
Attachment 243047
Attaching the CAD pdf in case someone wants it.
Attachment 243047
07-06-2012, 02:44 PM
#170
Member
Join Date: Jul 2009
Location: Northeast Ohio
Posts: 138
Likes: 0
Received 0 Likes
on
0 Posts
Car: 87 IROC Z-28
Engine: 5.0L 305 TPI V8
Transmission: 700R4
Axle/Gears: 3.23
Re: Dimensions for well sub box
Thanks, I made it. I've pretty much made all of my 'custom' projects in Inventor prior to actually making them. It's a little bit more work, but I'll find out if there will be any fitment issues or design issues before I find out the hard way.
08-23-2012, 07:59 PM
#171
Junior Member

Join Date: Sep 2011
Location: Vancouver B.C
Posts: 52
Likes: 0
Received 0 Likes
on
0 Posts
Car: 89 Trans Am GTA
Engine: 5.7 L98
Transmission: 700 r4
Axle/Gears: 3.27
Re: Dimensions for well sub box
I have 3 Alpine Type R 10's, trying to figure out what the hell to do!!!!
 09-15-2012, 08:31 PM
#173
Junior Member

Join Date: Jun 2012
Posts: 4
Likes: 0
Received 0 Likes
on
0 Posts
Car: 87 IROC Z
Engine: 383 Stroker
Transmission: 700r4
Re: Dimensions for well sub box
I just used the deminsions frm the top post & they worked really great for me. I would post pictures of my build but dont know how 2
11-11-2012, 11:38 PM
#174
Junior Member

Join Date: Nov 2012
Posts: 17
Likes: 0
Received 0 Likes
on
0 Posts
Re: Dimensions for well sub box
I built several of these back around 2002. As I remember, there was a slight variance around the trunk latch on the rear panel. I think cars with power trunk motors may have a slightly wider panel in that area so make sure to measure your particular vehicle before cutting. I did a few variations as well like three 10's and one for four 15's that put two in a box of this style shareing airspace with the other two that sat behind the rear seat facing the rear glass. I've even seen one with the rear seat removed and walled up.
01-04-2013, 01:29 AM
#175
Junior Member

Join Date: Jan 2013
Posts: 5
Likes: 0
Received 0 Likes
on
0 Posts
Re: Dimensions for well sub box
hey i have a 91 firebird and i have a 12" adire audio brahma mk2 12 sub 1600 rms does anyone have a layout for just 1 12" all i have seen is 2 10s and 2 12s any help
06-08-2013, 02:00 PM
#178
Junior Member

Join Date: May 2012
Posts: 25
Likes: 0
Received 0 Likes
on
0 Posts
Re: Dimensions for well sub box
so i know this is an older thread but im almost done building my box according to that pdf file and im noticing that there is not much depth in them at all. what are u guys running in them for 12's?
06-08-2013, 02:11 PM
#179
Junior Member

Join Date: Apr 2011
Posts: 22
Likes: 0
Received 0 Likes
on
0 Posts
Re: Dimensions for well sub box
What are you trying to run?
I was disappointed when I wasn't able to run the 12's I wanted but there was no room short about 2in in different areas. So I went with tens so it could maximize sound
I have a convertible so I had no choice but to leave amp underneath so had to consider that space. I looked at specs but was not sure on actual measurements so I did my on and just used picture to have an idea what it might look like.
You can also email me at hinlook@aol.com
06-08-2013, 03:19 PM
#180
Member
Join Date: Jul 2009
Location: Northeast Ohio
Posts: 138
Likes: 0
Received 0 Likes
on
0 Posts
Car: 87 IROC Z-28
Engine: 5.0L 305 TPI V8
Transmission: 700R4
Axle/Gears: 3.23
Re: Dimensions for well sub box
I ran 12"s but I also went with shallow mount subs instead of the run of the mill...
06-08-2013, 03:32 PM
#181
Junior Member
Join Date: Apr 2011
Posts: 22
Likes: 0
Received 0 Likes
on
0 Posts
Re: Dimensions for well sub box
Shallow would definetly fit. What exactly is the problem u ran into?
I spent a pretty good amount of time doing my system but I had to customize a lot of things. The customizing wasn't the big issue with me but trying to still look stock or closer to it was my issue. Although some things are custom they are not extremely custom at least to the look. I even tried using some q logic kick panels. What a mistake a big waist of money. It looked very sloppy unless you like micke mouse stuff stay away from it
But if u have any questions let me know
06-08-2013, 04:08 PM
#182
Re: Dimensions for well sub box
I'm running 2 - 12" MA Audio subs. I was thinking if customizing a amp mount in the tire well but there is no ventilation in there. So I just slapped on some Velcro under the amp and placed it in the "hump." Mine was prefab though. It's not a for sure fit as the pull down hinge hump doesn't allow the box to sit all the way down. So it has an appearance of slanting forward. It looks nice like that. But I also hate it because the back end of the top plate covers the loops to attach the t-top.
06-08-2013, 04:10 PM
#183
Member
Join Date: Jul 2009
Location: Northeast Ohio
Posts: 138
Likes: 0
Received 0 Likes
on
0 Posts
Car: 87 IROC Z-28
Engine: 5.0L 305 TPI V8
Transmission: 700R4
Axle/Gears: 3.23
Re: Dimensions for well sub box
I'm glad that you said something about the Q-form kick panels. I've actually been debating between those or custom door skins with a speaker mount. With that said, I think I'll just go the route of the door skins.
06-08-2013, 11:27 PM
#184
Junior Member
Join Date: May 2012
Posts: 25
Likes: 0
Received 0 Likes
on
0 Posts
Re: Dimensions for well sub box
well my original plans were to use that pdf and build the base then customize the top to accomodate my single memphis 15" but its seems like theres no way. so then i was gonna go with some alpine type r's but there like 6 inches deep too, however i found some rockford fosgates that are shallow my only concern is if by using these shallow subs do you think i would be sacraficing bass quality?
08-03-2013, 02:47 PM
#186
Junior Member

Join Date: Jul 2013
Posts: 32
Likes: 0
Received 0 Likes
on
0 Posts
Car: Z28 camaro T-tops
Engine: 2.8 v6
Re: Dimensions for well sub box
These dint work at all for me I made it and had to make a bunch of different cuts to make it fire then it still looked terrible so I put a cover on it and it looks decent but I need to recut it
11-29-2013, 01:54 PM
#187
Supreme Member
iTrader: (6)
Join Date: Aug 2009
Location: Elwood, IN
Posts: 3,670
Likes: 0
Received 3 Likes
on
3 Posts
Car: 1986 camaro Sports Coupe
Engine: L31 350
Transmission: 89 700R4
Axle/Gears: 3.42 gov lock
Re: Dimensions for well sub box
Can anyone repost the dimintions and the materials needed to do this? I'm wanting to build my first box but the links don't work anymore and I'm not sure what materials I need to do this correctly. I'm wanting to throw two 12" kendwood kfc-w12ps subs in the trunk
11-29-2013, 04:59 PM
#188
01-30-2014, 11:56 AM
#189
Supreme Member
Re: Dimensions for well sub box
The later set of photos seems to be of just a top cover for mounting speakers. I have one of these and it is not the same as a sealed(acoustic suspension) speaker cabinet. It works okay with my Kicker CDRs as they are rated for "free air" use but they work much better in a sealed cabinet. My dual coil 10s are rated at 600 watts each and I run them on a 1000 watt RMS Alpine M1000. I cam only give them about 1/2 power before the suspensions start to over-travel. In a sealed cabinet, theyw ould be able to take the amp's full power and the bass would be much tighter.
There is no way I can think of, short of gluing the entire cargo hold shut, which could make future speaker replacement difficult, to seal that space air tight. The actual box, mentioned in the title of this thread, is the only way I can see to build a sealed cabinet. Unfortunately, I can't get the old links to open.
I am planning on eventually building my own cabinet. I think mocking it up with cardboard to establish dimensions sounds like the best way to go. The trick is using the space effectively while clearing the shelf on the passenger side.
01-30-2014, 11:58 AM
#190
Supreme Member
Re: Dimensions for well sub box
Okay. Guess I didn't read ahead far enough. Thanks for posting this info!
01-30-2014, 12:31 PM
#191
Supreme Member
Re: Dimensions for well sub box
The PDF linked by Chevy86 IROC-Z is a great set of plans. I downloaded it into my files. One problem is the shallow depth of the speaker openings due to the shelve. My CRVs need 5 1/2" and that cabinet would only be 5 1/4". I think I'll do some measuring on the car and see what the effect would be of adding a 1/2" or so of height.
EDIT: The link by gooman to the PDF titled Model1 is also a good set of drawings. They provide a simple solution to the depth issue. I will however warn anyone using these plans not to cut panel A ahead of time as their initial dimensions for this piece are not correct. They provide instructions for cutting panels during assembly that will be helpful and may prevent cutting errors. Again, great set of plans.
EDIT: The link by gooman to the PDF titled Model1 is also a good set of drawings. They provide a simple solution to the depth issue. I will however warn anyone using these plans not to cut panel A ahead of time as their initial dimensions for this piece are not correct. They provide instructions for cutting panels during assembly that will be helpful and may prevent cutting errors. Again, great set of plans.
Last edited by ASE doc; 01-30-2014 at 12:48 PM.
01-06-2015, 01:21 PM
#192
Senior Member
Re: Dimensions for well sub box
Here's my version of a design presented by Steve "White_Rascal" at the FBodyAudio.com forums It is 1 cubic foot and it will fit one or two 10" subs. Maybe you can even squeeze in a 12" but I don't know. I put in a 10" Alpine Type R SWR-1042D sub.
The first attachment is a GIF image of my version at actual size if printed at 150dpi.
The second attachment is the drawing by Steve "White_Rascal".
Heres some pics of the build process and the final product:

The first attachment is a GIF image of my version at actual size if printed at 150dpi.
The second attachment is the drawing by Steve "White_Rascal".
Heres some pics of the build process and the final product
:THANK YOU FOR THIS!!!
08-29-2015, 09:54 AM
#193
Junior Member

Join Date: Aug 2015
Location: NIXA, MISSOURI
Posts: 22
Likes: 0
Received 0 Likes
on
0 Posts
Car: 91' RS CAMARO
Engine: 305 V8

Thread
Thread Starter
Forum
Replies
Last Post